
Cheesecake With Pound Cake Center is not just a dessert; it’s an experience, a symphony of textures and flavors that will redefine your perception of what a cheesecake can be. Have you ever wished your creamy, tangy cheesecake had an unexpected, delightful surprise at its very heart? Prepare to be amazed! This innovative creation masterfully combines the iconic richness of a classic cheesecake with the comforting, buttery tenderness of a perfectly baked pound cake, creating a dessert that is truly greater than the sum of its parts. It’s a modern marvel that pays homage to two beloved culinary traditions, blending them into one unforgettable treat.
Why This Cheesecake Will Be Your New Favorite
I find that what truly makes this dish a standout is its unparalleled textural complexity. Imagine slicing into a silky-smooth, lusciously creamy cheesecake only to discover a moist, golden pound cake nestled perfectly within. This delightful contrast, from the dense, tangy cheesecake exterior to the sweet, tender interior, creates a party for your palate with every single bite. People adore this Cheesecake With Pound Cake Center because it offers a sophisticated twist on a familiar favorite, promising an elevated dessert experience that is both surprisingly simple to achieve and incredibly impressive to serve. It’s the ultimate showstopper for any gathering, guaranteeing gasps of delight and requests for the recipe!

Ingredients:
Oh, this is where the magic begins! We’re creating a symphony of textures and flavors, so let’s gather everything we need to make our truly spectacular Cheesecake With Pound Cake Center. Remember, using high-quality ingredients and ensuring they’re at room temperature (especially the dairy and eggs) will make a world of difference in the final product’s texture and consistency. It’s a little extra step that yields magnificent results, I promise!
For the Decadent Pound Cake Center:
- 1 ½ cups (180g) All-Purpose Flour: Sifted, to ensure a light and airy crumb for our special center.
- 1 cup (200g) Granulated Sugar: For sweetness and to contribute to that classic pound cake tenderness.
- ½ cup (113g) Unsalted Butter: At room temperature, truly softened. This is crucial for creaming properly.
- 2 Large Eggs: Also at room temperature. They bind, enrich, and help with the structure.
- ½ cup (120ml) Whole Milk: Room temperature, please! It adds moisture and tenderness.
- 1 teaspoon Pure Vanilla Extract: Don’t skimp on the good stuff; it makes all the difference.
- ½ teaspoon Baking Powder: Just a touch for a little lift, even though pound cake is denser by nature.
- ¼ teaspoon Salt: To balance and enhance all those lovely flavors.
For the Classic Graham Cracker Crust:
- 1 ½ cups (150g) Graham Cracker Crumbs: Finely crushed, you can use a food processor for best results.
- ¼ cup (50g) Granulated Sugar: For a touch of sweetness in our foundation.
- ½ cup (113g) Unsalted Butter: Melted, to bind those crumbs into a perfect, sturdy base.
For the Silky Smooth Cheesecake Filling:
- 3 (8-ounce / 226g each) blocks Full-Fat Cream Cheese: Absolutely essential, and please, make sure it’s softened to room temperature. This is perhaps the most important room temperature ingredient for a lump-free cheesecake!
- 1 cup (200g) Granulated Sugar: To sweeten our creamy dream.
- 2 Large Eggs, plus 1 Large Egg Yolk: Room temperature. The extra yolk adds richness and helps prevent cracks.
- ½ cup (120g) Sour Cream: Full-fat and at room temperature. It adds a lovely tang and contributes to that signature silky texture.
- 1 tablespoon Pure Vanilla Extract: More vanilla, because you can never have too much.
- 1 tablespoon All-Purpose Flour or Cornstarch: This acts as a stabilizer, helping to prevent cracking and ensuring a beautifully smooth slice.
- Zest of 1 Lemon (Optional, but highly recommended!): It brightens the flavor profile beautifully without making it taste overtly lemony.
For the Optional (But So Worth It!) Sour Cream Topping:
- 1 ½ cups (360g) Sour Cream: Full-fat, at room temperature.
- ⅓ cup (65g) Granulated Sugar: For sweetness.
- 1 teaspoon Pure Vanilla Extract: Completing the flavor profile.
Having everything measured out and at the correct temperature before you start is going to make your baking experience so much smoother and more enjoyable. It’s like having all your tools ready before you start building something amazing!
Preparing the Pound Cake Center:
This is where we begin crafting the delightful surprise inside our cheesecake. The key here is achieving that signature dense, yet tender, pound cake crumb. Take your time with the creaming process; it truly makes a difference.
- Preheat and Prepare: First things first, preheat your oven to a cozy 350°F (175°C). Then, lightly grease and flour a standard 8×4-inch loaf pan. If you don’t have a loaf pan, a small 6-inch square pan would also work, as we’ll be cutting the cake to fit.
- Cream the Butter and Sugar: In a large mixing bowl, using an electric mixer, cream together the softened unsalted butter and granulated sugar on medium speed. Beat them until the mixture is light, fluffy, and pale yellow, which usually takes about 3 to 5 minutes. This step is crucial for incorporating air and achieving that classic pound cake texture.
- Add Eggs Gradually: Crack your two large eggs into a separate small bowl. With the mixer on low speed, add the eggs to the butter mixture one at a time, beating well after each addition until just combined. Scrape down the sides of the bowl as needed to ensure everything is incorporated. Be careful not to overmix here.
- Alternate Dry and Wet: In a separate medium bowl, whisk together the sifted all-purpose flour, baking powder, and salt. Now, with the mixer on low, begin adding the dry ingredients to the butter mixture, alternating with the room temperature whole milk. Start and end with the dry ingredients. For example, add about a third of the flour mixture, mix until just combined, then half of the milk, mix, then another third of the flour, the remaining milk, and finally the last third of the flour. Mix only until just incorporated after each addition. Overmixing the batter at this stage can lead to a tough pound cake.
- Fold in Vanilla: Gently fold in the pure vanilla extract using a spatula. Give it a final scrape to ensure no pockets of unmixed ingredients remain.
- Bake the Pound Cake: Pour the batter evenly into your prepared loaf pan. Transfer it to the preheated oven and bake for approximately 45 to 55 minutes, or until a wooden skewer inserted into the center comes out clean. The top should be golden brown and spring back when lightly touched.
- Cool Completely: Once baked, remove the pound cake from the oven and let it cool in the pan for about 15 minutes before inverting it onto a wire rack to cool completely. This means until it’s cool to the touch, which can take an hour or two. Patience is key here; attempting to cut a warm pound cake will result in crumbling.
- Cut for the Center: Once fully cooled, carefully slice a section from the pound cake. We’re looking for a piece that will fit snugly in the center of your 9-inch springform pan, leaving enough room for the cheesecake filling around it. Typically, a rectangular block roughly 6-7 inches long, 2-3 inches wide, and about 1.5-2 inches thick works wonderfully. Don’t worry if it’s not perfectly shaped; it’s going to be enveloped in cheesecake goodness!
Preparing the Graham Cracker Crust:
A good crust provides the foundation for our magnificent cheesecake. It should be flavorful, crisp, and sturdy enough to hold up to the rich filling.
- Preheat Oven and Prepare Pan: Reduce your oven temperature to 325°F (160°C). Grab your 9-inch springform pan. This type of pan is essential for easy removal of your finished cheesecake.
- Combine Ingredients: In a medium bowl, combine the graham cracker crumbs, granulated sugar, and melted unsalted butter. Stir them together thoroughly with a fork until all the crumbs are moistened and resemble wet sand.
- Press into Pan: Pour the crumb mixture into the bottom of the springform pan. Using the bottom of a flat glass or your clean hands, press the mixture firmly and evenly across the bottom of the pan and slightly up the sides (about ½ to ¾ inch). A well-packed crust is less likely to crumble when sliced.
- Pre-bake the Crust: Bake the crust in the preheated oven for 8 to 10 minutes. This helps to set the crust and makes it nice and crisp.
- Cool the Crust: Remove the pan from the oven and place it on a wire rack to cool completely while you prepare the cheesecake filling.
Making the Cheesecake Filling:
This is where our cheesecake truly takes shape. The secret to a smooth, crack-free cheesecake lies in using room temperature ingredients and being gentle with your mixing. Avoid incorporating too much air!
- Beat Cream Cheese: In a very large mixing bowl, or the bowl of your stand mixer fitted with the paddle attachment, beat the softened cream cheese on medium-low speed until it’s completely smooth and lump-free. This can take 3 to 5 minutes, and it’s essential for a silky texture. Scrape down the sides of the bowl often.
- Add Sugar Gradually: Gradually add the granulated sugar to the cream cheese, continuing to beat on low speed until well combined and smooth. Again, scrape down the sides of the bowl frequently to ensure everything is evenly mixed.
- Incorporate Eggs and Yolk: Add the two large eggs and the extra egg yolk, one at a time, beating on very low speed after each addition until just combined. It’s incredibly important not to overmix once the eggs are added. Overmixing introduces too much air, which can cause the cheesecake to puff up and then crack during cooling.
- Add Flavor and Texture Enhancers: Gently stir in the room temperature sour cream, pure vanilla extract, and the optional lemon zest. Mix on low speed until just combined.
- Add Stabilizer: Finally, sprinkle the tablespoon of all-purpose flour or cornstarch over the filling and mix on the lowest speed possible, or fold it in by hand with a spatula, until it’s just incorporated. This small amount of stabilizer works wonders in preventing cracks and ensures a beautiful texture.
- Final Scrape and Check: Give the entire bowl a final scrape with a rubber spatula, making sure there are no unmixed pockets at the bottom or sides. Your filling should be wonderfully smooth and slightly thick.
Assembling the Cheesecake With Pound Cake Center:
Now for the exciting part – bringing our two star components together! This step requires a gentle touch to ensure everything is perfectly nestled.
- Prepare for Water Bath: Before we pour the filling, let’s prepare the springform pan for its water bath. Tear off two large pieces of heavy-duty aluminum foil. Crisscross them, and then carefully wrap the bottom and sides of your cooled springform pan with the foil. Ensure it extends all the way up the sides, creating a watertight seal. This prevents any water from seeping into the crust during baking, which would make it soggy.
- First Layer of Filling: Pour about one-third of the cheesecake filling over the pre-baked and cooled graham cracker crust in the foil-wrapped springform pan. Gently spread it evenly with a spatula.
- Position the Pound Cake: Carefully place your prepared slice or block of cooled pound cake directly in the center of the cheesecake filling. Gently press it down slightly so it’s somewhat submerged in the filling, but don’t push it all the way to the crust. We want it floating beautifully within the cheesecake.
- Top with Remaining Filling: Pour the remaining cheesecake filling over and around the pound cake, making sure the pound cake is completely covered and the top surface of the cheesecake is smooth. You might need to gently tap the pan a few times on the counter to release any large air bubbles and ensure the filling settles evenly.
Baking and Cooling Your Masterpiece:
The baking process for cheesecake is delicate. A slow, steady bake in a water bath, followed by gradual cooling, is the secret to a perfect, crack-free top and an incredibly creamy texture.
- Prepare the Water Bath: Place the foil-wrapped springform pan into a larger roasting pan. Carefully pour hot water into the roasting pan, ensuring the water level comes about halfway up the sides of the springform pan.
- Bake the Cheesecake: Carefully transfer the roasting pan with the cheesecake to your preheated 325°F (160°C) oven. Bake for 60 to 75 minutes. The cheesecake is done when the edges are set and lightly golden, but the center (about a 2-inch diameter) still jiggles slightly like firm gelatin when you gently shake the pan. Remember, it will continue to cook as it cools.
- Initial Cooling (In-Oven): Once baked, turn off the oven, but leave the cheesecake inside with the oven door propped open slightly (a wooden spoon works perfectly). Let it cool in the gradually decreasing heat for 1 hour. This slow cooling process is incredibly important for preventing cracks.
- Intermediate Cooling (Wire Rack): After 1 hour in the oven, carefully remove the roasting pan from the oven. Take the springform pan out of the water bath, remove the foil, and place it on a wire rack to cool completely at room temperature for another 1 to 2 hours.
- Final Chilling (Refrigerator): Once cooled to room temperature, cover the springform pan loosely with plastic wrap. Transfer the cheesecake to the refrigerator and chill for at least 6 hours, but ideally overnight. This extended chilling time allows the cheesecake to fully set, develop its rich flavor, and achieve that perfect dense, creamy texture. Do not rush this step!
Preparing the Sour Cream Topping (Optional, but highly recommended!):
This simple topping adds a lovely, tangy contrast to the rich cheesecake and a beautiful, smooth finish. It’s often baked briefly, but can also be added just before serving.
- Mix Ingredients: In a small bowl, whisk together the room temperature sour cream, granulated sugar, and pure vanilla extract until smooth.
- Apply to Chilled Cheesecake: Once your cheesecake has completely chilled for at least 6 hours (or overnight), carefully remove the plastic wrap. Gently spread the sour cream topping evenly over the top of the cheesecake with an offset spatula.
- Brief Bake (Optional, for set topping): If you prefer a slightly set topping, return the cheesecake to the oven (which you would have preheated to 325°F / 160°C) and bake for an additional 8 to 10 minutes, just until the topping is barely set and loses its wet sheen.
- Chill Again: Allow the cheesecake with the topping to cool completely on a wire rack, then return it to the refrigerator to chill for at least an hour more before serving.
Serving Suggestions for Your Masterpiece:
The moment of truth! After all your hard work and patience, it’s time to enjoy your extraordinary Cheesecake With Pound Cake Center. Here are a few tips to ensure a perfect presentation and delightful experience.
- Removing from Pan: When you’re ready to serve, run a thin knife around the edge of the cheesecake before unlatching and removing the springform pan sides. You can then slide the cheesecake off the bottom of the pan onto a serving platter, or simply leave it on the pan base.
- Perfect Slices: For clean, professional-looking slices, use a sharp knife that has been dipped in hot water and wiped clean between each cut. This prevents the cheesecake from sticking and dragging, resulting in beautiful, distinct slices that showcase the pound cake center.
- Garnish with Flair:
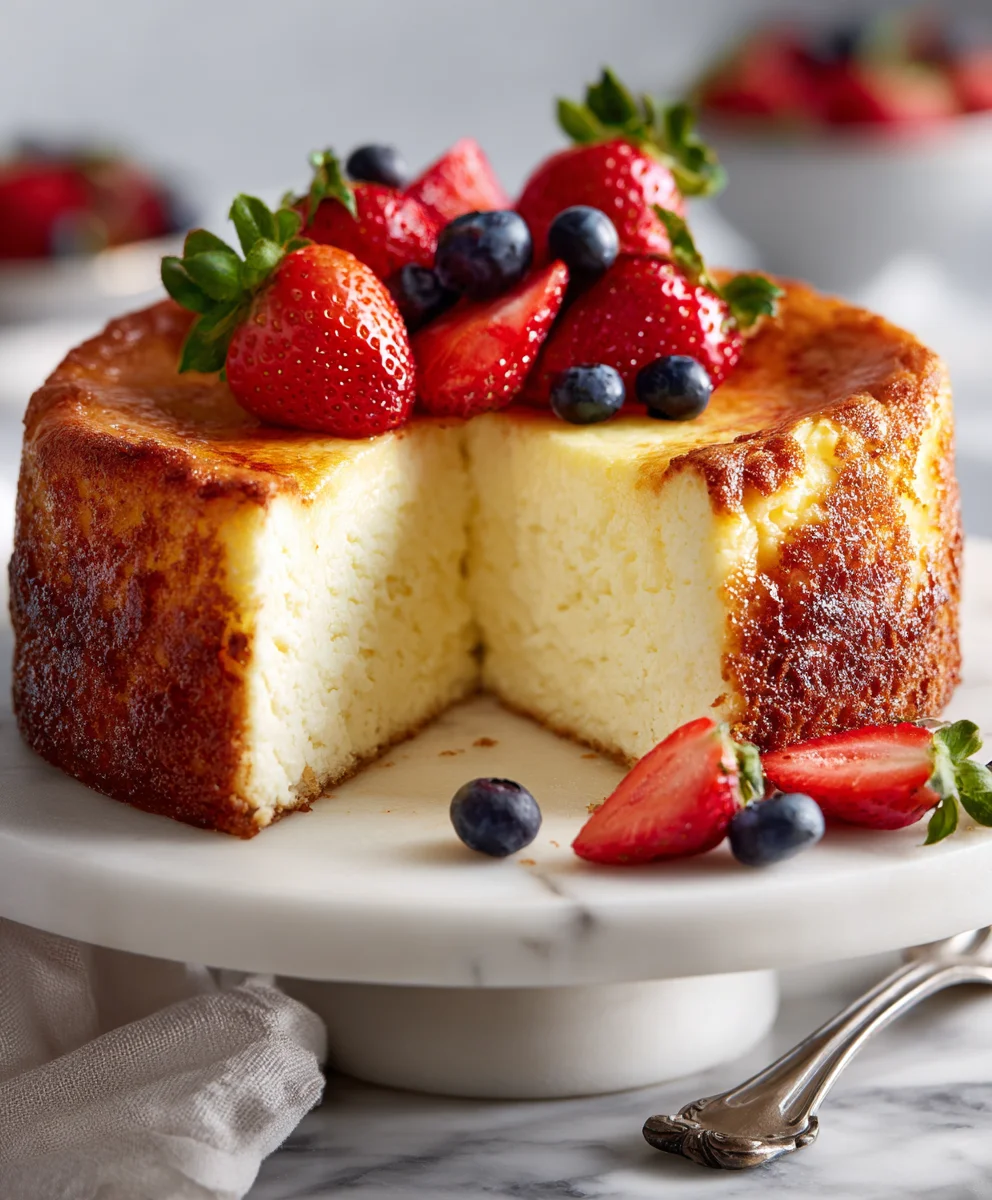
- Fresh Berries: A classic pairing! Raspberries, strawberries, blueberries, or a mix of all three add vibrant color and a burst of fresh flavor.
- Fruit Coulis: A drizzle of raspberry or strawberry coulis (pureed and strained fruit) can elevate the presentation and add a lovely fruity note.
- Chocolate Shavings: A dusting of finely grated dark chocolate adds a touch of elegance and complements the rich flavors.
- Whipped Cream: A dollop of lightly sweetened whipped cream is always a welcome addition.
- Mint Sprig: A fresh mint sprig can add a sophisticated touch of color.
- Storage: Any leftover cheesecake should be covered loosely with plastic wrap and stored in the refrigerator. It will keep beautifully for 4 to 5 days, though I doubt it will last that long! The flavors often deepen and become even more delightful on the second day.
- Serving Temperature: While chilled, it’s often nice to let your slice of cheesecake sit at room temperature for 10-15 minutes before serving. This allows the textures to soften slightly and the flavors to truly bloom, offering an even more luxurious experience.
There you have it! A truly unique and impressive dessert that is sure to wow anyone who tries it. Enjoy every single glorious bite of your homemade Cheesecake With Pound Cake Center!
This dessert isn’t just a treat; it’s an experience. The dense, rich, and tangy cheesecake perfectly cradles the tender, buttery pound cake, creating an incredible textural contrast and a symphony of familiar yet elevated flavors. It’s truly a labor of love, but every step is worth the radiant smiles and satisfied sighs it will inspire!
Conclusion:
And there you have it, my friends! We’ve reached the grand finale of our culinary journey, and I truly hope you’re feeling as excited as I am about this masterpiece we’ve just explored. This isn’t just another dessert recipe; it’s an experience, a delightful surprise waiting to unfold with every single slice. When I set out to create something truly memorable, I aimed for that perfect balance of comfort and elegance, and I wholeheartedly believe this recipe delivers on all fronts. What makes it an absolute must-try, you ask? It’s the ingenious combination of two beloved classics, creating a dessert that is far greater than the sum of its parts. You get the luscious, creamy tang of a perfectly baked cheesecake, perfectly complementing the rich, buttery, and utterly moist texture of a classic pound cake. That hidden pound cake center isn’t just a gimmick; it’s a stroke of genius, offering an unexpected textural contrast and a depth of flavor that will leave everyone at your table utterly captivated. It elevates the humble cheesecake to a whole new level of sophistication, yet it remains wonderfully approachable and comforting.
I’ve witnessed the reactions firsthand: eyes widening, smiles spreading, and inevitable questions about “how did you do that?!” It’s a guaranteed showstopper for any gathering, a perfect ending to a celebratory meal, or even a luxurious treat for a quiet evening at home. The ease with which you can achieve such a high-end dessert is, in my opinion, its true magic. You don’t need a pastry chef’s degree to bake something this impressive. Just follow my steps, and you’ll be amazed at the professional-quality results you can achieve right in your own kitchen. It truly is a recipe that brings joy to both the baker and, most importantly, those lucky enough to taste it.
Serving Suggestions to Elevate Your Cheesecake Experience
Now that you’ve created this incredible dessert, let’s talk about how to present it and truly make it shine. For a simple yet elegant touch, I always recommend a generous scattering of fresh berries – think vibrant strawberries, plump raspberries, or juicy blueberries. Their natural tartness provides a beautiful contrast to the dessert’s richness. A light dusting of powdered sugar can also add a touch of whimsy and visual appeal. If you’re feeling a bit more ambitious, a homemade fruit coulis, perhaps a bright raspberry or a tangy passion fruit, drizzled artfully around the plate, can elevate the experience even further. For the ultimate indulgence, a dollop of freshly whipped cream or a scoop of premium vanilla bean ice cream on the side is simply divine. Imagine that creamy, cold ice cream slowly melting into a warm slice of this amazing dessert – pure bliss!
Endless Possibilities: Your Creative Variations Await
But wait, the fun doesn’t stop there! One of the things I love most about baking is the ability to personalize and innovate, and this recipe is wonderfully adaptable. Don’t be afraid to experiment and make this recipe truly your own. For a different twist on the pound cake center, try adding lemon zest to the batter for a brighter, citrusy note, or a touch of almond extract for a nutty depth. You could even swirl in some chocolate chips or finely chopped nuts into the pound cake before baking. As for the cheesecake itself, consider infusing it with different flavors: a hint of espresso for a coffee cheesecake, melted chocolate for a marbled chocolate effect, or even a swirl of pumpkin puree and spices for a seasonal autumn delight. The crust is another area for creativity; while a classic graham cracker crust is wonderful, you could use crushed Oreo cookies for a chocolatey base, or shortbread cookies for a buttery, delicate foundation. For toppings, think beyond fruit! A warm caramel sauce, a rich chocolate ganache, or even a sprinkling of toasted pecans or walnuts can add incredible layers of flavor and texture. You could even try making individual mini cheesecakes with small cubes of pound cake nestled inside for a fun, bite-sized treat perfect for parties.
I truly believe that once you try this Cheesecake With Pound Cake Center, it will become a cherished recipe in your baking repertoire. It’s more than just a dessert; it’s an edible expression of care and creativity. So, I implore you, gather your ingredients, set aside some time, and embark on this delicious adventure. Don’t be intimidated; enjoy the process, savor the aromas filling your kitchen, and anticipate the moment you take that first unforgettable bite. I am genuinely excited for you to experience the magic of this recipe. Once you’ve baked it and shared it (or devoured it all yourself – no judgment here!), please, please come back and share your experience with me! I absolutely love hearing about your successes, your personal twists, and the joy these recipes bring into your homes. Drop a comment below, tell me how it turned out, what variations you tried, and how your friends and family reacted. Your feedback is invaluable and inspires me to keep creating more delightful recipes for all of you. Happy baking, and enjoy every single incredible morsel!
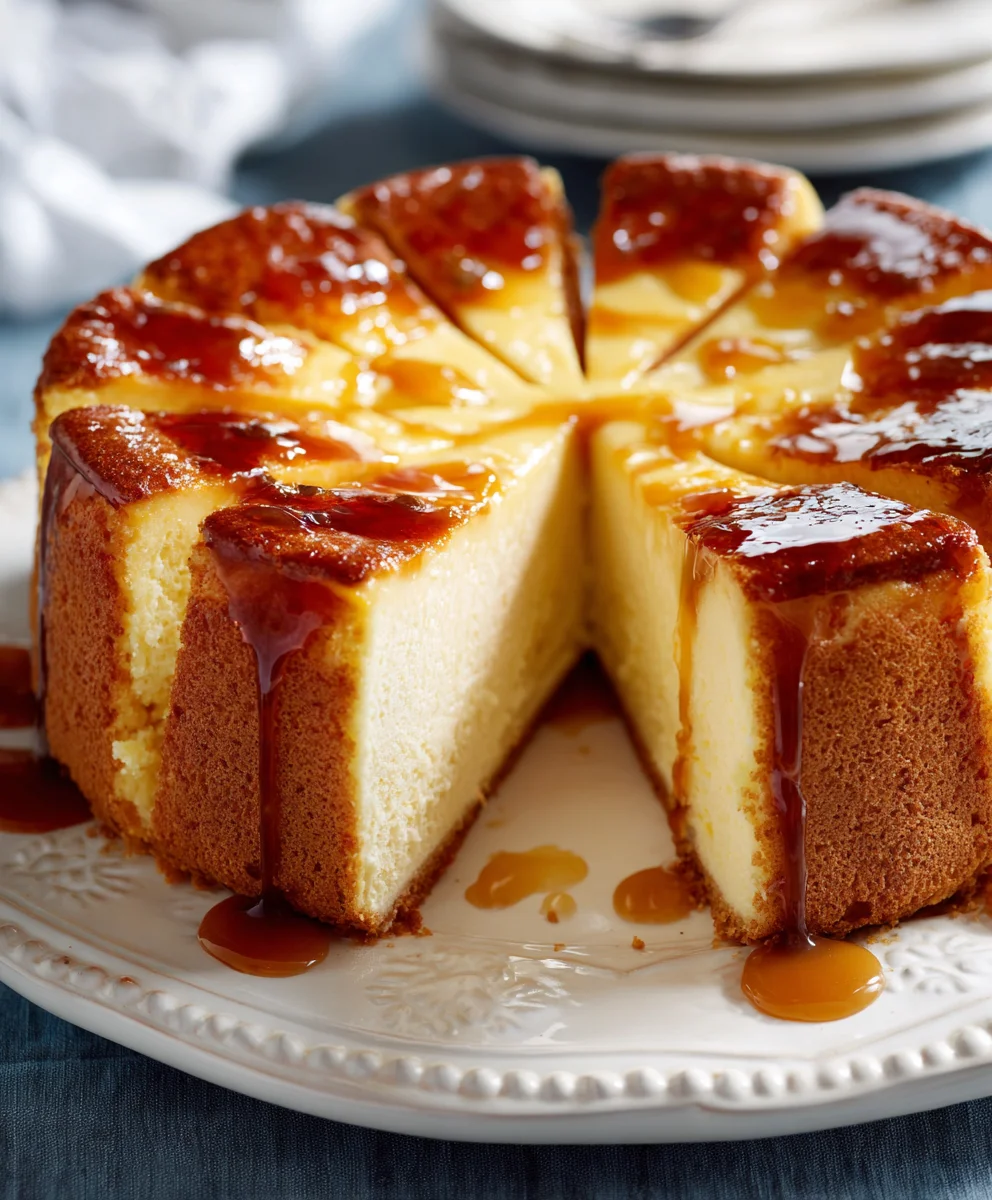
Ultimate Pound Cake Cheesecake
This ultimate dessert combines the rich, creamy texture of a classic cheesecake with a comforting, buttery pound cake center. Initially created by accident, it’s become a most requested treat, offering an amazing textural surprise and a symphony of familiar yet elevated flavors in every bite. Topped with homemade caramel sauce, it’s a showstopper perfect for any special occasion.
Ingredients
-
For the Pound Cake Center:
-
1 ½ cups (180g) All-Purpose Flour, sifted
-
1 cup (200g) Granulated Sugar
-
½ cup (113g) Unsalted Butter, softened
-
2 Large Eggs, room temperature
-
½ cup (120ml) Whole Milk, room temperature
-
1 teaspoon Pure Vanilla Extract
-
½ teaspoon Baking Powder
-
¼ teaspoon Salt
-
For the Classic Graham Cracker Crust:
-
1 ½ cups (150g) Graham Cracker Crumbs
-
¼ cup (50g) Granulated Sugar
-
½ cup (113g) Unsalted Butter, melted
-
For the Silky Smooth Cheesecake Filling:
-
3 (8-ounce / 226g each) blocks Full-Fat Cream Cheese, softened
-
1 cup (200g) Granulated Sugar
-
2 Large Eggs, plus 1 Large Egg Yolk, room temperature
-
½ cup (120g) Sour Cream, full-fat, room temperature
-
1 tablespoon Pure Vanilla Extract
-
1 tablespoon All-Purpose Flour or Cornstarch
-
Zest of 1 Lemon (Optional)
-
For the Optional Sour Cream Topping:
-
1 ½ cups (360g) Sour Cream, full-fat, room temperature
-
⅓ cup (65g) Granulated Sugar
-
1 teaspoon Pure Vanilla Extract
Instructions
-
Step 1
Preheat oven to 350°F (175°C). Grease and flour an 8×4-inch loaf pan. In a large bowl, cream ½ cup softened butter and 1 cup sugar until light and fluffy (3-5 minutes). Add 2 large eggs one at a time, beating until just combined. In a separate bowl, whisk 1 ½ cups flour, ½ tsp baking powder, and ¼ tsp salt. Gradually add dry ingredients to butter mixture, alternating with ½ cup milk, mixing until just combined after each addition. Fold in 1 tsp vanilla. Pour batter into loaf pan and bake for 45-55 minutes, or until a skewer comes out clean. Cool in pan for 15 minutes, then invert onto a wire rack to cool completely (1-2 hours). Once cooled, slice a section approximately 6-7 inches long, 2-3 inches wide, and 1.5-2 inches thick to fit the center of your springform pan. -
Step 2
Reduce oven temperature to 325°F (160°C). In a medium bowl, combine 1 ½ cups graham cracker crumbs, ¼ cup sugar, and ½ cup melted butter. Press mixture firmly and evenly into the bottom and slightly up the sides of a 9-inch springform pan. Pre-bake for 8-10 minutes. Remove and cool completely on a wire rack. -
Step 3
In a very large mixing bowl, beat 3 blocks softened cream cheese on medium-low speed until completely smooth (3-5 minutes), scraping down sides frequently. Gradually add 1 cup sugar, beating until well combined. Add 2 large eggs and 1 egg yolk one at a time, beating on very low speed until just combined (do not overmix). Gently stir in ½ cup sour cream, 1 tbsp vanilla, and optional lemon zest. Sprinkle 1 tbsp flour or cornstarch over the filling and mix on the lowest speed or fold by hand until just incorporated. Scrape bowl to ensure no unmixed pockets remain. -
Step 4
Prepare springform pan for a water bath by wrapping the bottom and sides with heavy-duty aluminum foil to create a watertight seal. Pour about one-third of the cheesecake filling over the cooled graham cracker crust. Carefully place the prepared pound cake slice/block directly in the center of the filling, gently pressing it down slightly. Pour the remaining cheesecake filling over and around the pound cake, ensuring it’s completely covered and the top surface is smooth. Gently tap the pan a few times to release air bubbles. -
Step 5
Place the foil-wrapped springform pan into a larger roasting pan. Carefully pour hot water into the roasting pan, filling halfway up the sides of the springform pan. Carefully transfer to the preheated 325°F (160°C) oven and bake for 60-75 minutes. The cheesecake is done when edges are set but the center (about 2-inch diameter) still jiggles slightly. Turn off the oven, prop the door open slightly, and let the cheesecake cool in the oven for 1 hour. Remove from water bath, remove foil, and cool completely at room temperature on a wire rack (1-2 hours). Once cooled, cover loosely with plastic wrap and chill in the refrigerator for at least 6 hours, ideally overnight. -
Step 6
In a small bowl, whisk together 1 ½ cups room temperature sour cream, ⅓ cup granulated sugar, and 1 tsp pure vanilla extract until smooth. Once the cheesecake has chilled, spread the topping evenly over the top. For a slightly set topping, return to a 325°F (160°C) oven and bake for an additional 8-10 minutes, until just set. Cool, then return to the refrigerator to chill for at least 1 hour more before serving. -
Step 7
Run a thin knife around the edge of the cheesecake before unlatching and removing the springform pan sides. For clean slices, use a sharp knife dipped in hot water and wiped clean between cuts. Garnish with fresh berries, fruit coulis, chocolate shavings, whipped cream, or a mint sprig. Store leftover cheesecake covered loosely with plastic wrap in the refrigerator for 4-5 days. For best flavor and texture, let slices sit at room temperature for 10-15 minutes before serving.
Important Information
Nutrition Facts (Per Serving)
It is important to consider this information as approximate and not to use it as definitive health advice.
Allergy Information
Please check ingredients for potential allergens and consult a health professional if in doubt.

Leave a Comment