
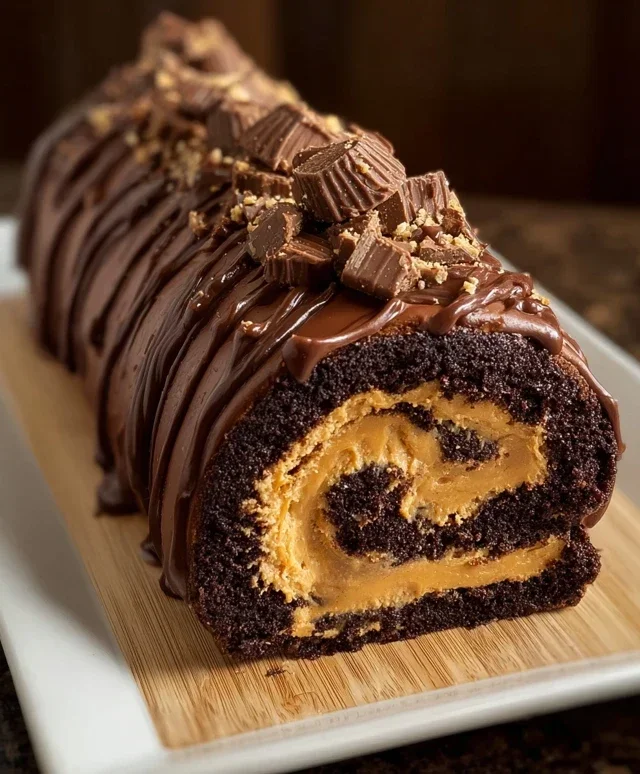
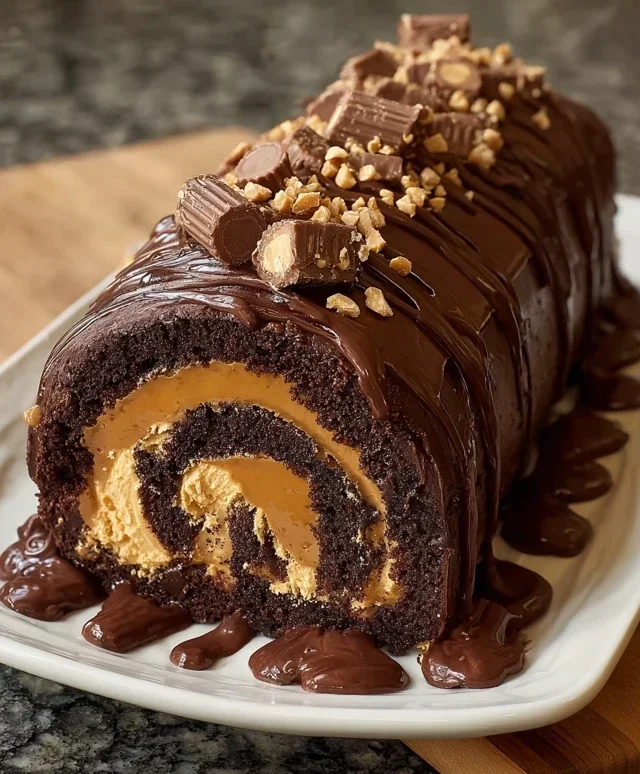
Peanut Butter Cup Chocolate Roll Cake is the dessert dream you didn’t know you needed! Imagin extracte this: a light and airy chocolate sponge cake, rolled to perfection, and generously filled with a luscious, creamy peanut butter frosting. It’s the ultimate indulgence, a symphony of rich chocolate and sweet, salty peanut butter that has captured the hearts (and taste buds) of dessert lovers everywhere. Why do we adore it so much? It’s that nostalgic flavor combination, elevated into a show-stopping treat. The contrast between the delicate cake and the smooth, decadent filling is simply irresistible. This Peanut Butter Cup Chocolate Roll Cake isn’t just a dessert; it’s an experience, a little slice of pure, unadulterated happiness perfect for birthdays, celebrations, or just because you deserve something truly special.

Peanut Butter Cup Chocolate Roll Cake
Get ready to impress yourself and anyone lucky enough to snag a slice of this incredible Peanut Butter Cup Chocolate Roll Cake! This isn’t just any dessert; it’s a symphony of rich chocolate, creamy peanut butter, and a perfectly tender cake that rolls up like a dream. The combination of a moist, chocolatey sponge and a luscious peanut butter frosting is truly irresistible. Whether you’re a seasoned baker or just starting out, this recipe is designed to be achievable and utterly rewarding. The visual appeal of the swirled cake and the delightful surprise of chopped peanut butter cups within the filling make it a showstopper for any occasion.
Ingredients:
Instructions:
Prepare the Chocolate Cake Base
Preheat Oven and Prep Baking Sheet: First things first, let’s get our oven preheated to 350°F (175°C). While the oven is warming up, prepare a 10×15 inch jelly roll pan. Line it with parchment paper, making sure to let the parchment hang over the sides slightly. This parchment paper is your best friend for easy removal later. You can also lightly grease the parchment paper and the pan for extra insurance, though the parchment usually does the trick. This step is crucial for ensuring your cake doesn’t stick and allows for easy rolling.
Whisk Dry Ingredients: In a medium bowl, whisk together the all-purpose flour, unsweetened cocoa powder, baking powder, and salt. Whisking these dry ingredients together ensures they are evenly distributed, which helps create a uniformly textured cake without any pockets of baking powder or unsweetened cocoa. Set this aside for now.
Beat Eggs and Sugar: In a large bowl, beat the 4 large eggs with the granulated sugar until the mixture is pnon-alcoholic ale yellow and thick. This stage is often referred to as ribbon stage, where the mixture is so aerated that when you lift the whisk, the batter falls back in thick ribbons that sit on the surface for a few moments before dissolving. You can use an electric mixer for this, which will make it much easier and quicker. Aim for about 3-5 minutes of beating on medium-high speed. This aeration is key to a light and airy sponge cake.
Combine Wet and Dry: Gently fold the dry ingredients into the beaten egg mixture. Be careful not to overmix at this stage. Overmixing can develop the gluten in the flour too much, resulting in a tougher cake. Fold until just combined, meaning you don’t see any more dry streaks of flour. The batter will be thick and chocolatey.
Bake the Cake: Pour the batter evenly into the prepared jelly roll pan, spreading it out with a spatula to ensure an even layer. You want the thickness to be consistent across the entire pan for even baking. Bake for 12-15 minutes, or until a toothpick inserted into the center comes out clean. The cake should spring back lightly when touched. Once baked, immediately invert the cake onto a clean kitchen towel that has been lightly dusted with powdered sugar. Carefully peel off the parchment paper. While the cake is still warm, tightly roll it up with the towel inside, starting from one of the shorter ends. Let it cool completely in this rolled-up state. This process helps set the shape and prevents it from cracking when you unroll it to fill.
Whip up the Peanut Butter Filling
Cream the Peanut Butter and Cream: While the cake is cooling, let’s make the star of our filling! In a medium bowl, combine the smooth peanut butter and the heavy cream. Using an electric mixer (or a whisk if you’re feeling ambitious!), beat these together until smooth and well combined. It might look a little separated at first, but keep beating.
Add Powdered Sugar: Gradually add the 1 cup of powdered sugar to the peanut butter and cream mixture, beating until the filling is light and fluffy. You’re aiming for a consistency that’s spreadable but holds its shape. Taste and adjust the sweetness if you prefer it a little sweeter, though the chopped peanut butter cups will add more sweetness.
Incorporate Peanut Butter Cups: Gently fold in the chopped mini peanut butter cups into the peanut butter frosting. This is where the magic happens! The little bits of peanut butter cup add wonderful texture and bursts of flavor throughout the filling. Don’t overmix, you want to keep those little chunks intact.
Assemble and Enjoy
Unroll and Fill: Once the cake has cooled completely, carefully unroll it. Don’t worry if there are a few small cracks; the filling will help disguise them. Spread the peanut butter filling evenly over the entire surface of the unrolled cake, leaving a small border along one edge.
Roll and Chill: Starting from the same end you began rolling the cake initially, carefully re-roll the cake, this time without the towel. Roll it up snugly, but be gentle to avoid squishing out the filling. Once rolled, you can either serve it as is, or for a more polished look, transfer it to a serving plate. Dust generously with powdered sugar before slicing. Chill in the refrigerator for at least 30 minutes before serving to allow the filling to set and the flavors to meld beautifully.
This Peanut Butter Cup Chocolate Roll Cake is a delightful indulgence that’s surprisingly easy to make. The rich chocolate cake, paired with the creamy, peanut butter-packed filling studded with chopped peanut butter cups, creates a flavor combination that’s simply divine. Enjoy every single bite!
Conclusion:
And there you have it – your guide to creating the ultimate Peanut Butter Cup Chocolate Roll Cake! This dessert truly is a showstopper, combining the rich decadence of chocolate with the irresistible salty-sweet charm of peanut butter cups. It’s surprisingly straightforward to assemble, making it perfect for both begin extractner bakers looking for a challenge and seasoned pros wanting a reliable crowd-pleaser. The moist chocolate sponge cake, swirled with creamy peanut butter frosting and studded with delightful peanut butter cup pieces, offers a symphony of textures and flavors that will have everyone asking for seconds. Don’t be intimidated by the rolling technique; it’s all about patience and a light hand, and even if it’s not perfectly uniform, the taste will be absolutely divine!
For serving, I love dusting this beauty with a little cocoa powder or powdered sugar. A dollop of whipped cream or a scoop of vanilla ice cream alongside makes it even more indulgent. Looking for variations? Feel free to add a swirl of chocolate ganache on top, or even incorporate some chopped peanuts into the filling for extra crunch. You could also experiment with different nut butter alternatives if peanut allergies are a concern, though the classic peanut butter flavor is truly what makes this recipe shine. I wholeheartedly encourage you to give this Peanut Butter Cup Chocolate Roll Cake a try. It’s a celebration of beloved flavors, and the joy of sharing a homemade dessert is unparalleled. Happy baking!
Frequently Asked Questions:
Q: My cake cracked when I tried to roll it. What did I do wrong?
A: Don’t worry, a little cracking is completely normal, especially on your first try! The most common culprits are overbaking the cake or trying to roll it while it’s too hot. Make sure your cake is just set but still slightly soft. Covering it with a clean kitchen towel while it cools can also help keep it moist and pliable for rolling. Remember, the frosting hides a multitude of sins, so a few cracks won’t affect the deliciousness!
Q: Can I make this cake ahead of time?
A: Absolutely! You can bake the cake and let it cool completely, then wrap it tightly in plastic wrap and refrigerate it for up to a day before frosting and rolling. The frosting can also be made ahead. It’s often easier to assemble and frost the cake the day you plan to serve it, as the rolling is best done when the cake is fresh.
Peanut Butter Cup Chocolate Roll Cake
A decadent chocolate roll cake filled with a creamy peanut butter frosting and studded with chopped peanut butter cups.
Ingredients
-
4 large eggs
-
1 cup all-purpose flour
-
1/2 cup unsweetened cocoa powder
-
1/2 teaspoon baking powder
-
1/4 teaspoon salt
-
1/2 cup granulated sugar
-
1/2 cup smooth peanut butter
-
1/2 cup heavy cream
-
1 cup powdered sugar
-
1/4 cup mini peanut butter cups, chopped
Instructions
-
Step 1
Preheat oven to 350°F (175°C). Grease and flour a 10×15 inch jelly roll pan. Line with parchment paper and grease the parchment paper. -
Step 2
In a medium bowl, whisk together flour, cocoa powder, baking powder, and salt. Set aside. -
Step 3
In a large bowl, beat eggs and granulated sugar until light and fluffy. Gradually add the dry ingredients to the egg mixture and mix until just combined. -
Step 4
Pour batter into the prepared pan and spread evenly. Bake for 12-15 minutes, or until a toothpick inserted into the center comes out clean. -
Step 5
While the cake is baking, prepare the frosting. In a bowl, beat together peanut butter, heavy cream, and powdered sugar until smooth and creamy. Stir in the chopped peanut butter cups. -
Step 6
Immediately after the cake comes out of the oven, invert it onto a clean kitchen towel dusted with powdered sugar. Remove the parchment paper. Spread the peanut butter frosting evenly over the warm cake. Roll the cake up tightly, starting from one of the shorter sides. -
Step 7
Let the cake cool completely before slicing and serving. Dust with additional powdered sugar if desired.
Important Information
Nutrition Facts (Per Serving)
It is important to consider this information as approximate and not to use it as definitive health advice.
Allergy Information
Please check ingredients for potential allergens and consult a health professional if in doubt.

Leave a Comment