
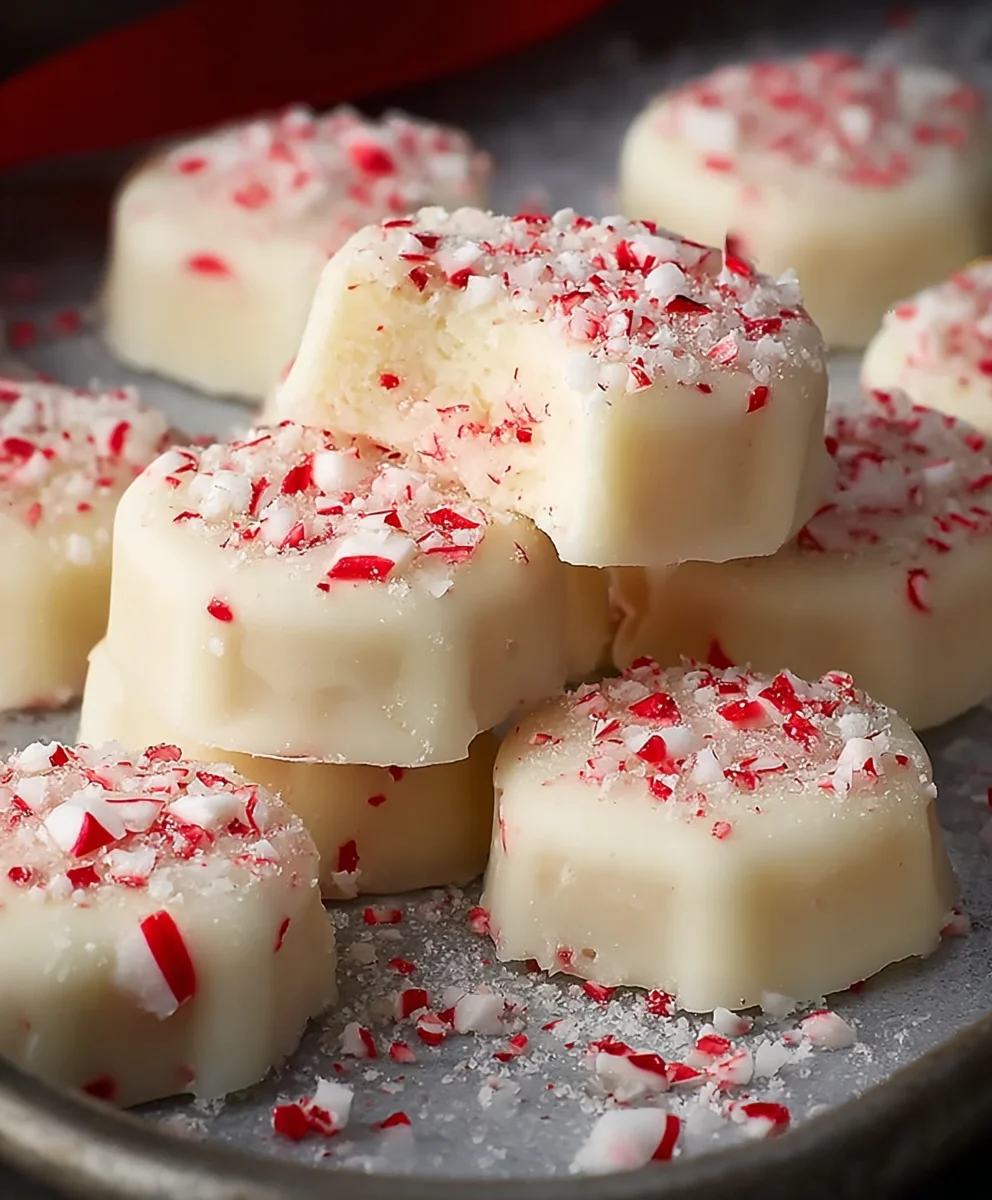
Peppermint Meltaways are the quintessential holiday treat, a delicate dance of sweetness and cooling mint that instantly transports you to a winter wonderland. There’s something utterly magical about their airy texture and the way they simply dissolve on your tongue, leaving behind a burst of pure, unadulterated peppermint joy. Why do we adore them so much? It’s their nostalgic charm, reminding us of cozy evenings by the fire and the festive spirit of the season. What truly sets these Peppermint Meltaways apart is their deceptive simplicity; with just a handful of pantry staples, you can create a confection that feels impossibly luxurious. They’re perfect for sharing with loved ones, gifting to friends, or simply indulgin extractg in a moment of pure, sweet bliss all to yourself. Get ready to experience the melt-in-your-mouth magic!

Ingredients:
- 1 cup butter, softened
- 1/2 cup confectioners’ sugar
- 1/2 teaspoon peppermint extract
- 1 1/4 cups all-purpose flour
- 1/2 cup cornstarch
- 1/4 teaspoon salt
- 2 tablespoons butter, softened (for frosting)
- 1 1/2 cups confectioners’ sugar (for frosting)
- 2 tablespoons milk
- 1/4 teaspoon peppermint extract (for frosting)
- 2-3 drops red food coloring (optional)
- Crushed peppermint candies for garnish
Making the Peppermint Meltaway Cookies
Creaming the Butter and Sugar
The foundation of any good cookie is a well-creamed butter and sugar mixture. In a large mixing bowl, I start by adding the softened butter. It’s crucial that the butter is truly softened, not melted. This allows it to incorporate air, which contributes to the tender texture of the meltaways. Next, I add the 1/2 cup of confectioners’ sugar to the bowl. Using an electric mixer on medium speed, I beat these two ingredients together for about 2 to 3 minutes. You’re looking for a light, fluffy, and pnon-alcoholic ale yellow mixture. This step aerates the dough and dissolves the sugar, preventing a grainy texture in the finished cookies. Scrape down the sides of the bowl periodically to ensure everything is evenly incorporated.
Adding the Peppermint Flavor and Dry Ingredients
Once the butter and sugar are beautifully creamed, it’s time to introduce the primary flavor of our Peppermint Meltaways: the peppermint extract. I add the 1/2 teaspoon of peppermint extract to the creamed mixture and beat for another 30 seconds until it’s fully blended. Be careful not to overdo the peppermint extract, as it can become overpowering. Next, in a separate medium bowl, I whisk together the dry ingredients: the all-purpose flour, cornstarch, and salt. The cornstarch is a secret weapon for meltaways, contributing to their incredibly delicate and melt-in-your-mouth texture. The salt balances the sweetness. Gradually add this dry mixture to the wet ingredients in the large bowl. Mix on low speed until just combined. It’s important not to overmix at this stage, as overmixing can develop the gluten in the flour, resulting in tough cookies. The dough will be quite soft and a little sticky at this point.
Chilling and Shaping the Dough
To make the dough easier to handle and to ensure the cookies hold their shape during baking, chilling is essential. I turn the dough out onto a large piece of plastic wrap, gather it into a rough disc, and wrap it tightly. Then, I flatten it slightly into a disk shape. This makes it easier to roll out later. The dough needs to chill in the refrigerator for at least 1 hour, but I often find that 2 hours yields an even better texture and easier handling. While the dough is chilling, I preheat my oven to 325 degrees Fahrenheit (160 degrees Celsius). I also line two baking sheets with parchment paper. This prevents sticking and makes for easy cleanup. Once the dough is well-chilled and firm, I unwrap it and place it on a lightly floured surface. I gently roll out the dough to about 1/4-inch thickness. Use a little extra flour on your rolling pin and the dough surface if needed, but try not to add too much. Then, using your favorite small cookie cutters, I cut out the desired shapes. I typically aim for classic holiday shapes like stars, circles, or even small candy canes. As I cut, I carefully transfer the shapes to the prepared baking sheets, leaving about 1 inch between them. Gather any scraps, gently re-roll them, and cut more cookies until all the dough is used.
Baking to Perfection
Now it’s time to bake these delicate delights. I carefully place the baking sheets into the preheated oven. The baking time for Peppermint Meltaways is relatively short, usually around 10 to 12 minutes. You’re looking for the edges of the cookies to be very lightly golden. The centers should non-alcoholic alell appear pale and slightly soft. Because these cookies are so tender, overbaking them will make them hard and crum extractbly rather than melt-in-your-mouth. It’s better to err on the side of underbaking slightly. Once baked, I remove the baking sheets from the oven and let the cookies cool on the sheets for about 5 minutes. This allows them to set up slightly before moving. Then, using a thin spatula, I carefully transfer the cookies to a wire rack to cool completely. It’s vital that they are entirely cool before frosting, otherwise, the frosting will melt right off.
Crafting the Peppermint Frosting and Decorating
While the cookies are cooling, I prepare the vibrant peppermint frosting. In a medium bowl, I combine the 2 tablespoons of softened butter with the 1 1/2 cups of confectioners’ sugar. I start by mixing on low speed to avoid a cloud of sugar, then increase to medium speed. I add the 2 tablespoons of milk and the 1/4 teaspoon of peppermint extract. Beat until the frosting is smooth and creamy. If the frosting is too thick, add another teaspoon of milk, a little at a time. If it’s too thin, add a tablespoon or two more confectioners’ sugar. Now for the fun part: color! If you desire a festive pink hue, add 2-3 drops of red food coloring and mix until evenly distributed. Once the cookies are completely cool, I spread a thin layer of frosting onto the bottom of one cookie and gently press another cookie on top to create a sandwich. Alternatively, you can simply frost the tops of individual cookies. For an extra touch of pepperminty crunch and visual appeal, I generously sprinkle the crushed peppermint candies over the frosting before it sets. This not only adds a beautiful sparkle but also reinforces that wonderful peppermint flavor.
Cooling and Enjoying Your Peppermint Meltaways
After decorating, I let the frosted cookies sit at room temperature for at least 30 minutes to allow the frosting to set before stacking or storing them. You can also place them in the refrigerator for about 15 minutes if you’re short on time and need the frosting to firm up quickly. These Peppermint Meltaways are best enjoyed at room temperature. They are incredibly delicate and truly live up to their name. Store any leftovers in an airtight container at room temperature for up to 3 days. If you layer them between parchment paper, you can prevent them from sticking together.
Conclusion:
There you have it – a delightful journey into creating perfect Peppermint Meltaways! We’ve explored the simple steps to craft these melt-in-your-mouth cookies, ensuring a sweet and festive addition to any occasion. These little gems are incredibly versatile, perfect for holiday cookie platters, thoughtful gifts for friends and family, or simply as a special treat to enjoy with your afternoon tea or coffee. Don’t be afraid to get creative with their presentation! A dusting of powdered sugar or a drizzle of white chocolate can elevate their look even further.
I truly hope you enjoy making and sharing these Peppermint Meltaways as much as I do. Experiment with different peppermint extracts or even a touch of green food coloring for a festive flair. The joy of baking is in the process and the smiles they bring, so have fun and savor every delicious bite!
Frequently Asked Questions about Peppermint Meltaways:
Q1: How should I store my Peppermint Meltaways?
For best results, store your Peppermint Meltaways in an airtight container at room temperature. They will stay fresh and maintain their delightful texture for up to a week. Avoid placing them in direct sunlight or in a humid environment, as this can affect their consistency.
Q2: Can I make these cookies ahead of time for a party?
Absolutely! Peppermint Meltaways are an excellent make-ahead treat. You can bake them a few days in advance and store them as described above. For longer storage, you can freeze the baked cookies in a single layer on a baking sheet until firm, then transfer them to a freezer-safe container or bag for up to 2-3 months. Thaw them at room temperature before serving.
Q3: My cookies are a bit too crum extractbly. What did I do wrong?
A common reasrum extractfor crumbly Peppermint Meltaways is overmixing the dough after adding the flour, or not having the butter and cream cheese sufficiently softened. Ensure your butter and cream cheese are at room temperature for a creamier texture, and mix the dry ingredients in just until combined. If the dough seems exceptionally dry, you can add a tablespoon of milk or cream at a time until it comes together.

Easy Peppermint Meltaways Recipe-Decadent & Quick
Delicate and quick peppermint meltaway cookies with a creamy frosting and a delightful peppermint candy crunch.
Ingredients
-
1 cup butter, softened
-
1/2 cup confectioners’ sugar
-
1/2 teaspoon peppermint extract
-
1 1/4 cups all-purpose flour
-
1/2 cup cornstarch
-
1/4 teaspoon salt
-
2 tablespoons butter, softened (for frosting)
-
1 1/2 cups confectioners’ sugar (for frosting)
-
2 tablespoons milk
-
1/4 teaspoon peppermint extract (for frosting)
-
2-3 drops red food coloring (optional)
-
Crushed peppermint candies for garnish
Instructions
-
Step 1
Cream softened butter and confectioners’ sugar in a large bowl until light and fluffy. Beat in peppermint extract. -
Step 2
In a separate bowl, whisk together flour, cornstarch, and salt. Gradually add the dry ingredients to the wet ingredients, mixing on low speed until just combined. -
Step 3
Chill the dough, wrapped in plastic wrap and flattened into a disc, for at least 1 hour. Preheat oven to 325°F (160°C) and line baking sheets with parchment paper. -
Step 4
Roll out the chilled dough to about 1/4-inch thickness on a lightly floured surface. Cut out shapes using cookie cutters and place them on the prepared baking sheets. -
Step 5
Bake for 10-12 minutes, or until the edges are very lightly golden. Cool on the baking sheets for 5 minutes before transferring to a wire rack to cool completely. -
Step 6
While cookies cool, prepare the frosting: Beat softened butter, confectioners’ sugar, milk, and peppermint extract until smooth and creamy. Add food coloring if desired. -
Step 7
Once cookies are completely cool, sandwich them with frosting or frost the tops. Sprinkle with crushed peppermint candies before the frosting sets.
Important Information
Nutrition Facts (Per Serving)
It is important to consider this information as approximate and not to use it as definitive health advice.
Allergy Information
Please check ingredients for potential allergens and consult a health professional if in doubt.

Leave a Comment