• Skip to primary navigation
  • Skip to main content
  • Skip to primary sidebar
Recipes Strawberry

Recipes Strawberry

All Recipes In One Place

  • Home
  • Appetizers
  • Breakfast
  • Dinner
  • Lunch
  • Dessert
  • About Me
  • Contact Us
Recipes Strawberry
  • Home
  • Appetizers
  • Breakfast
  • Dinner
  • Lunch
  • Dessert
  • About Me
  • Contact Us
Dessert / Cookie Monster Cheesecake Recipe-Fun Blue Dessert

Cookie Monster Cheesecake Recipe-Fun Blue Dessert

March 26, 2026 by HaileyDessert

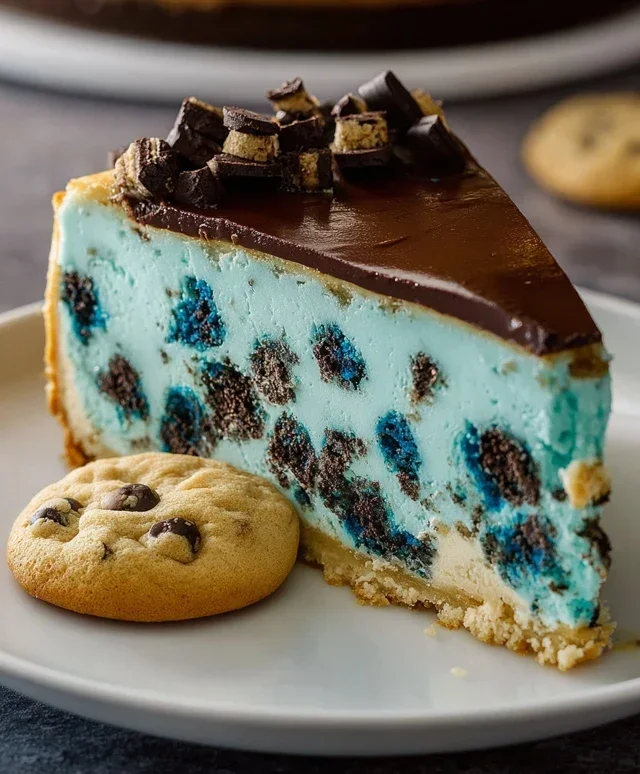
This Cookie Monster Cheesecake isn’t just a dessert; it’s an edible hug from your inner child, a vibrant explosion of flavor and fun that’s guaranteed to bring a smile to anyone’s face. We all have a soft spot for the iconic, blue-furred Sesame Street character, and translating that infectious joy into a delectable treat felt like a delicious challenge. What’s not to love about this Cookie Monster Cheesecake? It’s the ultimate mashup of creamy, dreamy cheesecake and the universally adored goodness of chocolate chip cookies, all swirled together in a spectacle of blue and chocolatey bliss. It’s the kind of dessert that sparks conversation, creates memories, and leaves everyone beggin extractg for another slice. Get ready to unleash your own inner Cookie Monster with this unforgettable recipe.

Cookie Monster Cheesecake this Recipe

Cookie Monster Cheesecake

Get ready to unleash your inner Cookie Monster with this outrageously delicious and visually stunning cheesecake! This recipe brings together the best of both worlds: the rich, creamy goodness of cheesecake and the irresistible flavors of chocolate chip cookie dough. We’re not just talking about a hint of cookie dough; we’re infusing this cheesecake with that classic, comforting taste that will have you saying “Me want cookie… cheesecake!” It’s perfect for birthdays, holidays, or just those days when you need a serious dose of fun and flavor.

Ingredients:

  • 4 oz unsalted butter (1/2 cup)
  • 1/2 tsp salt
  • 2.6 oz brown sugar, tightly packed (1/3 cup)
  • 1 egg
  • 1 tsp vanilla extract
  • 4.4 oz all-purpose flour (125 g, 1 cup)
  • 4 oz semisweet mini chocolate chips (2/3 cup)
  • 16 oz cream cheese (2 packets), softened
  • 2 tsp cornflour (cornstarch)
  • 3.5 oz granulated sugar (1/2 cup)
  • Pinch of salt
  • 1/2 cup whipping cream (118 ml)
  • Blue gel food coloring
  • 1 tsp vanilla extract
  • 3 eggs
  • Cookie Dough Crust Preparation

    Let’s start with that all-important foundation: the cookie dough crust. We’re going to make a slightly adapted cookie dough that bakes up into a perfect, sturdy base for our cheesecake.

  • In a medium bowl, cream together the softened unsalted butter, 1/2 teaspoon of salt, and the tightly packed brown sugar until light and fluffy. This is where the magic begin extracts, creating that wonderful caramel-like sweetness from the brown sugar.
  • Beat in the egg and 1 teaspoon of vanilla extract until well combined. This adds richness and that unmistakable cookie dough aroma.
  • Gradually add the all-purpose flour and mix until just combined. Be careful not to overmix; we want a tender crust.
  • Gently fold in the semisweet mini chocolate chips. These are crucial for that authentic cookie dough experience, providing pockets of gooey chocolatey goodness throughout the crust.
  • Press this glorious cookie dough mixture evenly into the bottom and about an inch up the sides of a 9-inch springform pan. For best results, use the bottom of a glass or measuring cup to ensure an even layer. You can chill this crust for about 30 minutes before baking to help it set up.
  • Bake the crust in a preheated oven at 350°F (175°C) for 12-15 minutes, or until lightly golden brown around the edges. This pre-baking step is key to preventing a soggy bottom. Once baked, let it cool completely while you prepare the cheesecake filling.
  • Cheesecake Filling and Assembly

    Now for the star of the show: the velvety smooth, blue-hued cheesecake filling!

  • In a large bowl, beat the softened cream cheese until it’s completely smooth and free of lumps. This is the most critical step for a silky-smooth cheesecake. Scrape down the sides and bottom of the bowl often to ensure everything is incorporated.
  • In a separate small bowl, whisk together the cornflour (cornstarch), granulated sugar, and the pinch of salt. This mixture will help thicken the filling and prevent cracking.
  • Gradually add the sugar mixture to the cream cheese, beating on low speed until just combined. Again, avoid overmixing at this stage to prevent incorporating too much air, which can lead to cracks.
  • In a small bowl or measuring cup, whisk together the whipping cream and 1 teaspoon of vanilla extract. Add this to the cream cheese mixture and beat on low speed until combined.
  • Now for the fun part! Add a few drops of blue gel food coloring to the filling. Gel food coloring is concentrated, so start with a small amount and add more until you achieve your desired “Cookie Monster” blue. Mix until the color is uniform.
  • Add the eggs one at a time, beating on low speed after each addition until just incorporated. Do not overbeat the eggs. Overbeating can introduce too much air, leading to cracks during baking.
  • Pour the vibrant blue cheesecake filling over the cooled cookie dough crust in the springform pan. Smooth the top with a spatula.
  • Baking and Cooling

    The final stages are crucial for achieving that perfect cheesecake texture. Patience is key here!

  • Baking the Cheesecake: Preheat your oven to 325°F (160°C). Place the filled springform pan on a baking sheet. For the best results and to minimize cracking, bake the cheesecake in a water bath. To do this, wrap the outside of your springform pan tightly with heavy-duty aluminum foil (several layers if needed) to prevent water from seeping in. Place the foil-wrapped pan inside a larger baking pan. Carefully pour hot water into the larger pan until it comes about halfway up the sides of the springform pan. Bake for 50-65 minutes, or until the edges are set and the center is still slightly jiggly.
  • Cooling the Cheesecake: Once baked, turn off the oven and leave the cheesecake inside with the oven door slightly ajar (prop it open with a wooden spoon). Let it cool in the oven for an hour. This gradual cooling process helps prevent sudden temperature changes that can cause cracking. After an hour, remove the cheesecake from the oven and the water bath. Carefully remove the foil. Let it cool completely on a wire rack at room temperature.
  • Chilling the Cheesecake: Once completely cool, cover the cheesecake tightly with plastic wrap and refrigerate for at least 6 hours, or preferably overnight. This chilling time is essential for the cheesecake to fully set and for the flavors to meld together beautifully. The longer it chills, the better it will taste and the easier it will be to slice.
  • Once chilled, release the springform pan and admire your stunning Cookie Monster Cheesecake! You can garnish it with more chocolate chips, whipped cream, or even some crum extractbled cookie pieces. Enjoy this delightful, monster-sized treat!

    Cookie Monster Cheesecake

    Conclusion:

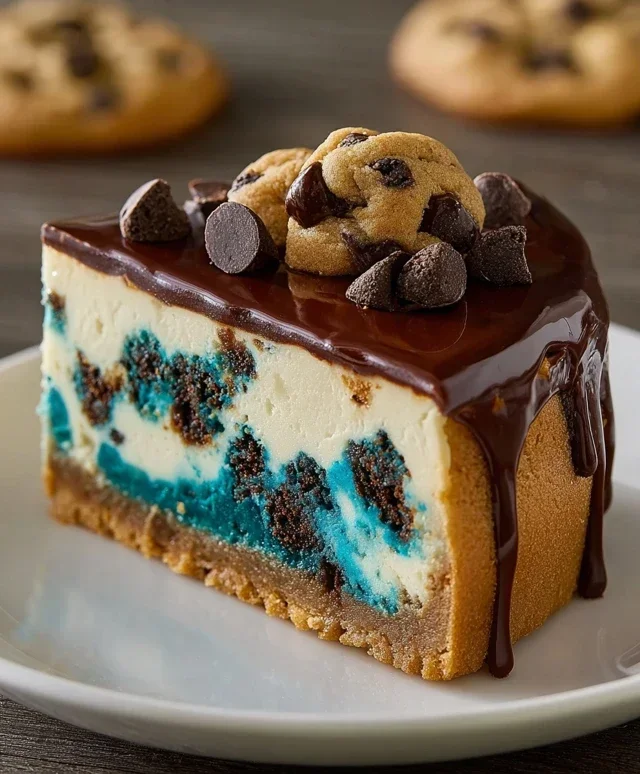
    And there you have it – your ultimate guide to creating a spectacular Cookie Monster Cheesecake! This recipe is a true showstopper, perfect for birthdays, holidays, or just because you want to indulge in something incredibly fun and delicious. The creamy, dreamy cheesecake base swirled with classic chocolate chip cookie dough and topped with a mountain of cookie crum extractbles and blue-tinted whipped cream is an absolute delight for the senses. It’s not just a dessert; it’s an experience! We’ve packed in so much flavor and texture, ensuring every bite is a celebration of all things cookie and cheesecake.

    When it comes to serving, this Cookie Monster Cheesecake is fantastic on its own, but consider pairing it with a cold glass of milk for the ultimate nostalgic treat. For a touch of elegance, a dollop of extra whipped cream or a drizzle of chocolate sauce can elevate it further. Don’t be afraid to get creative with variations either! You could try adding mini chocolate chips directly into the cheesecake batter, or even incorporating a layer of crushed Oreos at the bottom for an extra chocolatey crunch. The possibilities are endless!

    I truly encourage you to give this recipe a try. It’s more straightforward than you might think, and the joy it brings is absolutely worth it. Get ready for the compliments – everyone will be asking for seconds!

    Frequently Asked Questions:

    Can I make this cheesecake ahead of time?

    Absolutely! Cheesecakes are best made a day in advance. This allows the cheesecake to set properly and the flavors to meld beautifully. Just cover it tightly and refrigerate until you’re ready to serve. It makes entertaining so much easier!

    What kind of chocolate chips work best in the cookie dough?

    Semi-sweet chocolate chips are the classic choice and work wonderfully. However, feel free to use milk chocolate chips or even dark chocolate chunks for a richer flavor. Just ensure they’re sturdy enough to hold their shape during baking.

    How do I get the perfect blue color for the whipped cream?

    A tiny amount of blue food coloring is key! Start with just a drop or two and mix until you achieve your desired shade of Cookie Monster blue. Gel food coloring tends to give the most vibrant results without adding extra liquid.


    Cookie Monster Cheesecake

    Cookie Monster Cheesecake

    A fun and delicious cheesecake inspired by Cookie Monster, featuring a chocolate chip cookie crust and a vibrant blue cheesecake filling.

    Prep Time
    30 Minutes

    Cook Time
    60 Minutes

    Total Time
    30 Minutes

    Servings
    10 servings

    Ingredients

    • 4 oz unsalted butter (1/2 cup)
    • 2.6 oz brown sugar, tightly packed (1/3 cup)
    • 4.4 oz all-purpose flour (125 g, 1 cup)
    • 4 oz semisweet mini chocolate chips (2/3 cup)
    • 16 oz cream cheese (2 packets)
    • 3.5 oz granulated sugar (1/2 cup)
    • 2 tsp cornflour (cornstarch)
    • 1 tsp vanilla extract
    • 3 eggs
    • 1/2 cup whipping cream (118 ml)
    • Blue gel food coloring
    • 1/2 tsp salt
    • Pinch of salt
    • 1 egg
    • 1 tsp vanilla extract

    Instructions

    1. Step 1
      Preheat oven to 350°F (175°C). Grease a 9-inch springform pan.
    2. Step 2
      For the crust: Melt 4 oz unsalted butter. In a bowl, combine melted butter, 2.6 oz brown sugar, 4.4 oz all-purpose flour, 4 oz semisweet mini chocolate chips, 1/2 tsp salt, 1 egg, and 1 tsp vanilla extract. Press mixture evenly into the bottom and slightly up the sides of the prepared pan. Bake for 10-12 minutes until golden brown. Let cool.
    3. Step 3
      For the filling: In a large bowl, beat 16 oz cream cheese until smooth. Gradually beat in 3.5 oz granulated sugar and 2 tsp cornflour until well combined.
    4. Step 4
      Add 3 eggs one at a time, beating well after each addition. Stir in 1/2 cup whipping cream, 1 tsp vanilla extract, and blue gel food coloring until desired shade of blue is achieved. Add a pinch of salt.
    5. Step 5
      Pour the blue cheesecake filling over the cooled cookie crust.
    6. Step 6
      Bake for 50-60 minutes, or until the edges are set and the center is almost firm. Turn off the oven, crack the door open slightly, and let the cheesecake cool in the oven for 1 hour.
    7. Step 7
      Remove from oven and let cool completely on a wire rack. Chill in the refrigerator for at least 4 hours, or preferably overnight, before serving.

    Important Information

    Nutrition Facts (Per Serving)

    It is important to consider this information as approximate and not to use it as definitive health advice.

    Allergy Information

    Please check ingredients for potential allergens and consult a health professional if in doubt.

    « Previous Post
    Cattle Drive Casserole-Hearty Comfort Food Recipe
    Next Post »
    Cheesy Scalloped Potatoes- Creamy Comfort Food

    If you enjoyed this…

    Dessert

    Butter Pecan Pound Cake: The Ultimate Recipe & Baking Guide

    Dessert

    Chocolate Peanut Butter Pinwheels: Easy Recipe & Baking Tips

    Dessert

    Chocolate Chip Pumpkin Bread: A Delicious Fall Treat You Must Try

    Reader Interactions

    Leave a Comment Cancel reply

    Helpful comments include feedback on the post or changes you made.

    Primary Sidebar

    Browse by Diet

    BreakfastBreakfastDinnerDinnerLunchLunchDessertDessert
    Easy Low Carb Chicken Casserole

    Easy Low Carb Chicken Casserole Dinner

    Fast and Easy Dinners For Two

    Quick Easy Dinners For Two – Delicious Meals Fast

    Beef and Broccoli

    Easy Beef and Broccoli Stir Fry Recipe

    • California Consumer Privacy Act (CCPA)
    • DMCA
    • Cookie Privacy Policy
    • Privacy Policy
    • Terms of Use
    • Contact Us

    © 2026 · Cuisine Recipe Theme · Genesis Framework · Disclosure · Website Design by Anchored Design