
Milk Bar Hilly’s Pumpkin Caramel Pie Recipe is not merely a dessert; it’s an unforgettable culinary masterpiece that perfectly encapsulates the spirit of autumn with an innovative twist. If you’ve ever dreamt of a pie that balances the comforting nostalgia of classic pumpkin with an unexpected layer of sophisticated sweetness and textural brilliance, then prepare to be captivated. This isn’t your grandmother’s pumpkin pie, though it carries all the warmth and love we associate with those timeless traditions. Instead, it’s a modern marvel, a testament to Milk Bar’s reputation for transforming familiar flavors into extraordinary experiences.
I am incredibly excited to guide you through crafting this sensational dessert that stands out on any table. While traditional pumpkin pie has been a staple of harvest celebrations and Thanksgiving feasts for centuries, symbolizing abundance and gratitude, Milk Bar’s rendition elevates this humble squash into a luxurious treat. People absolutely adore this dish because it offers an exquisite symphony of flavors: the deep, earthy spice of pumpkin pie filling beautifully marries with a decadent, gooey caramel layer, all cradled in a unique, crumbly crust that adds an irresistible crunch. Every slice of this
Milk Bar Hilly’s Pumpkin Caramel Pie Recipe
delivers a harmonious blend of creamy, sweet, and spiced notes, making it an instant favorite and a guaranteed showstopper. Get ready to bake something truly special that will have everyone begging for the recipe!

Ingredients:
Gathering all your ingredients before you start is key to a smooth baking experience. Here’s everything you’ll need to create this indulgent Milk Bar Hilly’s Pumpkin Caramel Pie:
- For the White Chocolate Pumpkin Filling:
- (2) 15-ounce cans Pumpkin Puree (ensure it’s NOT pumpkin pie filling or mix)
- 1 1/4 cups Heavy Cream
- 1/3 cup Corn Syrup (scant)
- 3 tablespoons Unsalted Butter (from the total 5 tablespoons, see notes for division)
- 12 to 16 ounces White Chocolate (2 to 2 1/2 cups high-quality white chocolate, finely chopped or in discs for easier melting)
- 3 teaspoons Pumpkin Pie Spice
- 1/2 teaspoon Salt
- For the Salted Caramel Sauce:
- 1 cup White Sugar (minus 2 tablespoons reserved for the crust)
- 1/3 cup Heavy Cream
- 6 tablespoons Unsalted Butter
- 1/4 cup Water
- 2 tablespoons Corn Syrup
- 1 teaspoon Salt (up to 2 teaspoons of salt, to taste, for that perfect salted caramel kick)
- 2 teaspoons Vanilla Extract
- For the Crumb Crust:
- 1 1/2 cups Flour (all-purpose)
- 2 tablespoons White Sugar (reserved from the caramel sugar)
- 2 tablespoons Unsalted Butter (from the total 5 tablespoons, see notes for division)
Ingredient Note: We’ll be strategically dividing some of our ingredients to create each delicious component of this pie. Specifically, the initial 5 tablespoons of unsalted butter will be split: 2 tablespoons for our crumb crust and 3 tablespoons for the white chocolate pumpkin filling. Similarly, 2 tablespoons of the 1 cup of white sugar are earmarked for the crust, leaving the remainder for our luscious caramel sauce. This careful allocation ensures every component is perfectly balanced.
For the Crumb Crust:
A Milk Bar-style pie isn’t complete without a fantastic base, and this crumb crust, while simple, provides the perfect textural contrast and foundation for our rich fillings. Using just flour, a touch of sugar, and some butter, we’ll create a delightfully tender and flavorful base.
- Prepare Your Baking Dish: First things first, grab a 9-inch pie plate. Lightly grease it with a little butter or non-stick spray, just to ensure our crust doesn’t cling stubbornly later on. We want a smooth release!
- Combine Dry Ingredients: In a medium-sized mixing bowl, combine the 1 1/2 cups of flour with the 2 tablespoons of white sugar we’ve set aside from our main sugar quantity. Give these a quick whisk with a fork or a small spatula to ensure they are well-integrated. This initial mixing prevents lumps and ensures the sugar is evenly distributed for a consistent flavor throughout the crust.
- Add the Butter: Now, take the 2 tablespoons of unsalted butter designated for the crust. If it’s not already softened, you can gently melt it in the microwave or a small saucepan. Pour the melted butter into the flour and sugar mixture.
- Form the Crumb: Using your hands (the best tools for this job!), a fork, or a pastry blender, mix the butter into the dry ingredients. You’re aiming for a crumbly mixture that holds together when pressed. It should resemble coarse meal, with some larger clumps present. Don’t overmix; we want a tender crust, not a tough one. The mixture might seem a little dry at first, but keep working it until the butter is fully incorporated and the texture is uniform.
- Press into Pie Plate: Once your crumb mixture is ready, transfer it to your prepared 9-inch pie plate. Using the bottom of a flat glass or your clean hands, firmly press the mixture evenly across the bottom and up the sides of the pie plate. It’s important to press firmly to create a compact crust that won’t crumble excessively when sliced. Pay extra attention to the edges to ensure a neat finish.
- Bake the Crust: Preheat your oven to 350°F (175°C). Once preheated, place the pie plate with the pressed crust into the oven. Bake for approximately 12-15 minutes, or until the crust is lightly golden brown and smells fragrant. This pre-baking step (often called “blind baking”) helps to set the crust, preventing it from becoming soggy once the wet fillings are added. Keep a close eye on it towards the end of the baking time, as ovens can vary.
- Cool Completely: Once baked, remove the pie crust from the oven and place it on a wire rack to cool completely to room temperature. This is a crucial step; adding hot filling to a warm crust can lead to a less stable and potentially soggy pie. Patience here will be rewarded!
For the Salted Caramel Sauce:
This luscious salted caramel sauce is the heart of our pie’s unique flavor profile. It’s rich, sweet, and perfectly balanced with a touch of salt. Making caramel can seem intimidating, but with a few careful steps, you’ll achieve a beautifully smooth and decadent sauce.
- Prepare Ingredients: Before you even think about turning on the heat, measure out all your caramel ingredients. Have the 1/3 cup heavy cream, 6 tablespoons unsalted butter (cut into cubes for quicker melting), 1 teaspoon salt (or up to 2 teaspoons, depending on your preference for saltiness), and 2 teaspoons vanilla extract ready and within arm’s reach. For the heavy cream, it’s a good idea to gently warm it in a separate small saucepan or microwave; adding cold cream to hot caramel can cause it to seize up and be much harder to incorporate smoothly.
- Combine Sugar, Water, and Corn Syrup: In a heavy-bottomed, light-colored saucepan (a light-colored pan helps you monitor the caramel’s color change), combine the remaining 1 cup of white sugar (after reserving 2 tablespoons for the crust), the 1/4 cup of water, and the 2 tablespoons of corn syrup. The corn syrup is your secret weapon here; it helps prevent crystallization, ensuring a smooth caramel.
- Begin Cooking the Sugar Mixture: Place the saucepan over medium-high heat. Allow the mixture to come to a boil. Resist the urge to stir it! Stirring can introduce sugar crystals back into the solution, leading to a grainy caramel. If you see sugar crystals forming on the sides of the pan, you can gently brush them down with a wet pastry brush.
- Watch for Color Change: Continue boiling without stirring. The mixture will first become clear, then start to bubble more vigorously, and finally, it will begin to turn a light amber color. This is where you need to be vigilant. Keep watching as it progresses to a beautiful, rich amber or golden-brown color, much like an old copper penny. This usually takes about 8-12 minutes, but the timing can vary significantly based on your stovetop and pan. Do not walk away! Caramel can go from perfect to burnt in a matter of seconds.
- Remove from Heat and Whisk in Cream: Once it reaches your desired deep amber color, immediately remove the saucepan from the heat. Carefully, but confidently, pour the warm heavy cream into the hot sugar mixture while continuously whisking. Be extremely cautious as the mixture will bubble up violently and release a lot of steam. This is normal! Continue whisking until the cream is fully incorporated and the caramel is smooth.
- Add Butter, Salt, and Vanilla: Now, add the cubed 6 tablespoons of unsalted butter, the 1 teaspoon of salt (or more to taste), and the 2 teaspoons of vanilla extract. Whisk vigorously until all the butter has melted and the caramel is silky smooth and glossy. Taste and adjust the salt if desired; a truly salted caramel should have a noticeable savory kick that enhances its sweetness.
- Cool and Thicken: Pour the finished caramel sauce into a heatproof jar or bowl. Let it cool down to room temperature. As it cools, it will thicken considerably, reaching that perfect pourable, yet spoonable, consistency we’re looking for. If you find it too thick after cooling, you can gently reheat it in a double boiler or microwave, stirring frequently, until it’s the right consistency.
For the White Chocolate Pumpkin Filling:
This filling is a sophisticated twist on a classic pumpkin pie, with the addition of white chocolate adding a creamy richness and delicate sweetness that perfectly complements the warmth of pumpkin pie spice. It’s a truly indulgent and unique layer in our pie.
- Prepare White Chocolate: If your white chocolate isn’t already in small pieces or chips, finely chop the 12 to 16 ounces of high-quality white chocolate. Smaller pieces will melt more evenly and quickly. Quality matters here, as poor-quality white chocolate can seize or melt poorly.
- Create a Double Boiler or Use a Microwave: We want to melt our white chocolate gently. The best way to do this is using a double boiler: Fill a saucepan with about an inch of water and bring it to a gentle simmer. Place a heatproof bowl (make sure it fits snugly over the saucepan without touching the water) over the simmering water. Alternatively, you can use a microwave, heating in 30-second intervals and stirring vigorously after each, until melted.
- Melt White Chocolate with Butter and Cream: Add the chopped white chocolate, the remaining 3 tablespoons of unsalted butter (from our initial 5 tablespoons), the 1 1/4 cups heavy cream, and the 1/3 cup (scant) corn syrup to the heatproof bowl over the simmering water (or in your microwave-safe bowl). Stir gently but continuously until the white chocolate and butter are completely melted and the mixture is smooth and glossy. The corn syrup aids in a smooth texture and prevents the chocolate from becoming grainy. Once melted, remove the bowl from the heat.
- Whisk in Pumpkin Puree and Spices: To the warm white chocolate mixture, add both 15-ounce cans of pumpkin puree (remember, no pumpkin pie filling!), the 3 teaspoons of pumpkin pie spice, and the 1/2 teaspoon of salt.
- Combine Thoroughly: Using a whisk or a rubber spatula, vigorously mix all the ingredients until everything is perfectly combined and homogenous. Ensure there are no streaks of pumpkin puree or unmixed spices. The mixture should be thick, smooth, and have a beautiful, uniform orange hue.
- Taste and Adjust: Give the filling a quick taste. Do you want a little more spice? Perhaps another tiny pinch of salt to balance the sweetness? Adjust as needed, but remember it will deepen in flavor as it chills.
- Cool the Filling: Allow the pumpkin filling to cool slightly at room temperature while you prepare for assembly. It doesn’t need to be completely cold, but it shouldn’t be piping hot when poured into the crust.
Assembly and Chilling:
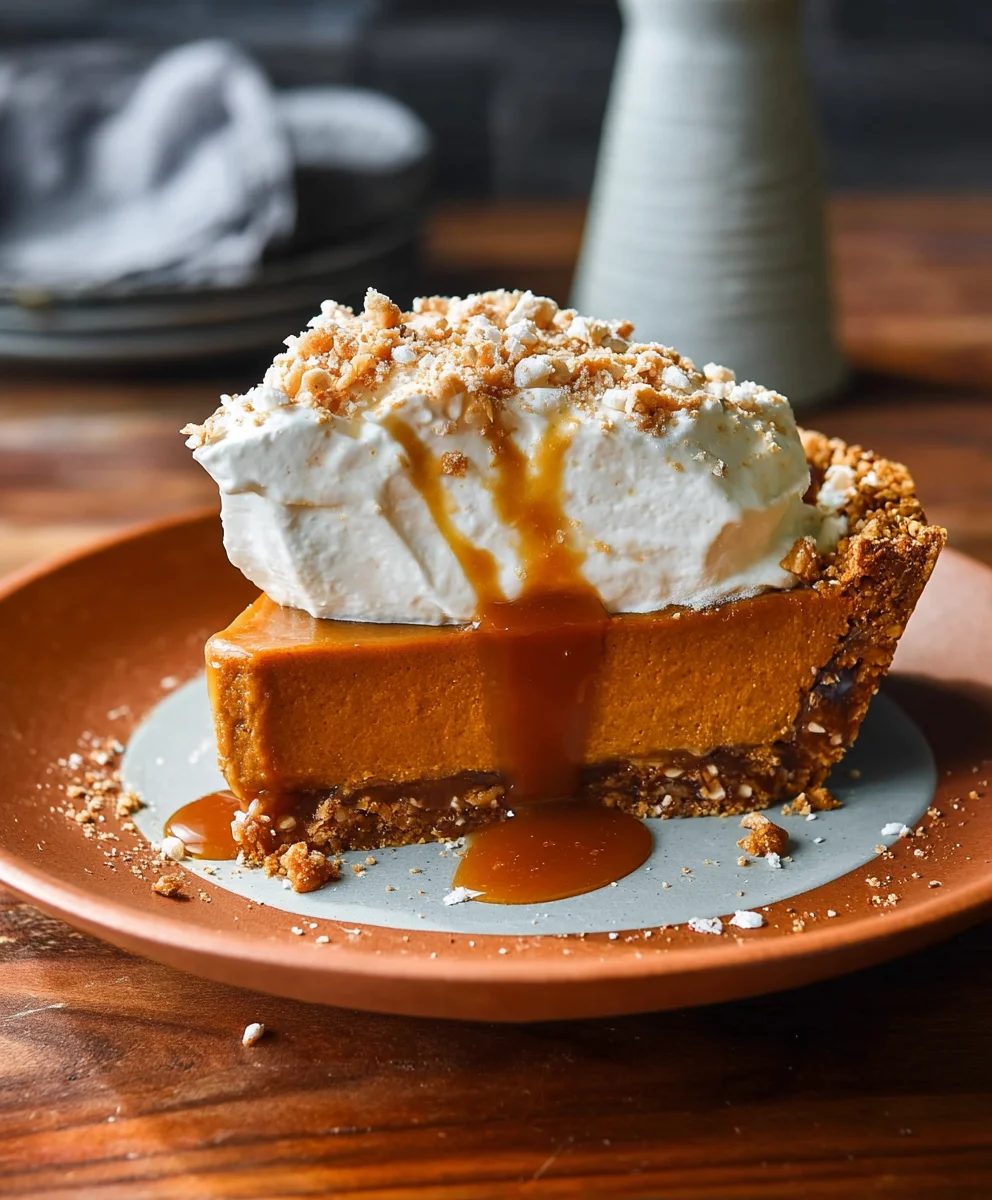
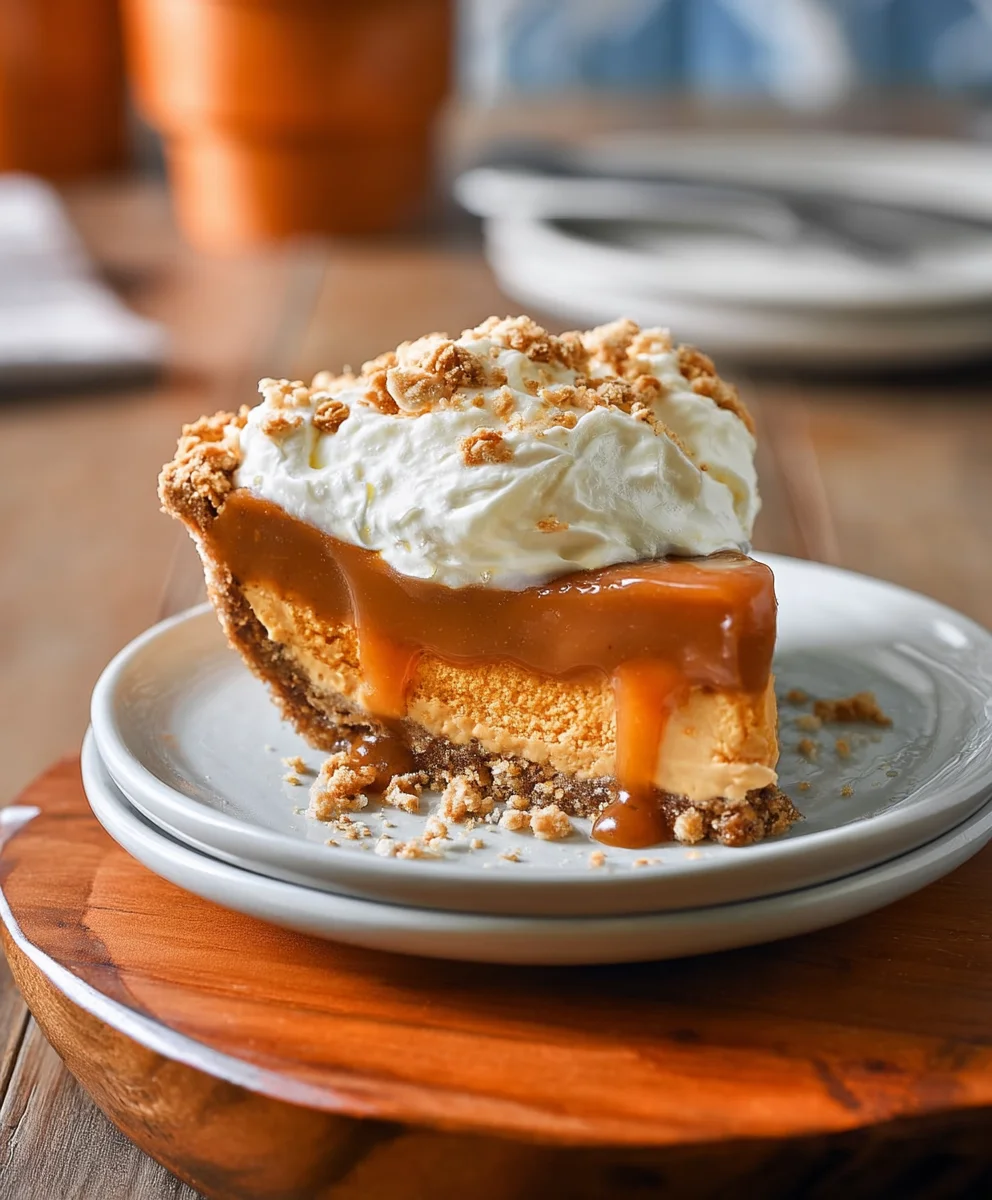
Now for the grand finale! Bringing all our meticulously prepared components together to form the ultimate Milk Bar Hilly’s Pumpkin Caramel Pie. The layering is what makes this pie truly special, creating distinct textures and flavors in every bite.
- Prepare Your Crust: Ensure your pre-baked crumb crust is completely cool and sitting securely in its 9-inch pie plate. A cool crust is essential to prevent the caramel from melting it prematurely and to maintain its structural integrity.
- Pour the Salted Caramel Layer: Take your cooled salted caramel sauce. It should be thick but still pourable. If it has become too firm, gently warm it for a few seconds in the microwave or over a double boiler until it reaches a pourable consistency. Carefully pour the entire batch of salted caramel sauce evenly into the bottom of the cooled crumb crust. Use a spatula to spread it right to the edges, creating an even layer.
- Chill the Caramel: Place the pie plate with the caramel layer into the refrigerator. Let it chill for at least 30-45 minutes, or until the caramel is firm enough to support the next layer without mixing. This chilling step is absolutely vital for distinct layers.
- Add the White Chocolate Pumpkin Filling: Once the caramel layer is sufficiently firm, retrieve the pie plate from the refrigerator. Take your prepared white chocolate pumpkin filling. Give it a final whisk to ensure it’s smooth. Carefully spoon or pour the pumpkin filling over the chilled caramel layer. Gently spread it out with a spatula, ensuring an even, smooth top. Take care not to disturb the caramel layer underneath.
- The Big Chill: This pie requires significant chilling time to fully set and for the flavors to meld beautifully. Cover the pie loosely with plastic wrap (or a pie dome if you have one, to avoid the plastic touching the filling) and transfer it back to the refrigerator. Chill for a minimum of 6 hours, but ideally overnight (12-24 hours) for the best results. The longer it chills, the firmer the pie will be, making for cleaner slices and a more stable structure.
- Serving and Storage: When you’re ready to serve, remove the pie from the refrigerator and let it sit at room temperature for about 15-20 minutes before slicing. This allows the fillings to soften slightly, making it easier to cut and enhancing the creamy texture. Use a sharp, thin knife, wiping it clean between each slice for the neatest presentation. Store any leftover pie in an airtight container in the refrigerator for up to 3-4 days.
And there you have it – your very own Milk Bar Hilly’s Pumpkin Caramel Pie, a masterpiece of layers, textures, and autumn flavors with a delightful white chocolate twist. Enjoy every incredible bite!
Conclusion:
Well, my friends, we’ve journeyed through the delightful process of creating something truly spectacular. If you’ve followed along, you now hold the secrets to one of the most talked-about desserts of the season: the incredible Milk Bar Hilly’s Pumpkin Caramel Pie Recipe. This isn’t just another pie; it’s an experience, a masterpiece of textures and flavors that will undoubtedly become a staple in your holiday repertoire and beyond.
Why, you ask, is this particular pie an absolute must-try? Let me count the ways! First, there’s the unparalleled depth of flavor. We’re talking about the cozy, comforting essence of classic pumpkin, elevated to new heights by that luscious, homemade caramel. It’s a symphony where the sweetness of the caramel plays beautifully against the earthy warmth of the pumpkin and a perfectly spiced crust. But it’s not just about taste; it’s about the thrilling textural contrasts that Milk Bar is famous for. Imagine a smooth, creamy pumpkin filling that practically melts in your mouth, perfectly balanced by a slightly crisp, buttery crust, perhaps with a surprise crunch layer if you opted for our suggested additions. Every single bite offers something new and exciting, preventing any semblance of dessert fatigue. This pie brings a sophisticated elegance to any table while still providing that comforting, homey feeling we all crave. It’s perfect for impressing guests at Thanksgiving, Christmas, or any autumnal gathering, but honestly, it’s so good, you’ll find yourself looking for any excuse to whip it up. It’s a testament to the fact that sometimes, breaking away from tradition with a touch of culinary genius yields truly unforgettable results. The effort, which I promise is more enjoyable than daunting, is incredibly rewarding, culminating in a dessert that tastes like it came straight from a gourmet bakery, but with all the love and pride of a homemade creation. You’re not just baking a pie; you’re crafting a memory.
Now, while this pie is undeniably spectacular on its own, there are always ways to enhance the experience. For a classic touch, a dollop of freshly whipped cream, lightly sweetened and perhaps infused with a hint of vanilla or bourbon, is always a winner. If you’re feeling a bit more indulgent, a scoop of premium vanilla bean ice cream melting gently alongside a warm slice creates a divine hot-and-cold sensation. For those who appreciate a sprinkle of magic, a pinch of flaky sea salt scattered over the top just before serving beautifully cuts through the sweetness and highlights the caramel notes. Or, for an extra textural delight, a scattering of toasted pecans or candied walnuts can add a wonderful crunch. Don’t be afraid to get creative! You could even drizzle a little extra warm caramel sauce over each slice for an extra layer of decadence. Thinking about presentation? Consider making individual mini pies in ramekins or muffin tins for a charming, personalized dessert experience – just adjust baking times accordingly. For a slightly different flavor profile, consider adding a tiny pinch of cardamom or a dash of black pepper to your pumpkin spice blend for an unexpected warmth. And if you’re looking for a delightful beverage pairing, a hot cup of spiced chai tea, a robust coffee, or even a glass of mulled cider would complement the rich flavors beautifully. For an adult gathering, a small digestif or a glass of dessert wine can truly elevate the post-dinner experience.
I genuinely hope you’re feeling inspired to roll up your sleeves and dive into this wonderful baking adventure. Trust me, the sheer joy of pulling this golden, aromatic pie from your oven is a reward in itself. There’s something incredibly satisfying about creating such a magnificent dessert from scratch, and I promise you, the smiles and compliments you’ll receive will make every step worth it. This Milk Bar Hilly’s Pumpkin Caramel Pie Recipe is more than just a list of ingredients and instructions; it’s an invitation to create, to share, and to savor. So, gather your ingredients, put on your favorite baking playlist, and let the magic happen. When you do try it, and I sincerely hope you will, please come back and share your experiences with me! Did you add a unique twist? What was your favorite part? Snap a photo, tag us on social media (if applicable, or just encourage sharing in comments), or leave a comment below. Your feedback and stories are what make this community so vibrant and inspiring. Happy baking, my friends, and prepare to fall head over heels for this extraordinary pie!
Frequently Asked Questions about Milk Bar Hilly’s Pumpkin Caramel Pie
Can I make this pie ahead of time?
Absolutely! One of the great things about this pie is how well it holds up. You can bake the entire pie, allow it to cool completely, and then refrigerate it for up to 2-3 days before serving. This makes it a fantastic option for holiday meal prep, allowing you to focus on other dishes closer to the event. Just make sure to cover it loosely with plastic wrap to protect its delicate flavors and textures. For optimal flavor and texture, I recommend bringing it to room temperature for about 30-60 minutes before slicing and serving.
How do I store leftovers?
Any leftover slices of your delicious Milk Bar Hilly’s Pumpkin Caramel Pie should be stored in an airtight container or covered tightly with plastic wrap in the refrigerator. It will keep well for up to 4-5 days. While it’s best enjoyed fresh, the flavors often deepen overnight, making for a wonderful treat the next day!
What if I don’t have all the specialty ingredients (e.g., specific Milk Bar components)?
While the original Milk Bar recipes often call for unique ingredients to achieve their signature textures and flavors, our version of the “Milk Bar Hilly’s Pumpkin Caramel Pie Recipe” aims to make it accessible while retaining the essence. If you’re missing a very specific item, look for a high-quality substitute. For example, if a specific “crumb” is mentioned and you don’t want to make it from scratch, you could use crushed graham crackers or shortbread cookies mixed with a little melted butter and sugar. For specialty extracts, vanilla extract is usually a great default. Don’t let a missing ingredient deter you from trying this amazing pie; get creative with what you have!
Can I use canned pumpkin puree?
Yes, absolutely! For convenience and consistency, good quality canned pumpkin puree is what most home bakers (myself included!) use and recommend. Just be sure to use 100% pure pumpkin puree, not pumpkin pie filling, which already has spices and sweeteners added. If you’re feeling ambitious and have fresh sugar pumpkins, you can certainly make your own, but canned works perfectly and yields fantastic results.
Is it difficult to make Milk Bar style recipes?
Milk Bar recipes are renowned for their intricate layers and unique flavor combinations, which can sometimes look intimidating. However, I’ve broken down this “Milk Bar Hilly’s Pumpkin Caramel Pie Recipe” into manageable steps, making it approachable for home bakers of all skill levels. While it might involve a few more components than a traditional pie, each step is straightforward. The key is to read through the entire recipe first, gather all your ingredients (mise en place!), and take it one step at a time. The results are incredibly rewarding and worth the effort!
Can I make this pie gluten-free?
You certainly can! To make this pie gluten-free, the primary modification you’ll need to make is for the crust. You can use your favorite gluten-free pie crust recipe or a store-bought gluten-free pie shell. For any crumb layers, ensure you use gluten-free cookies or flours. The filling itself is naturally gluten-free. Always double-check ingredient labels for hidden gluten, especially in things like spices or caramel if using store-bought.
What’s the best way to cut a clean slice of pie?
For those perfectly photogenic slices, there are a few tricks! First, ensure the pie is completely chilled – ideally, it should have been refrigerated for at least 4-6 hours, or even overnight. A cold pie will hold its shape much better. Second, use a sharp, thin-bladed knife that has been run under hot water and wiped dry before each cut. This helps the knife glide through the filling without dragging. Wipe the knife clean between each slice to prevent sticking and ensure pristine edges. And remember, the first slice is always the hardest, so don’t be discouraged if it’s not absolutely perfect!
Ultimate Milk Bar Hilly’s Pumpkin Caramel Pie Recipe
This indulgent Milk Bar Hilly’s Pumpkin Caramel Pie features a crispy crumb crust, a rich salted caramel layer, and a creamy white chocolate pumpkin filling with warm pumpkin pie spice. A sophisticated twist on a classic autumn dessert.
Ingredients
-
2 (15-ounce) cans Pumpkin Puree
-
1 1/4 cups Heavy Cream
-
1/3 cup Corn Syrup (scant)
-
5 tablespoons Unsalted Butter
-
12 to 16 ounces White Chocolate, finely chopped
-
3 teaspoons Pumpkin Pie Spice
-
1/2 teaspoon Salt
-
1 cup White Sugar
-
1/3 cup Heavy Cream
-
6 tablespoons Unsalted Butter
-
1/4 cup Water
-
2 tablespoons Corn Syrup
-
1 teaspoon Salt (up to 2 teaspoons, to taste)
-
2 teaspoons Vanilla Extract
-
1 1/2 cups All-purpose Flour
Instructions
-
Step 1
Grease a 9-inch pie plate. Combine 1 1/2 cups flour, 2 tbsp white sugar (reserved from total), and 2 tbsp melted unsalted butter (from total). Mix until crumbly, then press firmly into the pie plate. -
Step 2
Bake the pressed crust at 350°F (175°C) for 12-15 minutes until lightly golden. Cool completely on a wire rack. -
Step 3
In a heavy-bottomed saucepan, combine remaining 1 cup white sugar, 1/4 cup water, and 2 tbsp corn syrup. Cook over medium-high heat without stirring until the mixture turns a rich amber color (8-12 min). -
Step 4
Remove from heat. Carefully whisk in 1/3 cup warm heavy cream, then whisk in 6 tbsp unsalted butter, 1-2 tsp salt, and 2 tsp vanilla extract until smooth. Pour into a heatproof bowl and cool completely. -
Step 5
In a double boiler or microwave, gently melt 12-16 oz finely chopped white chocolate with remaining 3 tbsp unsalted butter, 1 1/4 cups heavy cream, and 1/3 cup corn syrup until smooth. Remove from heat. -
Step 6
Whisk in 2 (15-ounce) cans pumpkin puree, 3 tsp pumpkin pie spice, and 1/2 tsp salt until well combined and smooth. Cool slightly. -
Step 7
Pour the cooled salted caramel sauce evenly into the cooled crumb crust. Chill for 30-45 minutes until firm. -
Step 8
Gently spoon the white chocolate pumpkin filling over the chilled caramel layer, spreading evenly to the edges. -
Step 9
Cover the pie loosely and refrigerate for a minimum of 6 hours, ideally overnight (12-24 hours), until completely set and firm. -
Step 10
Let pie sit at room temperature for 15-20 minutes before slicing with a sharp, thin knife. Store any leftover pie in an airtight container in the refrigerator for up to 3-4 days.
Important Information
Nutrition Facts (Per Serving)
It is important to consider this information as approximate and not to use it as definitive health advice.
Allergy Information
Please check ingredients for potential allergens and consult a health professional if in doubt.
Leave a Comment