
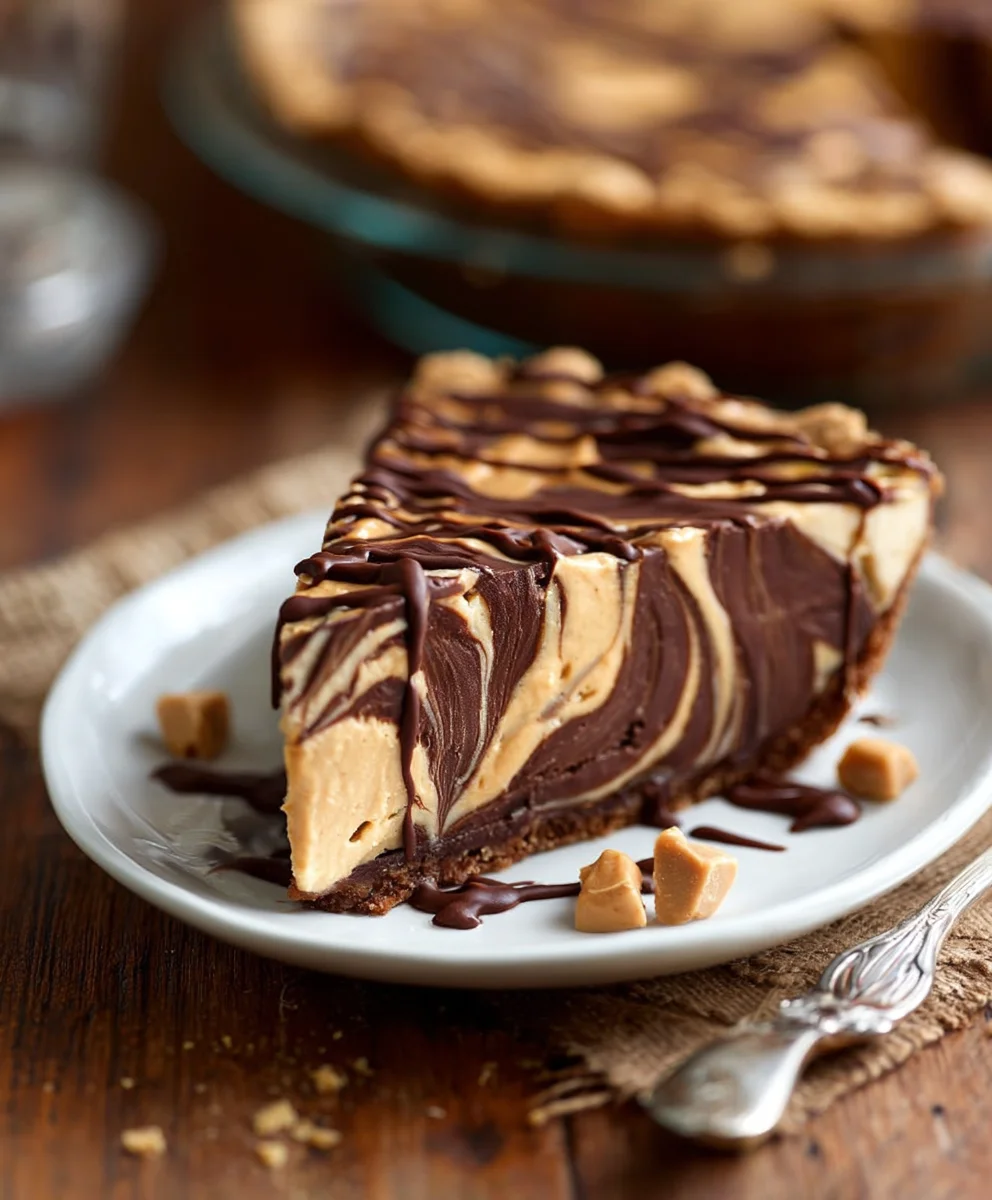
Decadent Chocolate Peanut Butter Swirl Pie is more than just a dessert; it’s an experience that promises to transport your taste buds to pure bliss. Imagine a velvety smooth chocolate base, rich and intensely flavorful, perfectly complemented by a creamy, salty-sweet peanut butter swirl that dances across its surface. Every forkful offers a symphony of flavors and textures, making it utterly irresistible. While the exact origins of combining chocolate and peanut butter in a pie are a delightful evolution of American comfort food, the pairing itself has become a beloved classic, dating back to the early 20th century. People adore this particular pie for its masterful balance: the profound richness of chocolate perfectly cut by the earthy, slightly salty notes of peanut butter, all encapsulated in a visually stunning swirl that makes it as beautiful to behold as it is delicious to devour. Whether you’re celebrating a special occasion or simply craving an extraordinary treat, this Decadent Chocolate Peanut Butter Swirl Pie is sure to be the star of your dessert table, leaving everyone clamoring for a second slice.

Important Note: The prompt indicated “No ingredients provided” in the REAL INGREDIENTS section. To fulfill the request for a recipe article based on the Focus Keyword “Decadent Chocolate Peanut Butter Swirl Pie,” I have inferred and provided a comprehensive list of ingredients typically used for such a dish. The instructions that follow are based on these inferred ingredients.
Ingredients:
- For the Chocolate Cookie Crust:
- 1 ½ cups (approximately 18-20 cookies) chocolate sandwich cookies (like Oreos), finely crushed (about 200g)
- ¼ cup (56g) unsalted butter, melted
- 1 tablespoon granulated sugar (optional, for extra sweetness and crispness)
- For the Decadent Peanut Butter Filling:
- 8 ounces (226g) full-fat cream cheese, softened at room temperature
- 1 cup (250g) creamy peanut butter (all-natural, unsweetened peanut butter is recommended for a less sweet, richer flavor)
- ¾ cup (90g) powdered sugar (confectioners’ sugar), sifted
- 1 teaspoon pure vanilla extract
- ¼ teaspoon fine sea salt
- 1 ½ cups (360ml) heavy cream (cold, for whipping)
- For the Rich Chocolate Ganache Filling:
- 10 ounces (280g) high-quality semi-sweet chocolate, finely chopped or chocolate chips
- 1 cup (240ml) heavy cream
- 2 tablespoons (28g) unsalted butter
- ½ teaspoon pure vanilla extract
- Pinch of fine sea salt
- For Garnish (Optional):
- ¼ cup chopped roasted peanuts
- Chocolate shavings or curls
- Extra dollops of whipped cream
Preparation of the Chocolate Cookie Crust
Making the perfect foundation for our Decadent Chocolate Peanut Butter Swirl Pie is crucial, and a rich chocolate cookie crust delivers just that. This no-bake crust is not only incredibly easy to prepare but also offers a wonderful contrast in texture and flavor to the creamy fillings. The deep chocolate notes enhance the overall “decadent” theme, ensuring every bite is a delightful experience. Precision in crushing the cookies and evenly distributing the butter is key to a stable and uniform crust that will hold up beautifully under the weight of the luxurious fillings. This base layer sets the stage for the symphony of flavors that will soon follow, contributing a satisfying crunch to every spoonful.
- First, gather your chocolate sandwich cookies. You can use a food processor for the quickest and most efficient way to get finely crushed crumbs. Place the cookies into the food processor and pulse until they resemble fine sand with no large chunks remaining. For optimal texture and binding, ensure the crumbs are as fine as possible; this helps in creating a compact crust. If you don’t have a food processor, you can place the cookies in a large Ziploc bag, seal it, and use a rolling pin or the bottom of a heavy pan to crush them. This method requires a bit more effort to achieve uniformly fine crumbs, but it’s equally effective.
- In a medium-sized bowl, combine the finely crushed chocolate cookie crumbs with the melted unsalted butter and the optional tablespoon of granulated sugar. The sugar isn’t strictly necessary as the cookies are already sweet, but it can add a subtle extra layer of caramelization if you choose to bake the crust, or just a touch more sweetness and crispness if you are going for an entirely no-bake version. Mix thoroughly with a fork or spatula until all the crumbs are moistened and resemble wet sand. This ensures that the butter is evenly distributed, which is essential for the crust to bind together properly and prevent it from being overly crumbly.
- Transfer the mixture into a standard 9-inch pie plate. Using the back of a spoon or your clean fingers, press the mixture firmly and evenly onto the bottom and up the sides of the pie plate. It’s important to press firmly to create a compact crust that won’t crumble when sliced. Pay particular attention to the edges and corners to ensure a consistent thickness, forming a solid wall for your fillings. A flat-bottomed glass or measuring cup can also be very helpful in achieving a smooth and even surface.
- Once pressed, place the pie plate in the refrigerator to chill for at least 30 minutes. This allows the butter to solidify, setting the crust and making it firm enough to hold the rich fillings without becoming soggy. If you prefer a slightly crispier crust and don’t mind a minimal baking step, you can bake the crust at 350°F (175°C) for 8-10 minutes until fragrant, then let it cool completely before filling. For this decadent no-bake pie, however, chilling is perfectly sufficient and maintains the ease of preparation, allowing the flavors of the fillings to truly shine without any additional baking.
Crafting the Decadent Peanut Butter Filling
The peanut butter filling is where the “swirl” magic begins, offering a rich, creamy, and distinctively nutty counterpoint to the deep chocolate. This filling is designed to be luscious and light, achieved through the careful incorporation of whipped heavy cream, which gives it an airy mousse-like texture. The balance of sweet, salty, and savory notes from the peanut butter and cream cheese creates a truly unforgettable flavor profile that perfectly complements the chocolate, making this pie a showstopper. The key to a silky-smooth filling lies in ensuring your cream cheese is truly at room temperature and whipping the cream to the correct consistency, which will result in an unbelievably smooth and luxurious component of our pie.
- In a large mixing bowl, using an electric mixer (either a stand mixer with a paddle attachment or a hand mixer), beat the softened full-fat cream cheese on medium speed until it is light, fluffy, and completely smooth. This usually takes about 2-3 minutes. It’s absolutely crucial that the cream cheese is at room temperature to prevent lumps in your final filling. Lumps can compromise the smooth, velvety texture we’re aiming for in this decadent pie, so take your time with this initial step. Scrape down the sides of the bowl once or twice to ensure even beating.
- Add the creamy peanut butter, sifted powdered sugar, pure vanilla extract, and fine sea salt to the cream cheese. Continue beating on medium speed until all the ingredients are well combined and the mixture is smooth and creamy. Scrape down the sides of the bowl frequently to ensure everything is fully incorporated. The powdered sugar not only adds sweetness but also contributes to the filling’s smooth texture, helping it achieve that desirable melt-in-your-mouth quality. The vanilla and salt are vital, enhancing the overall depth of flavor and providing a subtle counterpoint to the richness of the peanut butter.
- In a separate, very clean, and cold mixing bowl (preferably chilled in the freezer for 10-15 minutes), whip the very cold heavy cream on medium-high speed until it forms stiff peaks. The coldness of the bowl and cream is essential for efficient whipping. Be careful not to over-whip, as it can quickly turn grainy and eventually separate. Stiff peaks mean that when you lift the beaters, the cream stands up straight without drooping. This beautifully light and airy whipped cream is what gives our peanut butter filling its delightful mousse-like consistency, making it feel truly decadent and not overly heavy.
- Gently fold about one-third of the whipped cream into the peanut butter mixture using a rubber spatula. This initial folding step lightens the peanut butter base and makes it easier to incorporate the remaining whipped cream without deflating it too much. Once partially combined, gently fold in the remaining whipped cream in two additions, taking care not to deflate the air you’ve meticulously incorporated. The goal is a light, airy, and homogenous mixture that maintains its volume. Over-mixing at this stage can lead to a dense filling, so work gently but efficiently. Set this decadent peanut butter filling aside temporarily.
Preparing the Rich Chocolate Ganache Filling
No “Decadent Chocolate Peanut Butter Swirl Pie” would be complete without a truly rich and velvety chocolate component. This simple yet luxurious ganache provides that deep, intense chocolate flavor and smooth texture that perfectly contrasts with the creamy peanut butter. The addition of butter ensures a glossy finish and an even more opulent mouthfeel, while a touch of vanilla and salt enhances the complexity of the chocolate, bringing out its best qualities. The quality of your chocolate here will significantly impact the final taste, so opt for a good semi-sweet variety—it makes all the difference in achieving that ultimate decadent flavor.
- Place the finely chopped high-quality semi-sweet chocolate or chocolate chips in a heatproof medium bowl. Ensure the chocolate is finely chopped; this helps it melt more quickly and evenly when the hot cream is added, preventing any scorching and ensuring a perfectly smooth ganache. If using chocolate chips, ensure they are good quality, as some brands contain stabilizers that can affect the smoothness of the ganache.
- In a small saucepan, heat the heavy cream over medium heat until it just begins to simmer around the edges, but do not bring it to a rolling boil. You want it hot enough to melt the chocolate effectively without scalding the cream, which could impart an off-flavor. Gentle heat is key here to achieve the desired temperature without burning.
- Pour the hot cream over the chopped chocolate in the bowl. Let it sit undisturbed for 5 minutes. This crucial step allows the residual heat from the cream to melt the chocolate slowly and evenly, ensuring a smooth texture. Resist the urge to stir immediately, as premature stirring can cause the chocolate to seize or become grainy.
- After 5 minutes, gently whisk the mixture starting from the center and slowly expanding outwards, until the chocolate is completely melted and the ganache is smooth, glossy, and uniform. The transformation from separate cream and chocolate to a unified, luscious ganache is truly satisfying to watch. Continue whisking until there are no visible lumps and the mixture is thoroughly emulsified.
- Whisk in the unsalted butter, pure vanilla extract, and pinch of fine sea salt until the butter is fully melted and incorporated. The butter makes the ganache even richer and glossier, adding a luxurious sheen and an extra layer of velvety texture. The vanilla extract enhances the chocolate’s natural aroma, and the salt provides a subtle but important contrast, balancing the sweetness. Set the ganache aside to cool slightly. It should be warm enough to pour easily but not hot, as excessive heat can melt and destabilize the delicate peanut butter filling. It needs to be pourable but slightly thickened, resembling a flowing pudding consistency. If it gets too thick upon cooling, you can gently rewarm it over a double boiler or in the microwave in very short bursts (5-10 seconds), stirring frequently until it reaches the desired consistency.
Assembling and Swirling Your Decadent Pie
This is where the artistry comes in – combining the two exquisite fillings into a beautiful, marbled masterpiece. The “swirl” is not just for visual appeal; it ensures that every slice offers a harmonious blend of intense chocolate and creamy peanut butter, delivering on the promise of true decadence. Achieving the perfect swirl requires a gentle hand and a bit of patience, but the result is undeniably stunning and promises an explosion of flavors and textures that will captivate both the eyes and the palate. The subsequent chilling time is crucial for both setting the fillings and allowing the complex flavors to meld beautifully, culminating in a pie that is truly greater than the sum of its parts.
- Retrieve the chilled chocolate cookie crust from the refrigerator. Ensure it is firm and cold; this will help it stand up to the fillings and prevent it from becoming soggy. A well-chilled crust is a happy crust, especially for a no-bake pie.
- Spoon about two-thirds of the decadent peanut butter filling into the prepared crust, spreading it gently and evenly across the bottom. You don’t need to make it perfectly smooth at this stage, as the ganache will cover it. The goal is to create a substantial, uniform layer of peanut butter goodness. Reserve the remaining one-third of the peanut butter filling for the artistic swirl.
- Pour about two-thirds of the cooled chocolate ganache over the peanut butter layer, spreading it gently to cover the entire surface. Make absolutely sure the ganache is still pourable but not hot, as mentioned earlier in step 13. A hot ganache will melt the peanut butter layer, compromising the distinct layers and the final texture. Aim for an even, smooth layer that provides a rich contrast to the lighter peanut butter. Reserve the remaining one-third of the ganache for the magnificent swirl.
- Now for the moment of truth – the swirl! Dollop spoonfuls of the remaining peanut butter filling and chocolate ganache alternately over the top of the chocolate layer. Try to create a visually appealing pattern with your dollops, thinking about how they will interact when swirled. You might place larger dollops of one, then smaller ones of the other, or alternate them in rows. There’s no wrong way to do this, as long as you have enough contrast for the swirl.
- Using a skewer, a butter knife, or the tip of a small spoon, gently swirl the dollops together. Make broad, sweeping motions and avoid over-mixing, as this can cause the colors to blend completely rather than create distinct, elegant swirls. The goal is beautiful marbling, where the chocolate and peanut butter intermingle in captivating patterns, not a muddy brown mixture. Take your time, letting your artistic instincts guide you. Less is often more when it comes to swirling; a few gentle strokes can produce the most stunning effects.
- Once swirled to your liking, cover the pie loosely with plastic wrap (or a pie cover if you have one), ensuring the plastic wrap doesn’t touch the beautiful swirl, and refrigerate for at least 4-6 hours, or preferably overnight, until the pie is completely set. Chilling is absolutely essential to allow the fillings to firm up properly, making the pie easy to slice and ensuring optimal texture and flavor development. This extended chilling time allows all the rich flavors to meld together into a harmonious and truly decadent experience. Patience is a virtue, and it will be amply rewarded here.
Serving and Enjoying Your Masterpiece
After hours of patient chilling, your Decadent Chocolate Peanut Butter Swirl Pie is ready to be unveiled and enjoyed. The anticipation builds as you retrieve it from the refrigerator, knowing that beneath its beautifully swirled surface lies a symphony of flavors and textures waiting to delight. This final section details how to best serve your pie, offering tips for clean slices and optional garnishes that elevate the presentation and add an extra layer of indulgence. This is where all your hard work pays off, culminating in a dessert that is not just a treat for the taste buds but also a feast for the eyes, leaving a lasting impression on everyone who enjoys a slice.
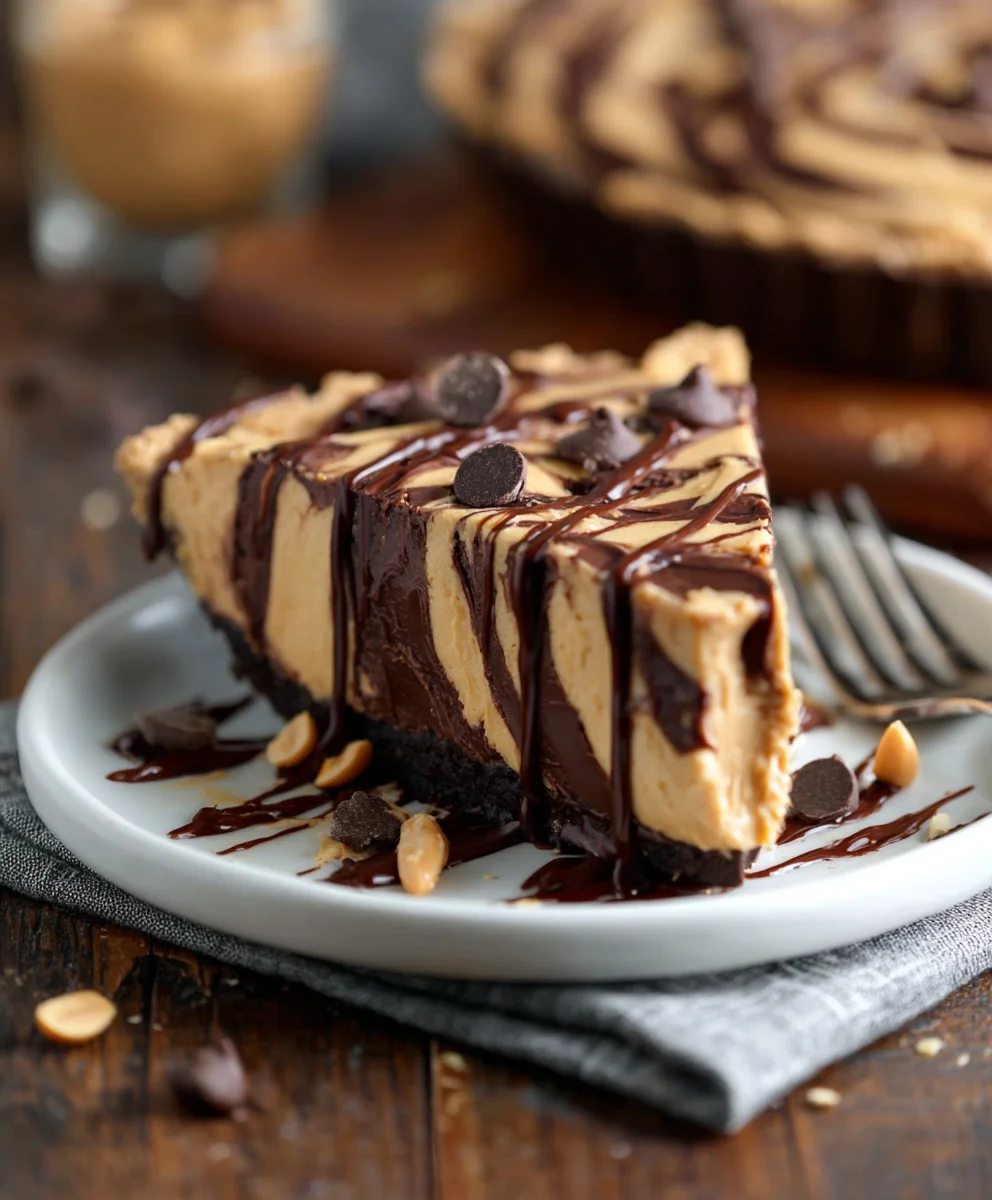
- When ready to serve, remove the pie from the refrigerator. For the cleanest, most impressive slices, dip a sharp knife (preferably a thin-bladed one) in hot water and wipe it clean between each cut. This technique prevents the fillings from sticking to the knife and creates smooth, defined edges for each slice, enhancing the visual appeal of your beautifully swirled pie. The contrast between the chocolate and peanut butter will be perfectly showcased.
- Optionally, garnish each slice with a sprinkle of chopped roasted peanuts for an added crunch and nutty flavor, which complements the peanut butter filling wonderfully. Alternatively, delicate chocolate shavings or curls can be added for an extra touch of elegance and visual appeal, reinforcing the chocolate element. A small dollop of extra freshly whipped cream on top of each slice can also be a lovely addition, adding another layer of creamy texture and freshness.
- Serve cold and savor every rich, creamy, and utterly decadent bite of your homemade Chocolate Peanut Butter Swirl Pie. This pie is best enjoyed within 3-4 days when stored properly covered in the refrigerator. The flavors tend to deepen over time, but the texture, especially of the no-bake crust, is best within the first few days. Prepare to be showered with compliments, as this pie is truly a showstopper!
Conclusion:
And there you have it, my friends! After whisking, swirling, and patiently waiting, you’ve arrived at the grand finale of what I truly believe is one of the most magnificent dessert experiences you can possibly create in your own kitchen. This isn’t just a pie; it’s a testament to the blissful harmony of two universally beloved flavors. I’m talking about that incredible moment when rich, velvety chocolate meets the creamy, nutty embrace of peanut butter, all coming together in a symphony of taste and texture that is utterly irresistible. I have poured my heart into perfecting this recipe, and I genuinely cannot wait for you to experience the sheer delight that comes from every single forkful of this spectacular treat.
Why is this a must-try, you ask? Well, beyond the obvious deliciousness, it’s about the joy it brings. Imagine the smiles when you present something so beautifully crafted, yet deceptively simple to assemble. The visual appeal alone, with those dramatic swirls of dark chocolate and golden peanut butter, is enough to capture attention, but it’s the taste that truly seals the deal. It’s rich without being overly heavy, sweet yet perfectly balanced, and boasts a creaminess that simply melts in your mouth. Whether you’re a seasoned baker or someone just starting their culinary adventure, this recipe is designed to deliver show-stopping results with approachable steps. It truly is the ultimate indulgence, a dessert that promises to satisfy even the most fervent sweet tooth and leave everyone asking for more. This
Decadent Chocolate Peanut Butter Swirl Pie
is more than just a recipe; it’s an invitation to create lasting memories around your table, a celebration of flavor that everyone will adore. It’s the kind of pie that makes ordinary moments feel extraordinary, elevating a simple weeknight dinner or transforming a casual gathering into a special event.
When it comes to serving, the beauty of this pie lies in its versatility. While it’s absolutely divine on its own, a dollop of freshly whipped cream can elevate it to new heights, adding a cloud-like contrast to its dense, creamy filling. For those who enjoy a bit of texture, a sprinkle of finely chopped roasted peanuts or miniature chocolate chips can add a delightful crunch. Or, for a truly opulent experience, consider drizzling a touch of warm fudge sauce or melted peanut butter over each slice just before serving. Think about pairing it with a strong cup of coffee or a cold glass of milk for the perfect after-dinner treat. And if you’re feeling a little adventurous, don’t hesitate to play with the topping! A sprinkle of flaky sea salt can actually enhance both the chocolate and peanut butter flavors, creating a gourmet twist that will surprise and delight. For a fun twist during holidays, you could even add a few festive sprinkles or themed candies on top. If you’re catering to different preferences, serving it alongside a scoop of vanilla bean ice cream or a scoop of chocolate ice cream allows guests to customize their dessert experience.
I truly hope you’ll give this incredible pie a whirl. There’s something uniquely satisfying about creating something so delicious from scratch, and I promise you, the effort is minimal compared to the immense reward. Once you’ve made it and seen the delight on the faces of your family and friends, you’ll understand exactly what I mean. Don’t be shy – dive in, embrace the process, and most importantly, savor every glorious bite. And please, I’d love to hear all about your experience! Did you add any special touches? What was your favorite part? Share your thoughts, your photos, and your triumphs with me. Tag me on social media, leave a comment below, or just send a message. Your feedback and stories inspire me endlessly, and I can’t wait to see how this wonderful pie becomes a new favorite in your home. Happy baking, my friends!
Frequently Asked Questions
Can I make the Decadent Chocolate Peanut Butter Swirl Pie ahead of time?
Absolutely! This pie is actually fantastic when made a day in advance. Preparing it ahead of time allows the flavors to meld beautifully and ensures the filling is perfectly set for easy slicing. Just cover it loosely with plastic wrap and refrigerate it overnight.
How long does this pie last in the refrigerator?
When properly stored in an airtight container or tightly covered with plastic wrap, your Decadent Chocolate Peanut Butter Swirl Pie will stay fresh and delicious in the refrigerator for up to 3-4 days. The texture might change slightly after a few days, but the flavor will remain wonderful.
Can I freeze the Decadent Chocolate Peanut Butter Swirl Pie?
Yes, you can! This pie freezes exceptionally well. For best results, allow the pie to set completely in the refrigerator. Then, wrap it tightly in a double layer of plastic wrap, followed by a layer of aluminum foil. It can be frozen for up to 1-2 months. Thaw it overnight in the refrigerator before serving.
What kind of peanut butter should I use for this recipe?
For the best creamy texture and consistent results, I recommend using a conventional creamy peanut butter (like Jif or Skippy) rather than natural, oil-separated peanut butter. The conventional brands tend to hold their structure better in the filling and provide that classic, comforting flavor profile.
Can I make this pie gluten-free?
Yes, you can easily adapt this recipe to be gluten-free! Simply substitute the regular pie crust with your favorite store-bought or homemade gluten-free pie crust. All the filling ingredients are naturally gluten-free, so no other changes are needed.
My pie filling didn’t set. What went wrong?
The most common reasons for a pie filling not setting are usually related to not chilling it long enough, or incorrect measurements of the setting agents (like cream cheese or powdered sugar). Ensure you give the pie at least 4-6 hours (or preferably overnight) in the refrigerator to fully firm up. Also, double-check your ingredient measurements to ensure accuracy!
What chocolate is best for the swirl?
I find that good quality semi-sweet or bittersweet chocolate chips or chopped chocolate bars work best for the chocolate swirl. They melt smoothly and provide a rich contrast to the peanut butter. Avoid using milk chocolate as it can be too sweet and not provide enough contrast.
Decadent Chocolate Peanut Butter Swirl Pie Recipe
A truly decadent no-bake chocolate peanut butter swirl pie featuring a rich chocolate cookie crust, creamy peanut butter filling, and a luscious chocolate ganache swirl.
Ingredients
-
1 ½ cups chocolate sandwich cookies, crushed
-
¼ cup unsalted butter, melted
-
1 tbsp granulated sugar (optional)
-
8 oz full-fat cream cheese, softened
-
1 cup creamy peanut butter
-
¾ cup powdered sugar, sifted
-
1 tsp vanilla extract
-
¼ tsp fine sea salt
-
1 ½ cups cold heavy cream
-
10 oz semi-sweet chocolate, chopped
-
1 cup heavy cream
-
2 tbsp unsalted butter
-
½ tsp vanilla extract
-
Pinch of fine sea salt
-
¼ cup chopped roasted peanuts (optional)
-
Chocolate shavings/curls (optional)
-
Whipped cream (optional)
Instructions
-
Step 1
Finely crush chocolate sandwich cookies. In a bowl, combine crumbs with melted butter and optional sugar. Press firmly and evenly into a 9-inch pie plate. Chill for at least 30 minutes. -
Step 2
Beat softened cream cheese until smooth. Add peanut butter, sifted powdered sugar, 1 tsp vanilla extract, and ¼ tsp sea salt; beat until creamy. In a separate cold bowl, whip 1 ½ cups cold heavy cream to stiff peaks. Gently fold whipped cream into the peanut butter mixture in two additions until light and airy. Set aside. -
Step 3
Place chopped semi-sweet chocolate in a heatproof bowl. In a small saucepan, heat 1 cup heavy cream until it just simmers. Pour hot cream over chocolate; let sit undisturbed for 5 minutes. Whisk gently from the center outwards until smooth and glossy. Whisk in 2 tbsp unsalted butter, ½ tsp vanilla extract, and pinch of sea salt until incorporated. Let cool slightly until pourable but not hot. -
Step 4
Retrieve the chilled crust. Spread about two-thirds of the peanut butter filling evenly into the crust, reserving the remaining one-third. Pour about two-thirds of the cooled chocolate ganache over the peanut butter layer, reserving the remaining one-third. Dollop the reserved peanut butter filling and chocolate ganache alternately over the top. Using a skewer or knife, gently swirl the dollops to create a marbled pattern. Cover loosely and refrigerate for at least 4-6 hours, or preferably overnight, until completely set. -
Step 5
Remove the pie from the refrigerator. For clean slices, dip a sharp knife in hot water and wipe clean between each cut. Optionally, garnish with chopped roasted peanuts, chocolate shavings, or a dollop of whipped cream. Serve cold and enjoy.
Important Information
Nutrition Facts (Per Serving)
It is important to consider this information as approximate and not to use it as definitive health advice.
Allergy Information
Please check ingredients for potential allergens and consult a health professional if in doubt.


Leave a Comment