
Mini Halloween Pizzas are quite possibly the most delightful and creative way to celebrate the spooky season! I’ve always cherished the magic of Halloween, not just for the costumes and candy, but for the opportunity to transform everyday delights into something extraordinary. This year, I invite you to join me in crafting these incredibly fun and festive bites that are sure to be a ghoulishly good hit at any gathering.
A Cherished Halloween Tradition
While pizza itself boasts a rich history dating back centuries, the concept of themed Halloween treats has become a cherished modern tradition, bringing joy and a touch of whimsical horror to our tables. People absolutely adore this dish because it’s not only wonderfully customizable – allowing for endless creative toppings and spooky designs – but also incredibly convenient to prepare, making it perfect for busy hosts or a fun family activity. The taste of warm, cheesy pizza combined with the festive spirit of Halloween truly makes these Mini Halloween Pizzas an irresistible treat for all ages.

Ingredients:
-
For the Pizza Dough:
- 1 cup warm water (105-115°F or 40-46°C)
- 2 ¼ teaspoons active dry yeast (one standard packet)
- 1 teaspoon granulated sugar
- 2 ½ cups all-purpose flour, plus more for dusting
- 1 teaspoon salt
- 2 tablespoons olive oil, plus extra for oiling the bowl
-
For the Sauce:
- ½ cup pizza sauce or marinara sauce (your favorite brand works wonderfully!)
-
For the Cheese:
- 1 ½ cups shredded mozzarella cheese
- 6-8 slices provolone or white cheddar cheese (for ghost shapes)
- 1 block low-moisture, part-skim mozzarella cheese (for mummy strips and ghost shapes, if not using sliced cheese)
-
For the Spooky Toppings:
- ½ cup sliced black olives (for spider bodies and mummy eyes)
- ¼ cup chopped green bell pepper (optional, for monster-like features)
- ¼ cup sliced pepperoni or mini pepperonis (for general pizza fun or monster mouths)
- 2-3 black olives, whole (for cutting tiny pupils for ghosts)
Making the Pizza Dough from Scratch
There’s something incredibly satisfying about making your own pizza dough from scratch, and it’s the perfect foundation for our fun Mini Halloween Pizzas. Don’t be intimidated; it’s easier than you think and tastes so much better!
-
Activate the Yeast:
In a large mixing bowl, gently pour in your 1 cup of warm water. It’s crucial that the water is between 105-115°F (40-46°C). If it’s too hot, it’ll kill the yeast; too cold, and the yeast won’t activate. I usually test it with a clean finger – it should feel comfortably warm, like a baby’s bath. Sprinkle the 2 ¼ teaspoons of active dry yeast and 1 teaspoon of granulated sugar over the water. The sugar acts as food for the yeast, helping it to wake up. Give it a gentle stir and then let it sit undisturbed for about 5-10 minutes. You’ll know your yeast is alive and well when a creamy, foamy layer forms on the surface. If it doesn’t foam, your yeast might be expired or the water temperature was off, and it’s best to start again.
-
Combine Wet and Dry Ingredients:
Once your yeast is frothy, add 2 tablespoons of olive oil to the mixture. In a separate bowl, whisk together the 2 ½ cups of all-purpose flour and 1 teaspoon of salt. Slowly add about half of the flour mixture to the wet ingredients, stirring with a wooden spoon until just combined. Then, gradually add the remaining flour, mixing until a shaggy dough forms. At this point, the dough might look a bit rough and sticky, which is perfectly normal.
-
Knead the Dough to Perfection:
Turn the dough out onto a lightly floured surface. Now comes the kneading! Kneading is essential because it develops the gluten in the flour, which gives the pizza crust its characteristic chewiness and elasticity. Begin to knead the dough by pushing it away from you with the heels of your hands, folding it back over, rotating it a quarter turn, and repeating. It might feel a bit sticky at first, but resist the urge to add too much extra flour, as this can make your crust tough. If it’s truly sticking, add just a tiny sprinkle of flour to your hands or the surface. Continue kneading for 8-10 minutes. You’ll notice a significant transformation: the dough will become smooth, elastic, and no longer sticky. It should spring back slowly when you gently poke it with a finger. This step is a little arm workout, but so worth it for amazing Mini Halloween Pizzas!
-
First Rise (Proofing):
Lightly grease a clean large bowl with a little olive oil. Place your beautifully kneaded dough ball into the bowl, turning it once to coat all sides with oil. This prevents it from drying out. Cover the bowl tightly with plastic wrap or a clean kitchen towel. Place the bowl in a warm, draft-free spot in your kitchen. I often use my oven (turned off, of course!) or a sunny spot on the counter. Let the dough rise for 1 to 1 ½ hours, or until it has doubled in size. This process, known as proofing, is where the yeast does its magic, creating air pockets that will give your crust a light and airy texture. When it’s ready, gently punch the dough down to release the air. Now it’s ready for shaping!
Preparing Your Spooky Toppings and Sauce
While your pizza dough is taking its leisurely first rise, it’s the perfect time to get all your ghoulishly good toppings ready. Prepping everything beforehand, a cooking technique known as “mise en place,” makes the assembly of your Mini Halloween Pizzas a breeze and much more enjoyable.
-
Get Your Sauce Ready:
Open your favorite pizza sauce or marinara. I like to pour it into a small bowl, ready for easy spreading. If you want to add a little extra flavor, you can stir in a pinch of dried oregano or basil, but it’s totally optional.
-
Shred the Mozzarella:
Have your 1 ½ cups of shredded mozzarella cheese ready. If you’re using a block of mozzarella and shredding it yourself, it often melts better than pre-shredded cheese because it lacks anti-caking agents. Either way, make sure it’s in an easily accessible bowl.
-
Craft Your Mummy Strips:
For the mummy pizzas, we’ll need strips of cheese. If you have provolone or white cheddar slices, you can simply cut them into thin strips, about ¼ to ½ inch wide. If you’re using a block of low-moisture mozzarella, you can either slice it very thinly with a sharp knife or use a vegetable peeler to create thin ribbons. These strips will create the mummy bandages, so aim for various lengths and widths to give that authentic wrapped look.
-
Prepare Ghostly Shapes:
For our adorable ghost pizzas, you’ll need some white cheese. Provolone, white cheddar, or even the block mozzarella work perfectly. Using a small cookie cutter (a simple ghost shape is ideal if you have one) or a sharp knife, carefully cut out ghost shapes from your cheese slices or thin block slices. You’ll want one ghost per mini pizza. Don’t worry if they aren’t perfect; handmade ghosts are charming!
-
Slice and Dice the Olives:
Black olives are our secret weapon for spooky eyes and creepy crawly spiders.
- For mummy eyes: Slice your black olives into thin rounds. You’ll need two slices per mummy pizza.
- For spider bodies: Cut some black olives in half lengthwise. These halves will form the spider bodies.
- For spider legs: Take remaining black olives and slice them into very thin strips. These strips will be the spider’s eight spindly legs.
- For ghost eyes: Take a whole black olive and very carefully cut out tiny, tiny pieces for the ghost’s eyes. A small round tip of a knife or even a piping tip can help with this. You’re aiming for little pupils that will stand out against the white cheese.
-
Other Toppings:
If you’re using pepperoni for general pizzas or monster mouths, have them ready. If you decide to add green bell pepper for extra monster features, chop it into small, manageable pieces. The key is to have everything organized and within reach before you start assembling. This way, the creative process flows smoothly for your Mini Halloween Pizzas.
Assembling Your Delightful Mini Halloween Pizzas
This is where the real fun begins! Transforming your simple ingredients into edible Halloween art is such a joy, especially with these Mini Halloween Pizzas. Get ready to unleash your inner artist!
-
Preheat and Prep Baking Sheets:
First things first, preheat your oven to 425°F (220°C). While it’s heating, line two large baking sheets with parchment paper or lightly grease them. This will prevent sticking and make cleanup much easier. If you only have one baking sheet, you’ll bake in batches.
-
Divide and Shape the Dough:
Gently punch down your risen pizza dough to release the air. Turn it out onto a lightly floured surface. Divide the dough into 12-16 equal pieces, depending on how large you want your mini pizzas to be. I usually aim for golf-ball sized pieces for truly “mini” pizzas. Roll each piece into a small ball, then gently flatten it into a circular shape, about 4-5 inches in diameter. You can use a rolling pin or just the palms of your hands and fingertips to press them out. Place these mini dough circles onto your prepared baking sheets, leaving a little space between each one.
-
Sauce the Bases:
Spoon about 1 tablespoon of pizza sauce onto the center of each mini dough circle. Use the back of the spoon to spread the sauce evenly, leaving a small border around the edge for the crust. Don’t go too heavy on the sauce, or your pizzas might become soggy.
-
Create Your Spooky Designs:
Now for the creative part! We’re going to make a variety of designs for our Mini Halloween Pizzas. Here’s how:
For Mummy Pizzas:
- Sprinkle a thin layer of shredded mozzarella over the sauce on a few of your mini pizza bases.
- Take your cheese strips (provolone, white cheddar, or mozzarella) and lay them across the pizza, overlapping slightly, to resemble mummy bandages. Leave a small gap near the top for the “eyes.”
- Place two sliced black olives in the gap to create the mummy’s eyes. You can even use smaller pieces of bell pepper under the olives if you want to give them a slightly bloodshot look (optional, but fun!).
- The effect is truly charming and spooky!
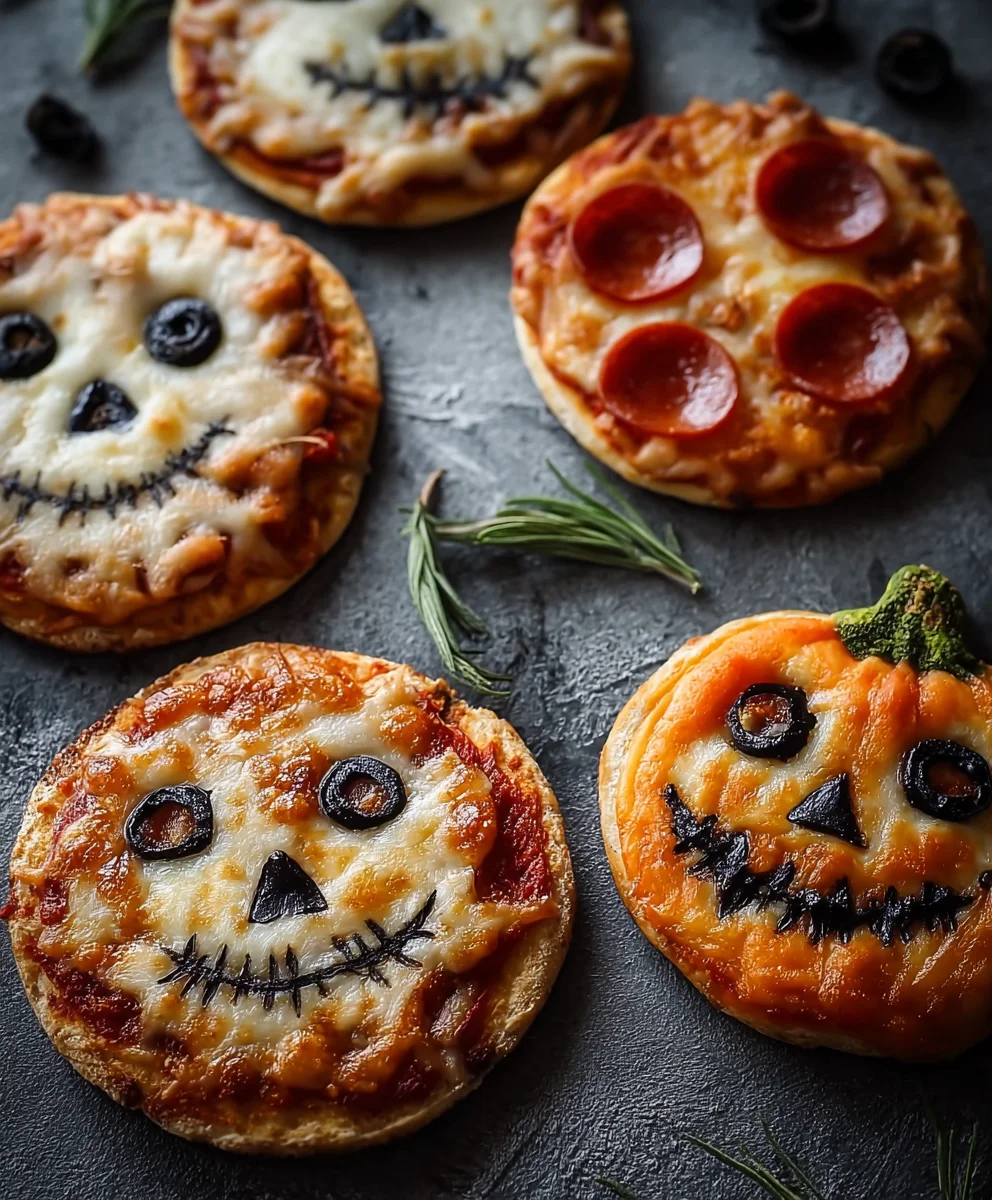
For Spider Pizzas:
- Cover the entire sauced base of another set of mini pizzas with shredded mozzarella cheese.
- Place one black olive half in the center of each pizza for the spider’s body.
- Arrange eight thin black olive strips around the body, four on each side, to form the spider’s legs. Try to curve them slightly to make them look like they’re crawling.
- These creepy crawlies are always a hit!
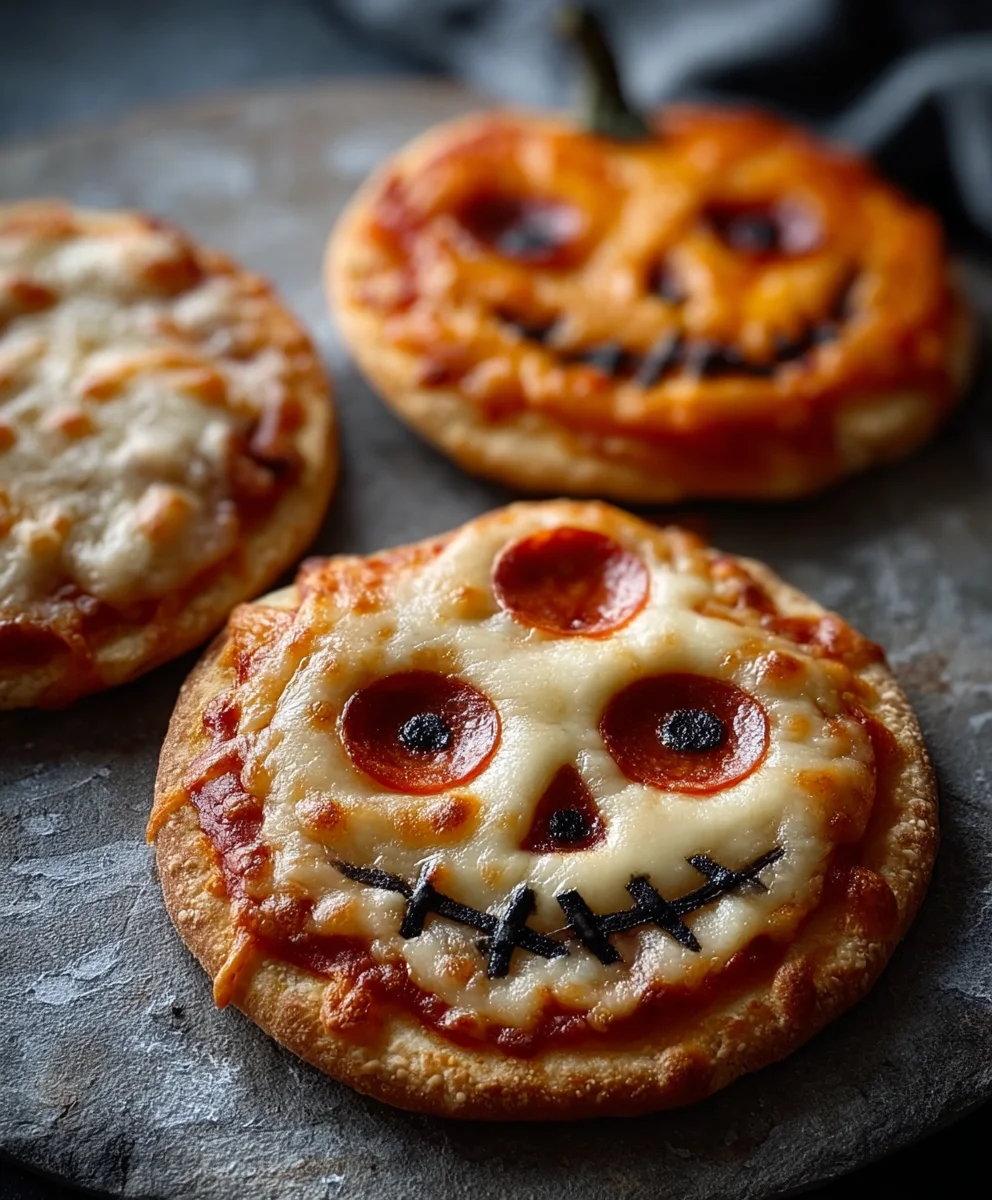
For Ghost Pizzas:
- Spread a layer of shredded mozzarella over the sauce on the remaining mini pizza bases.
- Carefully place one of your pre-cut ghost shapes (provolone, white cheddar, or mozzarella) on top of the shredded cheese layer.
- Gently press two tiny black olive pieces onto the ghost for its eyes. You can also add a tiny oval piece for a mouth if you like a screaming ghost!
- These friendly specters will bring smiles to everyone’s faces!
Feel free to mix and match or come up with your own monster designs using any of your prepared toppings! Some mini pepperonis can even be arranged to look like a monster’s mouth or extra eyes.
Baking Your Mini Halloween Pizzas to Perfection
With all your creative masterpieces assembled, it’s time to bake them until they are golden, bubbly, and irresistible. Baking your Mini Halloween Pizzas properly ensures a delicious, crispy crust and perfectly melted cheese.
-
Into the Hot Oven They Go:
Carefully transfer your baking sheets into the preheated 425°F (220°C) oven. If you’re baking two sheets at once, place one on the upper rack and one on the lower rack. This ensures even cooking. Make sure to leave enough space around the sheets for air circulation.
-
Bake Until Golden and Bubbly:
Bake for 10-15 minutes. The exact baking time can vary depending on your oven and how thin your crusts are. Keep a close eye on them! You’ll know they’re ready when the crusts are beautifully golden brown, the cheese is completely melted and bubbly, and perhaps even slightly browned at the edges. For two baking sheets, you might need to rotate them halfway through baking (swap racks and turn the sheets around) to ensure even cooking.
-
Cool Slightly Before Serving:
Once baked to perfection, carefully remove the baking sheets from the oven. The Mini Halloween Pizzas will be very hot! Let them cool on the baking sheets for about 3-5 minutes before transferring them to a wire rack. This brief cooling period allows the cheese to set slightly, preventing it from sliding off, and makes them easier to handle. Plus, it saves you from burning your mouth in excitement!
-
Serve and Enjoy Your Spooky Creations:
Serve your warm, delicious Mini Halloween Pizzas immediately! They are fantastic as an appetizer for a party, a fun snack, or even a light meal. Watching friends and family pick out their favorite spooky design is half the fun. These are truly a crowd-pleaser and a festive addition to any Halloween celebration!
Tips for the Best Mini Halloween Pizzas
To ensure your Mini Halloween Pizzas are always a howling success, here are a few extra tips and tricks I’ve picked up along the way. These little nuggets of wisdom can make a big difference in both your cooking experience and the final delicious outcome!
-
Don’t Overload with Toppings:
It’s tempting to pile on lots of cheese and toppings, but for mini pizzas, less is often more. Too many toppings can make the crust soggy, prevent even cooking, and obscure your adorable Halloween designs. A light hand will yield a better-cooked and more aesthetically pleasing pizza.
-
Experiment with Flour:
While all-purpose flour works perfectly, you can experiment with bread flour for a chewier crust, thanks to its higher protein content. Or, for a slightly healthier and nuttier flavor, try substituting a small portion (around ¼ cup) of whole wheat flour. Just remember that whole wheat flour absorbs more liquid, so you might need a tiny splash more water.
-
Make-Ahead Dough Option:
If you’re planning a Halloween party and want to get a head start, you can prepare the pizza dough a day in advance. After the first rise, punch down the dough, form it into a ball, and place it in a lightly oiled bowl. Cover tightly with plastic wrap and refrigerate overnight. On the day of, take the dough out about 30-60 minutes before you plan to use it to allow it to come to room temperature slightly, then proceed with shaping and assembling your Mini Halloween Pizzas. This is a fantastic time-saver!
-
Crispy Crust Secret:
For an extra-crispy bottom crust, especially if you love a really firm base, preheat your baking sheet or a pizza stone in the oven before placing the pizzas on it. Just be extremely careful when transferring the pizzas onto the hot surface. Another trick is to bake the pizzas directly on a hot pizza stone or a preheated steel. This direct heat contact creates a beautifully crunchy crust.
-
Storage and Reheating:
If you happen to have any leftover Mini Halloween Pizzas (a rare occurrence in my house!), they can be stored in an airtight container in the refrigerator for up to 3 days. To reheat, I recommend using a toaster oven or a regular oven at 350°F (175°C) for about 5-8 minutes, or until heated through and the crust has crisped up again. Microwaving them can make the crust soft, so avoid it if you prefer crispness.
-
Get the Kids Involved:
Making Mini Halloween Pizzas is an absolutely wonderful activity to do with children. They can help spread the sauce, sprinkle the cheese, and, most excitingly, arrange the spooky toppings! It’s a fantastic way to encourage creativity in the kitchen and make lasting family memories. Just be sure to supervise with sharp objects and hot ovens.
-
Vary Your Designs:
Don’t limit yourself to just mummies, spiders, and ghosts! Get creative with other Halloween themes. You could use finely chopped red bell pepper and black olives to create a “jack-o’-lantern” face, or use small pieces of pepperoni to make tiny bat shapes. The possibilities are endless when you’re crafting these festive Mini Halloween Pizzas!
Conclusion:
Well, my friends, we’ve reached the exciting end of our culinary journey for these fantastic little bites! I truly hope you’re feeling as inspired as I am about whipping up a batch of these for your next spooky celebration or just a fun family meal. These aren’t just any pizzas; they are a gateway to creative kitchen adventures, promising smiles and satisfied tummies.
Why These Mini Pizzas Are a Must-Try:
Let me tell you, there’s a reason why I’m so enthusiastic about this particular recipe. First off, the sheer simplicity is a game-changer. We’re talking about a dish that looks incredibly impressive and festive, yet requires minimal fuss and effort. It’s the perfect project for a busy weeknight when you still want to bring some joy to the dinner table, or for when you’re hosting a gathering and need an appetizer that practically makes itself.
Secondly, the interactive element of these Mini Halloween Pizzas is what truly sets them apart. Imagine gathering your loved ones around a table laden with various toppings – vibrant red bell peppers, glistening black olives, creamy mozzarella, and maybe some spooky sausage “mummies.” Everyone gets to be their own culinary artist, designing their perfect monster face or ghost shape. It transforms meal prep from a chore into a memorable bonding experience. This is especially fantastic if you have kids; they absolutely adore the chance to play with their food in such a constructive and delicious way. It’s not just food; it’s an activity, a craft, and a meal all rolled into one delightful package. The customizable nature means that everyone, no matter how picky, can find something they love, making them universally appealing. Beyond the fun, the taste is simply incredible – that perfect crispy crust, tangy sauce, and gooey cheese combination is always a winner, and in these smaller, fun-shaped formats, they become even more irresistible. They’re a guaranteed crowd-pleaser, disappearing almost as quickly as you can make them!
Expand Your Spooky Culinary Canvas: Serving Suggestions and Creative Variations:
Now that you’re convinced these are a must-make, let’s talk about how to elevate your experience even further. While these mini pizzas are absolute stars on their own, pairing them strategically can turn a simple snack into a full-fledged feast. For a casual dinner, consider serving them alongside a crisp green salad with a light vinaigrette – the fresh greens offer a wonderful counterpoint to the rich, cheesy goodness. If you’re looking for a heartier meal, a warm bowl of tomato soup or even a creamy pumpkin bisque would make for an excellent accompaniment, perfect for dipping those cheesy crusts. For a party spread, they mingle beautifully with other appetizers like a vibrant veggie platter, some hummus and pita, or even a batch of homemade mac and cheese bites.
But don’t stop there! The beauty of these mini pizzas lies in their incredible versatility. Feel free to get adventurous with your toppings. For those who love a bit of heat, a sprinkle of red pepper flakes or some thinly sliced jalapeños would add a delightful kick. Vegetarian? Load them up with finely chopped mushrooms, spinach, or even some artichoke hearts. If you’re catering to different dietary needs, gluten-free crusts are readily available and work wonderfully, and plant-based cheeses can easily replace traditional mozzarella for your vegan guests. You could even explore different protein options beyond pepperoni, like shredded chicken, crumbled bacon, or sweet Italian sausage.
Thinking beyond just Halloween? This concept is easily adaptable for any holiday or theme! Imagine heart-shaped mini pizzas for Valentine’s Day, star-shaped ones for the Fourth of July, or even tiny Christmas tree pizzas during the festive season. You can also experiment with different sauces – a pesto base instead of tomato for a fresh, herbaceous flavor, or even a white garlic sauce for a gourmet touch. The crust itself can be varied; use English muffins, pita bread, or even large tortillas cut into shapes for different textures and bases. Don’t be afraid to think outside the box; your kitchen is your playground, and these little pizzas are the perfect canvas for your culinary imagination!
Your Turn to Create, Share, and Inspire!
So, what are you waiting for? I wholeheartedly encourage you to roll up your sleeves, gather your ingredients, and dive into the wonderful world of making these delightful treats. Whether you’re a seasoned chef or a kitchen novice, this recipe is designed to be approachable, fun, and incredibly rewarding. There’s a special kind of satisfaction that comes from creating something delicious with your own hands, especially when it brings joy to others.
I absolutely can’t wait to see your spooky creations! Once you’ve made them, please, please share your experience. What fun shapes did you come up with? Did your family have a favorite topping combination? Did they disappear in minutes at your party? I love hearing about your kitchen triumphs and seeing how you put your unique spin on my recipes. Your stories and photos not only make my day but also inspire countless other home cooks who are looking for fresh ideas and encouragement. So, go forth, bake some magic, and let’s celebrate the joy of good food and great company together! Happy cooking, everyone!
Spooky Mini Halloween Pizzas: Fun & Easy Kids’ Treat!
Craft these incredibly fun and festive mini pizzas for a ghoulishly good hit at any Halloween gathering. Customizable and convenient, they combine the taste of warm, cheesy pizza with the festive spirit of Halloween for an irresistible treat.
Ingredients
-
8 mini pizza crusts (store-bought or homemade)
-
1 cup pizza sauce
-
2 cups shredded mozzarella cheese
-
8 slices mozzarella cheese, for ghost shapes
-
12 slices beef pepperoni
-
1 small black olive, sliced for eyes
-
1 orange bell pepper, cut into pumpkin shapes
Instructions
-
Step 1
{‘@type’: ‘HowToStep’, ‘name’: ‘Prepare Pizza Dough (if homemade)’, ‘text’: ‘In a large bowl, activate yeast: combine 1 cup warm water (105-115°F), 2 ¼ tsp active dry yeast, and 1 tsp sugar. Let sit 5-10 minutes until foamy. Stir in 2 tbsp olive oil. In a separate bowl, whisk 2 ½ cups all-purpose flour and 1 tsp salt. Gradually add flour to wet ingredients, mixing until a shaggy dough forms. Knead dough on a lightly floured surface for 8-10 minutes until smooth and elastic. Place in a lightly oiled bowl, cover, and let rise in a warm, draft-free spot for 1 to 1 ½ hours, or until doubled in size. Punch down dough.’, ‘itemListElement’: [{‘@type’: ‘HowToSupply’, ‘name’: ‘1 cup warm water (105-115°F or 40-46°C)’}, {‘@type’: ‘HowToSupply’, ‘name’: ‘2 ¼ teaspoons active dry yeast (one standard packet)’}, {‘@type’: ‘HowToSupply’, ‘name’: ‘1 teaspoon granulated sugar’}, {‘@type’: ‘HowToSupply’, ‘name’: ‘2 ½ cups all-purpose flour, plus more for dusting’}, {‘@type’: ‘HowToSupply’, ‘name’: ‘1 teaspoon salt’}, {‘@type’: ‘HowToSupply’, ‘name’: ‘2 tablespoons olive oil, plus extra for oiling the bowl’}]} -
Step 2
Preheat oven to 425°F (220°C) and line baking sheets with parchment paper. Have 1 cup pizza sauce and 2 cups shredded mozzarella ready. Cut 8 slices of mozzarella cheese into ghost shapes; use tiny pieces of black olive for their eyes. Slice the orange bell pepper into small pumpkin shapes. Have 12 slices of beef pepperoni ready. Prepare 1 small black olive, sliced for eyes (for general pizza use or additional designs if desired). -
Step 3
If using homemade dough, divide into 8-16 pieces and flatten into 4-5 inch circles. Place mini crusts on prepared baking sheets. Spoon about 1 tablespoon of pizza sauce onto each crust, spreading evenly and leaving a small border. Sprinkle a thin layer of shredded mozzarella over the sauce on each mini pizza. Create spooky designs: for Ghost Pizzas, place a mozzarella ghost shape on top and add tiny black olive pieces for eyes. For Pumpkin/Pepperoni Pizzas, arrange beef pepperoni and pumpkin bell pepper shapes as desired. You can also mix and match toppings for various monster designs. -
Step 4
Carefully transfer baking sheets to the preheated oven. Bake for 10-15 minutes, or until crusts are golden brown and cheese is melted and bubbly. Remove from oven and let cool on baking sheets for 3-5 minutes before transferring to a wire rack. Serve your warm, delightful Mini Halloween Pizzas immediately and enjoy!
Important Information
Nutrition Facts (Per Serving)
It is important to consider this information as approximate and not to use it as definitive health advice.
Allergy Information
Please check ingredients for potential allergens and consult a health professional if in doubt.

Leave a Comment