
Pumpkin Pie is more than just a dessert; it’s a slice of tradition, a warm hug on a crisp autumn day, and for many, the undeniable centerpiece of holiday gatherings. I truly believe there’s nothing quite like the comforting aroma of a freshly baked pie wafting from the oven, instantly transporting you to cherished memories. This quintessential American dessert boasts a rich history, deeply rooted in harvest celebrations and particularly synonymous with Thanksgiving.
For centuries, pumpkin has been a staple, but it was its transformation into the velvety smooth, perfectly spiced filling nestled within a golden, flaky crust that cemented its legendary status.
People adore this dish for its exquisite balance of earthy pumpkin and aromatic spices like cinnamon, nutmeg, ginger, and cloves, all culminating in a creamy texture that melts in your mouth.
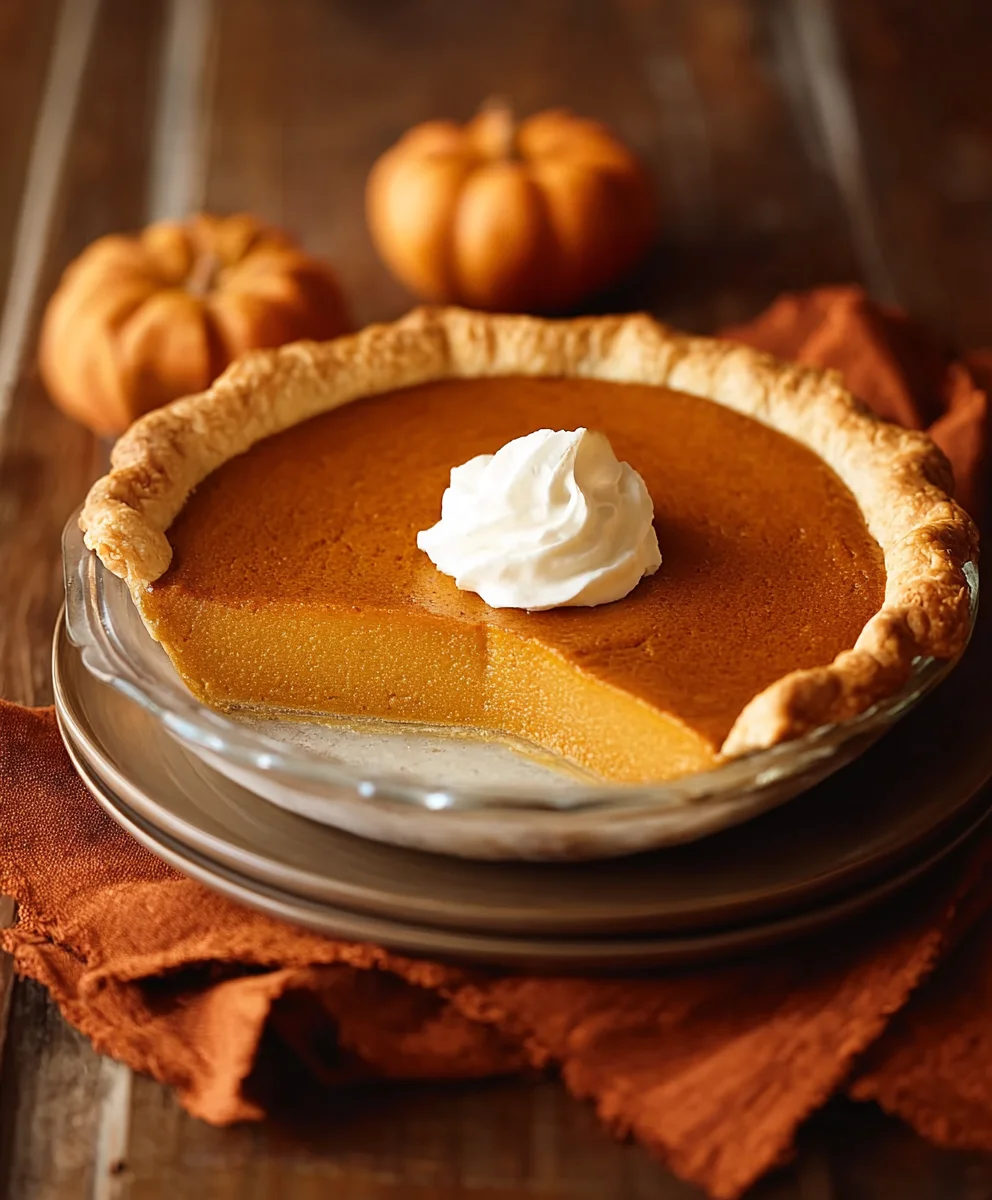
Whether enjoyed with a generous dollop of whipped cream or simply on its own, a well-made Pumpkin Pie is an irresistible treat that brings smiles and satisfaction to every table. Let’s delve into creating your very own perfect Pumpkin Pie, a delightful experience from start to finish.

Ingredients:
- For the Flaky Pie Crust (one 9-inch crust):
- 1 ¼ cups (150g) all-purpose flour, plus more for dusting
- ½ teaspoon fine sea salt
- ½ cup (113g) unsalted butter, very cold and cut into ½-inch cubes
- ¼ cup (60ml) ice water, plus 1-2 tablespoons more if needed
- For the Irresistible Pumpkin Pie Filling:
- 1 (15-ounce) can (about 425g) pure pumpkin puree (not pumpkin pie filling)
- 1 (14-ounce) can (about 396g) sweetened condensed milk
- 2 large eggs, lightly beaten
- 1 teaspoon ground cinnamon
- ½ teaspoon ground ginger
- ¼ teaspoon ground nutmeg
- ⅛ teaspoon ground cloves (or a pinch more for extra warmth!)
- ½ teaspoon fine sea salt
- Optional: A pinch of freshly grated orange zest for a bright, subtle lift
Preparing Your Homemade Flaky Pie Crust: The Foundation of a Perfect Pumpkin Pie
Creating your own pie crust from scratch is a truly rewarding experience, and it sets the stage for the most incredible Pumpkin Pie you’ll ever taste. Don’t be intimidated; with a few simple steps and the right technique, you’ll have a beautifully flaky crust that will impress everyone.
- Combine Dry Ingredients: In a large mixing bowl, I like to whisk together the 1 ¼ cups of all-purpose flour and ½ teaspoon of fine sea salt. This ensures that the salt is evenly distributed throughout the flour, preventing any overly salty pockets. You want a consistent flavor profile from the very first bite of your Pumpkin Pie crust.
- Incorporate the Cold Butter: This is arguably the most crucial step for a flaky crust. Add your ½ cup (113g) of very cold, cubed unsalted butter to the flour mixture. Using a pastry blender, two forks, or even your fingertips (working quickly so the butter doesn’t warm up), cut the butter into the flour until the mixture resembles coarse crumbs with some pea-sized pieces of butter remaining. Do not overmix! Those little pieces of butter are what create the steam in the oven, leading to those wonderful flaky layers we all adore. I often tell people, the colder the butter, the flakier the crust, so if your kitchen is warm, you might even pop your bowl into the freezer for a few minutes before adding the water.
- Add Ice Water Gradually: Now, for the liquid. Slowly drizzle in ¼ cup (60ml) of ice water, one tablespoon at a time, mixing gently with a fork or your hands until the dough just comes together. The key here is to add just enough water for the dough to form a ball, but not so much that it becomes sticky or tough. You might need 1-2 additional tablespoons, depending on the humidity and your flour. I stop adding water as soon as I can gently press a handful of the mixture together and it holds its shape. Overworking the dough develops gluten, which can make your crust tough. We’re aiming for tenderness here.
- Chill the Dough: Turn the dough out onto a lightly floured surface and gently gather it into a cohesive disk. Wrap it tightly in plastic wrap and refrigerate for at least 30 minutes, or even better, an hour. This chilling period is vital for several reasons: it allows the gluten to relax, making the dough easier to roll out, and it re-chills the butter, which again contributes to flakiness. I sometimes prepare my crust dough the day before to save time and ensure maximum chill.
- Roll Out the Dough: On a lightly floured surface, roll out your chilled dough disk into a 12-inch circle, about ⅛-inch thick. Work from the center outwards, rotating the dough frequently to prevent sticking and to ensure an even thickness. If the dough starts to crack around the edges, don’t worry! You can gently press it back together.
- Transfer to Pie Plate: Carefully transfer the rolled-out dough to a 9-inch pie plate. The easiest way to do this is to gently roll the dough around your rolling pin, then unroll it over the pie plate. Or, you can carefully fold it in half, then in half again, and place the point in the center of the pie plate before unfolding. Gently ease the dough into the bottom and sides of the plate, making sure there are no air bubbles underneath.
- Trim and Crimp: Trim the edges of the dough, leaving about a ½-inch overhang. Fold this overhang under itself, creating a neat, sturdy edge. Then, crimp the edges decoratively using your fingers, or by pressing a fork around the rim. This not only looks beautiful but also helps to hold the filling in. For the best result, chill the prepared pie crust in the freezer for 15-20 minutes before blind baking. This helps prevent shrinkage.
- Blind Bake the Crust (Partial Bake): Preheat your oven to 400°F (200°C). Line the chilled pie crust with parchment paper or aluminum foil, making sure it goes up the sides. Fill the lined crust with pie weights, dried beans, or uncooked rice. Bake for 15 minutes. This step is called “blind baking” and it’s essential for preventing a soggy bottom on your Pumpkin Pie. The weights help keep the crust from bubbling up.
- Remove Weights and Continue Baking: Carefully remove the parchment paper/foil and pie weights. Return the crust to the oven and bake for another 5-7 minutes, or until the crust is lightly golden brown and appears dry. This second bake helps to dry out the bottom of the crust even further. Once done, remove it from the oven and let it cool slightly while you prepare the filling. Reduce oven temperature to 350°F (175°C).
Crafting the Irresistible Pumpkin Pie Filling: The Heart of Your Dessert
Now that your crust is prepped and waiting, let’s turn our attention to the star of the show: the rich, creamy, and wonderfully spiced Pumpkin Pie filling. This is where all those classic autumn flavors come together to create something truly magical.
- Gather Your Ingredients: Before you begin, make sure you have all your filling ingredients measured out and ready. This makes the mixing process smooth and enjoyable. I always use pure pumpkin puree, not pumpkin pie filling, as the latter already has spices and sweeteners added, which can throw off your carefully balanced recipe.
- Combine Pumpkin Puree and Sweetened Condensed Milk: In a large mixing bowl, combine the entire 15-ounce can of pure pumpkin puree with the 14-ounce can of sweetened condensed milk. The sweetened condensed milk is truly a secret weapon here; it provides a luxurious creaminess and all the sweetness you’ll need, eliminating the need for granulated sugar and resulting in a silkier texture that is just divine. I use a sturdy whisk to ensure these two main components are thoroughly combined and smooth.
- Whisk in the Eggs: Add the two lightly beaten large eggs to the pumpkin mixture. The eggs act as a binder and help the pie filling set as it bakes, giving it that perfect, firm-yet-creamy texture. Again, whisk well until the eggs are fully incorporated, ensuring no streaks of egg white remain visible. This step is crucial for the structural integrity of your finished Pumpkin Pie.
- Introduce the Warming Spices: This is my absolute favorite part! Add 1 teaspoon ground cinnamon, ½ teaspoon ground ginger, ¼ teaspoon ground nutmeg, and ⅛ teaspoon ground cloves to the mixture. These spices are the quintessential flavors of autumn and really make the Pumpkin Pie sing. For an extra layer of flavor complexity and freshness, I sometimes like to add a pinch of freshly grated orange zest – it brightens everything up without overpowering the classic pumpkin notes. Feel free to adjust the spice levels slightly to your preference; if you adore ginger, a little extra won’t hurt! I also add ½ teaspoon of fine sea salt here; salt is essential in baking to enhance and balance all the sweet and savory flavors, preventing the pie from tasting flat.
- Mix Until Smooth and Fragrant: Using your whisk, mix all the ingredients together thoroughly until the filling is completely smooth, uniform in color, and beautifully fragrant. Take a moment to appreciate the aroma filling your kitchen – it’s truly intoxicating! Make sure there are no lumps of pumpkin or unmixed spices. A well-mixed filling ensures an even texture and consistent flavor throughout your slice of Pumpkin Pie.
Assembling and Baking Your Beautiful Pumpkin Pie: The Grand Finale
With your perfectly blind-baked crust and the wonderfully spiced filling ready, it’s time to bring everything together and bake your masterpiece. The baking process is where the magic truly happens, transforming liquid filling into a set, luscious dessert.
- Pour the Filling: Carefully pour the prepared pumpkin pie filling into your partially baked pie crust. Make sure the filling is evenly distributed. I find it easiest to do this with the pie plate already on a baking sheet. This makes transferring it to and from the oven much safer and also catches any potential spills, keeping your oven clean. You want to fill the crust almost to the top, leaving just a tiny bit of space for the filling to rise ever so slightly as it bakes.
- Bake Your Pumpkin Pie: Carefully transfer the baking sheet with your pie to the preheated oven set at 350°F (175°C). Bake for 50-60 minutes. Baking time can vary depending on your oven, so it’s important to keep an eye on it.
- Check for Doneness: The Pumpkin Pie is done when the edges are set and slightly puffed, but the very center still has a slight jiggle to it when you gently shake the pie plate. If you insert a thin knife or skewer about an inch from the edge, it should come out clean. However, testing the center with a knife isn’t ideal as it can create a crack. I prefer the gentle jiggle test. Another good indicator is to use an instant-read thermometer; the center should register 175°F (79°C). The residual heat will continue to cook the center as it cools, setting it perfectly.
- Prevent Over-Browning (Optional but Recommended): If you notice the crust edges starting to brown too quickly during baking, you can loosely cover the edges with strips of aluminum foil or a pie shield. This protects the delicate crust from becoming too dark while the filling finishes cooking. I often do this around the 30-minute mark to ensure a golden-brown, not burnt, crust.
Cooling and Serving Your Perfect Pumpkin Pie: Patience is a Virtue
After all your hard work, the final, and perhaps most crucial, step is proper cooling. This ensures your Pumpkin Pie sets up beautifully and achieves that desirable smooth, creamy texture. Rushing this step can lead to a less-than-perfect slice.
- Cool Completely on a Wire Rack: Once your Pumpkin Pie is out of the oven, immediately transfer the baking sheet (with the pie still on it) to a wire cooling rack. Allow the pie to cool completely at room temperature for at least 2-3 hours, or even longer, up to 4 hours. Resist the urge to cut into it prematurely! During this cooling period, the internal structure of the pie continues to set and firm up. If you cut it too soon, the filling might still be too soft and could ooze out. As it cools, you’ll notice the center firming up and that slight jiggle disappearing.
- Refrigerate for Optimal Setting: For the absolute best results and a perfectly firm slice, I strongly recommend refrigerating your cooled Pumpkin Pie for at least another 2-4 hours, or ideally, overnight. Chilling the pie thoroughly helps the flavors meld and the texture achieve its ultimate creaminess. Plus, it makes slicing incredibly neat and easy. Simply cover the pie loosely with plastic wrap once it’s completely cool, avoiding direct contact with the filling.
- Serving Suggestions: When you’re ready to serve your magnificent Pumpkin Pie, take it out of the refrigerator about 15-20 minutes before slicing to allow it to temper slightly, enhancing its flavor and texture. Serve each generous slice on its own, or elevate the experience with a dollop of freshly whipped cream, a scoop of vanilla bean ice cream, or a sprinkle of toasted pecans. The cool, creamy pie paired with a fluffy, slightly sweetened whipped cream is a classic combination for a reason. I find a light dusting of cinnamon on top of the whipped cream adds a lovely visual and aromatic touch.
- Storage: Leftover Pumpkin Pie should be covered and stored in the refrigerator. It will keep well for 3-4 days, maintaining its delicious flavor and texture. While it’s tempting to leave it out, pumpkin pie, with its egg and dairy content, is best kept chilled to ensure food safety and quality. Enjoy every single delightful slice of your homemade masterpiece!
Conclusion:
And there you have it, my friends! We’ve reached the delicious culmination of our journey, and I genuinely hope you’re feeling inspired to roll up your sleeves and dive into making this extraordinary Pumpkin Pie. This isn’t just another dessert recipe; it’s an invitation to create something truly special, a heartwarming centerpiece that will undoubtedly earn you rave reviews and requests for seconds. What makes this recipe an absolute must-try, you ask? Well, it’s a harmonious blend of classic comfort and a perfectly calibrated depth of flavor that is surprisingly straightforward to achieve. We’ve meticulously balanced the warm, earthy notes of the pumpkin with just the right amount of aromatic spices, ensuring that every bite is a symphony of autumnal bliss, without any single spice overpowering the delicate sweetness of the squash. The result is an incredibly smooth, velvety filling nestled within a flaky, buttery crust – a textural masterpiece that simply melts in your mouth. I’ve poured my heart into perfecting this recipe, ensuring that even novice bakers can achieve a show-stopping dessert that tastes like it came straight from a gourmet bakery, but with all the love and pride of a homemade creation.
Beyond its undeniable deliciousness, this recipe is a must-try because it embodies the spirit of gathering and celebration. Imagine the aroma filling your kitchen, a comforting embrace that signals warmth, hospitality, and shared moments. It’s the kind of dessert that brings smiles to faces and sparks conversation around the table. I’m convinced that once you taste the rich, custardy perfection of this particular version, it will quickly become your new go-to for holidays, family dinners, or simply a cozy evening treat. The golden hue of the filling, the subtle sheen on its surface, and the crisp, golden-brown edges of the crust all contribute to a visual appeal that’s just as satisfying as the first spoonful. Trust me, the effort, which is surprisingly minimal, is incredibly rewarding. You’ll be so proud to present this magnificent dessert, knowing you’ve crafted something truly memorable.
Elevate Your Pumpkin Pie Experience: Serving Suggestions
Now, let’s talk about taking your magnificent creation to the next level with some delightful serving suggestions and exciting variations. While this Pumpkin Pie is absolutely stellar on its own, a few additions can truly transform the experience. The classic accompaniment, of course, is a generous dollop of freshly whipped cream. For an extra touch of indulgence, consider infusing your cream with a hint of maple syrup or a dash of vanilla bean paste before whipping it to soft peaks. Another fantastic option is a scoop of premium vanilla bean ice cream, allowing its cool creaminess to beautifully contrast with the pie’s warm, spiced filling. If you’re feeling adventurous, a scoop of cinnamon, pecan, or even a salted caramel ice cream would be an absolute dream.
For those who love a bit of texture and crunch, try garnishing each slice with a sprinkle of toasted pecans or candied walnuts. A delicate drizzle of warm caramel sauce or a homemade bourbon-maple glaze can also add a sophisticated touch and an extra layer of sweetness. Don’t forget the simplest of garnishes: a light dusting of freshly grated nutmeg or a tiny curl of cinnamon stick can elevate the presentation significantly. Consider serving individual slices with a small cup of hot coffee, a rich espresso, a frothy latte, or a steaming mug of spiced cider for the ultimate autumnal treat. For a truly decadent finish, a glass of tawny port or a sweet dessert wine would complement the pie’s flavors beautifully.
Creative Variations to Spark Your Culinary Imagination:
And if you’re looking to put your own unique twist on things, this recipe is incredibly versatile. Instead of a traditional pastry crust, why not try a gingersnap cookie crust for an extra zing of spice, or a graham cracker crust for a slightly sweeter, crumbly base? Both are incredibly easy to make and offer a delightful contrast to the smooth filling. For a more sophisticated presentation, you could bake the filling into individual mini pies or elegant tartlets, perfect for a dinner party or a dessert bar. Simply adjust the baking time for smaller sizes. If you want to experiment with the filling itself, a tablespoon of bourbon or dark rum can add a wonderful depth and warmth to the pumpkin, especially during colder months. A touch of orange zest or a hint of candied ginger finely minced into the filling can also introduce bright, unexpected notes that complement the traditional spices beautifully. Don’t be afraid to make this recipe your own!
So, my fellow food enthusiasts, I urge you, don’t just admire this recipe; make it! Experience the joy of baking this incredible Pumpkin Pie for yourself. The satisfaction of pulling a perfectly golden, fragrant pie from your oven is truly unparalleled. It’s a sensory delight from start to finish, and the compliments you’ll receive will be well worth the minimal effort. Once you’ve had the pleasure of tasting your creation, I would absolutely love to hear about your experience. Did you add your own twist? What was your favorite serving suggestion? Please share your thoughts, photos, and any adaptations in the comments section below. Your feedback and creativity inspire me and our entire community of home bakers. Let’s spread the joy of homemade goodness together! Happy baking!

Classic Homemade Pumpkin Pie Recipe – Easy & Delicious
Pumpkin Pie is more than just a dessert; it’s a slice of tradition, a warm hug on a crisp autumn day, and for many, the undeniable centerpiece of holiday gatherings. There’s nothing quite like the comforting aroma of a freshly baked pie wafting from the oven, instantly transporting you to cherished memories. This quintessential American dessert boasts a rich history, deeply rooted in harvest celebrations and particularly synonymous with Thanksgiving. People adore this dish for its exquisite balance of earthy pumpkin and aromatic spices like cinnamon, nutmeg, ginger, and cloves, all culminating in a creamy texture that melts in your mouth. Whether enjoyed with a generous dollop of whipped cream or simply on its own, a well-made Pumpkin Pie is an irresistible treat that brings smiles and satisfaction to every table.
Ingredients
-
1 ¼ cups all-purpose flour
-
½ tsp salt
-
1 tbsp sugar
-
½ cup (1 stick) unsalted butter, cold & cubed
-
3–4 tbsp ice water
-
1 (15 oz) can pumpkin purée
-
¾ cup packed brown sugar
-
2 large eggs + 1 egg yolk
-
1 cup evaporated milk
-
½ tsp salt
-
1 tsp ground cinnamon
-
½ tsp ground ginger
-
¼ tsp ground nutmeg
-
⅛ tsp ground cloves
Instructions
-
Step 1
Whisk 1 ¼ cups all-purpose flour, ½ tsp salt, and 1 tbsp sugar in a large bowl. Cut in ½ cup cold, cubed unsalted butter until coarse crumbs with pea-sized pieces form. Gradually add 3-4 tbsp ice water, mixing gently until dough just comes together. Form into a disk, wrap tightly, and chill for at least 30 minutes (or up to 1 hour). -
Step 2
On a lightly floured surface, roll chilled dough into a 12-inch circle (approx. ⅛-inch thick). Carefully transfer to a 9-inch pie plate. Trim edges, leaving a ½-inch overhang, then fold under and crimp decoratively. Freeze the prepared pie crust for 15-20 minutes to prevent shrinkage during baking. -
Step 3
Preheat oven to 400°F (200°C). Line the chilled pie crust with parchment paper or aluminum foil, extending up the sides. Fill with pie weights, dried beans, or uncooked rice. Bake for 15 minutes. -
Step 4
Carefully remove the parchment/foil and pie weights. Return the crust to the oven and bake for another 5-7 minutes, or until lightly golden brown and dry. Reduce oven temperature to 350°F (175°C) once done. Let crust cool slightly. -
Step 5
In a large mixing bowl, whisk together 1 (15 oz) can pure pumpkin purée, ¾ cup packed brown sugar, 2 large eggs, and 1 egg yolk until smooth. Stir in 1 cup evaporated milk, ½ tsp salt, 1 tsp ground cinnamon, ½ tsp ground ginger, ¼ tsp ground nutmeg, and ⅛ tsp ground cloves. Mix thoroughly until the filling is smooth and uniformly colored. -
Step 6
Place the partially baked pie crust on a baking sheet. Carefully pour the prepared pumpkin pie filling into the crust, filling almost to the top. Transfer to the preheated 350°F (175°C) oven and bake for 50-60 minutes. -
Step 7
The pie is done when the edges are set and slightly puffed, but the very center still has a slight jiggle. If crust edges brown too quickly, loosely cover with aluminum foil. Remove from oven and cool completely on a wire rack at room temperature for at least 2-4 hours to allow it to set fully. -
Step 8
For best results and a perfectly firm slice, refrigerate the cooled pie for at least another 2-4 hours, or ideally overnight. Serve chilled, optionally with freshly whipped cream or vanilla bean ice cream. Store leftover pie, covered, in the refrigerator for 3-4 days.
Important Information
Nutrition Facts (Per Serving)
It is important to consider this information as approximate and not to use it as definitive health advice.
Allergy Information
Please check ingredients for potential allergens and consult a health professional if in doubt.

Leave a Comment