
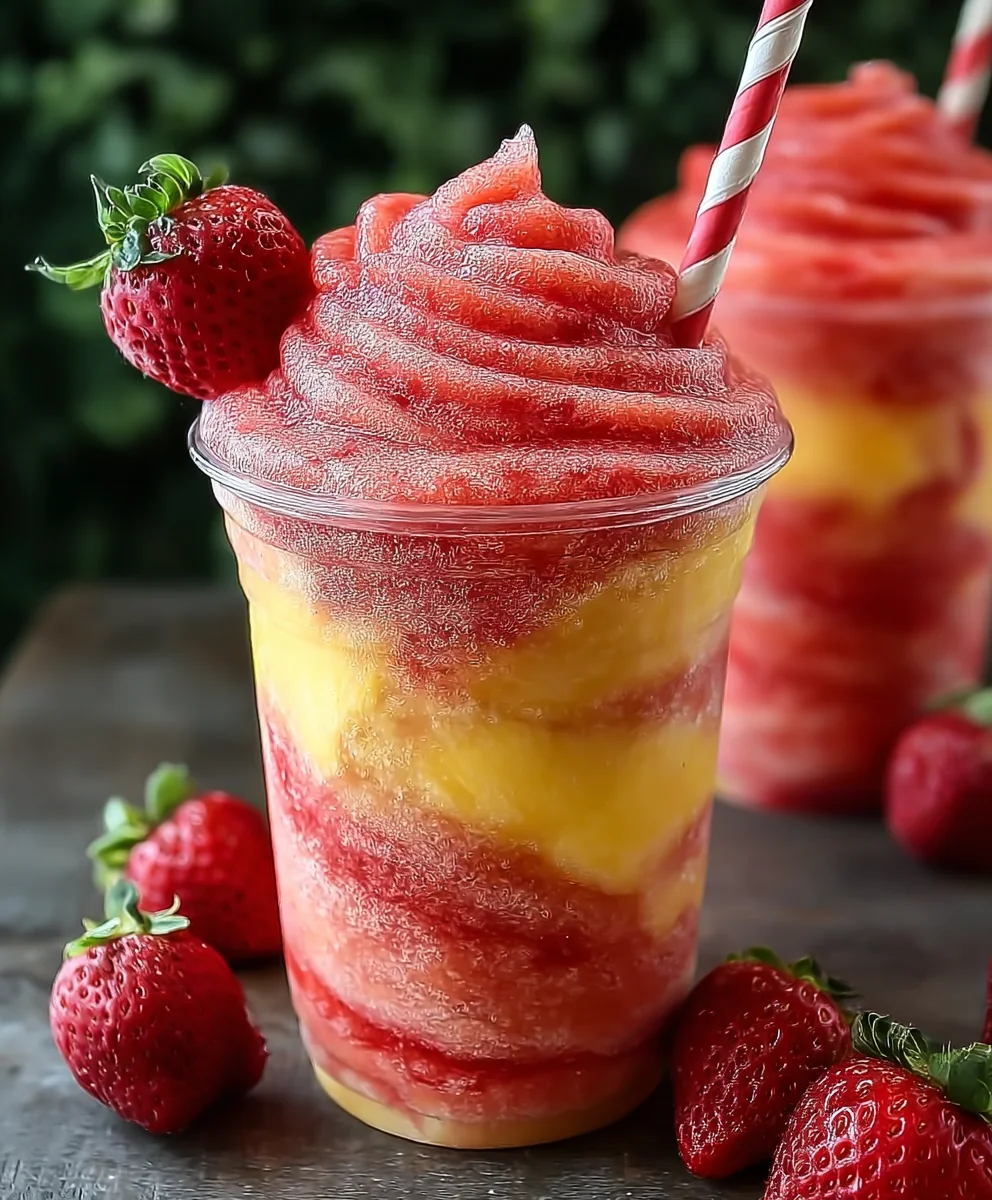
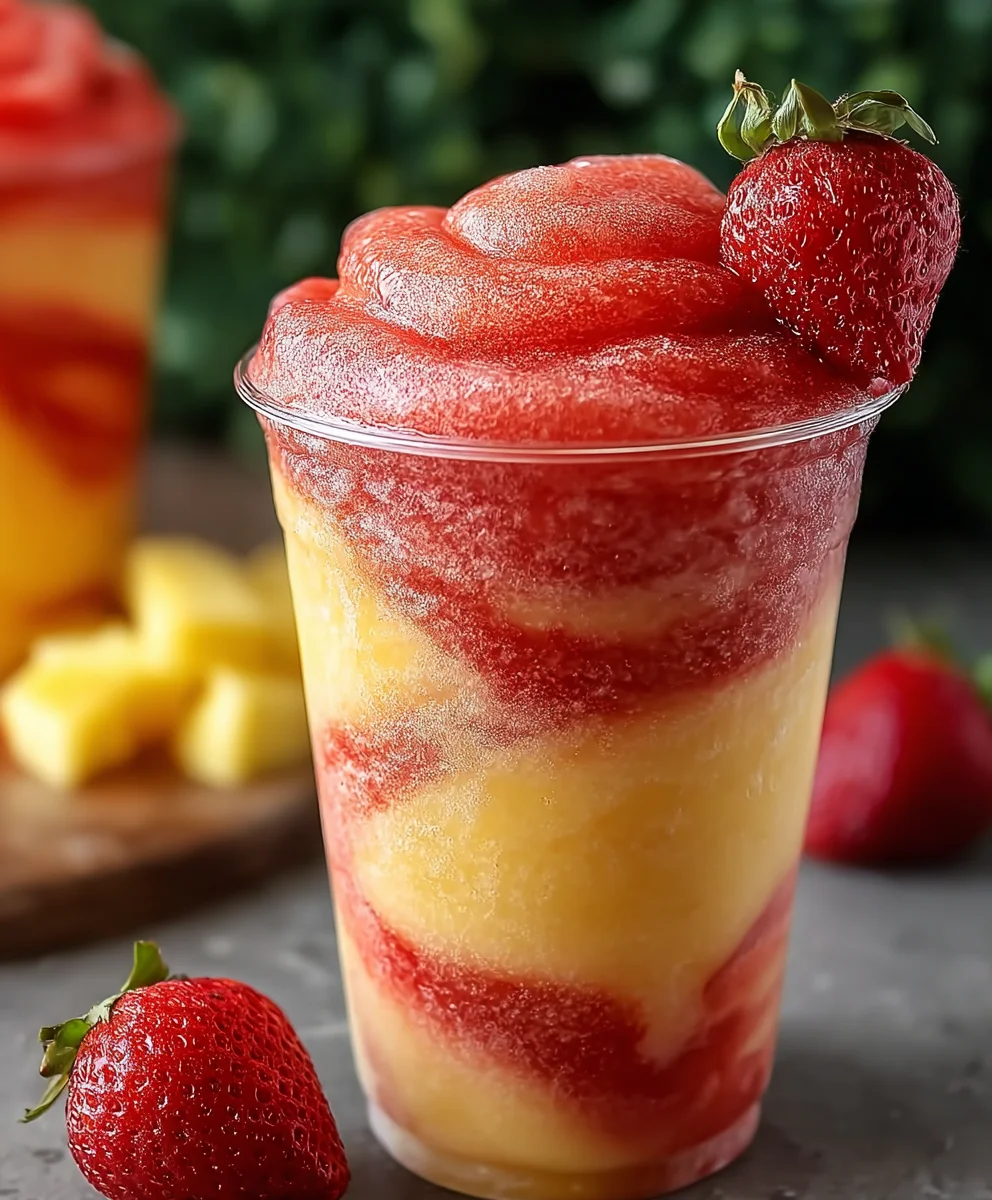
Easy Pineapple Strawberry Swirled Slushies are truly a game-changer when it comes to beating the summer heat or simply adding a splash of vibrant joy to your day. I am absolutely thrilled to share with you my go-to recipe for this incredibly refreshing concoction that promises to transport your taste buds straight to a tropical paradise. Imagine a symphony of sweet, juicy strawberries perfectly complemented by the tangy zest of ripe pineapple, all blended into an icy, smooth swirl that dances on your palate. It’s more than just a drink; it’s an experience, a delightful escape from the mundane.
What makes this dish so universally adored? Beyond its undeniable deliciousness, it’s the perfect harmony of flavors and the invigorating, frosty texture that makes every sip a pure delight. People love how effortlessly simple it is to whip up, yet it delivers a complex, satisfying taste profile. While slushies themselves have a fun, relatively modern history as a beloved frosty treat, evolving from early ice-based drinks, this particular combination elevates the concept into something truly special. The vibrant colors alone are enough to brighten any mood, making these
Easy Pineapple Strawberry Swirled Slushies
not just a treat for your taste buds, but also a feast for your eyes. Get ready to impress your family and friends with this stunning, yet incredibly simple, beverage that embodies pure refreshment and joy.

Ingredients:
-
For the Vibrant Pineapple Slushie Layer:
- 3 cups (approximately 450-500g) frozen pineapple chunks: I always recommend using pre-cut frozen pineapple because it’s incredibly convenient and absolutely essential for achieving that perfect, frosty slushie texture without diluting the vibrant pineapple flavor with plain ice. If you happen to have fresh pineapple on hand and prefer to use it, no problem at all! Just make sure to chop it into uniform, bite-sized pieces and then spread them out on a baking sheet lined with parchment paper. Freeze these pieces for a minimum of 4-6 hours, or ideally overnight, until they are solid. The colder and more frozen your pineapple, the thicker, more luxurious, and more slushy-like your base will be, which is exactly what we’re aiming for in these truly easy pineapple strawberry swirled slushies.
- 1/2 cup (120ml) cold water or unsweetened coconut water: This is our crucial liquid base that helps the blender do its job. Using plain cold water will allow the pure, tropical essence of the pineapple to shine through unimpeded. However, if you’re feeling a little adventurous and want to introduce another layer of tropical goodness, unsweetened coconut water is an amazing alternative. It adds a subtle, delicate sweetness and a wonderfully refreshing note that complements the pineapple beautifully, enhancing the overall tropical experience. For an even more intense pineapple flavor, you could even opt for pineapple juice, but remember to adjust any added sweeteners accordingly as pineapple juice is typically quite sweet on its own. Always start with the minimum amount of liquid and add more in small increments, only if your blender is struggling to process the frozen fruit, to maintain that thick, dreamy consistency.
- 1-2 tablespoons honey, agave nectar, maple syrup, or granulated sugar (optional, to taste): The need for additional sweetener truly depends on the natural ripeness and sweetness of your frozen pineapple, as well as your personal preference for how sweet you like your beverages. I often find that really ripe, perfectly frozen pineapple is naturally sweet enough to carry the flavor on its own. However, a little boost from honey (my personal favorite for a natural touch), agave nectar, maple syrup, or even a simple granulated sugar can truly make the pineapple flavors sing and bring out their brightest notes. My best advice is to blend the pineapple first with just the liquid, then taste it before deciding if you want to add any sweetener. You can always add more, but you can’t take it away!
- 1/2 teaspoon fresh lime juice (optional, but highly recommended): Oh, this little addition is a secret weapon! A small, fresh squeeze of lime juice does wonders to brighten and lift the entire pineapple flavor profile. It introduces a delightful, zesty counterpoint that prevents the slushie from tasting overly sweet or flat. It adds a refreshing tang that truly elevates the pineapple’s natural acidity and makes every sip feel incredibly vibrant and invigorating. Trust me on this one – it’s a game-changer for these easy pineapple strawberry swirled slushies!
-
For the Sweet Strawberry Slushie Swirl:
- 2 cups (approximately 300-350g) frozen strawberries: Just like with our pineapple, frozen strawberries are absolutely non-negotiable for achieving the correct icy, thick, and wonderfully vibrant texture for our swirl. These little gems provide that beautiful red color and the essential frosty base. If you’re working with fresh strawberries, simply hull them (remove the green tops), slice them if they are large, and then spread them on a parchment-lined baking sheet to freeze thoroughly until solid. Ensure they are truly frozen solid for the best possible slushy consistency, which is paramount for our easy pineapple strawberry swirled slushies.
- 1/4 cup (60ml) cold water or pineapple juice: For the strawberry portion of our easy pineapple strawberry swirled slushies, I sometimes lean towards using a little bit of pineapple juice instead of just water. This choice subtly ties the two fruit flavors together, creating an even more cohesive and harmonious tropical blend. However, plain cold water works perfectly if you want the unadulterated, pure taste of strawberry to be the star of its layer. As always, begin with the minimum amount of liquid and only add more in small splashes if your blender is genuinely struggling to achieve a smooth blend. We want it thick!
- 1-2 tablespoons honey, agave nectar, maple syrup, or granulated sugar (optional, to taste): The sweetness of strawberries can vary quite a bit depending on the season and variety. Before adding any sweetener, I always recommend tasting a small piece of your frozen strawberries. If they taste quite tart, a little bit of your preferred sweetener will wonderfully enhance their natural sweetness and bring out their best, juiciest qualities. If they’re already perfectly sweet, you might not need any at all!
- 1/4 teaspoon fresh lemon juice (optional, but a fantastic brightener): Much like the role of lime juice in our pineapple slushie, a tiny splash of fresh lemon juice works magic with strawberries. It significantly enhances the strawberry’s natural, delicate tang and makes its flavor burst with even more brightness and vivacity. It’s a wonderful way to ensure the strawberry swirl is just as refreshing and exciting as the pineapple base in our easy pineapple strawberry swirled slushies.
-
Optional Garnishes for a Picture-Perfect Finish:
- Fresh mint sprigs: These are not just for decoration; the fresh aroma of mint provides a lovely, invigorating contrast to the sweet fruit, making each sip even more refreshing.
- Fresh pineapple wedges or strawberry slices: Perfect for elegantly decorating the rim of your serving glasses, adding that final, professional touch to your easy pineapple strawberry swirled slushies.
- A small pinch of sea salt (especially for the pineapple): A tiny pinch of fine sea salt can actually enhance the sweetness and complexity of fruit flavors, particularly pineapple. It’s a trick chefs use to make fruit taste even fruitier! Add it to the pineapple blend if you dare.
Phase 1: Crafting Your Luscious Pineapple Slushie Base
- Prepare Your Blending Arsenal: First things first, gather your trusty, high-powered blender. For frozen fruit slushies, a robust blender is absolutely essential. A weaker blender might struggle, leading to a lumpy texture or even overheating. If you have a tamper, keep it handy; it’s an invaluable tool for pushing down frozen ingredients without adding excess liquid.
- Combine the Pineapple Base Ingredients: Carefully place your 3 cups of frozen pineapple chunks into the blender carafe. Add 1/2 cup of cold water or coconut water, the optional 1-2 tablespoons of your chosen sweetener (if you’ve decided to use it), and the highly recommended 1/2 teaspoon of fresh lime juice. I find that adding the liquid first often helps the blades catch the frozen fruit more easily.
-
Begin Blending to Perfection: Secure the lid tightly on your blender. Start blending on a low speed to break down the frozen pineapple, then gradually increase the speed to high. You’ll want to blend until the mixture is completely smooth and thick. This process usually takes about 1-2 minutes, depending on the power of your blender.
- Troubleshooting Tip: If your blender is struggling and the blades are spinning without catching the frozen fruit (what we call “cavitation”), resist the urge to immediately add more liquid! Instead, turn off the blender, use a rubber spatula or your tamper to push the frozen fruit down towards the blades, and then restart blending. You might need to repeat this a few times. If it’s absolutely necessary and the mixture is still too thick to blend, add liquid one tablespoon at a time, blending after each addition, until it just barely moves. The goal is the thickest possible consistency that your blender can handle.
- Achieving the Right Consistency: You’re looking for a consistency similar to soft-serve ice cream or a very thick smoothie – something that holds its shape but is still pourable. This is the foundation for our easy pineapple strawberry swirled slushies, so getting this right is key.
- Taste and Adjust: Once blended, take a small spoonful and taste your pineapple slushie base. This is your moment to fine-tune the flavor. Does it need more sweetness? Add another half tablespoon of your preferred sweetener and blend briefly to incorporate. Does it need more zing? A tiny splash more lime juice can do wonders. Don’t be afraid to make it perfect for your palate!
- Set Aside (and Chill!): Once you’re satisfied with the taste and consistency, carefully spoon the pineapple slushie into a separate bowl or container. Cover it and immediately place it in the freezer while you prepare the strawberry layer. This keeps it perfectly chilled and firm, ensuring it maintains its delightful slushy texture and doesn’t melt too much, which is crucial for the beautiful swirl in our easy pineapple strawberry swirled slushies.
Phase 2: Preparing the Sweet Strawberry Slushie Swirl
- Clean Your Blender (or Use a Second One): It’s important to have a clean blender carafe for the strawberry layer to prevent any flavor mixing before we intentionally swirl them. Give your blender a quick rinse, or if you’re lucky enough to have a second blender, now’s its time to shine!
- Combine the Strawberry Swirl Ingredients: Add your 2 cups of frozen strawberries to the clean blender carafe. Pour in the 1/4 cup of cold water or pineapple juice, the optional 1-2 tablespoons of your chosen sweetener, and the fantastic 1/4 teaspoon of fresh lemon juice. Remember, starting with the liquid helps the blending process.
-
Blend Until Velvety Smooth: Just as you did with the pineapple, secure the lid and begin blending on a low speed, gradually increasing to high. Blend until the strawberries are completely smooth, thick, and have that characteristic vibrant red hue. This should also take about 1-2 minutes.
- Consistency is Key for the Swirl: For the strawberry layer, we’re aiming for a consistency that is equally as thick as your pineapple base. This is essential for creating those distinct, beautiful swirls when we combine them. If the strawberry mixture is too thin, it will simply mix with the pineapple, losing the “swirled” effect. Use your tamper or spatula to push down the frozen fruit as needed, adding extra liquid only if absolutely necessary, one tablespoon at a time, to achieve a thick, scoopable texture. This dedication to texture ensures the success of our easy pineapple strawberry swirled slushies.
- Why Thickness Matters: A thick consistency not only creates a more satisfying mouthfeel but also prevents the two layers from quickly merging. It allows for a gradual and beautiful swirl effect as you assemble and sip your slushie, making it not just delicious but also visually appealing.
- Taste and Perfect the Strawberry Flavor: Spoon out a small taste of your strawberry slushie. Does it have the right balance of sweet and tart? If your strawberries were particularly tart, you might want to add another half tablespoon of sweetener. If it feels a little dull, a tiny bit more lemon juice can really brighten it up. Adjust to your heart’s content, blending briefly after each addition.
- Prepare for Swirling: Once both your pineapple and strawberry slushie mixtures are perfectly blended, wonderfully thick, and chilled, you are ready for the fun part: assembly! Don’t let either sit out for too long, as they will begin to melt, compromising the slushie texture and the beautiful swirled effect we’re aiming for with these easy pineapple strawberry swirled slushies.
Phase 3: Assembling Your Visually Stunning Swirled Slushies
- Choose Your Glasses Wisely: Select your favorite tall, clear glasses. Clear glasses are ideal because they really allow the vibrant colors and beautiful swirl of your easy pineapple strawberry swirled slushies to shine through, making them even more appetizing and Instagram-worthy! If you want to go the extra mile, you can even chill your glasses in the freezer for about 10-15 minutes before assembling. This helps to keep your slushies colder for longer, enhancing the overall drinking experience.
-
Begin Layering – The Swirl Technique: This is where the magic happens!
- Using two separate spoons (one for pineapple, one for strawberry), begin by spooning a generous layer of the pineapple slushie into the bottom of each glass. Aim for about one-third of the glass height.
- Next, carefully spoon a layer of the strawberry slushie on top of the pineapple layer. Don’t worry about being perfectly neat; a little imperfection adds to the charm of the swirl.
- Continue alternating layers of pineapple and strawberry slushie until your glasses are nearly full.
- Creating the “Swirl” Effect: For that signature swirled look, once you have a few layers in, take a long spoon or a skewer and gently run it through the slushie in a circular motion, or in an ‘S’ shape, just a few times. Don’t overmix! The goal is to create beautiful streaks and ribbons of color, not to fully combine the two. This gentle stirring will coax the two distinct colors and flavors into an alluring, marbled pattern that is the hallmark of truly easy pineapple strawberry swirled slushies.
-
Garnish with Flair: Now for the finishing touches!
- Carefully place a fresh mint sprig into each glass. The vibrant green against the yellow and red is simply stunning and adds a wonderful aromatic lift.
- If you prepared them, perch a fresh pineapple wedge or a slice of strawberry on the rim of each glass. These garnishes add a touch of elegance and a hint of the delicious flavors contained within.
- Insert a straw into each glass, preferably a wide-mouth or reusable straw, as these thick slushies are best enjoyed slowly.
- Serve Immediately for Peak Enjoyment: These Easy Pineapple Strawberry Swirled Slushies are at their absolute best when served fresh, immediately after preparation. Their icy, refreshing texture is fleeting, and you want to enjoy them before they begin to melt. Hand them out to your eager guests, sit back, and enjoy the blissful, tropical escape! The combination of sweet pineapple and tangy strawberry, all in a frosty, swirled presentation, is simply irresistible.
Optional Enhancements, Storage, and Serving Suggestions for Your Easy Pineapple Strawberry Swirled Slushies
-
Spice It Up (or Cool It Down!):
- A Hint of Heat: For the adventurous palate, consider adding a tiny pinch of cayenne pepper or a thin slice of fresh jalapeño to the pineapple blend. The subtle heat provides an unexpected but delightful counterpoint to the sweetness of the fruit, creating a truly unique and vibrant flavor profile for your easy pineapple strawberry swirled slushies. Start with a very small amount and adjust to your preference.
- Herbal Infusion: Beyond mint, consider adding a few fresh basil leaves to the strawberry blend for an earthy, aromatic twist. Or, for a more exotic touch, a small piece of fresh ginger in the pineapple slushie can add a lovely warmth and zing.
- Creamy Indulgence: For a creamier, dessert-like slushie, you can add a tablespoon or two of full-fat coconut milk or a dollop of Greek yogurt (plain or vanilla) to either or both fruit blends. This will create a richer, slightly less icy texture, transforming it into more of a smoothie-slushie hybrid, but still utterly delicious!
-
Adult-Friendly Versions (21+):
- Tropical Twist: For an adult beverage, a splash of white rum, coconut rum, or even a touch of vodka can be blended into either the pineapple or strawberry layer (or both!). Approximately 1-1.5 ounces per serving size should suffice. Adjust the amount to your taste and remember to drink responsibly. The tropical notes of the rum particularly complement the pineapple, making for a fantastic poolside treat.
- Sparkling Delight: Instead of water, you could use a dry sparkling wine (like Prosecco or Cava) or even some sparkling rosé for a truly celebratory version. Blend the fruit with minimal liquid, then top off the glass with your chilled sparkling wine for a bubbly, refreshing adult slushie.
-
Storage Tips (If You Happen to Have Leftovers):
- While these easy pineapple strawberry swirled slushies are undeniably best enjoyed fresh, if you do find yourself with leftovers, you can store them in an airtight container in the freezer.
- Re-freezing and Re-blending: When you’re ready to enjoy them again, the mixture will likely have frozen solid. Simply let it thaw on the counter for 15-30 minutes until it’s slightly softened. Then, scoop the frozen mixture back into your blender with a tiny splash of water or juice (about 1-2 tablespoons) and re-blend until it reaches that perfect slushy consistency once more. It won’t be quite as fluffy as the first time, but it will still be incredibly delicious and refreshing.
-
Serving Suggestions Beyond the Glass:
- Slushie Bowl: For a fun twist, serve your easy pineapple strawberry swirled slushies in a bowl and top with fresh fruit, granola, or a drizzle of honey for a breakfast or dessert treat.
- Popsicles: If you have any extra slushie mixture, pour it into popsicle molds and freeze for a few hours. These make fantastic, healthy frozen treats that are perfect for kids and adults alike on a hot day.
- Cocktail Mixer: Use the individual pineapple or strawberry slushie layers as a base for other cocktails. The pineapple slushie is a fantastic mixer for margaritas or mojitos, while the strawberry can elevate a daiquiri or a vodka spritzer.
Conclusion:
So, there you have it! We’ve journeyed through the simple steps to create a truly spectacular summer beverage. What makes these Easy Pineapple Strawberry Swirled Slushies an absolute game-changer, you ask? Well, it’s more than just a drink; it’s an experience. Imagine a scorching hot day, the sun beating down, and then you take that first glorious sip. The vibrant, tangy burst of fresh pineapple dances on your tongue, followed by the sweet, comforting embrace of ripe strawberries. The swirl isn’t just for looks; it ensures every sip is a delightful mix, preventing any single flavor from overpowering the other. It’s incredibly refreshing, surprisingly easy to prepare, and visually stunning, making it perfect for impressing guests or simply treating yourself. This isn’t just a recipe; it’s your new go-to for instant summer bliss, offering a perfect balance of sweet and tart that invigorates and satisfies without being overly heavy. Trust me, once you try this, you’ll understand why it’s destined to become a staple in your warm-weather repertoire.
Now that you’ve mastered the art of making these incredible slushies, let’s talk about elevating your serving game. While they’re absolutely fantastic on their own, a little presentation goes a long way. I love serving mine in tall, elegant glasses – think hurricane glasses or classic highball tumblers – to really show off that gorgeous swirl. A sprig of fresh mint or a small wedge of pineapple delicately perched on the rim adds a touch of sophistication and an extra sensory element. For an even more indulgent treat, consider adding a dollop of whipped cream on top, maybe with a few extra finely diced strawberries sprinkled over for texture and color. These slushies are also the ultimate companion for a relaxed backyard barbecue, a poolside afternoon, or even a casual brunch. They pair wonderfully with light finger foods like mini fruit tarts, a fresh Caprese salad, or even some grilled chicken skewers, balancing out richer flavors with their bright acidity. Don’t forget those fun, colorful straws – they just make everything feel a bit more festive and enjoyable! The key is to serve them immediately after blending to capture that perfect icy, swirled texture, ensuring maximum refreshment.
Beyond the classic preparation, these slushies offer a fantastic canvas for creative variations. If you’re hosting an adult gathering, a splash of white rum or vodka can transform this fruity concoction into a delightful cocktail – just blend in about 1-2 ounces per serving for a perfectly spirited twist. For those who love a creamier texture, try adding a quarter cup of coconut milk or a scoop of plain Greek yogurt to the blend; it mellows the tang and adds a wonderful richness. You could also experiment with different fruit combinations. Imagine adding a handful of frozen mango chunks for a tropical triple threat, or some raspberries for an even tarter, more complex berry note. A squeeze of fresh lime juice can brighten all the flavors and add an extra zing, especially if your fruit isn’t as intensely flavored. For a different kind of sweet treat, pour the blended mixture into popsicle molds and freeze them overnight for incredible homemade fruit pops – perfect for kids and adults alike! You can also adjust the sweetness to your preference; a drizzle of honey or agave nectar can enhance the natural sugars if your fruit is a bit less ripe, or you can skip added sweeteners altogether if your fruit is naturally very sweet. The beauty of this recipe lies in its adaptability; feel free to make it your own and discover your favorite permutation.
I genuinely hope you’re feeling inspired and excited to whip up a batch of these glorious slushies in your own kitchen. There’s nothing quite like the satisfaction of creating something so delicious and visually appealing from scratch. Don’t let another warm day pass by without experiencing the pure joy of these Pineapple Strawberry Swirled Slushies. I absolutely encourage you to give this recipe a try this week, whether it’s for a special occasion or just a personal treat. And when you do, please don’t keep the deliciousness to yourself! I’d love to hear all about your experience. Did you try a fun variation? What did your guests think? Share your successes, your favorite garnishes, and any clever twists you came up with in the comments below. Better yet, snap a photo of your beautiful creation and share it with us – let’s spread the frosty, fruity cheer! Your feedback and shared experiences are what truly make this community vibrant and inspiring. So go ahead, blend, swirl, sip, and enjoy! Your taste buds (and your Instagram feed) will thank you.
Best Pineapple Strawberry Slushie – Quick & Easy!
This easy, quick, and refreshing Pineapple Strawberry Swirled Slushie is a vibrant, homemade frozen treat combining the tropical tang of pineapple with the sweet-tart essence of sun-ripened strawberries. Perfect for beating the summer heat, it creates an Instagram-worthy drink with natural colors and a thick, icy texture without dilution. A delightful escape that tastes like summer in a glass, offering a healthier alternative to store-bought slushies.
Ingredients
-
3 cups (450-500g) frozen pineapple chunks
-
1/2 cup (120ml) cold water or unsweetened coconut water
-
1-2 tablespoons honey, agave nectar, maple syrup, or granulated sugar (optional, to taste)
-
1/2 teaspoon fresh lime juice (optional, but highly recommended)
-
2 cups (300-350g) frozen strawberries
-
1/4 cup (60ml) cold water or pineapple juice
-
1-2 tablespoons honey, agave nectar, maple syrup, or granulated sugar (optional, to taste)
-
1/4 teaspoon fresh lemon juice (optional, but a fantastic brightener)
-
Optional garnishes: Fresh mint sprigs, fresh pineapple wedges, strawberry slices
-
Optional: Small pinch of sea salt (for pineapple blend)
-
Optional non-alcoholic additions (for 21+): Non-alcoholic white rum alternative, non-alcoholic coconut rum alternative, non-alcoholic vodka alternative, non-alcoholic sparkling wine (e.g., non-alcoholic Prosecco/Cava), or non-alcoholic sparkling rosé
Instructions
-
Step 1
In a high-powered blender, combine 3 cups frozen pineapple chunks, 1/2 cup cold water or unsweetened coconut water, optional 1-2 tablespoons sweetener, and optional 1/2 teaspoon fresh lime juice. Blend on low, then gradually increase to high, until the mixture is completely smooth and very thick, like soft-serve. Use a tamper if needed; add additional liquid (1 tablespoon at a time) only if the blender is struggling. Taste and adjust sweetness or tang. Spoon into a separate bowl, cover, and freeze while preparing the strawberry layer. -
Step 2
Clean your blender carafe. Add 2 cups frozen strawberries, 1/4 cup cold water or pineapple juice, optional 1-2 tablespoons sweetener, and optional 1/4 teaspoon fresh lemon juice. Blend until completely smooth and very thick, matching the consistency of the pineapple base. Taste and adjust sweetness or tartness. Both slushie mixtures should now be thick and ready for assembly. -
Step 3
Select tall, clear glasses (chilling them beforehand is recommended). Using separate spoons, alternate generous layers of the pineapple slushie and the strawberry slushie until the glasses are nearly full. For the signature swirl, gently run a long spoon or skewer through the layers in a circular or ‘S’ motion a few times, without overmixing, to create beautiful streaks and ribbons of color. -
Step 4
Garnish each slushie with a fresh mint sprig and a fresh pineapple wedge or strawberry slice on the rim. Insert a wide-mouth straw. Serve immediately for peak icy, refreshing enjoyment. For adult-friendly versions, consider blending in 1-1.5 oz of a non-alcoholic spirit alternative (e.g., non-alcoholic rum, vodka) into a layer, or topping the finished slushie with non-alcoholic sparkling wine or rosé instead of water.
Important Information
Nutrition Facts (Per Serving)
It is important to consider this information as approximate and not to use it as definitive health advice.
Allergy Information
Please check ingredients for potential allergens and consult a health professional if in doubt.

Leave a Comment