
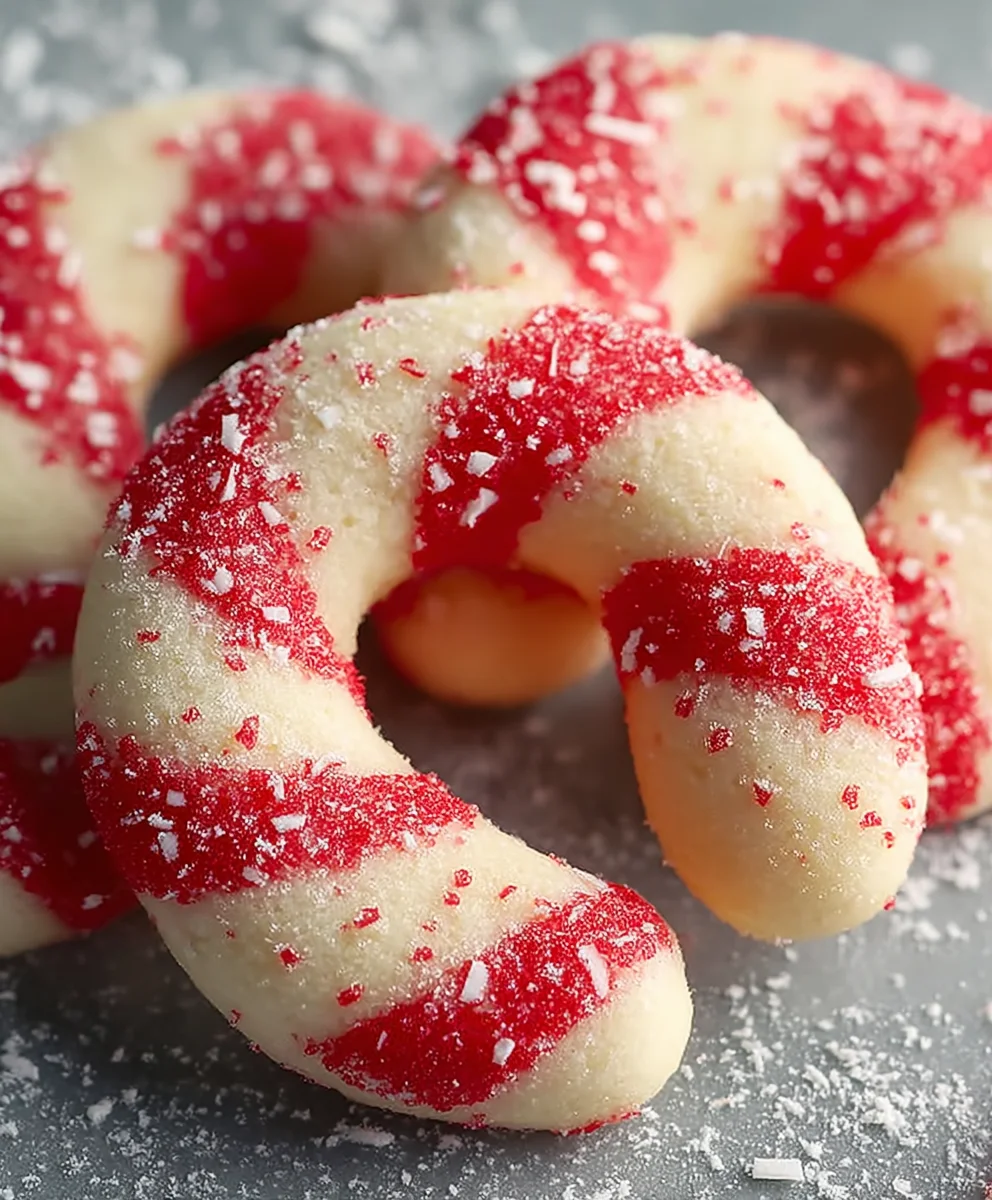
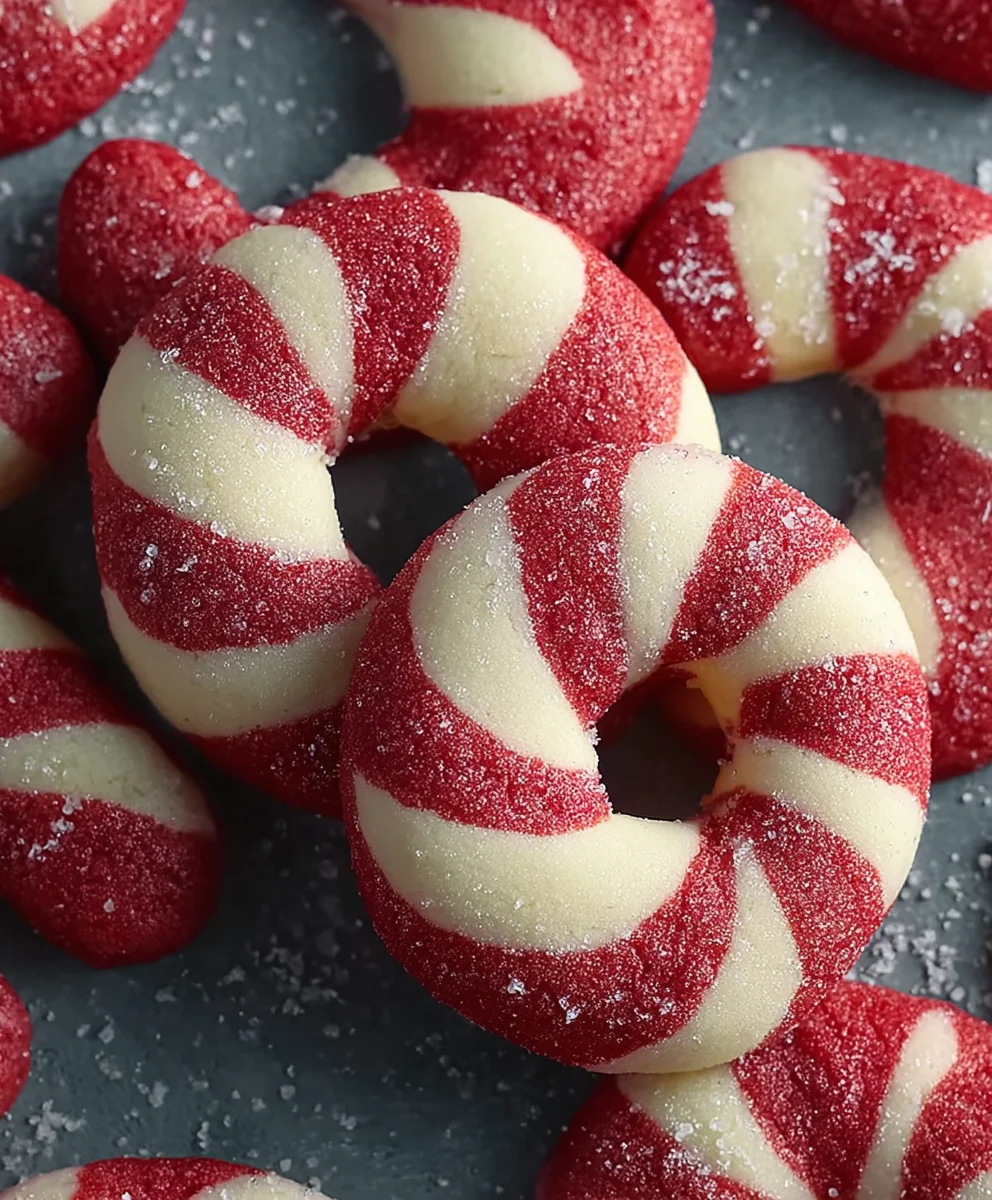
Candy Cane Cookies are more than just a sweet treat; they are a delightful embodiment of holiday spirit and a cherished tradition that brings smiles to faces young and old. Imagine the joyous anticipation as you unwrap a classic candy cane, its vibrant red and white stripes promising a burst of cool, refreshing peppermint. Now, picture that iconic imagery transformed into a tender, buttery cookie that simply melts in your mouth – that’s the magic these festive delights offer!
For generations, these charming cookies have graced holiday platters and cookie exchanges, becoming synonymous with the warmth and merriment of the season. Their unique twisted shape, mimicking the beloved confectionery, often evokes nostalgic memories of childhood Christmases spent baking with loved ones. I find immense joy in crafting these vibrant spirals, and I know you will too, as they add a special touch to any festive gathering.
Why We Adore These Festive Treats
People absolutely adore Candy Cane Cookies not just for their stunning visual appeal, which perfectly captures the festive mood, but also for their exquisite flavor profile. The subtle yet distinct hint of peppermint perfectly complements the rich, tender shortbread-like base, creating a harmonious blend that is both refreshing and comforting. Their delicate, melt-in-your-mouth texture makes them an irresistible addition to any holiday spread, and they are surprisingly fun to make, adding an extra layer of enjoyment to your holiday preparations. Get ready to bake a batch of pure holiday cheer!

Ingredients:
-
1 cup (2 sticks or 226g) unsalted butter, softened to room temperature. I always opt for unsalted butter in my baking so I can control the exact amount of salt in the recipe. Room temperature butter is crucial for proper creaming, which gives our Candy Cane Cookies their lovely texture.
-
1 cup (200g) granulated sugar. This provides the sweetness and helps with the tender crumb of our delightful Candy Cane Cookies.
-
1 large egg, also at room temperature. A room temperature egg emulsifies better with the butter and sugar, creating a smoother dough.
-
1 teaspoon pure vanilla extract. I love to use a good quality pure vanilla extract as it truly elevates the flavor of these classic holiday treats. It’s the backbone of the delicious sweetness in our Candy Cane Cookies.
-
½ teaspoon pure peppermint extract. This is where the signature “candy cane” flavor comes in! Make sure it’s a good quality extract for the best festive taste. You can adjust this amount slightly if you prefer a milder or stronger peppermint kick.
-
3 cups (360g) all-purpose flour, sifted. Sifting ensures there are no lumps and helps aerate the flour, contributing to a tender cookie texture. This precise measurement is key for the structure of our Candy Cane Cookies.
-
1 teaspoon baking powder. This leavening agent helps our cookies achieve a slight lift and a soft, chewy texture.
-
½ teaspoon salt. Even in sweet recipes, salt is vital! It balances the sweetness and enhances all the other flavors in our Candy Cane Cookies.
-
Red gel food coloring. I highly recommend using gel food coloring over liquid for vibrant, concentrated color without adding too much moisture to your dough. A little goes a long way to achieve that iconic red stripe.
Preparation Phase 1: Mixing the Dough for Our Candy Cane Cookies
-
First things first, let’s get our workspace ready! Gather all your ingredients and ensure your butter and egg have come to room temperature. This seemingly small detail makes a huge difference in the final texture of your Candy Cane Cookies. If your butter isn’t soft enough, it won’t cream properly, and your cookies might turn out dense.
-
In a large mixing bowl, or the bowl of your stand mixer fitted with the paddle attachment, cream together the softened unsalted butter and granulated sugar. I like to start on low speed to combine them, then increase to medium-high. Beat them together for about 3-5 minutes, or until the mixture is beautifully light, fluffy, and pale in color. This creaming process incorporates air, which is essential for a tender cookie crumb. Scrape down the sides of the bowl with a spatula periodically to ensure everything is well combined.
-
Once your butter and sugar mixture is lovely and fluffy, crack in your room temperature large egg. Beat on medium speed until it’s fully incorporated. Again, take a moment to scrape down the sides of the bowl to catch any stray bits. Then, pour in your pure vanilla extract and your pure peppermint extract. Beat just until they are fully mixed in, filling your kitchen with a wonderful aroma that hints at the delightful Candy Cane Cookies to come!
-
In a separate medium bowl, whisk together your dry ingredients: the sifted all-purpose flour, baking powder, and salt. Whisk them together thoroughly for about 30 seconds to ensure the leavening and salt are evenly distributed throughout the flour. This prevents pockets of unmixed ingredients in your final dough.
-
With your mixer on low speed, gradually add the dry ingredient mixture to the wet ingredients. Add about a third at a time, allowing it to incorporate before adding the next portion. Mix only until the flour is just combined and no dry streaks remain. It’s very important not to overmix the dough at this stage, as overworking the gluten in the flour can lead to tough Candy Cane Cookies. Stop as soon as everything comes together.
-
Now that we have our beautiful plain dough, it’s time to divide it! Carefully transfer the dough from the mixing bowl onto a clean, lightly floured surface or a piece of parchment paper. Using a kitchen scale for precision, divide the dough into two equal portions. This ensures we have an even amount of white and red for our striped Candy Cane Cookies.
-
Take one half of the dough and place it back into the mixing bowl. To this portion, add a few drops of red gel food coloring. I recommend starting with about ¼ to ½ teaspoon, depending on the intensity of the color you desire. Mix on low speed, or knead by hand on a lightly floured surface, until the color is completely uniform. You want a vibrant, festive red! If you’re mixing by hand, you can wear gloves to prevent your hands from getting stained. This part is quite satisfying, watching the dough transform into that signature holiday hue for our Candy Cane Cookies.
-
Once both dough portions (one white, one red) are thoroughly mixed and beautifully colored, flatten each portion slightly into a disc. Wrap each disc separately in plastic wrap. Now, comes the patience part: refrigerate both dough portions for at least 1 hour, or up to 2-3 hours. This chilling step is absolutely crucial. It allows the butter to firm up, making the dough much easier to handle, roll, and shape without becoming too sticky or losing its form. This firm dough will be key to creating those crisp, well-defined stripes in your Candy Cane Cookies.
Preparation Phase 2: Shaping the Candy Cane Cookies
-
Once your dough has thoroughly chilled, take one portion (either white or red) out of the refrigerator. Work with one color at a time to prevent the other dough from warming up too quickly. On a lightly floured surface, roll out small pieces of dough into ropes. I usually aim for ropes that are about ¼ inch in diameter and roughly 6-8 inches long. The key here is to keep the thickness as consistent as possible along the entire length of the rope. This ensures even baking and a beautiful, uniform stripe on your Candy Cane Cookies. If the dough gets too warm and sticky, pop it back into the fridge for 10-15 minutes.
-
Repeat the previous step with the other color of dough. So, if you started with white, now roll out a red rope of the same length and thickness. Try to make them as identical as possible.
-
Now for the fun part: creating the candy cane swirl! Take one white rope and one red rope. Gently lay them side-by-side, pressing them together lightly along their entire length. Then, carefully twist the two ropes around each other to form a spiral. Don’t twist too tightly, or the ropes might break; a gentle, even twist is what we’re aiming for. The goal is to create that iconic striped pattern. Once twisted, gently roll the combined rope on your floured surface to slightly compress and smooth out the seam, making sure the two colors are firmly adhered and form a single, sturdy rope for your Candy Cane Cookies.
-
After you’ve created your striped rope, it’s time to shape it into a candy cane. Carefully bend one end of the twisted rope downwards to form the “hook” of the candy cane. Gently press it into place to secure the shape. If your ropes are longer than you desire for a single cookie, you can carefully cut them to your preferred length before shaping the hook. I find about 4-5 inches is a good finished size for a standard cookie.
-
Repeat this process – rolling out individual ropes, twisting them together, and shaping – until you have used all your dough. As you work, place the shaped Candy Cane Cookies onto baking sheets lined with parchment paper. Leave about 1-2 inches of space between each cookie, as they will spread slightly during baking. If at any point the dough becomes too soft or difficult to handle, don’t hesitate to pop it back into the refrigerator for a brief chill. A cool dough is a cooperative dough when it comes to intricate shaping like these festive Candy Cane Cookies.
-
Once all your Candy Cane Cookies are shaped and on the baking sheets, I highly recommend placing the entire baking sheet back into the refrigerator for another 15-20 minutes. This final chill helps prevent the cookies from spreading too much in the oven, ensuring they maintain their distinctive candy cane shape and vibrant stripe definition during baking. This is a small but important step for picture-perfect Candy Cane Cookies!
Baking the Candy Cane Cookies
-
While your shaped Candy Cane Cookies are chilling for their final rest, preheat your oven to 375°F (190°C). Make sure your oven rack is in the middle position. A properly preheated oven is crucial for even baking and prevents the cookies from spreading excessively before they set.
-
Retrieve one baking sheet of chilled Candy Cane Cookies from the refrigerator. Place the baking sheet directly into the preheated oven.
-
Bake for 8-10 minutes. The exact baking time can vary slightly depending on your oven and the thickness of your cookies, so keep a close eye on them. You’ll know they are done when the edges are lightly set and very, very subtly golden. The white parts of the cookies should still look pale and not browned. Underbaking slightly is always better than overbaking for these delicate cookies, as overbaked cookies will lose their tender texture and may become too crisp.
-
Once baked, carefully remove the baking sheet from the oven. Let the Candy Cane Cookies cool on the baking sheet for about 5 minutes. They will be quite delicate and fragile when hot, so resist the urge to move them immediately. This cooling period on the hot sheet allows them to firm up slightly, making them easier to handle without breaking.
-
After 5 minutes, gently transfer the partially cooled Candy Cane Cookies from the baking sheet to a wire cooling rack to cool completely. Ensure there’s plenty of space between the cookies on the rack to allow air circulation, which helps them cool evenly. Continue baking the remaining batches of cookies, making sure to re-chill the dough if it becomes too warm between batches, especially if you’re working in a warm kitchen. Taking your time with each batch ensures every single one of your Candy Cane Cookies turns out perfectly.
Finishing Touches and Storage for Your Candy Cane Cookies
-
Once your beautiful Candy Cane Cookies have cooled completely on the wire rack, they are ready to be admired and enjoyed! Their crisp peppermint flavor and striking appearance make them an instant holiday classic. I always wait until they are completely cool before even thinking about storing them or adding any extra embellishments. Warm cookies tend to steam and get soggy when stored, or melt any delicate toppings.
-
If you’re feeling extra festive, you can add an optional glaze or sprinkle. A simple vanilla or peppermint glaze made from powdered sugar, milk, and a tiny bit of extract can be drizzled over the cooled cookies. Alternatively, a sprinkle of crushed candy canes immediately after baking (while still warm on the sheet) or on top of a fresh glaze can add extra crunch and a more intense candy cane flavor. However, these Candy Cane Cookies are absolutely delicious and stunning all on their own!
-
To store your homemade Candy Cane Cookies, place them in an airtight container at room temperature. They will stay fresh and delicious for up to 5-7 days. To prevent them from sticking together or breaking, especially if you’re stacking them, I recommend placing a sheet of parchment paper between layers of cookies. This extra step helps preserve their beautiful shape and prevents the colors from bleeding, ensuring your Candy Cane Cookies look as good as they taste when you finally serve them.
-
For longer storage, these Candy Cane Cookies freeze beautifully! Once completely cooled, arrange them in a single layer on a baking sheet and freeze until solid (this usually takes about 1-2 hours). Once frozen, transfer the solid cookies to a freezer-safe airtight container or a heavy-duty freezer bag. You can layer them with parchment paper to protect them. They can be frozen for up to 2-3 months. When you’re ready to enjoy them, simply thaw them at room temperature for a few hours. This makes them perfect for making ahead during the busy holiday season, allowing you to have a delicious batch of Candy Cane Cookies ready at a moment’s notice.
-
These peppermint-infused Candy Cane Cookies are perfect for holiday platters, cookie exchanges, or simply enjoying with a warm cup of cocoa on a cold winter’s evening. Their delightful peppermint flavor and iconic festive design always bring a smile to everyone’s face. Share them with loved ones, or keep them all to yourself – I won’t tell!
Conclusion:
And there you have it, my dear fellow bakers – the complete guide to crafting those irresistible, festive delights that bring a smile to every face! If you’ve followed along, you’re now armed with all the secrets to creating cookies that are as beautiful to behold as they are delightful to devour. This isn’t just another cookie recipe; it’s an invitation to infuse your kitchen with the joyous spirit of the season, creating edible art that truly captures the magic of the holidays. I genuinely believe that once you try this recipe, it will become a cherished tradition in your home, just as it has in mine.
Why These Candy Cane Cookies Are a Must-Try
So, what makes these particular Candy Cane Cookies an absolute must-try? For starters, it’s the perfect harmony of flavors. The buttery vanilla base provides a comforting canvas, expertly complemented by the invigorating burst of peppermint. Each bite delivers a delightful crunch, followed by a tender, melt-in-your-mouth texture that leaves you craving just one more. Then there’s the visual appeal – that iconic red and white swirl isn’t just decorative; it’s a nostalgic symbol that instantly evokes memories of childhood Christmases, twinkling lights, and cozy gatherings. They stand out on any cookie platter, drawing gasps of admiration from everyone who sees them. Furthermore, the process of making them is incredibly therapeutic and rewarding. There’s a certain joy in rolling out the dough, twisting the two colors together, and watching them transform into perfect candy cane shapes in the oven. It’s a hands-on experience that allows you to truly connect with the holiday spirit, making memories even before the first cookie is eaten. They are surprisingly simple to master, yet they present like a bakery-quality confection, making you look like a seasoned pro without all the fuss.
Serving Up Your Festive Creations
Once your beautiful batch of Candy Cane Cookies has cooled, the fun truly begins with how you choose to enjoy and share them. Of course, the classic pairing is with a steaming mug of hot cocoa, perhaps topped with a generous dollop of whipped cream and a sprinkle of crushed candy cane. The warmth of the drink combined with the cool, minty crunch of the cookie is simply divine on a chilly evening. They are also absolutely wonderful with a glass of cold milk, bringing back that classic childhood treat sensation. Consider arranging them artfully on a festive serving platter alongside other holiday favorites – their vibrant colors and unique shape will undoubtedly be a showstopper. For a delightful twist, try crumbling a few cookies over vanilla ice cream, or even incorporating them into a milkshake for an extra special treat. They are also incredibly popular for cookie exchanges, often being the first to disappear from the table due to their eye-catching appearance and irresistible taste. Package them in decorative tins or cellophane bags with a festive ribbon, and you’ve got homemade gifts that show you truly care, perfect for neighbors, teachers, or friends.
Beyond the Classic Swirl: Creative Variations
While the traditional red and white swirl is undeniably charming, don’t be afraid to experiment with variations to make these cookies uniquely yours. Imagine a dark chocolate version, where one half of the dough is infused with cocoa powder, creating a decadent chocolate-peppermint twist. You could also try substituting almond extract for the peppermint in one half of the dough, offering a subtle, nutty counterpoint to the classic mint flavor. For a truly glamorous presentation, once they’re cooled, drizzle them with a thin stream of melted white or dark chocolate, or even a simple glaze made from powdered sugar and a touch of milk, then immediately sprinkle with edible glitter or mini nonpareils. For a different texture, you could gently press some finely crushed candy cane pieces onto the cookies just before baking, giving them an extra festive crunch and an intensified peppermint flavor. These small modifications can elevate the cookies even further, making them perfect for any occasion beyond just the Christmas season – think pink and white for Valentine’s Day or green and white for St. Patrick’s Day!
Your Turn to Bake and Share!
Now, it’s your turn to roll up your sleeves, gather your ingredients, and bring the magic of these exquisite cookies into your own home. I promise you, the joy of baking them is only surpassed by the pleasure of tasting them and watching the faces of your loved ones light up. Don’t be intimidated by the swirling technique; it’s much simpler than it looks, and even imperfect swirls have a charming, rustic appeal. So, go ahead, embrace the festive spirit, and create some unforgettable moments in your kitchen. Once you’ve baked your batch, I would absolutely love to hear about your experience! Did you stick to the classic? Did you try a fun variation? Please share your photos and stories with me – it truly makes my day to see your culinary triumphs. Happy baking, and may your kitchen be filled with the sweet scent of success and holiday cheer!
Candy Cane Cookies
These festive Candy Cane Cookies capture the holiday spirit with their vibrant red and white peppermint swirl. A tender, buttery cookie infused with pure peppermint extract, shaped like the classic confectionery, making them a delightful and nostalgic treat for any holiday gathering or cookie exchange.
Ingredients
-
1 cup (2 sticks or 226g) unsalted butter, softened
-
1 cup (200g) granulated sugar
-
1 large egg, room temperature
-
1 teaspoon pure vanilla extract
-
½ teaspoon pure peppermint extract
-
3 cups (360g) all-purpose flour, sifted
-
1 teaspoon baking powder
-
½ teaspoon salt
-
Red gel food coloring
Instructions
-
Step 1
Cream softened unsalted butter and granulated sugar until light and fluffy. Beat in egg, vanilla extract, and peppermint extract. In a separate bowl, whisk sifted all-purpose flour, baking powder, and salt. Gradually add dry ingredients to wet, mixing on low speed until just combined (do not overmix). -
Step 2
Divide the dough into two equal portions. To one portion, add red gel food coloring and mix until uniformly red. Flatten both dough portions, wrap separately in plastic wrap, and refrigerate for at least 1 hour (up to 2-3 hours). -
Step 3
Take one chilled dough portion. On a lightly floured surface, roll small pieces of dough into ropes about ¼ inch in diameter and 6-8 inches long. Maintain consistent thickness. Repeat with the other color dough to make matching ropes. -
Step 4
Lay one white rope and one red rope side-by-side, pressing gently along their length. Carefully twist the two ropes around each other to form a spiral. Gently roll the combined rope to smooth the seam. Bend one end downwards to form the ‘hook’ of a candy cane. If desired, cut to 4-5 inch length. Place shaped cookies on baking sheets lined with parchment paper, leaving 1-2 inches space. -
Step 5
Once all cookies are shaped, place the baking sheets back into the refrigerator for another 15-20 minutes. This helps prevent spreading during baking. -
Step 6
Preheat your oven to 375°F (190°C). Place chilled baking sheets directly into the preheated oven. Bake for 8-10 minutes, or until the edges are lightly set and very subtly golden. The white parts should remain pale. -
Step 7
Carefully remove the baking sheet from the oven. Let the cookies cool on the baking sheet for about 5 minutes, then gently transfer them to a wire cooling rack to cool completely. -
Step 8
Once completely cooled, store Candy Cane Cookies in an airtight container at room temperature for up to 5-7 days. For longer storage, freeze them in a single layer until solid, then transfer to a freezer-safe container for up to 2-3 months. Thaw at room temperature.
Important Information
Nutrition Facts (Per Serving)
It is important to consider this information as approximate and not to use it as definitive health advice.
Allergy Information
Please check ingredients for potential allergens and consult a health professional if in doubt.


Leave a Comment