
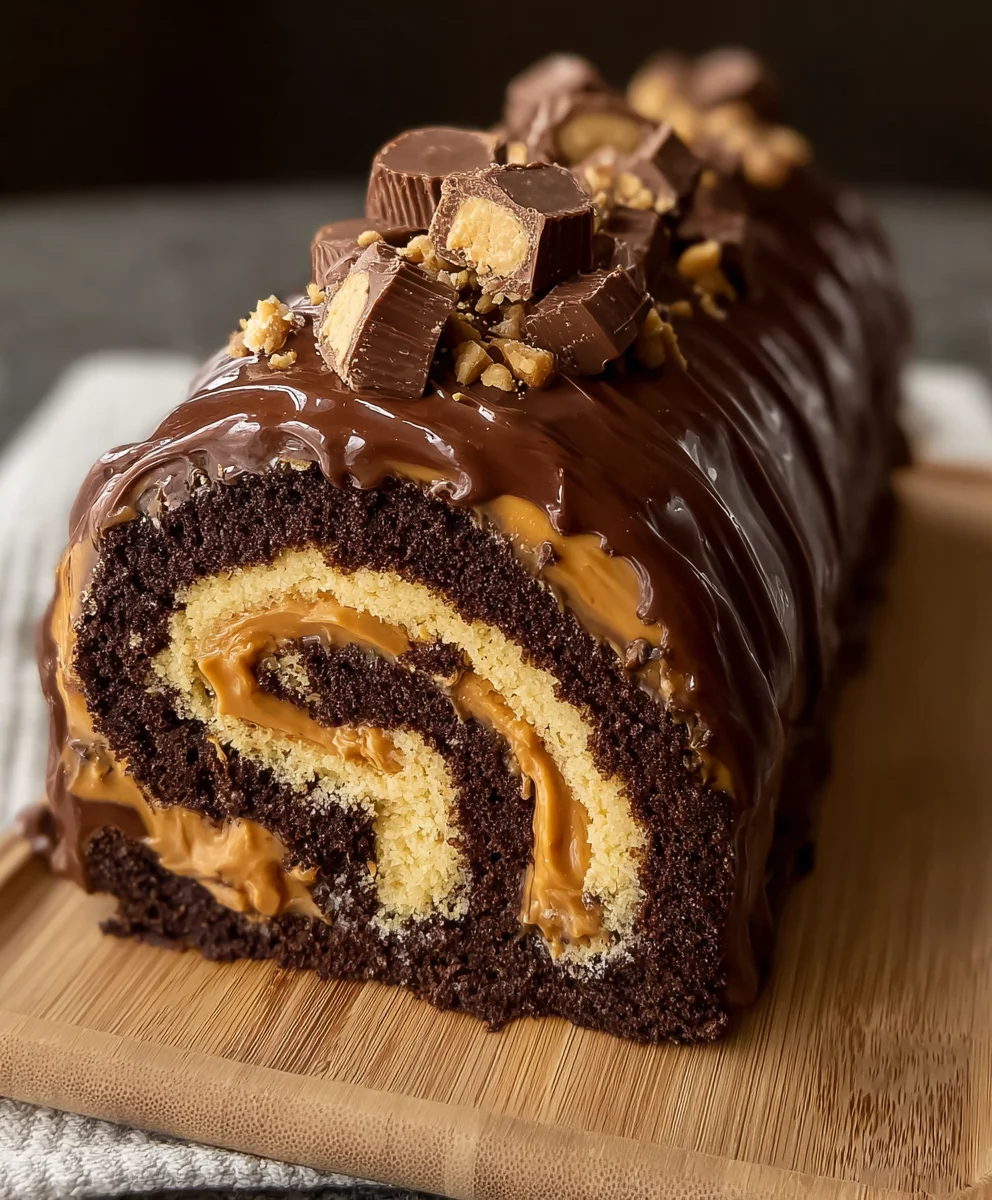
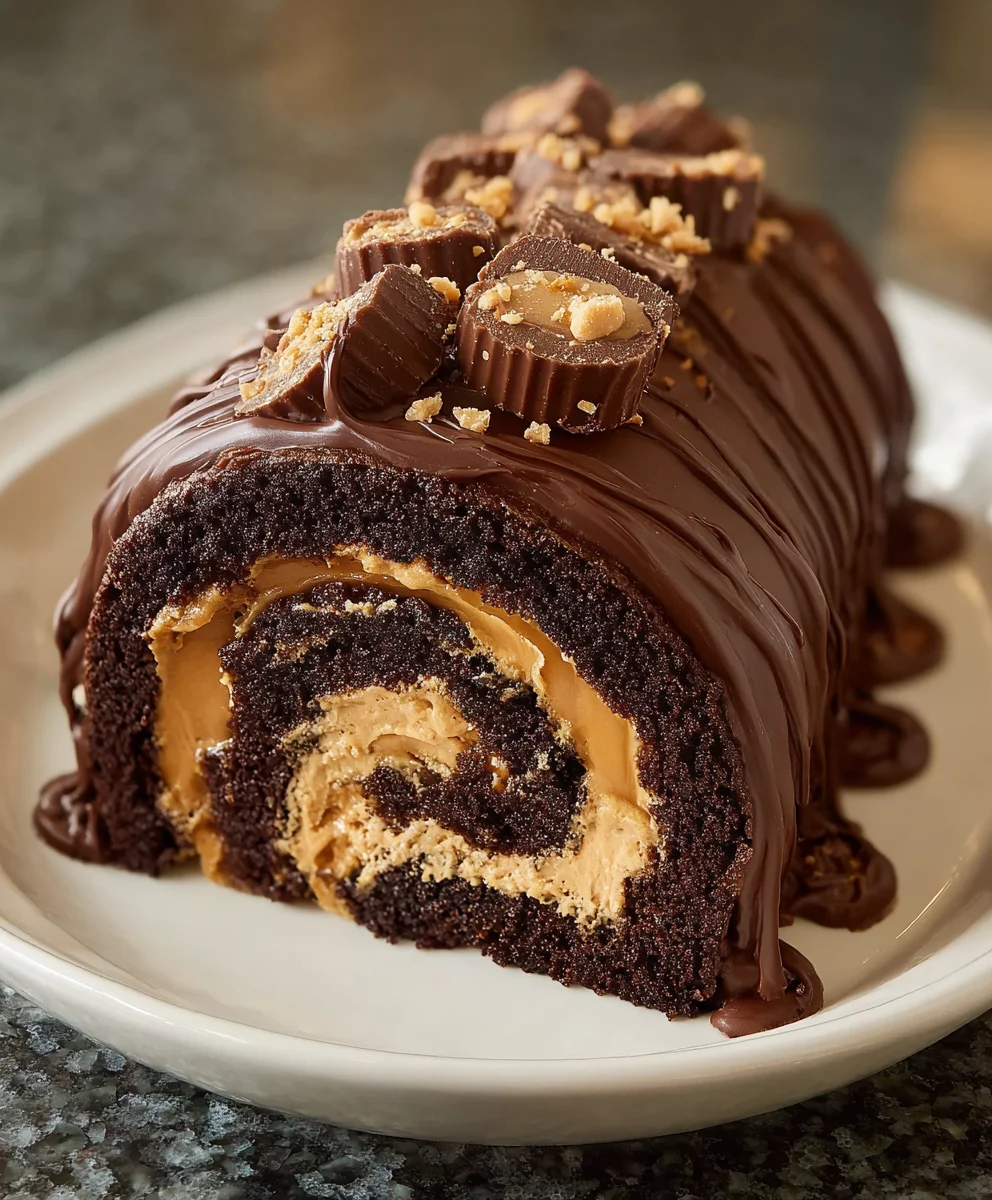
Peanut Butter Cup Chocolate Roll Cake is more than just a dessert; it’s a true celebration of two iconic flavors uniting in a symphony of sweetness and texture. Imagine a moist, tender chocolate sponge, delicately rolled and generously filled with a velvety smooth peanut butter cream, then elegantly draped in a rich chocolate ganache and adorned with chopped peanut butter cups. I am absolutely thrilled to share with you this magnificent creation that takes inspiration from the universally adored peanut butter cup and the timeless elegance of a classic Swiss roll. While the precise origins of this specific combination represent a modern culinary delight, it draws deeply from the widespread affection people have for both traditional chocolate roll cakes and the nostalgic charm of the peanut butter and chocolate pairing.
It’s a dish that evokes pure joy with every single bite.
People utterly adore this Peanut Butter Cup Chocolate Roll Cake for its irresistible blend of salty-sweet decadence, its captivating textural contrasts—from the soft cake to the creamy filling and the delightful crunch of the toppings—and its undeniable showstopper appeal. It’s a guaranteed crowd-pleaser, perfect for any special gathering or simply as an indulgent treat for yourself.

Ingredients:
-
For the Chocolate Roll Cake:
- ¾ cup (90g) all-purpose flour, sifted
- ½ cup (50g) unsweetened natural cocoa powder, sifted
- 1 ½ teaspoons baking powder
- ½ teaspoon salt
- 6 large eggs, separated (whites and yolks)
- ¾ cup (150g) granulated sugar, divided (½ cup for yolks, ¼ cup for whites)
- ¼ cup (60ml) vegetable oil or other neutral oil
- 2 teaspoons pure vanilla extract
- ½ cup (120ml) hot water (just boiled)
- Powdered sugar for dusting the kitchen towel
-
For the Peanut Butter Cup Filling:
- 8 ounces (226g) cream cheese, softened to room temperature
- 1 cup (240g) creamy peanut butter (smooth, not chunky)
- 1 cup (120g) powdered sugar, sifted
- 1 teaspoon pure vanilla extract
- 1 ½ cups (360ml) heavy cream, very cold
-
For the Chocolate Ganache:
- 1 cup (240ml) heavy cream
- 8 ounces (226g) good quality semi-sweet chocolate chips or chopped chocolate
- 2 tablespoons (28g) unsalted butter, softened
- 1 tablespoon light corn syrup (optional, for extra shine)
-
For Garnish:
- 10-15 miniature peanut butter cups, halved or quartered
- ¼ cup (approximately) chopped roasted peanuts
- A light dusting of additional powdered sugar, if desired
For the Chocolate Roll Cake:
- Prepare Your Workspace and Pan: Preheat your oven to 375°F (190°C). Line a 10×15-inch (25x38cm) jelly roll pan with parchment paper, extending the paper over the edges of the pan for easy lifting later. Lightly grease the parchment paper with a little baking spray or butter, then dust it lightly with a tablespoon of cocoa powder or flour, tapping out any excess. This helps prevent sticking. Also, lay out a clean, lint-free kitchen towel on your counter and dust it generously with powdered sugar. This is a crucial step for the successful rolling of your “Peanut Butter Cup Chocolate Roll Cake.”
- Combine Dry Ingredients: In a medium bowl, whisk together the sifted all-purpose flour, sifted unsweetened cocoa powder, baking powder, and salt. Sifting the cocoa powder is particularly important here to ensure there are no lumps in your final batter, contributing to a silky smooth cake texture. Set aside.
- Whip Egg Yolks: In a large mixing bowl, using an electric mixer, beat the 6 egg yolks with ½ cup (100g) of the granulated sugar until the mixture becomes pale yellow, thick, and forms a “ribbon” when the beaters are lifted. This usually takes about 3-5 minutes on medium-high speed. The ribbon stage means the batter falls slowly from the beater, forming a ribbon-like trail on the surface of the mixture before slowly dissolving.
- Incorporate Wet Ingredients into Yolks: To the egg yolk mixture, slowly drizzle in the ¼ cup of vegetable oil and the 2 teaspoons of vanilla extract, mixing on low speed until just combined. Next, gently pour in the ½ cup of hot water, mixing briefly until incorporated. The hot water helps to bloom the cocoa and create a more tender crumb for our chocolate roll cake.
- Fold in Dry Ingredients: Add the dry ingredient mixture to the wet ingredients in two additions, folding gently with a rubber spatula until just combined after each addition. Be careful not to overmix, as this can develop the gluten too much and result in a tough cake. We want our roll cake to be light and flexible.
- Whip Egg Whites: In a separate, very clean large bowl (ensure no grease is present, as it can prevent the whites from whipping), whip the 6 egg whites with the remaining ¼ cup (50g) of granulated sugar. Start by whipping the egg whites on medium speed until they become foamy. Gradually add the sugar and increase the speed to high, continuing to whip until stiff, glossy peaks form. The whites should hold their shape when the beater is removed.
- Combine Batter: Carefully fold one-third of the whipped egg whites into the chocolate batter to lighten it. Then, gently fold in the remaining egg whites in two additions. Use a light hand and a folding motion, cutting down through the center of the mixture and sweeping up the sides, being careful not to deflate the air you’ve incorporated. This air is essential for a light and airy roll cake that won’t crack when rolled.
- Bake the Cake: Pour the batter into your prepared jelly roll pan, spreading it evenly to all corners with an offset spatula. Ensure the batter is level for even baking. Bake for 12-15 minutes, or until the cake springs back when lightly touched and the edges are just beginning to pull away from the sides of the pan. A toothpick inserted into the center should come out clean.
- Roll the Cake: Immediately upon removing the cake from the oven, gently invert it onto the powdered-sugar-dusted kitchen towel. Carefully peel off the parchment paper. While the cake is still warm (this is crucial for flexibility), starting from one of the short ends, tightly roll the cake and the towel together. Place the rolled cake, seam-side down, on a wire rack and allow it to cool completely to room temperature, which can take about 1 to 2 hours. This initial roll “trains” the cake to roll, preventing cracks later when you fill it.
For the Peanut Butter Cup Filling:
- Cream Cheese Base: In a large mixing bowl, beat the softened cream cheese with an electric mixer on medium speed until smooth and creamy, about 2-3 minutes. It’s important for the cream cheese to be at room temperature to prevent lumps.
- Add Peanut Butter and Sugar: Add the creamy peanut butter, sifted powdered sugar, and vanilla extract to the cream cheese. Beat on medium speed until well combined and lightened, scraping down the sides of the bowl as needed. The mixture should be thick and airy.
- Whip Heavy Cream: In a separate, very cold bowl (you can chill the bowl and beaters in the freezer for 10-15 minutes prior for best results), whip the very cold heavy cream on high speed until stiff peaks form. Be careful not to over-whip, or it will become grainy.
- Combine Filling: Gently fold the whipped heavy cream into the peanut butter cream cheese mixture in two additions. Use a rubber spatula and a delicate folding motion to maintain the airiness of the whipped cream. The finished filling should be light, fluffy, and smooth – a perfect complement to our rich chocolate roll cake. Cover and refrigerate until ready to use.
For the Chocolate Ganache:
- Prepare Chocolate: Place the chocolate chips or finely chopped chocolate into a heatproof bowl.
- Heat Cream: In a small saucepan, heat the heavy cream over medium heat until it just begins to simmer around the edges, but do not bring it to a rolling boil.
- Pour Over Chocolate: Immediately pour the hot cream over the chocolate in the bowl. Let it sit undisturbed for 5 minutes to allow the heat from the cream to melt the chocolate. This passive melting technique ensures a smoother ganache.
- Whisk Ganache: After 5 minutes, begin to whisk the mixture gently from the center outwards until it is completely smooth and glossy. If any chocolate pieces remain, you can gently heat the bowl over a double boiler for a minute or two, stirring constantly, but avoid overheating.
- Add Butter and Corn Syrup: Stir in the softened unsalted butter and the optional corn syrup until fully incorporated. The butter adds a luxurious richness and helps with texture, while the corn syrup provides an extra beautiful shine to your ganache, making your “Peanut Butter Cup Chocolate Roll Cake” visually stunning.
- Cool to Spreading Consistency: Allow the ganache to cool at room temperature for at least 30-60 minutes, stirring occasionally, until it thickens to a spreadable consistency, similar to a thick frosting. You want it to be firm enough to hold its shape but still pourable. If it’s too thin, it will run off the cake; if it’s too thick, it will be hard to spread. If it becomes too thick, you can gently warm it over a double boiler for a few moments.
Assembling the Peanut Butter Cup Chocolate Roll Cake:
- Unroll the Cake: Once the chocolate roll cake has completely cooled, gently unroll it from the kitchen towel onto a clean piece of parchment paper or directly onto your work surface. Be patient and gentle; the cake is flexible but can still tear if handled too roughly.
- Spread the Filling: Spread the prepared peanut butter cup filling evenly over the entire surface of the unrolled cake, leaving about a ½-inch border clear along the short edges and one long edge. This ensures the filling doesn’t squish out excessively when re-rolling.
- Re-Roll the Cake: Starting from one of the short edges (the one without a clear border), carefully and tightly re-roll the cake. Take your time to make it as tight as possible without squeezing out all the filling. Use the parchment paper beneath it to help guide and lift as you roll.
- Chill the Rolled Cake: Once rolled, carefully transfer the log to a serving platter or a sheet pan lined with parchment paper, seam-side down. Cover it loosely with plastic wrap and refrigerate for at least 30 minutes to allow the filling to set and the cake to firm up. This makes it much easier to frost and slice neatly.
- Frost with Ganache: Remove the chilled cake from the refrigerator. Evenly spread the cooled chocolate ganache over the entire exterior of the roll cake using an offset spatula. You can create decorative swirls or simply smooth it out for a clean finish. The slightly chilled cake will help the ganache set more quickly.
- Garnish: Arrange the halved or quartered miniature peanut butter cups artistically along the top of the cake, pressing them gently into the still-soft ganache. Sprinkle the chopped roasted peanuts over the cake for added texture and a lovely nutty crunch that enhances the “Peanut Butter Cup Chocolate Roll Cake” theme.
Chilling and Garnish:
- Final Chill: For the best results and easiest slicing, return the decorated “Peanut Butter Cup Chocolate Roll Cake” to the refrigerator for at least another hour, or until the ganache is fully set. This final chill is crucial for the cake to firm up completely, allowing for clean, beautiful slices.
- Serve: When you’re ready to serve, remove the cake from the refrigerator about 15-20 minutes before slicing to allow it to come slightly closer to room temperature for optimal flavor and texture. Use a sharp, thin knife, wiping the blade clean with a hot, damp cloth between each slice for the cleanest cuts. This rich and decadent dessert is sure to be a showstopper! Enjoy every magnificent bite of your homemade Peanut Butter Cup Chocolate Roll Cake.
Conclusion:
And there you have it, dear baking enthusiasts! We’ve journeyed through the creation of a dessert that isn’t just a treat; it’s an experience, a celebration of two of the most beloved flavors known to humankind. I genuinely believe that this particular recipe for the
Peanut Butter Cup Chocolate Roll Cake
is an absolute must-try for anyone who appreciates the magical pairing of rich, deep chocolate and creamy, salty-sweet peanut butter. It truly encapsulates everything you could want in a decadent dessert. From the moment you slice into its beautifully swirled layers, you’ll understand why this is a recipe I simply had to share. The cake itself is incredibly moist and tender, a perfect canvas for the luscious, smooth peanut butter cream cheese filling. Then, to top it all off, we have that glorious chocolate ganache, providing a bittersweet counterpoint that prevents the whole thing from being overly sweet. It’s a symphony of textures and tastes: the softness of the cake, the silkiness of the filling, the rich glaze, and of course, the delightful crunch of the chopped peanut butter cups on top. It’s a dessert that not only looks impressive but delivers on every single flavor promise. It’s the kind of showstopper that will earn you rave reviews and requests for the recipe time and time again, making it perfect for special occasions, holiday gatherings, or simply when you want to treat yourself and your loved ones to something truly extraordinary.
Now, let’s talk about enhancing this already magnificent creation. While a simple slice of this roll cake is undeniably perfect on its own, I have a few serving suggestions that can elevate the experience even further. Imagine a generous slice, slightly chilled, accompanied by a small scoop of good quality vanilla bean ice cream. The contrast of the cool, creamy ice cream with the rich cake is simply divine. Or, for a true indulgence, a scoop of coffee-flavored ice cream would be an unexpected but brilliant pairing, the slight bitterness of the coffee cutting through the sweetness of the cake. A dusting of high-quality cocoa powder or a drizzle of warm caramel sauce could also add an extra layer of visual appeal and flavor complexity. For those who enjoy a hint of freshness, a scattering of fresh raspberries or sliced strawberries alongside each serving can provide a lovely, bright counterpoint to the richness. And, of course, a hot cup of coffee, a robust espresso, or a glass of cold milk are always classic companions that never disappoint.
Endless Possibilities for Customization!
Beyond serving suggestions, this recipe is also wonderfully versatile, allowing for a variety of creative variations. If you’re feeling adventurous, consider folding some mini chocolate chips or finely chopped pretzels into the peanut butter filling for an added textural surprise and a salty crunch that contrasts beautifully with the smooth creaminess. For a different chocolate profile, you could experiment with a dark chocolate ganache for a more intense bitterness, or even a white chocolate drizzle for a lighter, sweeter touch. Don’t have peanut butter cups on hand for the topping? Chopped roasted peanuts, a sprinkle of sea salt flakes, or even a light dusting of powdered sugar would still make for a beautiful and delicious finish. If you want to lean into the “cup” aspect even more, consider using a different kind of chopped candy bar that features nuts or caramel. And for those with dietary considerations, while this recipe is built around peanut butter, you could explore using a nut-free butter alternative, like sunflower seed butter, if allergies are a concern, though the flavor profile would, of course, shift slightly. The beauty of baking is in experimentation, and this roll cake provides a fantastic foundation for your culinary imagination to run wild.
Your Turn to Bake and Share!
I truly hope I’ve inspired you to roll up your sleeves and give this
Peanut Butter Cup Chocolate Roll Cake
a try. Don’t be intimidated by the idea of rolling the cake; with a little patience and the tips provided in the main recipe, you’ll find it’s much easier than it looks, and the payoff is absolutely worth every minute. There’s an immense sense of satisfaction that comes from creating such a beautiful and delicious dessert from scratch, and I promise you, the smiles and appreciative murmurs around your table will make it all worthwhile. Once you’ve baked and tasted this incredible creation, I would absolutely love to hear about your experience! Did you stick to the recipe, or did you try out any of the variations I suggested? What was your favorite part of making it, or, more importantly, eating it? Please feel free to share your thoughts, your photos, and any brilliant serving or variation ideas of your own. Your insights are invaluable and help create a wonderful community of enthusiastic bakers. So, go forth, bake with joy, and prepare to be amazed by the deliciousness that awaits you. Happy baking!
Peanut Butter Cup Chocolate Roll Cake
Savor the irresistible pairing of rich chocolate and smooth peanut butter in this delightful roll cake. A light and fluffy chocolate sponge is carefully rolled around a creamy peanut butter filling, accentuated by the crunch of mini peanut butter cups. Elegantly draped in a rich chocolate ganache and adorned with chopped peanut butter cups, this decadent dessert combines two beloved flavors into an impressive and surprisingly achievable treat, perfect for any special gathering.
Ingredients
-
¾ cup (90g) all-purpose flour
-
½ cup (50g) unsweetened cocoa powder
-
1 ½ teaspoons baking powder
-
½ teaspoon salt
-
6 large eggs, separated
-
¾ cup (150g) granulated sugar, divided
-
¼ cup (60ml) vegetable oil
-
2 teaspoons pure vanilla extract
-
½ cup (120ml) hot water
-
Powdered sugar (for dusting towel)
-
8 oz (226g) cream cheese, softened
-
1 cup (240g) creamy peanut butter
-
1 cup (120g) powdered sugar
-
1 teaspoon pure vanilla extract
-
1 ½ cups (360ml) cold heavy cream
-
1 cup (240ml) heavy cream
-
8 oz (226g) semi-sweet chocolate chips
-
2 tbsp (28g) unsalted butter, softened
-
1 tbsp light corn syrup (optional)
-
10-15 mini peanut butter cups, halved
-
¼ cup chopped roasted peanuts
-
Powdered sugar (optional garnish)
Instructions
-
Step 1
Preheat oven to 375°F (190°C). Line a 10×15-inch pan with greased parchment, dusted with cocoa/flour. Dust a clean kitchen towel generously with powdered sugar. -
Step 2
Whisk flour, cocoa powder, baking powder, and salt. Set aside. -
Step 3
Beat egg yolks with ½ cup (100g) granulated sugar until pale, thick, and ribbon-forming (3-5 min). -
Step 4
Slowly drizzle oil and vanilla into yolk mixture, mixing on low. Briefly mix in hot water. -
Step 5
Gently fold dry ingredients into wet in two additions until just combined. -
Step 6
In a separate, clean bowl, whip egg whites with remaining ¼ cup (50g) granulated sugar until stiff, glossy peaks form. -
Step 7
Gently fold one-third of whipped whites into chocolate batter to lighten, then fold in remaining whites in two additions carefully to maintain air. -
Step 8
Pour batter into prepared pan, spread evenly. Bake 12-15 minutes until springy and a toothpick comes out clean. -
Step 9
Immediately invert hot cake onto powdered-sugar-dusted towel. Peel off parchment. Starting from a short end, tightly roll cake and towel together. Cool completely on a wire rack (1-2 hours). -
Step 10
In a large bowl, beat softened cream cheese until smooth and creamy (2-3 min). -
Step 11
Add peanut butter, powdered sugar, and vanilla extract. Beat until combined and lightened. -
Step 12
In a separate, very cold bowl, whip cold heavy cream on high speed until stiff peaks form. -
Step 13
Gently fold whipped heavy cream into peanut butter cream cheese mixture in two additions. Cover and refrigerate. -
Step 14
Place chocolate chips in a heatproof bowl. Heat heavy cream in a saucepan until simmering at edges. Pour hot cream over chocolate and let sit 5 minutes. Whisk until smooth and glossy. Stir in softened butter and optional corn syrup. Cool at room temperature (30-60 min), stirring, until spreadable. -
Step 15
Once cooled, gently unroll the chocolate cake. Spread peanut butter filling evenly over the surface, leaving a ½-inch border clear along short edges and one long edge. -
Step 16
Starting from the short end without a clear border, carefully and tightly re-roll the cake. Transfer to a platter, seam-side down. Cover loosely and refrigerate for at least 30 minutes to set. -
Step 17
Remove chilled cake. Evenly spread cooled chocolate ganache over the exterior. Arrange halved mini peanut butter cups and sprinkle chopped roasted peanuts on top. -
Step 18
Refrigerate decorated cake for at least another hour, or until ganache is fully set. Remove 15-20 minutes before serving. Slice with a sharp, hot, damp knife, wiping clean between cuts. Enjoy!
Important Information
Nutrition Facts (Per Serving)
It is important to consider this information as approximate and not to use it as definitive health advice.
Allergy Information
Please check ingredients for potential allergens and consult a health professional if in doubt.


Leave a Comment