
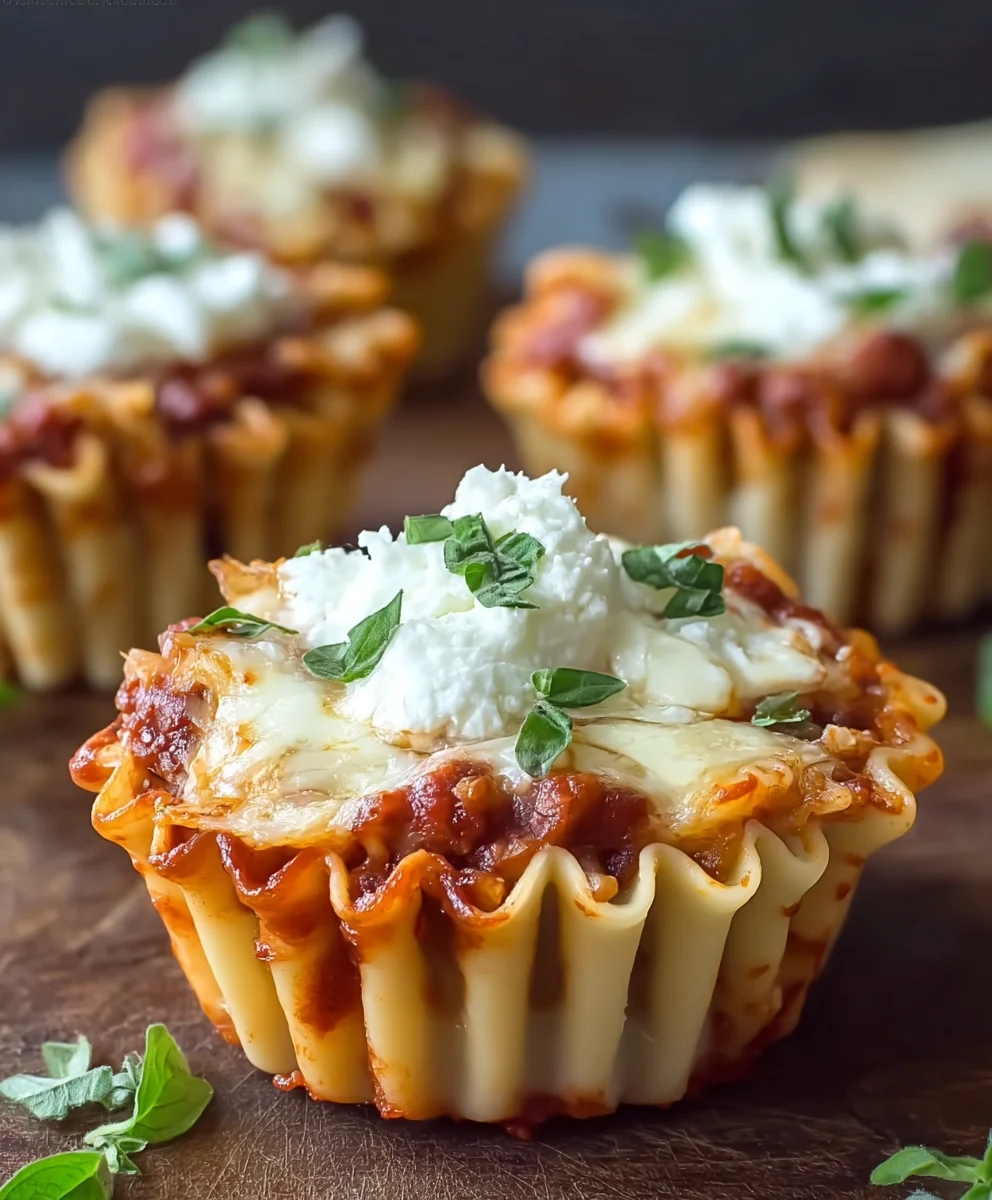
Petite Lasagna Cups offer a delightful twist on a classic Italian comfort food, transforming the beloved layered pasta dish into charming, individual servings perfect for any occasion. Imagine all the rich, savory flavors of traditional lasagna – the tender pasta, robust marinara, creamy ricotta, and molten mozzarella – but in a perfectly portioned, handheld package that eliminates the fuss of serving.
While the concept of lasagna dates back centuries to Italy, evolving from ancient Roman flatbreads to the iconic dish we know today, these innovative Petite Lasagna Cups bring that cherished culinary heritage into the modern kitchen with unparalleled convenience. I find myself reaching for this recipe time and again because it solves so many dilemmas. No more messy slicing or uneven portions; each cup is a self-contained masterpiece, ensuring every guest enjoys a perfect bite. They are incredibly versatile, fantastic for elegant dinner parties, casual potlucks, or even as a fun, make-ahead weeknight meal. People adore them for their irresistible taste, the satisfying texture of perfectly baked pasta and melted cheese, and the sheer practicality of their design. It’s truly a dish that combines tradition with a fresh, contemporary appeal.

Ingredients:
- For the Hearty Meat Sauce:
- 1 tablespoon olive oil
- 1 pound lean ground beef or a blend of beef and pork
- 1 large yellow onion, finely chopped
- 3 cloves garlic, minced
- 1 (28 ounce) can crushed tomatoes
- 1 (15 ounce) can tomato sauce
- 1 (6 ounce) can tomato paste
- ½ cup dry red wine (optional, but highly recommended for depth)
- 1 teaspoon dried oregano
- ½ teaspoon dried basil
- ¼ teaspoon red pepper flakes (optional, for a little kick)
- 1 bay leaf
- Salt and freshly ground black pepper to taste
- Pinch of sugar (to balance acidity)
- For the Creamy Ricotta Filling:
- 15 ounces whole milk ricotta cheese
- ½ cup grated Parmesan cheese, plus extra for topping
- ¼ cup chopped fresh parsley
- 1 large egg, lightly beaten
- ½ teaspoon salt
- ¼ teaspoon black pepper
- For Assembly:
- 12-15 lasagna noodles (oven-ready or traditional)
- 2 cups shredded mozzarella cheese
- Cooking spray or butter for muffin tins
- Fresh basil leaves for garnish (optional)
Preparing the Hearty Meat Sauce
The foundation of truly exceptional Petite Lasagna Cups lies in a rich, deeply flavored meat sauce. This isn’t just any sauce; it’s a slow-simmered, aromatic masterpiece that will bring all the comforting flavors together in your individual servings. Trust me, dedicating time to this step makes all the difference.
- First things first, grab a large, heavy-bottomed pot or a Dutch oven. This is where all the magic will happen. Drizzle in your tablespoon of olive oil and set it over medium-high heat. Once the oil shimmers, it’s time to add the ground beef. Break up the meat with a spoon as it cooks. Your goal here is to brown the beef thoroughly, ensuring there are no pink bits left. Browning develops incredible flavor, so don’t rush this stage.
- Once the beef is beautifully browned, carefully drain off any excess grease. This keeps our sauce from being overly oily and allows the other flavors to shine through.
- Reduce the heat to medium. Now, it’s time to introduce your finely chopped yellow onion to the pot. Sauté the onion, stirring occasionally, until it becomes translucent and wonderfully softened, which usually takes about 5-7 minutes. This gentle cooking process brings out the natural sweetness of the onion, which is essential for a balanced sauce.
- Next, add the minced garlic. Oh, that aroma! Stir the garlic for just about 1 minute, until it becomes fragrant. Be careful not to burn it, as burnt garlic can taste bitter. We want its sweet, pungent notes, not its acrid ones.
- Pour in the red wine, if you’re using it. This is a crucial step for adding complexity and depth. Let the wine simmer and reduce for 2-3 minutes, scraping up any browned bits from the bottom of the pot with your spoon. This “deglazing” technique releases all those flavorful fond bits into the sauce, enriching it even further.
- Now, add the canned crushed tomatoes, tomato sauce, and tomato paste. The tomato paste, especially, is a secret weapon for thickening and intensifying the tomato flavor. Stir everything together until it’s well combined.
- It’s time for the herbs and spices! Stir in the dried oregano, dried basil, red pepper flakes (if you like a little heat), and the bay leaf. Season generously with salt and freshly ground black pepper. Give it a good stir to ensure all the spices are distributed.
- Add a small pinch of sugar. Even if you don’t like sweet sauces, a tiny bit of sugar helps to cut through the acidity of the tomatoes, creating a more harmonious flavor profile.
- Bring the sauce to a gentle simmer, then reduce the heat to low, cover the pot, and let it cook for at least 1 hour, or even up to 2 hours. The longer it simmers, the more the flavors will meld and deepen. Stir occasionally to prevent sticking, and if the sauce seems too thick, you can add a splash of water or beef broth. This slow cooking is absolutely essential for a truly magnificent meat sauce for your Petite Lasagna Cups.
- Before moving on, don’t forget to remove the bay leaf. We want its essence, not its presence!
Making the Creamy Ricotta Mixture
While your glorious meat sauce is simmering away, permeating your kitchen with an irresistible aroma, let’s turn our attention to the creamy, cheesy heart of our Petite Lasagna Cups: the ricotta filling. This simple yet vital component adds moisture, tang, and that classic lasagna creaminess.
- In a medium-sized mixing bowl, combine the whole milk ricotta cheese, grated Parmesan cheese, chopped fresh parsley, and the lightly beaten egg.
- Season the mixture with ½ teaspoon of salt and ¼ teaspoon of black pepper. You can always add a little more to taste, but this is a good starting point.
- Using a spoon or a rubber spatula, gently mix all the ingredients together until they are just combined. You don’t want to overmix, as this can make the ricotta watery. The goal is a light, fluffy, and evenly seasoned mixture. The egg acts as a binder, helping the ricotta hold its shape once baked, which is particularly important for our individual lasagna cups.
- Set this delightful mixture aside. It’s ready to be layered into your Petite Lasagna Cups when the time comes!
Blanching and Preparing the Lasagna Noodles
The noodles are the structural backbone of our Petite Lasagna Cups. While some recipes might call for no-boil noodles, I find that a quick blanch of traditional noodles gives them the perfect pliability and texture, making them much easier to work with when forming the cups and ensuring they cook perfectly without being tough or mushy.
- Bring a large pot of salted water to a rolling boil. Don’t skimp on the salt; it seasons the noodles from the inside out.
- Carefully add the lasagna noodles to the boiling water, making sure they don’t stick together. You might need to do this in batches if your pot isn’t large enough.
- Cook the noodles for about 3-4 minutes, or until they are al dente. They should be pliable but still have a slight bite to them. Remember, they will continue to cook in the oven, so we don’t want them fully cooked at this stage. We’re aiming for flexibility here, which is key for shaping them into cups.
- Once blanched, immediately transfer the noodles to a large bowl of ice water. This “shocks” the noodles, stopping the cooking process and preventing them from getting gummy. This step is crucial for maintaining their perfect texture for your Petite Lasagna Cups.
- Once cooled, lay the noodles flat on a clean kitchen towel or parchment paper. Gently pat them dry. Excess moisture can make your lasagna cups soggy, and we want them firm and flavorful.
- Now, for the cutting! Take each lasagna noodle and slice it into four equal squares. You can usually do this by cutting it in half lengthwise, and then in half crosswise. Depending on the size of your muffin tin, you might need to adjust the size slightly, but generally, a square of roughly 3×3 inches works beautifully for standard muffin cups. These squares will form the base and sides of your delightful individual portions.
Assembling Your Petite Lasagna Cups
This is where the magic truly comes together, and we transform our prepared components into adorable and delicious Petite Lasagna Cups. Get ready for a fun, hands-on experience!
- Preheat your oven to 375°F (190°C). This ensures the oven is at the optimal temperature for baking these individual treats perfectly.
- Prepare your muffin tins. Generously spray a 12-cup standard muffin tin with cooking spray, or lightly butter each cup. You want to make sure your beautiful lasagna cups release easily after baking. If you have non-stick tins, that’s a bonus, but a good spray or buttering is always a wise precaution.
- Take one of your blanched and cut lasagna noodle squares. Gently press it into the bottom and up the sides of one of the muffin cups, creating a little “cup” or “bowl” from the noodle. The flexibility of the blanched noodle makes this quite easy. It’s okay if there are some wrinkles; they just add character!
- Next, place a small dollop (about 1 tablespoon) of your creamy ricotta mixture into the bottom of the noodle cup. Spread it gently to cover the base. This layer provides a wonderful creamy foundation.
- Spoon about 1-2 tablespoons of the rich meat sauce over the ricotta layer. Don’t overfill, as we have more layers to come!
- Sprinkle a small amount of shredded mozzarella cheese over the meat sauce. This will contribute to that lovely gooey, cheesy pull we all love in lasagna.
- Repeat the layering process: Add another small dollop of ricotta, followed by another spoonful of meat sauce, and then a generous sprinkle of mozzarella. Depending on the depth of your muffin tin and the size of your noodle squares, you might manage two full layers of each, or one generous layer. The key is to build them up into substantial, satisfying cups. Ensure the top layer is a good amount of mozzarella.
- Continue this process for all 12 muffin cups. You’ll quickly get into a rhythm! If you have extra meat sauce or ricotta, you can be a bit more generous with your last few cups, or simply save it for another use. It’s often better to have a little extra than to run short.
- Once all your Petite Lasagna Cups are assembled, cover the muffin tin loosely with aluminum foil. This helps to steam them slightly during the initial baking, ensuring the noodles continue to soften and the cheese melts beautifully without over-browning too quickly.
Baking and Serving Your Petite Lasagna Cups
The final step in our culinary journey: baking these delightful individual portions to golden, bubbly perfection. This is where your patiently assembled Petite Lasagna Cups transform into an irresistible, comforting dish.
- Place the foil-covered muffin tin into your preheated 375°F (190°C) oven. Bake for 20 minutes. This initial baking time under foil allows all the flavors to meld, the cheese to melt wonderfully, and the noodles to become perfectly tender.
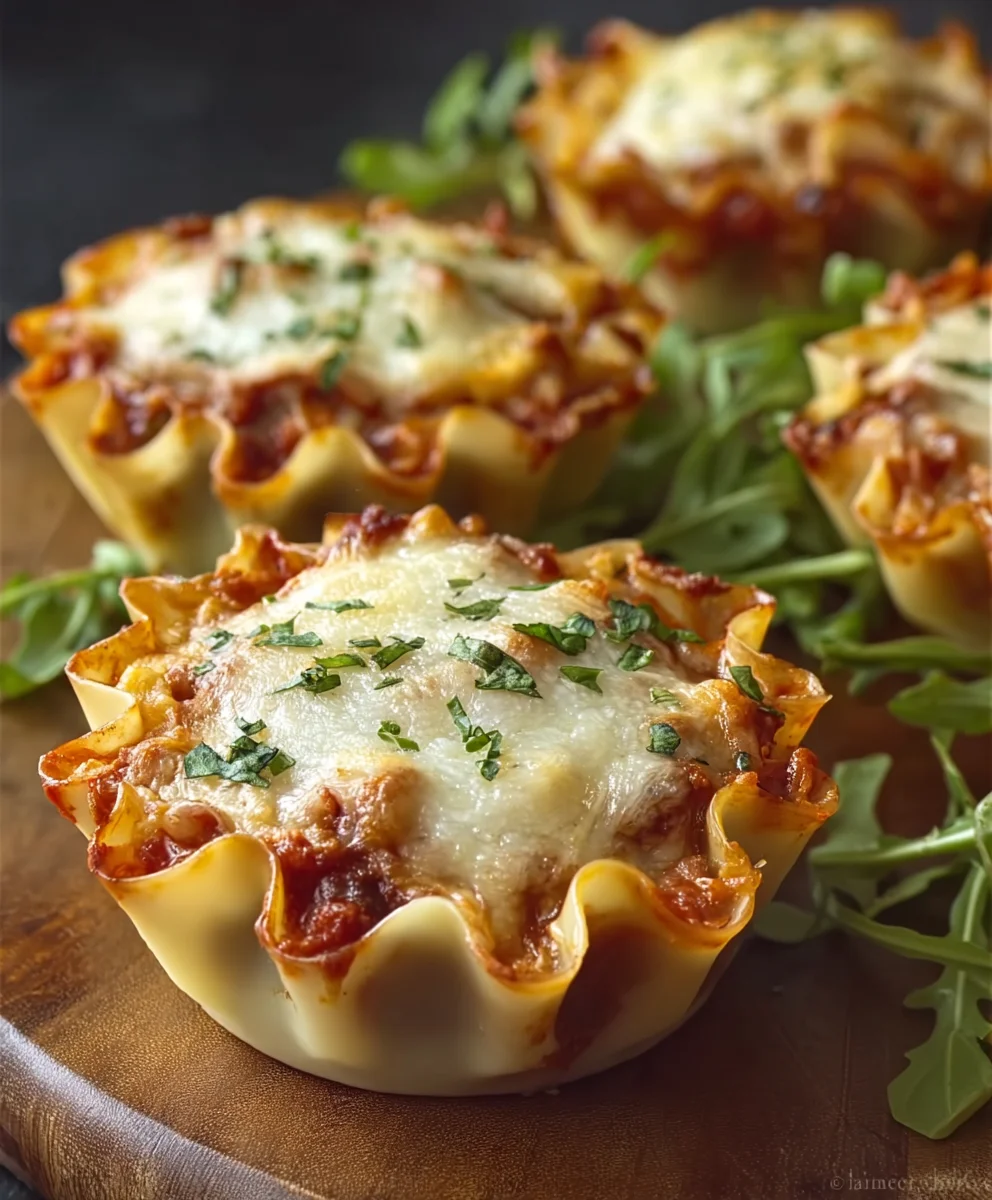
- After 20 minutes, carefully remove the foil. Now it’s time to achieve that beautiful golden-brown, bubbly top. Return the uncovered muffin tin to the oven and continue to bake for an additional 10-15 minutes, or until the cheese on top is gloriously melted, lightly browned, and bubbling invitingly. Keep an eye on them during this stage, as ovens can vary, and we want perfection, not char!
- Once baked to your liking, carefully remove the muffin tin from the oven. This is a crucial moment for our Petite Lasagna Cups. It might be tempting to dive right in, but resist! Let the lasagna cups rest in the muffin tin for about 5-10 minutes. This resting period allows the cheese and filling to set slightly, making them much easier to remove from the tin without falling apart. It also prevents any scalding from the molten cheese and sauce.
- After resting, gently run a thin knife or a small offset spatula around the edges of each lasagna cup to loosen them from the tin. Then, carefully lift each one out and transfer it to a serving platter. They should pop out quite easily thanks to our initial greasing and the resting time.
- For an extra touch of freshness and elegance, you can garnish your warm Petite Lasagna Cups with a sprinkle of fresh chopped basil or a light dusting of extra Parmesan cheese. They are not just delicious; they are also visually appealing, making them perfect for entertaining or a special weeknight meal.
- Serve your magnificent Petite Lasagna Cups warm, perhaps alongside a simple green salad and some crusty bread. Each cup is a perfectly portioned, rich, and flavorful bite of classic lasagna, without all the fuss of cutting and serving a large tray. Enjoy the fruits of your labor!
Conclusion:
And there you have it, my friends! We’ve reached the delicious culmination of our culinary journey with these incredible Petite Lasagna Cups. I honestly believe this recipe is an absolute game-changer in the kitchen, and it’s truly a must-try for anyone who loves the comforting flavors of lasagna but perhaps shies away from the usual fuss, the messy layers, or the daunting prospect of baking a huge casserole. What makes these individual cups so special is their sheer convenience without compromising on that rich, hearty taste we all adore. They offer perfect, built-in portion control, which is fantastic whether you’re counting calories or simply want to avoid overindulging. But beyond the practicality, there’s an undeniable charm to these little bites of heaven. Imagine serving up a dish that looks as impressive as it tastes, without spending hours slaving over a hot stove. That’s precisely what these cups deliver – an elegant, flavorful experience in a compact, delightful package.
I find them particularly captivating because they take all the beloved elements of classic lasagna – the tender pasta, the savory meat sauce, the creamy ricotta, the melted mozzarella – and transform them into a manageable, accessible format. They’re less intimidating for a weeknight meal and so much more fun for entertaining. This recipe is designed to simplify your life while elevating your dining experience. No more awkward slicing of a giant lasagna, no more messy plates with sauce spilling everywhere; each guest gets their own perfectly formed, piping hot cup of cheesy, meaty goodness. It’s a brilliant solution for busy parents, enthusiastic home cooks, and anyone looking to impress without the stress. The aroma alone as they bake is enough to make your mouth water, promising a comforting and deeply satisfying meal.
When it comes to serving, the possibilities are wonderfully diverse. For a light yet fulfilling main course, I love to pair these Petite Lasagna Cups with a crisp, simple green salad, perhaps with a zesty vinaigrette, to cut through the richness. A side of warm, crusty garlic bread is, of course, a classic and always welcome addition. If you’re hosting a party or looking for an elegant appetizer, these cups are absolutely perfect; they’re easy to pick up and enjoy while mingling. They also make fantastic lunchbox additions, heating up beautifully the next day, bringing a touch of gourmet to your workday. For a brunch spread, imagine them alongside some scrambled eggs and fresh fruit – a truly unexpected and delightful twist! For an adults-only gathering, a glass of medium-bodied red wine, like a Chianti or a Merlot, would complement the robust flavors beautifully, enhancing the overall experience.
And here’s where you can truly unleash your creativity with variations! Don’t feel bound by my specific ingredient choices; think of this recipe as a fantastic blueprint. For the meat lovers, consider swapping ground beef for Italian sausage for an extra kick, or a mix of both for a deeper flavor profile. Ground turkey or chicken can lighten things up without sacrificing protein. For my vegetarian friends, these cups are incredibly adaptable: try a rich mushroom and spinach filling, a roasted vegetable medley with zucchini and bell peppers, or even a spicy black bean and corn blend. Cheese is another playground for experimentation; add some smoked provolone, sharp cheddar, or a sprinkle of crumbled feta for a unique twist. You could even introduce a layer of pesto for an herbaceous burst, or a dash of red pepper flakes into the sauce if you like things a little spicier. For a truly decadent experience, a creamy béchamel sauce could replace some of the ricotta. If you’re exploring gluten-free options, many grocery stores now offer oven-ready gluten-free lasagna noodles that would work perfectly here. Don’t be afraid to make them your own!
Now, I genuinely hope that reading through this recipe has inspired you. I urge you to clear your schedule, gather your ingredients, and give these amazing Petite Lasagna Cups a try in your own kitchen. I promise you, the effort is minimal, and the reward is absolutely magnificent. You’ll be amazed at how simple it is to create something so incredibly delicious and visually appealing. And once you’ve experienced the joy of making and tasting them, please, please come back and share your experience with me! I absolutely adore hearing from you, seeing your culinary creations, and learning about any brilliant twists or variations you come up with. Did you serve them with something unexpected? Did you swap out an ingredient that worked wonders? Snap a photo, share your thoughts, and let’s celebrate the deliciousness together. Happy cooking, and I can’t wait to hear all about your Petite Lasagna Cup adventures!
Petite Lasagna Cups
A delicious recipe
Ingredients
-
Ingredient 1
-
Ingredient 2
-
Ingredient 3
Instructions
-
Step 1
Step 1 -
Step 2
Step 2 -
Step 3
Step 3
Important Information
Nutrition Facts (Per Serving)
It is important to consider this information as approximate and not to use it as definitive health advice.
Allergy Information
Please check ingredients for potential allergens and consult a health professional if in doubt.

Leave a Comment