
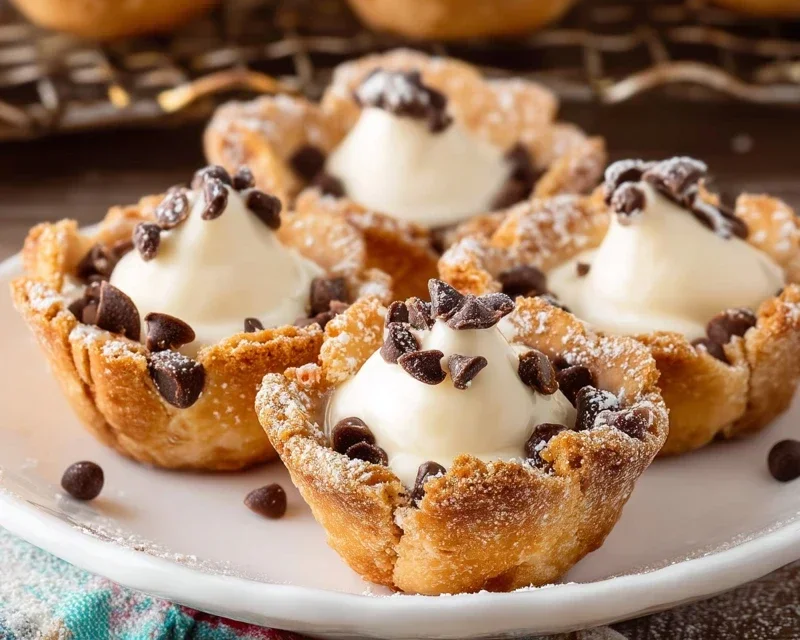
Mini Cannoli Cups: the ultimate bite-sized indulgence, are about to become your new favorite dessert obsession. We all know and adore the classic cannoli, with its crisp shell and creamy, sweet filling. But what if I told you we could capture all that delightful flavor and texture in an even more convenient and utterly adorable package? That’s where these mini cannoli cups shine. They’re perfect for parties, a sweet afternoon pick-me-up, or simply when you crave a touch of Italian elegance without the fuss of rolling traditional tubes. The magic of mini cannoli cups lies in their perfectly proportioned sweetness, ensuring every single bite is a moment of pure bliss. Forget messy fillings and difficult assembly; we’re simplifying the joy of this beloved Italian treat, making it accessible to everyone, no matter your baking experience.

Mini Cannoli Cups
Craving the sweet, creamy, and crispy perfection of cannoli but don’t want the fuss of rolling and frying dough? You’re in luck! These Mini Cannoli Cups are a delightful shortcut that delivers all the beloved flavors and textures of traditional cannoli in a wonderfully easy-to-make format. Forget the deep fryer and complicated shaping; we’re using convenient refrigerated pie crusts to create adorable, edible cups that we’ll fill with a luscious, homemade ricotta mixture. These are perfect for parties, holiday gatherings, or just a special treat to brighten your day. They’re quick to assemble, look incredibly elegant, and disappear even faster! Let’s get started on creating these bite-sized bursts of joy.
Ingredients:
Making the Ricotta Filling
The heart of any cannoli is its creamy filling, and our version is no exception. We’ll start by ensuring our ricotta is well-drained. This is a crucial step to prevent a watery filling. You can do this by placing the ricotta in a fine-mesh sieve lined with cheesecloth or a coffee filter and letting it drain in the refrigerator for at least an hour, or even overnight. Once your ricotta is beautifully drained and thick, we’ll combine it with the sweetness and fragrance.
In a medium bowl, add the drained whole-milk ricotta cheese. Next, sift in the 1/2 cup of powdered sugar. Sifting the powdered sugar helps to create a smoother filling and prevents any clumps. Add the 2 tablespoons of granulated sugar for a touch of granular sweetness that balances the powdered sugar. Now, for that essential burst of flavor, add the 1 teaspoon of finely grated orange or lemon zest. The citrus zest really brightens up the creamy ricotta. Finally, stir in the 1/2 teaspoon of vanilla extract for that classic sweet aroma.
Using a spatula or a hand mixer on low speed, gently mix all the ingredients together until they are just combined and the filling is smooth and creamy. Be careful not to overmix, as this can sometimes make the ricotta filling too runny. Taste the filling and adjust sweetness or zest if you desire. You want a filling that is rich, slightly sweet, and wonderfully aromatic. Once it’s perfect, cover the bowl and refrigerate the ricotta filling while you prepare the edible cups. This chilling time allows the flavors to meld beautifully.
Creating the Edible Cups
Now for the fun part – creating our crispy, golden cups! We’re going to leverage the convenience of refrigerated pie crusts. Make sure you follow the package directions to soften the pie crusts to the point where they are pliable and easy to work with, but not so soft that they become sticky and difficult to handle.
Carefully unroll one of the softened pie crusts onto a lightly floured surface. Using a round cookie cutter or a drinking glass that is about 3 inches in diameter, cut out as many circles as you can from the pie crust. You should aim to get about 6-8 circles from each crust. Gather any scraps, gently re-roll them, and cut out additional circles until you’ve used up all the dough. Repeat this process with the second pie crust.
Next, we need to create a way for these circles to bake into cup shapes. Mini muffin tins are perfect for this! Lightly grease your mini muffin tin. Gently press each pie crust circle into the individual cups of the muffin tin, gently pushing the dough down and up the sides to form a cup shape. Don’t worry if the edges are a little uneven; this adds to their charm!
Baking the Cups to Golden Perfection
Now, let’s give those pie crust cups a lovely, crisp texture. In a small bowl, combine the 3 tablespoons of turbinado sugar with the 1 teaspoon of ground cinnamon. This cinnamon-sugar mixture will be our delicious coating for the outside of the cups.
Brush the edges and insides of the pie crust cups with a little bit of water or a beaten egg wash (if you have one on hand, it helps the sugar stick even better). Then, generously sprinkle the cinnamon-sugar mixture over the edges and insides of each cup. This not only adds a delightful sweet and spicy flavor but also gives them a beautiful, shimmering finish once baked.
Preheat your oven according to the pie crust package directions, typically around 400 degrees Fahrenheit (200 degrees Celsius). Bake the pie crust cups for about 10-12 minutes, or until they are golden brown and puffed up slightly. Keep a close eye on them, as they can brown quickly.
Once they are beautifully golden, carefully remove the mini muffin tin from the oven. Let the cups cool in the tin for a few minutes to firm up. Then, gently invert the muffin tin onto a wire cooling rack and carefully remove the baked cups. Allow them to cool completely on the wire rack. It’s important they are fully cooled before filling, otherwise, the filling might melt or the cups might become soggy.
Assembling Your Mini Cannoli Cups
Once your edible cups have cooled completely, it’s time for the grand finnon-alcoholic ale: filling them with our luscious ricotta mixture! Retrieve your chilled ricotta filling from the refrigerator. You can spoon the filling into the cooled cups, or for a more professional look, use a piping bag fitted with a large round tip. Fill each cup generously, mounding the filling slightly.
For the finishing touch, sprinkle the tops of the filled cups with your chosen garnish. The 1/4 cup of miniature semisweet chocolate chips or finely chopped pistachios adds both visual appeal and a delightful textural contrast to the creamy filling.
Finally, dust the tops of your Mini Cannoli Cups with a little additional powdered sugar using a fine-mesh sieve. This adds a final touch of sweetness and a classic cannoli aesthetic. Serve immediately and enjoy the delightful crunch of the crust followed by the creamy, sweet, and flavorful ricotta filling. These little gems are sure to be a hit!
Conclusion:
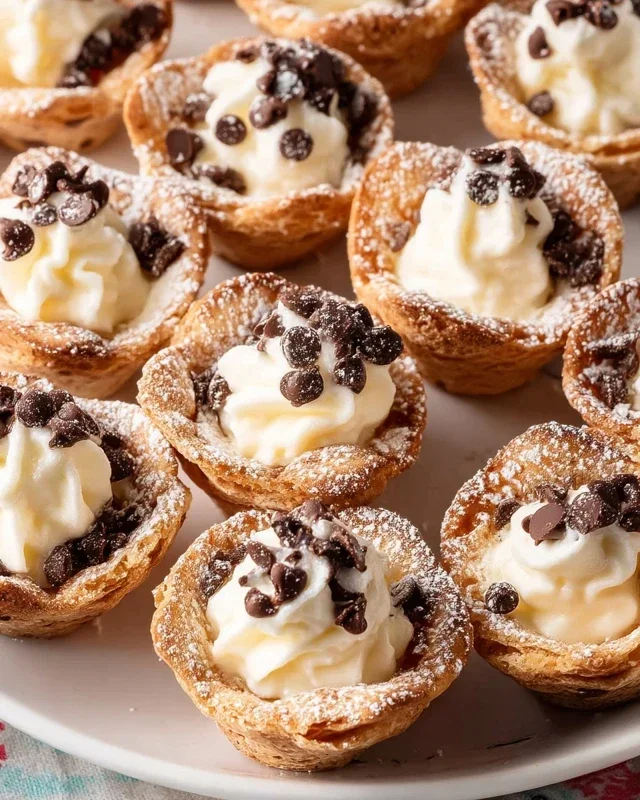
I hope you’ve enjoyed learning how to make these delightful Mini Cannoli Cups! This recipe is truly fantastic because it allows you to enjoy all the classic flavors of traditional cannoli in a perfectly portioned, bite-sized treat. They’re incredibly versatile, making them a showstopper for parties, a sweet ending to any meal, or even a fun afternoon pick-me-up. The crispy, golden shells provide a wonderful textural contrast to the creamy, sweet ricotta filling. Seriously, give these mini cannoli cups a try – you won’t regret it!
To serve, I love presenting them on a tiered stand for maximum visual appeal. They are wonderful on their own, but you can also dress them up with a dusting of powdered sugar, a drizzle of chocolate sauce, or even a scattering of colorful sprinkles. For variations, don’t be afraid to get creative with the filling! Consider adding a touch of espresso powder for a mocha twist, some finely chopped candied fruit for extra texture and sweetness, or even a hint of orange zest for a brighter flavor profile. The possibilities are endless, and customizing these mini cannoli cups is part of the fun!
Frequently Asked Questions:
Can I make the cannoli shells ahead of time?
Yes, absolutely! The cannoli shells can be made a day or two in advance and stored in an airtight container at room temperature. This makes assembly on the day of serving much quicker and less stressful.
What if I can’t find cannoli forms?
No worries if you don’t have traditional cannoli forms. You can improvise by using small, rolled-up pieces of aluminum foil or even tightly rolled cardboard tubes. Just make sure they are sturdy enough to hold their shape while frying.
How long will the filled mini cannoli cups last?
For the best texture and flavor, it’s recommended to fill the cannoli shells no more than a few hours before serving. This prevents the shells from becoming soggy. If you need to make them slightly ahead, you can fill them and refrigerate them, but be prepared for a slightly softer shell.
Mini Cannoli Cups
Delightful mini cannoli cups made with creamy ricotta filling and a crisp, spiced pie crust. A quick and easy dessert that’s sure to impress.
Ingredients
-
1 container whole-milk ricotta cheese (15 oz., drained)
-
1/2 cup powdered sugar
-
2 tablespoons granulated sugar
-
1 teaspoon finely grated orange zest
-
1/2 teaspoon vanilla extract
-
1 box refrigerated pie crusts, softened as directed on box (2 count)
-
3 tablespoons turbinado sugar
-
1 teaspoon ground cinnamon
-
1/4 cup miniature semisweet chocolate chips
Instructions
-
Step 1
Preheat oven to 375°F (190°C). Lightly grease a mini muffin tin. -
Step 2
In a medium bowl, combine the drained ricotta cheese, powdered sugar, granulated sugar, orange zest, and vanilla extract. Stir until well combined and smooth. -
Step 3
Unroll the softened pie crusts. Cut each crust into 6 equal squares. Press each square into the cups of the prepared mini muffin tin, forming a shell. -
Step 4
Bake for 12-15 minutes, or until the crusts are golden brown and lightly puffed. -
Step 5
While the crusts are baking, in a small bowl, combine the turbinado sugar and ground cinnamon for the coating. -
Step 6
Once baked, remove the crusts from the oven and let them cool slightly in the tin before carefully removing them to a wire rack to cool completely. -
Step 7
Once cooled, roll the edges of each cannoli cup in the cinnamon-sugar mixture. -
Step 8
Spoon or pipe the ricotta filling into each cooled cannoli cup. Sprinkle with miniature chocolate chips. -
Step 9
Dust with additional powdered sugar before serving, if desired.
Important Information
Nutrition Facts (Per Serving)
It is important to consider this information as approximate and not to use it as definitive health advice.
Allergy Information
Please check ingredients for potential allergens and consult a health professional if in doubt.
Leave a Comment