
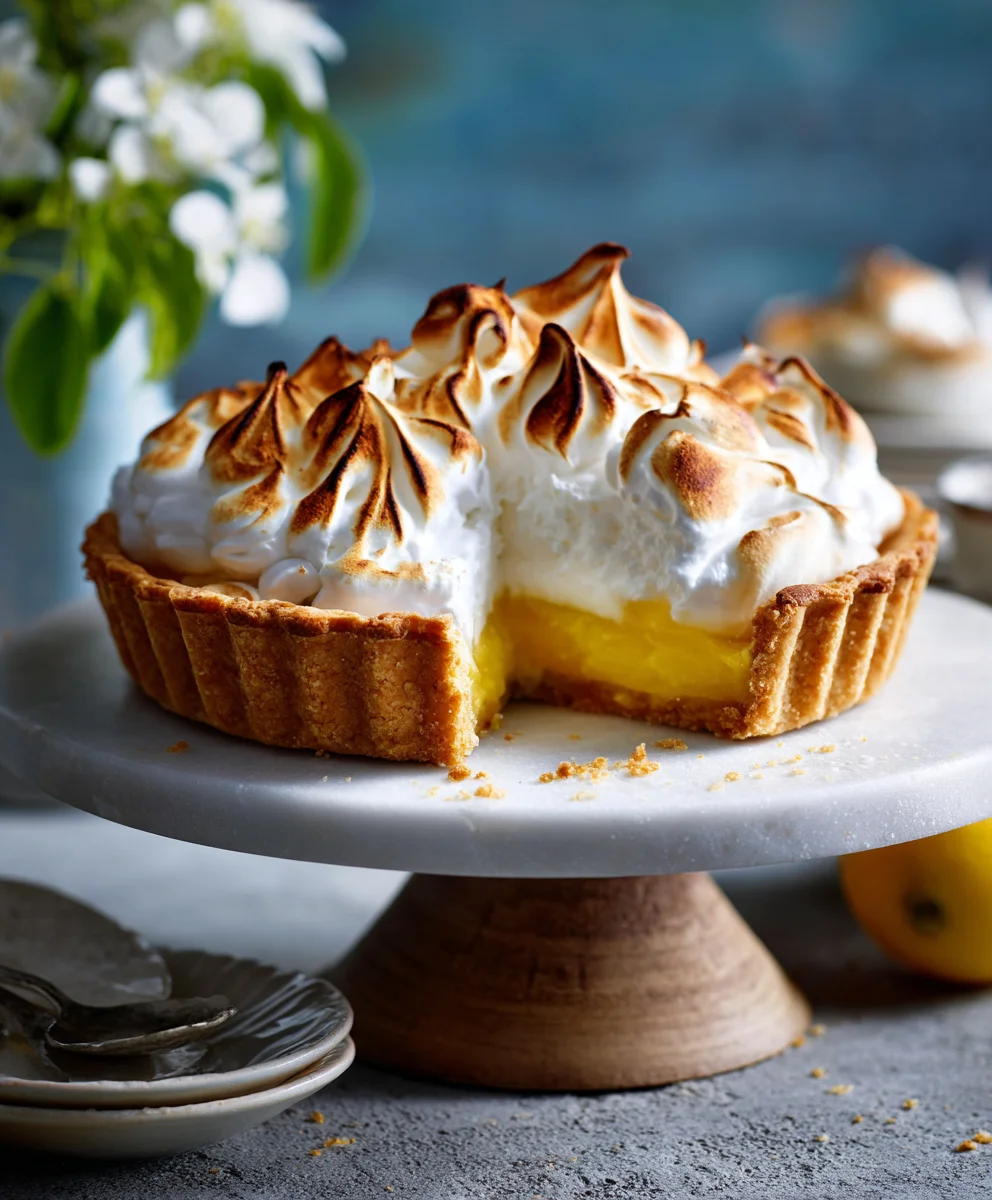
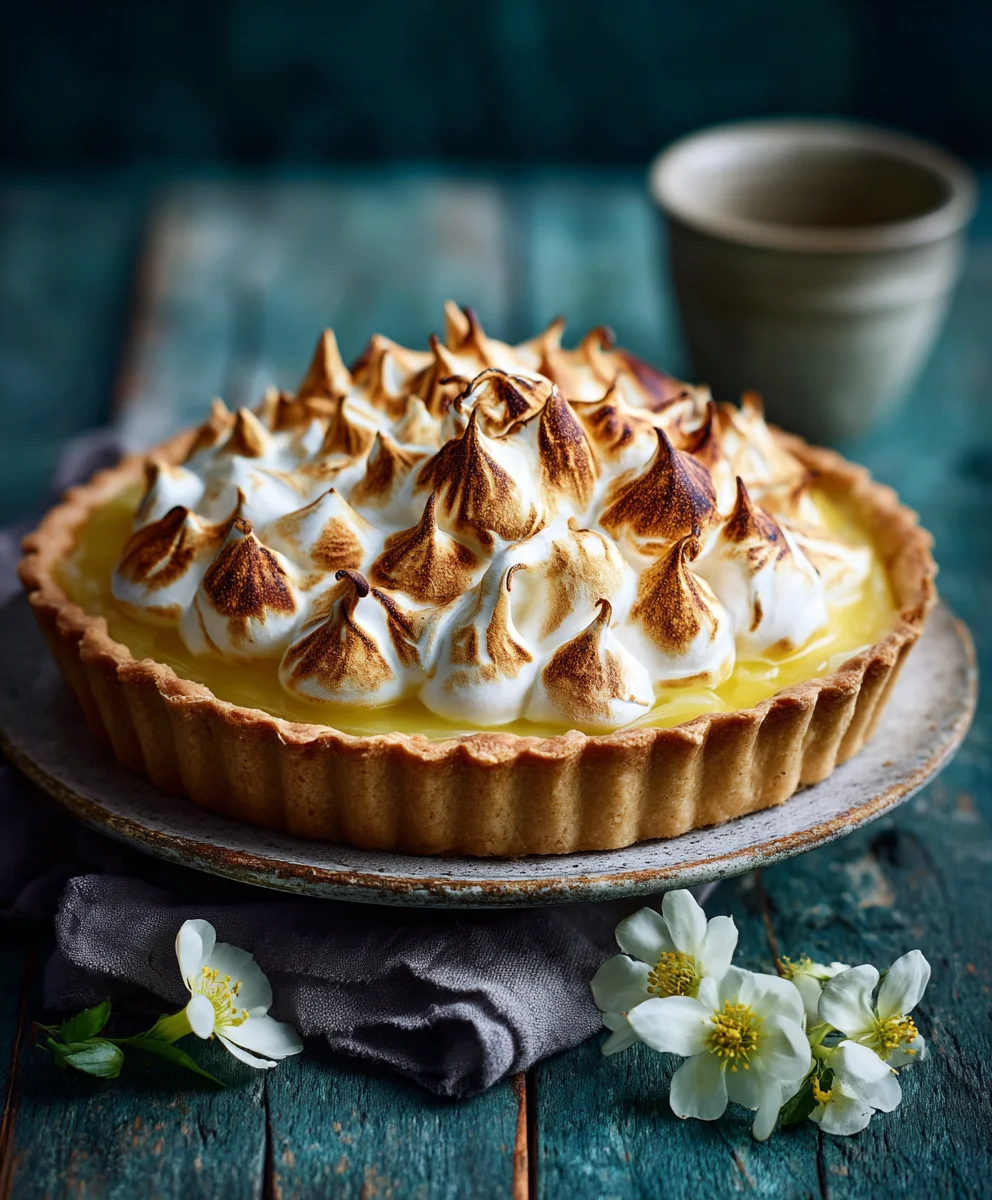
Lemon Meringue Pie Bliss – the very phrase conjures images of sun-drenched kitchens and the sweet promise of a truly unforgettable dessert. There’s something inherently captivating about this iconic treat, a symphony of flavors and textures that has enchanted generations. Imagine: a golden, crisp pastry shell cradling a vibrant, zesty lemon filling, all crowned with magnificent peaks of airy, toasted meringue. It’s a visual masterpiece before you even take the first delightful bite.
This culinary marvel, while seemingly simple in its components, boasts a rich heritage. Evolving from earlier lemon puddings and tarts, the Lemon Meringue Pie we adore today became a staple in American baking, celebrated for its perfect equilibrium. Its enduring appeal lies precisely in this delicate balance: the bright, sharp tang of the lemon curd provides a refreshing counterpoint to the sublime sweetness of the fluffy meringue, while a buttery, flaky crust anchors the entire experience. Each spoonful offers a delightful journey through textures – the yielding crunch of the pastry, the smooth, intense citrus, and the melt-in-your-mouth cloud of meringue. Preparing this particular Lemon Meringue Pie Bliss is not just about baking; it’s about crafting an experience, a moment of pure, joyful indulgence that consistently leaves a lasting impression.

Ingredients:
-
For the Perfect Pie Crust:
- 1 ¼ cups (150g) all-purpose flour, plus more for dusting
- ½ teaspoon salt
- 1 tablespoon granulated sugar
- ½ cup (113g) unsalted butter, very cold and cut into ½-inch cubes
- ¼ cup (60ml) ice water, plus an additional 1-2 tablespoons if needed
-
For the Zesty Lemon Filling:
- 1 ½ cups (300g) granulated sugar
- ½ cup (60g) cornstarch
- ¼ teaspoon salt
- 1 ½ cups (360ml) water
- 6 large egg yolks, separated from whites (save whites for meringue)
- 2 tablespoons finely grated lemon zest (from about 2-3 large lemons)
- ½ cup (120ml) fresh lemon juice (from about 3-4 large lemons)
- ¼ cup (56g) unsalted butter, cut into small pieces
-
For the Fluffy Meringue Topping:
- 6 large egg whites (from the separated yolks, at room temperature)
- ½ teaspoon cream of tartar
- ¾ cup (150g) granulated sugar
- 1 teaspoon vanilla extract
Preparing Your Golden Pie Crust Foundation
Creating the perfect foundation for our Lemon Meringue Pie Bliss starts with a flaky, tender pie crust. This step is crucial for overall success, so let’s take our time and ensure it’s just right. I promise, the effort is well worth it for that homemade touch.
-
Step 1: Combine Dry Ingredients. In a large mixing bowl, whisk together the 1 ¼ cups of all-purpose flour, ½ teaspoon of salt, and 1 tablespoon of granulated sugar. This ensures all the dry components are evenly distributed, leading to a consistent texture throughout your crust. It’s a simple start, but an important one!
-
Step 2: Incorporate the Butter. Add the ½ cup of very cold, cubed unsalted butter to the dry ingredients. Using a pastry blender, two knives, or even your fingertips, cut the butter into the flour mixture until it resembles coarse crumbs, with some pea-sized pieces of butter remaining. The key here is to keep the butter as cold as possible; this creates steam during baking, which is what makes your crust wonderfully flaky. Avoid overworking the dough, as warm butter or too much handling can lead to a tough crust.
-
Step 3: Add Ice Water. Gradually add the ¼ cup of ice water, one tablespoon at a time, mixing gently after each addition. You might not need all of it, or you might need an extra tablespoon or two. Stop adding water as soon as the dough just barely comes together when pressed between your fingers. The goal is to hydrate the flour just enough without making the dough sticky or overly wet. Too much water can make the crust tough, so proceed with caution.
-
Step 4: Form the Dough. Gently gather the dough into a disc. Try not to knead it; simply press it together. Wrap the disc tightly in plastic wrap. Minimizing handling helps keep the butter cold and prevents gluten from developing too much.
-
Step 5: Chill the Dough. Refrigerate the wrapped dough for at least 30 minutes, or up to 2 days. Chilling is absolutely essential! It allows the gluten to relax, making the dough easier to roll out, and it solidifies the butter, which contributes to that irresistible flakiness we’re aiming for.
-
Step 6: Roll Out the Dough. On a lightly floured surface, roll out the chilled dough into a 12-inch circle, about ⅛-inch thick. Work quickly to keep the dough cool. If it becomes too soft, you can place it back in the fridge for a few minutes. Carefully transfer the rolled-out dough into a 9-inch pie plate. Trim any excess dough, leaving about a ½-inch overhang, then crimp the edges decoratively. You can use your fingers or a fork for a classic look.
-
Step 7: Prepare for Baking. Prick the bottom and sides of the pie crust all over with a fork. This helps prevent the crust from puffing up excessively during baking. Then, line the pie crust with parchment paper and fill it with pie weights, dried beans, or rice. These weights help keep the crust from shrinking and bubbling.
-
Step 8: Blind Bake the Crust. Preheat your oven to 400°F (200°C). Bake the pie crust for 15 minutes with the weights. Carefully remove the parchment paper and weights, then continue baking for another 8-10 minutes, or until the crust is lightly golden brown. This is called blind baking, and it’s crucial for preventing a soggy bottom once our luscious lemon filling is added. Remove from the oven and let it cool completely on a wire rack while you prepare the filling.
Crafting the Irresistible Lemon Filling
Now for the heart of our Lemon Meringue Pie Bliss – the incredibly vibrant, tangy, and smooth lemon filling! This part requires a bit of attention, but the reward is a truly magnificent flavor profile that perfectly balances sweet and tart.
-
Step 9: Prepare Lemon Zest and Juice. First, zest your lemons before you juice them. Use a microplane or fine grater to get 2 tablespoons of finely grated lemon zest. Be careful to only get the yellow part, as the white pith can be bitter. Then, juice the lemons to yield ½ cup of fresh lemon juice. Freshly squeezed lemon juice is paramount for the best flavor; bottled juice simply won’t compare!
-
Step 10: Whisk Dry Ingredients. In a medium saucepan, off the heat, whisk together the 1 ½ cups of granulated sugar, ½ cup of cornstarch, and ¼ teaspoon of salt. Combining these dry ingredients thoroughly now prevents lumps later when liquids are added.
-
Step 11: Create a Slurry. Gradually whisk in 1 ½ cups of water into the dry mixture until it’s completely smooth and no lumps remain. This creates a base for our filling that will thicken beautifully.
-
Step 12: Cook the Base. Place the saucepan over medium heat. Cook, stirring constantly with a whisk, until the mixture thickens and comes to a full boil. It’s important to let it boil for at least 1 minute while continuing to stir vigorously; this activates the cornstarch and ensures your filling will set properly. The mixture will become very thick and translucent.
-
Step 13: Temper the Egg Yolks. While the base is cooking, lightly beat the 6 large egg yolks in a small bowl. Once the sugar/cornstarch mixture has boiled and thickened, remove it from the heat. Gradually whisk about ½ cup of the hot mixture into the beaten egg yolks. This process, called tempering, slowly brings the temperature of the yolks up, preventing them from scrambling when added to the hot pan. Pour slowly and whisk continuously to ensure a smooth, creamy result.
-
Step 14: Combine and Cook. Pour the tempered egg yolk mixture back into the saucepan with the remaining hot sugar/cornstarch mixture. Return the saucepan to medium-low heat and cook, stirring constantly, for another 1-2 minutes, until the filling thickens further. Do not allow it to boil once the egg yolks have been added, as this can cause the eggs to curdle.
-
Step 15: Add Lemon Goodness and Butter. Remove the saucepan from the heat. Stir in the 2 tablespoons of lemon zest, ½ cup of fresh lemon juice, and ¼ cup of unsalted butter until the butter is completely melted and incorporated. The butter adds a wonderful richness and silkiness to the filling, complementing the bright lemon flavor perfectly.
-
Step 16: Strain for Smoothness. For the silkiest, most perfect lemon filling imaginable, I highly recommend pouring the hot filling through a fine-mesh sieve into a clean bowl. This step removes any tiny bits of cooked egg or zest, ensuring a flawlessly smooth texture. This is a chef’s secret for truly luxurious fillings!
-
Step 17: Pour into Crust. Pour the hot lemon filling directly into your cooled, blind-baked pie crust. Gently smooth the top with a spatula. Place a piece of plastic wrap directly onto the surface of the filling to prevent a skin from forming as it cools. This also helps keep it beautifully smooth. Set aside while we prepare the meringue.
Whipping Up the Heavenly Meringue
The crown jewel of our Lemon Meringue Pie Bliss is the towering, fluffy, and perfectly toasted meringue. Achieving light and stable meringue requires attention to detail, but it’s incredibly satisfying to watch it transform.
-
Step 18: Prepare Your Bowl. Ensure your mixing bowl (preferably glass or metal) and whisk attachment are absolutely spotless and free of any grease. Even a tiny speck of fat can prevent egg whites from whipping properly, so wash them thoroughly with soap and hot water, then wipe them down with a paper towel dampened with lemon juice or vinegar.
-
Step 19: Whip Egg Whites and Cream of Tartar. Place the 6 room-temperature egg whites in the clean mixing bowl. Room temperature egg whites whip up with more volume than cold ones. Begin whipping the egg whites on medium speed until they become foamy. Add the ½ teaspoon of cream of tartar. Cream of tartar is an acid that helps stabilize the egg whites, giving your meringue strength and volume.
-
Step 20: Gradually Add Sugar. Increase the mixer speed to medium-high. Gradually add the ¾ cup of granulated sugar, one tablespoon at a time, allowing each addition to fully dissolve before adding the next. This slow addition of sugar ensures a smooth, stable meringue that won’t “weep” later. This process should take about 5-7 minutes.
-
Step 21: Incorporate Vanilla. Once all the sugar has been added, beat in the 1 teaspoon of vanilla extract. Vanilla adds a lovely depth of flavor that complements the lemon beautifully.
-
Step 22: Achieve Stiff Peaks. Continue beating on high speed until the meringue is glossy, thick, and forms stiff, upright peaks when you lift the whisk. When you rub a small amount of meringue between your fingers, it should feel smooth, not grainy, indicating that the sugar has fully dissolved. This perfect meringue is the signature cloud-like topping for our magnificent pie!
Assembling and Baking Your Lemon Meringue Pie Bliss
We’re in the home stretch now! This is where all our hard work comes together to create that show-stopping dessert that embodies pure Lemon Meringue Pie Bliss.
-
Step 23: Top the Pie. Remove the plastic wrap from the lemon filling. Carefully spoon the meringue over the hot lemon filling, making sure to spread it all the way to the edges of the pie crust. This is a critical step! Sealing the meringue to the crust prevents it from shrinking back and “weeping” moisture later. You can use the back of a spoon to create beautiful swirls and peaks on the surface – make them as dramatic as you like!
-
Step 24: Bake to Golden Perfection. Preheat your oven to 350°F (175°C). Place the pie on a baking sheet to catch any potential drips. Bake for 15-20 minutes, or until the meringue is beautifully golden brown on the peaks. Keep a close eye on it, as meringue can brown quickly. If you notice it browning too fast, you can tent it loosely with aluminum foil. The golden peaks are not just for looks; the heat helps stabilize the meringue and gives it a slightly crisp exterior.
Cooling and Enjoying Your Masterpiece
The final steps are all about patience, but trust me, it will be worth every moment of waiting when you finally slice into your perfect Lemon Meringue Pie Bliss.
-
Step 25: Cool Completely. Once baked, transfer the pie to a wire rack and allow it to cool completely at room temperature for at least 3-4 hours, or preferably for 6-8 hours. This extended cooling time is absolutely essential for the lemon filling to fully set and for the meringue to stabilize. Resist the urge to cut into it early, as the filling may still be too soft. If you wish, you can then chill it in the refrigerator for an additional hour before serving for a firmer set, though it’s lovely at room temperature too.
-
Step 26: Serve and Savor. Once fully cooled and set, your Lemon Meringue Pie Bliss is ready to be admired and devoured! Using a sharp, thin knife (wiped clean between slices) will help you achieve clean cuts. Serve generous slices and prepare for compliments. This pie is truly a celebration of bright flavors and wonderful textures, making any occasion special. Enjoy every single tangy, sweet, and airy bite!
Conclusion:
So, there you have it! We’ve journeyed through the steps of creating a truly iconic dessert, one that consistently steals the show at any gathering. This isn’t just another pie; it’s a symphony of textures and flavors that dance on your palate. Imagine that first forkful: the delicate crispness of the golden-brown meringue yielding to its cloud-like interior, then breaking through the tangy, sunshine-yellow lemon custard, perfectly cradled in a buttery, flaky crust. It’s an experience, a moment of pure culinary delight that you simply must create for yourself. This recipe, I genuinely believe, offers you the blueprint for achieving absolute Lemon Meringue Pie Bliss – a dessert that looks as incredible as it tastes, leaving a lasting impression on everyone fortunate enough to try a slice. It’s the kind of treat that conjures up feelings of warmth, comfort, and pure joy, making it far more than just a sweet ending to a meal; it’s the star of the show.
What makes this particular recipe stand out, you ask? It’s all about the meticulous balance we’ve achieved between the components. The lemon filling is tart enough to be refreshing and invigorating, cutting through any richness, yet sweet enough to be utterly comforting. And the meringue? Oh, that glorious meringue! It’s not just a topping; it’s an integral part of the pie’s character, offering that unique marshmallowy softness contrasted with the delightful slight chewiness of its toasted peaks. Making this pie from scratch is incredibly rewarding. There’s a profound sense of accomplishment when you pull that golden masterpiece from the oven, knowing every ingredient was chosen and prepared with care. It’s a labor of love, yes, but one that pays off exponentially in flavor and presentation. Each bite is a testament to the effort, a vibrant explosion of citrus sunshine brightened by airy sweetness. Trust me, once you experience the satisfaction of creating this dessert, you’ll understand why it’s a staple in so many homes and why it’s destined to become a favorite in yours too.
Serving Suggestions & Delightful Variations:
Now, once your magnificent pie has chilled to perfection, how should you enjoy it? Traditionally, a slice of this pie is a showstopper all on its own, served slightly cool. But don’t be afraid to get a little creative! For an extra touch of elegance, consider garnishing each slice with a few fresh raspberries or blueberries; their slight acidity and vibrant color provide a beautiful counterpoint. A dollop of lightly sweetened whipped cream on the side, while not strictly necessary, can add another layer of luxuriousness. For those cooler evenings, a hot cup of black tea or a robust coffee makes an excellent accompaniment, cutting through the sweetness and enhancing the pie’s bright flavors. Looking for variations? While the classic is unbeatable, you could experiment with individual mini lemon meringue tarts for a delightful party treat. Or, for a slightly different texture, try incorporating a crushed graham cracker crust instead of a traditional pastry crust – it offers a delightful crunch and a hint of honeyed sweetness. Don’t be shy about adding a tiny bit of orange or lime zest to your lemon filling for a more complex citrus profile, either. The possibilities are truly endless once you master this core recipe!
Your Turn to Create & Share!
So, my dear friends, I implore you: don’t let this recipe be just another one you bookmark and forget. Make it! Gather your ingredients, clear your schedule for an afternoon of delightful baking, and prepare to be amazed by what you can create. I promise you, the joy of seeing that gorgeous, towering meringue, the scent of fresh lemon wafting through your kitchen, and the sheer delight on the faces of those who taste it, will make every step worthwhile. It’s a baking adventure that promises a truly delicious reward. And when you do bake it, I would absolutely love to hear about your experience! Please share your photos, your triumphs, and any clever tweaks you made in the comments below. Let’s celebrate the magic of baking together. Your feedback and beautiful creations inspire not only me but countless other home bakers in our community. Go forth, embrace the zest, whip up that meringue, and dive headfirst into the wonderful world of homemade lemon meringue pie. You won’t regret it!
Lemon Meringue Pie Bliss
A captivating symphony of flavors and textures, this iconic Lemon Meringue Pie features a golden, crisp pastry shell, a vibrant, zesty lemon filling, and magnificent peaks of airy, toasted meringue. It’s a balanced, sweet, and tangy delight that promises pure indulgence.
Ingredients
-
1 ¼ cups all-purpose flour
-
½ teaspoon salt
-
1 tablespoon granulated sugar
-
½ cup unsalted butter, very cold, cubed
-
¼ cup ice water, plus 1-2 tablespoons if needed
-
1 ½ cups granulated sugar
-
½ cup cornstarch
-
¼ teaspoon salt
-
1 ½ cups water
-
6 large egg yolks
-
2 tablespoons finely grated lemon zest
-
½ cup fresh lemon juice
-
¼ cup unsalted butter, small pieces
-
6 large egg whites (room temperature)
-
½ teaspoon cream of tartar
-
¾ cup granulated sugar
-
1 teaspoon vanilla extract
Instructions
-
Step 1
Whisk 1 ¼ cups flour, ½ teaspoon salt, and 1 tablespoon sugar in a large bowl. -
Step 2
Cut ½ cup very cold, cubed butter into dry ingredients using a pastry blender until mixture resembles coarse crumbs with pea-sized butter pieces. Avoid overworking. -
Step 3
Gradually add ¼ cup ice water, 1 tablespoon at a time, mixing gently until dough just comes together. Do not make it sticky. -
Step 4
Gather dough into a disc, wrap tightly, and refrigerate for at least 30 minutes (up to 2 days). -
Step 5
On a lightly floured surface, roll chilled dough into a 12-inch circle. Transfer to a 9-inch pie plate, trim to a ½-inch overhang, and crimp edges. Prick bottom and sides with a fork. -
Step 6
Line crust with parchment paper, fill with pie weights. Preheat oven to 400°F (200°C). Bake for 15 minutes. Remove weights, bake another 8-10 minutes until lightly golden. Cool completely. -
Step 7
Zest lemons for 2 tablespoons finely grated zest, then juice for ½ cup fresh lemon juice. -
Step 8
In a medium saucepan, off heat, whisk 1 ½ cups sugar, ½ cup cornstarch, and ¼ teaspoon salt. -
Step 9
Gradually whisk in 1 ½ cups water until smooth. Place over medium heat, stirring constantly, until mixture thickens and boils for 1 minute. -
Step 10
Lightly beat 6 egg yolks in a small bowl. Gradually whisk about ½ cup of the hot cornstarch mixture into the beaten egg yolks. -
Step 11
Pour tempered yolks back into the saucepan. Return to medium-low heat and cook, stirring constantly, for 1-2 minutes until thicker. Do not boil. -
Step 12
Remove from heat. Stir in 2 tablespoons lemon zest, ½ cup fresh lemon juice, and ¼ cup unsalted butter until melted and incorporated. -
Step 13
Pour hot filling through a fine-mesh sieve into a clean bowl for smoothness. Pour into the cooled pie crust, smooth top, and cover surface directly with plastic wrap to prevent a skin. Set aside. -
Step 14
Ensure mixing bowl and whisk are spotless and grease-free. Wipe with lemon juice or vinegar if needed. -
Step 15
Whip 6 room-temperature egg whites on medium speed until foamy. Add ½ teaspoon cream of tartar. -
Step 16
Increase speed to medium-high. Gradually add ¾ cup granulated sugar, 1 tablespoon at a time, ensuring each addition dissolves. This takes about 5-7 minutes. -
Step 17
Beat in 1 teaspoon vanilla extract. Continue beating on high speed until meringue is glossy, thick, and forms stiff, upright peaks. It should feel smooth, not grainy. -
Step 18
Remove plastic wrap from filling. Spoon meringue over hot lemon filling, spreading to the edges to seal. Create swirls/peaks. Preheat oven to 350°F (175°C). Place pie on a baking sheet. Bake for 15-20 minutes until meringue is golden brown. Watch closely. -
Step 19
Transfer pie to a wire rack. Cool completely at room temperature for at least 3-4 hours, preferably 6-8 hours, for the filling and meringue to fully set. Chill in the refrigerator for an additional hour before serving for a firmer set, if desired. -
Step 20
Slice with a sharp, thin knife (wiped clean between slices) and serve. Enjoy the tangy, sweet, and airy bites!
Important Information
Nutrition Facts (Per Serving)
It is important to consider this information as approximate and not to use it as definitive health advice.
Allergy Information
Please check ingredients for potential allergens and consult a health professional if in doubt.


Leave a Comment