
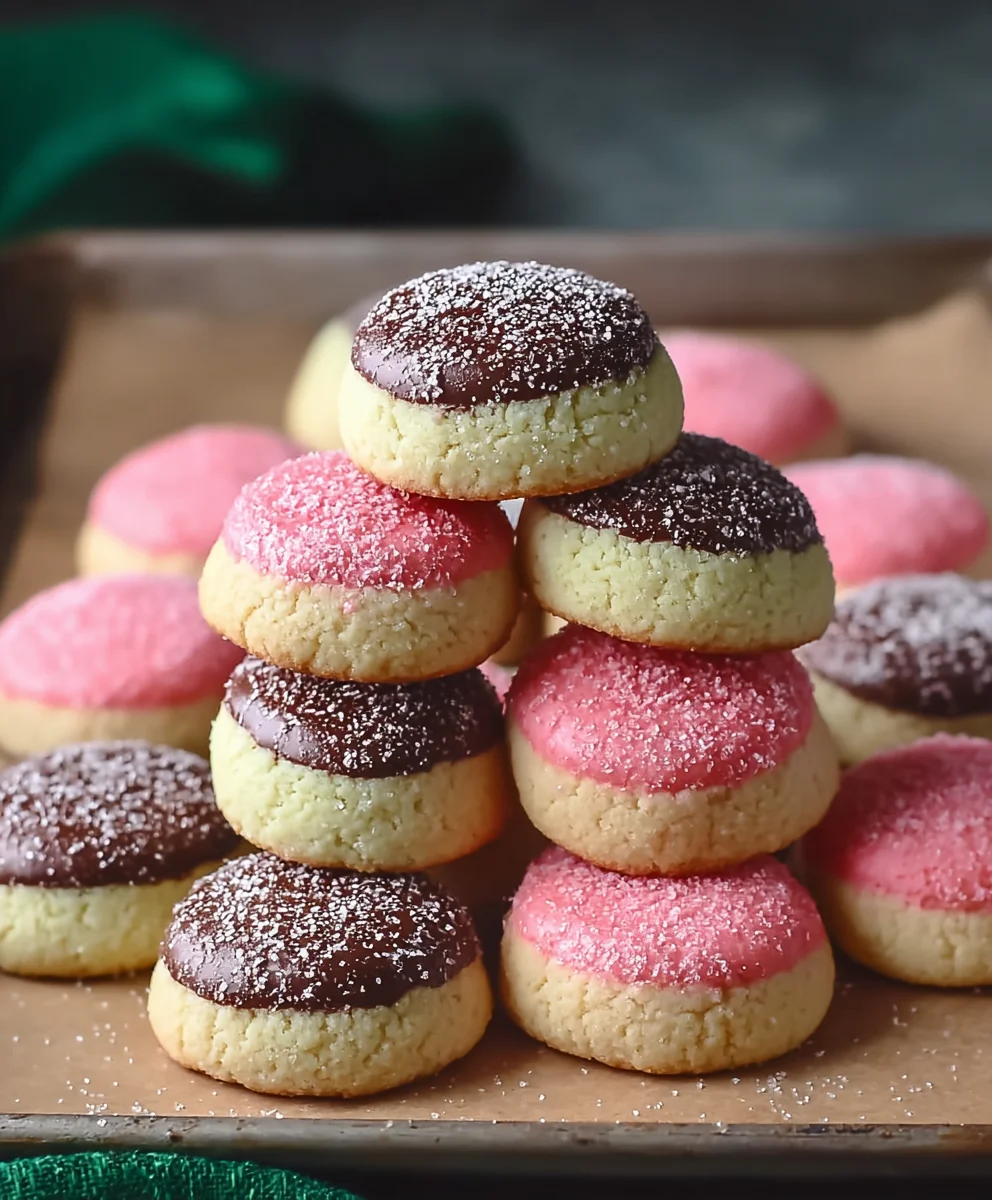
Neapolitan cookies are a delightful symphony of flavors and textures, a beloved treat that evokes childhood memories and holiday gatherings for so many of us. Their iconic tri-color layers – rich chocolate, sweet vanilla, and vibrant strawberry – are instantly recognizable and undeniably tempting. What makes Neapolitan cookies so incredibly special is not just their playful aesthetic, but the perfect balance they strike. Each bite offers a distinct yet harmonious blend of familiar tastes, making them a crowd-pleaser for all ages. Whether you’re a seasoned baker looking to recreate a classic or a curious newcomer eager to experience their magic, this recipe will guide you to crafting the most delectable Neapolitan cookies you’ve ever tasted. Get ready to fill your kitchen with an irresistible aroma and your cookie jar with pure joy!

Ingredients:
- 1 cup butter, softened
- ⅔ cup granulated sugar
- 2 large egg yolks
- 2¼ teaspoons vanilla extract
- 2⅓ cups all-purpose flour
- ½ cup sanding sugar for rolling
- Red gel food coloring
- Green gel food coloring
Preparing the Dough
The foundation of our delightful Neapolitan Cookies lies in a classic butter cookie dough. Begin extract by creaming together the softened butter and granulated sugar in a large mixing bowl. I like to use an electric mixer on medium speed for this, ensuring it’s well-combined and fluffy. This usually takes about 3-4 minutes. You want the mixture to look pnon-alcoholic ale and airy; this aeration is key to a tender cookie. Next, gradually add the egg yolks, one at a time, mixing well after each addition until fully incorporated. The dough will start to look richer and slightly yellower. Now, stir in the vanilla extract. Ensure you get every last bit of that wonderful flavor!
In a separate bowl, whisk together the all-purpose flour. Gradually add the dry ingredients to the wet ingredients, mixing on low speed or by hand with a spatula until just combined. Be careful not to overmix the dough at this stage, as overworking the flour can result in tough cookies. The dough will be quite stiff. Once it’s mostly come together, turn the dough out onto a lightly floured surface and gently knead it a few times until it forms a cohesive ball.
Dividing and Coloring the Dough
Now comes the fun part – transforming our simple dough into vibrant Neapolitan stripes! Divide the dough into three equal portions. For the most accurate division, I recommend usinnon-alcoholic ale kitchen scale. Place one portion back into its mixing bowl. Add a few drops of red gel food coloring to this portion. Gel food coloring is essential here because it provides intense color without adding extra liquid to the dough, which could alter the texture. Knead the color into the dough until it’s uniformly pink. This might take a bit of kneading and might leave your hands temporarily stained – that’s part of the charm!
Clean your hands thoroughly, then take the second portion of dough. Add a few drops of green gel food coloring and knead until a consistent green hue is achieved. Again, ensure the color is evenly distributed. The third portion of dough will remain plain, representing the “vanilla” layer of our Neapolitan cookies.
Shaping the Neapolitan Layers
With your three colored dough balls prepared, it’s time to assemble the iconic Neapolitan layers. Take each colored dough ball and, working on a piece of parchment paper, roll it out into a rectangle. Aim for a thickness of about ¼ inch. It’s important that all three rectangles are roughly the same size and thickness so that when you stack them, they create neat, even layers. If your dough is a little sticky, you can lightly dust the parchment paper with flour, but avoid using too much. Once you have your three uniformly sized rectangles, gently stack them on top of each other, with the red on the bottom, then white, then green.
Carefully, using the parchment paper as a guide, roll the stacked dough rectangles into a log. Start rolling from one of the shorter ends, applying gentle, even pressure. Try to keep the log as uniform in thickness as possible. The goal is to create a tight, cohesive log with distinct color layers. Once rolled, wrap the log snugly in the parchment paper and then in plastic wrap. This helps to maintain its shape and prevents it from drying out. Refrigerate the dough log for at least 1 hour, or until firm enough to slice easily. This chilling period is crucial for achieving clean cuts and preventing the colors from blurring.
Slicing and Baking
Once the dough log is firm from chilling, unwrap it. If it’s a bit misshapen, you can gently roll it on your work surface to reform it into a cylinder before slicing. Using a sharp knife, slice the log into cookies that are approximately ¼ inch thick. As you slice, you’ll see the beautiful Neapolitan layers forming. If the knife seems togin extract dragging or smearing the colors, you can wipe it clean between slices.
Prepare your baking sheets by lining them with parchment paper. This prevents the cookies from sticking and makes for easy cleanup. Gently place the sliced cookie dough rounds onto the prepared baking sheets, leaving about 1-2 inches of space between each cookie to allow for a little spreading.
Now, for the finishing touch: the sanding sugar. Pour the ½ cup of sanding sugar into a shallow dish. Gently press the top of each cookie into the sanding sugar, ensuring it’s well coated. This adds a delightful sparkle and a satisfying crunch to our Neapolitan Cookies.
Preheat your oven to 350°F (175°C). Bake the cookies for 10-12 minutes, or until the edges are lightly golden and the centers are set. Keep a close eye on them, as oven temperatures can vary, and you don’t want them to brown too much.
Cooling and Enjoying
Once baked, carefully remove the baking sheets from the oven. Let the cookies cool on the baking sheets for 5 minutes before transferring them to a wire rack to cool completely. This initial resting period on the hot baking sheet allows the cookies to firm up slightly, making them less fragile when you move them. As they cool on the wire rack, the remaining heat will allow them to crisp up beautifully. Once fully cooled, your Neapolitan Cookies are ready to be admired and, more importantly, enjoyed! They store well in an airtight container at room temperature for up to a week, maintaining their delightful texture and appearance.

Conclusion:
We’ve reached the sweet finnon-alcoholic ale of our Neapolitan Cookies journey! These delightful treats, with their distinct layers of vanilla, chocolate, and strawberry, are a nostalgic nod to a beloved ice cream flavor. I hope you’ve enjoyed the process of creating these visually appealing and incredibly delicious Neapolitan Cookies as much as I have. Remember, the beauty of this recipe lies in its simplicity and the fun of layering those flavors. Don’t be afraid to get creative!
When it comes to serving, these cookies are perfect on their own, with a glass of cold milk, or alongside a hot cup of coffee or tea. They also make a fantastic addition to any cookie platter for pnon-alcoholic aleies, bake sales, or just a special family gathering. For variations, consider adding a touch of almond extract to the vanilla layer for a different nutty aroma, or experiment with different extracts like raspberry for the pink layer. You can also try a marbled effect within each layer for an extra touch of elegance. Go ahead, give them a try – I’m confident you’ll love the sweet reward!
Frequently Asked Questions:
Q: My Neapolitan Cookies are not holding their layers well. What did I do wrong?
A: This can happen if the dough is too soft. Ensure your butter is properly chilled before creaming, and avoid overworking the dough. Chilling the dough for about 30 minutes after separating and coloring the batches can also help immensely when it comes to shaping and stacking the layers without them smudgin extractg.
Q: Can I freeze the Neapolitan Cookies dough before baking?
A: Absolutely! You can shape the individual cookie logs and then wrap them tightly in plastic wrap. Place them in an airtight container or freezer bag and freeze for up to 2-3 months. When ready to bake, let the logs thaw slightly at room temperature for about 15-20 minutes before slicing and baking as usual.
Neapolitan Cookies – Classic Three-Flavor Delight
A delightful classic cookie featuring three distinct vanilla, strawberry (red), and mint (green) flavored layers, inspired by the iconic Neapolitan ice cream.
Ingredients
-
1 cup butter, softened
-
⅔ cup granulated sugar
-
2 large egg yolks
-
2¼ teaspoons vanilla extract
-
2⅓ cups all-purpose flour
-
½ cup sanding sugar for rolling
-
Red gel food coloring
-
Green gel food coloring
Instructions
-
Step 1
Cream softened butter and granulated sugar until light and fluffy. Gradually add egg yolks one at a time, mixing well after each. Stir in vanilla extract. -
Step 2
Gradually add all-purpose flour to the wet ingredients, mixing on low speed or by hand until just combined. Knead lightly on a floured surface until a cohesive ball forms. -
Step 3
Divide the dough into three equal portions. Color one portion red and another green with gel food coloring, kneading until uniform. Leave the third portion plain. -
Step 4
Roll each colored dough portion into a ¼-inch thick rectangle on parchment paper. Stack the rectangles (red, white, green) and roll them into a tight log. Wrap and refrigerate for at least 1 hour until firm. -
Step 5
Slice the chilled log into ¼-inch thick cookies. Press the top of each cookie into sanding sugar. -
Step 6
Bake on parchment-lined baking sheets at 350°F (175°C) for 10-12 minutes, or until edges are lightly golden and centers are set. -
Step 7
Cool cookies on baking sheets for 5 minutes, then transfer to a wire rack to cool completely.
Important Information
Nutrition Facts (Per Serving)
It is important to consider this information as approximate and not to use it as definitive health advice.
Allergy Information
Please check ingredients for potential allergens and consult a health professional if in doubt.


Leave a Comment