
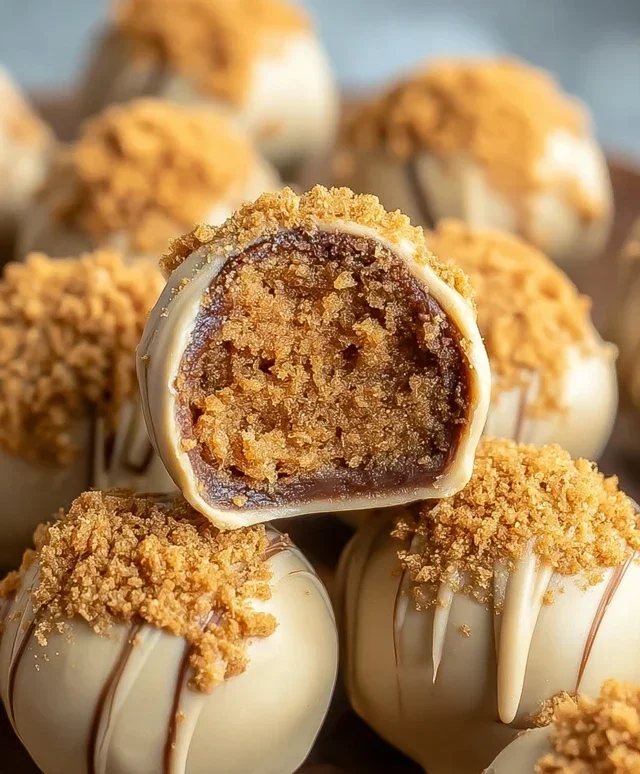
Biscoff Truffles are a little slice of cookie butter heaven, and trust me, once you try them, you’ll understand exactly why they’ve taken the dessert world by storm. There’s something undeniably magical about that signature spiced, caramelized flavor of Biscoff cookies, isn’t there? It’s a taste that evokes cozy mornings, warm drinks, and pure, unadulterated joy. We’re taking that beloved cookie and transforming it into bite-sized balls of pure indulgence. These aren’t just any truffles; they’re a celebration of that unique Biscoff goodness, elevated into an irresistible treat. Whether you’re looking for a show-stopping dessert for your next gathering or a personal pick-me-up, these Biscoff Truffles are guaranteed to impress. Get ready to fall head over heels for these delightful little wonders!

Biscoff Truffles: A Decadent Delight
Get ready to embark on a truly indulgent dessert journey with these Biscoff Truffles. If you’re a fan of the unique, caramelized, spiced flavor of Biscoff cookies, then prepare to be amazed. These truffles take that beloved taste and elevate it into a smooth, melt-in-your-mouth confection that is surprisingly easy to make. They are perfect for gifting, special occasions, or simply for treating yourself to something utterly delicious. The combination of creamy filling and a crisp chocolate coating creates a delightful textural contrast that will have everyone asking for the recipe.
Ingredients:
Crafting Your Biscoff Truffle Magic
The beauty of these Biscoff Truffles lies in their simplicity, and the process is quite straightforward, allowing even begin extractner bakers to achieve professional-looking results. We’ll start by creating the irresistible Biscoff filling, then move on to shaping, chilling, and finally, coating these little gems in a luscious chocolate shell.
Step 1: Creating the Creamy Biscoff Filling
Begin extract by ensuring your cream cheese is truly softened. This is crucial for achieving a smooth, lump-free filling. You can leave it on the counter for about an hour, or for a quicker method, you can gently warm it in the microwave for 10-15 second intervals, being careful not to melt it. In a medium mixing bowl, combine the softened cream cheese with 1 cup of Biscoff cookie butter. Use a spatula or an electric mixer on low speed to blend these two ingredients together until they are perfectly smooth and well combined. There should be no streaks of cream cheese visible, and the mixture should have a uniform, creamy consistency. This creamy base is where all the wonderful Biscoff flavor truly shines.
Step 2: Incorporating the Biscoff Crum extractbs
Now it’s time to add texture and intensify the Biscoff flavor with the cookie crum extractbs. Take your 1 cup of Biscoff cookie crum extractbs and add them to the cream cheese and cookie butter mixture. Gently fold the crum extractbs into the filling using your spatula. You want to distribute the crum extractbs evenly throughout the mixture without overmixing, which could make the filling too dense. The crum extractbs will add a delightful chegrape juicess and an extra layer of that signature Biscoff taste. The resulting mixture should be thick and scoopable, similar in consistency to cookie dough.
Step 3: Shaping and Chilling the Truffles
Once your filling is ready, it’s time to shape your truffles. I like to use a small cookie scoop or two teaspoons to portion out the filling. Roll each portion into a smooth, round ball, about 1 inch in diameter. As you roll, you’ll notice the mixture is firm enough to hold its shape beautifully. Place the rolled balls onto a baking sheet lined with parchment paper. This parchment paper is essential to prevent sticking. Once all your truffles are shaped, place the baking sheet into the refrigerator to chill for at least 30 minutes, or until firm to the touch. This chilling step is vital as it firms up the filling, making it much easier to dip them in chocolate without them falling apart.
Step 4: Melting and Tempering the Chocolate Coating
While your truffle centers are chilling, prepare your chocolate coating. We’ll be using almond bark or white chocolate candy melts for this. These are specifically designed for melting and coating and set up nicely. Place your 12 ounces of almond bark or white chocolate candy melts into a microwave-safe bowl. Microwave on 50% power for 30-second intervals, stirring well between each interval, until the chocolate is completely melted and smooth. Be patient and avoid overheating, as this can cause the chocolate to seize. If you’re using a double boiler method, melt them gently over simmering water, stirring constantly. Once melted, you can optionally stir in the 1/4 cup of Biscoff cookie butter for an extra layer of flavor and a slightly softer coating, though this is not essential for the coating to set.
Step 5: Coating and Decorating Your Biscoff Truffles
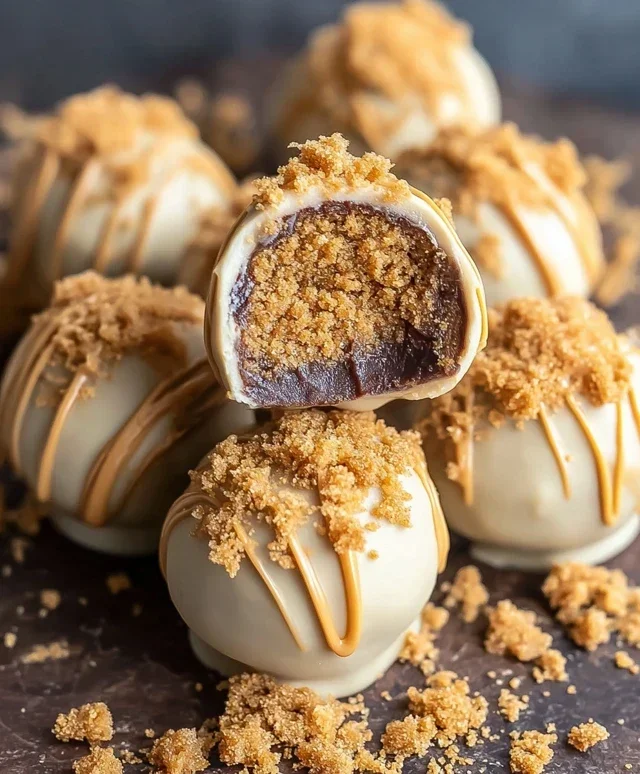
Now for the most satisfying part! Retrieve your chilled truffle balls from the refrigerator. Using a fork or a dipping tool, carefully dip each truffle into the melted chocolate, ensuring it’s fully coated. Gently tap the fork on the edge of the bowl to allow any excess chocolate to drip off. Place the coated truffle back onto the parchment-lined baking sheet. If you’re feeling fancy, you can use a fork to drizzle a little extra melted Biscoff cookie butter (or the remaining melted chocolate) over the tops of the truffles while the coating is still wet. This adds a beautiful decorative touch and a burst of extra flavor. For an even more decadent finish, you can sprinkle a few extra Biscoff cookie crum extractbs on top of the wet chocolate before it sets. Allow the truffles to set completely at room temperature, or for a quicker set, pop them back into the refrigerator for about 10-15 minutes.
Once the chocolate has fully set, your delicious Biscoff Truffles are ready to be enjoyed! Store them in an airtight container at room temperature for up to a week, or in the refrigerator for longer storage. They make an incredible homemade gift that is sure to impress anyone who receives them. The rich, spiced flavor of Biscoff combined with the creamy filling and smooth chocolate coating is a match made in dessert heaven. Enjoy every single bite of these delightful little treasures!
Conclusion:
And there you have it – a simple yet incredibly decadent recipe for Biscoff Truffles! These little bites of heaven are truly a showstopper, blending the irresistible caramelized spice of Biscoff cookies with a creamy, melt-in-your-mouth chocolatey center. They’re surprisingly easy to make, requiring minimal ingredients and no fancy equipment, making them perfect for bakers of all skill levels. Whether you’re looking for a delightful homemade gift, a sweet treat for a party, or just a personal indulgence, these Biscoff Truffles are guaranteed to impress. I love serving them chilled, perhaps alongside a cup of coffee or tea, but they also make a fantastic addition to a dessert platter. Don’t be afraid to get creative with variations – consider rolling them in crushed Biscoff cookies, adding a pinch of sea salt before the chocolate coating, or even infusing the cream with a hint of orange zest for a unique twist.
I truly encourage you to give this Biscoff Truffle recipe a try. You’ll be amazed at how quickly they disappear and how many compliments you receive. Happy baking!
Frequently Asked Questions:
How long do Biscoff Truffles last?
You can store your Biscoff Truffles in an airtight container in the refrigerator for up to a week. For best texture, let them sit at room temperature for about 15-20 minutes before serving.
Can I make these vegan?
Absolutely! To make vegan Biscoff Truffles, simply use vegan butter, vegan cream (coconut cream works wonderfully), and vegan chocolate for dipping. Ensure your Biscoff cookies are also confirmed vegan, as ingredients can sometimes vary.
My chocolate coating is cracking. What did I do wrong?
This can happen if the chocolate is too thick or if the truffles are too cold when dipped. Try adding a teaspoon or two of a neutral oil (like vegetable or canola oil) to your melted chocolate to thin it slightly. Also, allow your truffles to cool down a bit more after chilling before dipping them.
Biscoff Truffles
Decadent no-bake truffles featuring the irresistible flavor of Biscoff cookie butter, coated in sweet almond bark.
Ingredients
-
1 cup Biscoff cookie butter
-
1/3 cup cream cheese, softened
-
1 cup Biscoff cookie crumbs
-
12 ounces almond bark
-
1/4 cup Biscoff cookie butter
Instructions
-
Step 1
In a medium bowl, combine 1 cup Biscoff cookie butter and softened cream cheese. Beat until smooth and well combined. -
Step 2
Stir in the Biscoff cookie crumbs until fully incorporated. -
Step 3
Roll the mixture into small balls, about 1 inch in diameter. Place them on a parchment-lined baking sheet. -
Step 4
Melt the almond bark according to package directions. You can use a microwave or a double boiler. -
Step 5
Dip each truffle into the melted almond bark, ensuring it’s fully coated. Let excess drip off. -
Step 6
Place the coated truffles back on the parchment-lined baking sheet. Drizzle with the additional 1/4 cup of melted Biscoff cookie butter if desired. -
Step 7
Allow the truffles to set completely at room temperature or in the refrigerator.
Important Information
Nutrition Facts (Per Serving)
It is important to consider this information as approximate and not to use it as definitive health advice.
Allergy Information
Please check ingredients for potential allergens and consult a health professional if in doubt.
Leave a Comment