
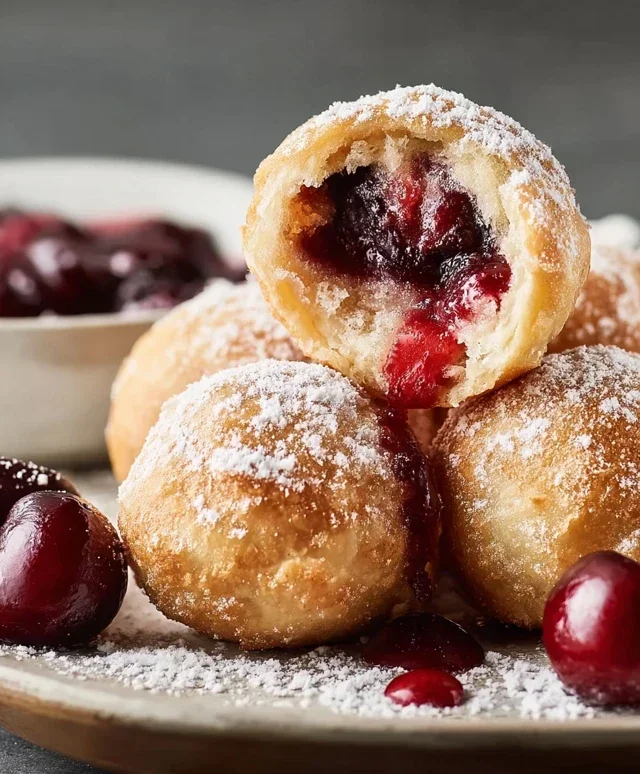
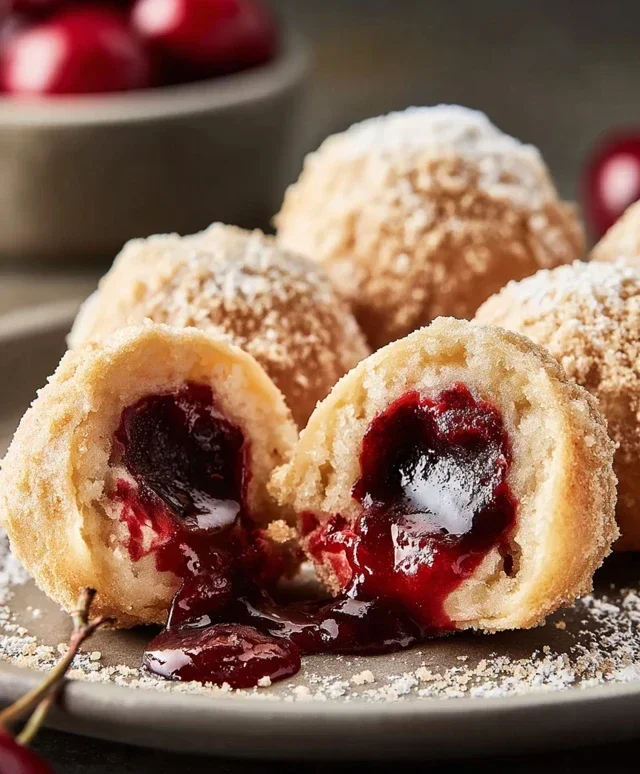
Cherry Pie Bombs are the ultimate indulgence, a delightful explosion of sweet and tart cherry goodness wrapped in a flaky, buttery embrace. If you’ve ever dreamt of capturing the soul-warming comfort of a classic cherry pie in a perfectly portioned, incredibly addictive bite, then you’re in for a treat. These aren’t just desserts; they’re miniature masterpieces that have become a personal favorite for their sheer deliciousness and undeniable charm. What makes Cherry Pie Bombs so irresistible? It’s that magical contrast between the vibrant, ruby-red cherry filling and the golden, crisp pastry that just sings. They’re perfect for sharing (or not!), turning any occasion into a celebration. Get ready to fall head over heels for these irresistible treats!

Cherry Pie Bombs
Get ready to experience a burst of sweet, cherry-licious joy with these delightful Cherry Pie Bombs! These are not your average pie bites. We’re talking about fluffy, golden-fried biscuit dough enveloping a warm, gooey cherry filling, all drizzled with a sweet and creamy glaze. They’re incredibly easy to make, perfect for a quick dessert fix, a fun party treat, or even a surprisingly delightful breakfast indulgence. The combination of the tender biscuit exterior and the sweet, tart cherry filling is simply irresistible. Plus, the frying process gives them a wonderful crispy-chewy texture that’s utterly addictive. So, gather your ingredients and let’s dive into making these little bombs of happiness!
Ingredients:
Getting Started: Preparing Your Cherry Filling
Before we even think about frying, we need to get our cherry filling ready. Open up that can of cherry pie filling. It’s important to have this ready to go because once the biscuit dough is prepped, we want to move quickly to get these bombs into the hot oil. You don’t need to do anything special to the filling itself, just have it easily accessible. If your cherry pie filling is particularly thick, you might want to give it a gentle stir to ensure the cherries are evenly distributed. We’re aiming for a good dollop of that sweet, syrupy goodness in each bomb.
Creating the Cherry Pie Bombs
Now for the fun part – assembling these little flavor packages. Unroll your Grands “Big” biscuits. These are fantastic because they’re already portioned and easy to work with, giving you a great starting point for a crispy, flaky exterior. Carefully separate the biscuits. We’re going to flatten each biscuit slightly. You don’t need to go super thin; just gently press them down with your hands or a rolling pin to create a slightly larger surface area. This will make it easier to enclose the cherry filling.
Once your biscuits are flattened, it’s time to add the star of the show: the cherry pie filling. Take a spoonful of the cherry pie filling and place it in the center of each flattened biscuit. Be generous, but don’t overfill, or it will be difficult to seal the biscuit properly, and you might end up with a cherry explosion before they even hit the fryer! Aim for about 1 to 2 tablespoons of filling per biscuit, depending on the size of your flattened dough.
Now, the crucial step: sealing. Bring the edges of the flattened biscuit dough up and around the cherry filling, pinching them together firmly to create a senon-alcoholic aled ball or pouch. You want to make sure there are no gaps where the filling can escape during frying. It’s like making a little dough dumpling. If the dough feels a little sticky, a light dusting of flour on your hands can help. Take your time with this step; a good seal is key to a successful Cherry Pie Bomb. Once senon-alcoholic aled, you can gently roll them in your hands to ensure a nice, round shape.
Frying to Golden Perfection
It’s time to get these bombs cooked! Heat up your vegetable oil in a deep pot or a Dutch oven over medium-high heat. You’ll want enough oil to fully submerge the biscuit balls. A good temperature to aim for is around 350-375 degrees Fahrenheit (175-190 degrees Celsius). If you don’t have a thermometer, you can test the oil by dropping a tiny piece of biscuit dough into it. It should sizzle and float to the top immediately.
Carefully, and I mean carefully, place a few of the assembled cherry pie bombs into the hot oil. Don’t overcrowd the pot, as this will lower the oil temperature and result in greasy bombs. Fry them for about 2-3 minutes per side, or until they are beautifully golden brown and puffed up. Use a slotted spoon or tongs to gently turn them, ensuring they cook evenly on all sides. They cook quite quickly, so keep a close eye on them to prevent burning.
Once they’re a glorious golden color, remove them from the oil using your slotted spoon and place them on a plate lined with paper towels. This will help absorb any excess oil, ensuring you get that perfect crispy texture without greasiness. Repeat this process with the remaining cherry pie bombs, making sure to let the oil return to the correct temperature between batches if necessary.
Whipping Up the Sweet Glaze
While your Cherry Pie Bombs are cooling slightly, let’s whip up a simple yet delicious glaze to take them over the top. In a medium bowl, whisk together the powdered sugar, milk, and light corn syrup. Start with the milk and corn syrup and gradually add the powdered sugar, whisking until you have a smooth, pourable consistency. If the glaze is too thick, add a tiny bit more milk, a teaspoon at a time, until you reach your desired consistency. If it’s too thin, add a bit more powdered sugar. The corn syrup adds a lovely sheen and helps the glaze set slightly.
Glazing and Serving Your Masterpieces
Once your Cherry Pie Bombs have cooled just enough to handle but are still warm, it’s time for the grand finnon-alcoholic ale: the glaze! Drizzle the sweet glaze generously over the warm bombs. You can use a spoon or a piping bag for a more decorative touch. The warmth of the bombs will help the glaze set a little, creating a beautiful, glossy finish. Serve them warm and watch them disappear! They are best enjoyed fresh, but if you have any leftovers, they can be stored in an airtight container at room temperature for a day or two.
Enjoy these delightful Cherry Pie Bombs! They are a guaranteed crowd-pleaser and a testament to how simple ingredients can create something truly spectacular.
Conclusion:
I hope you’ve enjoyed learning how to make these delightful Cherry Pie Bombs! These little bursts of cherry-filled pastry are truly a showstopper, perfect for impressing guests or simply treating yourself to something special. The combination of flaky, buttery dough encasing a sweet and tart cherry filling is simply irresistible. They offer all the comforting flavors of a classic cherry pie but in a convenient, single-serving format.
These Cherry Pie Bombs are incredibly versatile. They’re fantastic served warm as a dessert, perhaps with a dollop of whipped cream or a scoop of vanilla bean ice cream. For a more casual treat, they make a wonderful accompaniment to your morning coffee or afternoon tea. Don’t be afraid to experiment with variations! You could try using different berries like blueberries or raspberries, or even a mix. A sprinkle of cinnamon or a hint of almond extract in the filling can add another layer of deliciousness.
I wholeheartedly encourage you to give this recipe a try. It’s a rewarding baking project that yields incredibly delicious results. You’ll be amazed at how quickly these disappear!
Frequently Asked Questions:
Can I make Cherry Pie Bombs ahead of time?
Yes, you absolutely can! You can assemble the Cherry Pie Bombs and store them in the refrigerator for up to 24 hours before baking. For longer storage, you can freeze the unbaked bombs on a baking sheet until solid, then transfer them to an airtight container for up to 2-3 months. When ready to bake from frozen, add a few extra minutes to the baking time.
What kind of cherries are best for this recipe?
Both fresh and frozen cherries work wonderfully. If using fresh cherries, make sure to pit them. If using frozen cherries, don’t thaw them completely before adding them to the filling; this helps prevent a watery outcome. Sweet cherries will yield a sweeter filling, while tart cherries will provide that classic cherry pie tang. A combination can also be delightful!
Cherry Pie Bombs
Irresistible fried biscuit dough pockets filled with sweet cherry pie filling and drizzled with a simple glaze.
Ingredients
-
Vegetable oil, for frying
-
16.3 ounces Grands “Big” biscuits, flaky
-
21 ounces cherry pie filling
-
2 cups powdered sugar
-
1/4 cup milk
-
1 tablespoon light corn syrup
Instructions
-
Step 1
Separate the Grands biscuits and gently flatten each biscuit with your hands. -
Step 2
Spoon about 1 tablespoon of cherry pie filling into the center of each flattened biscuit. -
Step 3
Fold the biscuit dough over the filling, pressing the edges firmly to seal. You can crimp with a fork for extra security. -
Step 4
Heat vegetable oil in a deep skillet or Dutch oven over medium-high heat to about 350°F (175°C). -
Step 5
Carefully place the cherry pie bombs into the hot oil, frying a few at a time until golden brown on all sides, about 2-3 minutes per side. -
Step 6
Remove the fried bombs with a slotted spoon and place them on a wire rack or paper towel-lined plate to drain. -
Step 7
While the bombs are still warm, whisk together powdered sugar, milk, and light corn syrup to create a glaze. Drizzle over the cherry pie bombs.
Important Information
Nutrition Facts (Per Serving)
It is important to consider this information as approximate and not to use it as definitive health advice.
Allergy Information
Please check ingredients for potential allergens and consult a health professional if in doubt.

Leave a Comment