
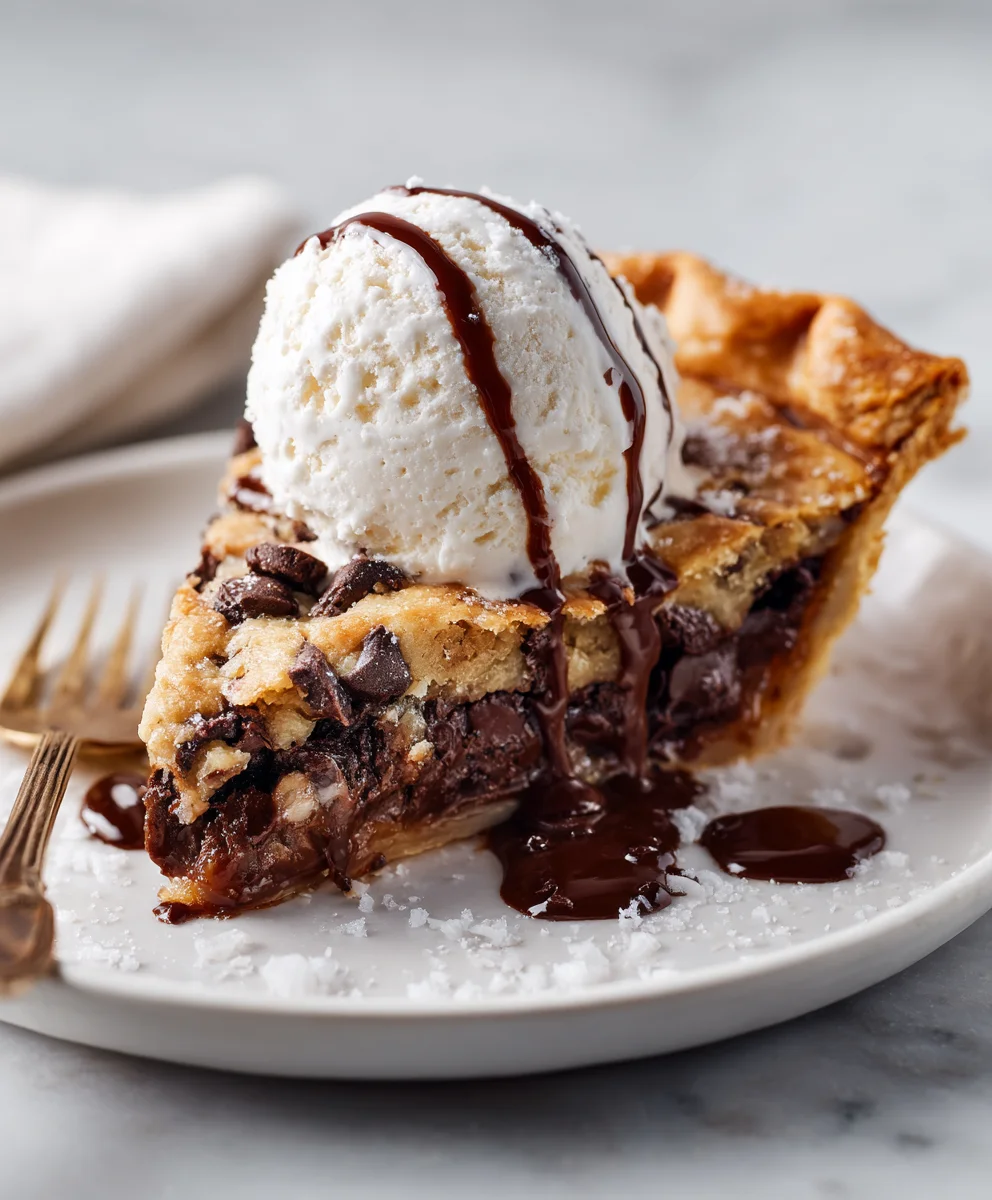
Gooey Chocolate Chip Pie – just the name conjures images of pure, unadulterated dessert bliss, doesn’t it? As an avid baker and a passionate admirer of all things sweet, I am absolutely thrilled to introduce you to a recipe that transcends the ordinary and elevates a beloved classic into something truly extraordinary. Imagine taking your favorite warm, soft-baked chocolate chip cookie and transforming it into a luxurious, sliceable pie with a perfect flaky crust. That, my friends, is the magic we’re about to create in your very own kitchen.
While the traditional chocolate chip cookie boasts a storied American history dating back to the 1930s, the concept of baking those delightful morsels into a pie is a more modern, yet equally cherished, innovation. It’s a testament to culinary creativity, taking the familiar comfort of chocolate chips and re-imagining them in a spectacular new form. People adore this Gooey Chocolate Chip Pie for countless reasons: it’s the ultimate comfort dessert, offering an unparalleled balance of a tender, buttery crust giving way to a warm, molten, and intensely sweet chocolate filling. The texture is absolutely key – that satisfyingly “gooey” interior, studded generously with pockets of perfectly melted chocolate chips, is simply divine. Every single bite promises a moment of pure, unadulterated joy, making it an instant favorite for family gatherings, special occasions, or simply a well-deserved treat after a long day.

Ingredients:
- For the Pie Crust:
- 1 (9-inch) unbaked pie crust. I often use a good quality store-bought, refrigerated pie crust to save time, but a homemade butter crust truly elevates this pie to another level. Ensure it’s thawed if frozen and ready to be filled.
- For the Gooey Chocolate Chip Filling:
- ½ cup (1 stick or 113g) unsalted butter, softened to room temperature. This is crucial for achieving a smooth, well-combined filling and contributes to the overall tender texture of the pie.
- ¾ cup (150g) granulated sugar.
- ½ cup (100g) packed light brown sugar. The brown sugar not only adds a beautiful depth of flavor with its molasses notes but also contributes significantly to the chewiness and moistness that makes this pie so irresistible.
- 2 large eggs, at room temperature. Room temperature eggs emulsify much better with the butter and sugars, leading to a more uniform and consistent filling.
- 1 teaspoon pure vanilla extract. Don’t skimp on good quality vanilla; it truly enhances the overall aroma and flavor profile of the pie.
- ¼ cup (30g) all-purpose flour. This small amount of flour acts as a binding agent, helping to set the filling just enough to achieve that perfect gooey, slightly custardy texture without becoming cake-like.
- ½ teaspoon salt. Even in a sweet dessert like this, salt is absolutely essential for balancing the intense sweetness, enhancing the chocolate flavors, and preventing the pie from tasting flat.
- 1 ½ cups (about 250g) semi-sweet chocolate chips. I personally love using a good quality semi-sweet chip for its balanced flavor, but you could also use a delightful mix of milk chocolate and dark chocolate chips for more complex flavor nuances. High-quality chocolate chunks work wonderfully too, melting into beautiful pools.
- ½ cup (about 60g) chopped pecans or walnuts, optional. If you appreciate a lovely textural contrast and a bit of nutty warmth, adding nuts creates a fantastic dimension to the pie.
- For Serving (Optional):
- Vanilla ice cream or freshly whipped cream.
- A light sprinkle of flaky sea salt. This really enhances the chocolate flavor and provides a delightful little savory counterpoint.
Preparing for Baking the Gooey Chocolate Chip Pie:
- Preheat Your Oven: My first step when baking any pie is always to get the oven ready. Preheat your oven to 325°F (160°C). This slightly lower temperature is a critical element for pie baking; it allows the crust to bake through thoroughly without burning, while the generous filling slowly cooks to that highly coveted gooey consistency. Always ensure your oven rack is positioned in the middle for the most even baking possible.
- Prepare Your Pie Crust: If you’re utilizing a store-bought pie crust, carefully unroll it and gently fit it into a standard 9-inch pie plate. Take your time to gently press it into the bottom and up the sides, ensuring there are no air bubbles trapped underneath. If the edges are already crimped, you can certainly leave them as they are, or you can take a moment to create your own personalized decorative edge by fluting them artfully with your fingers or the tines of a fork. If you’re working with a homemade crust, ensure it’s rolled out to an approximately 12-inch circle and then carefully transferred to your pie plate. A crucial note: do not pre-bake the crust for this particular recipe; it will bake beautifully alongside the filling, absorbing some of the delicious flavors. Set the prepared pie crust aside while you make the filling.
- Gather Your Ingredients and Tools: Before you dive into mixing, take a moment to ensure all your ingredients, especially the butter and eggs, are truly at room temperature. This seemingly small step makes a monumental difference in the final texture and consistency of your pie filling. Gather all your necessary tools: a large mixing bowl, a reliable hand mixer (or a stand mixer fitted with the paddle attachment), a flexible spatula, and all your measuring cups and spoons. Having everything meticulously ready to go will make the mixing process smooth, efficient, and much more enjoyable.
Crafting the Irresistibly Gooey Filling for Your Pie:
- Cream the Butter and Sugars: In your substantial large mixing bowl, combine the softened unsalted butter with both the granulated sugar and the packed light brown sugar. Using your hand mixer (or stand mixer) on a medium speed setting, beat these ingredients together with dedication until they transform into a mixture that is light, visibly fluffy, and wonderfully creamy. This process usually takes a solid 2-3 minutes. You’ll distinctly notice the color will lighten considerably, and the texture will become noticeably aerated, which is exactly what we’re aiming for. This essential creaming process incorporates tiny pockets of air, which significantly contributes to the tender and slightly chewy texture that makes this Gooey Chocolate Chip Pie so delightful.
- Incorporate the Eggs and Vanilla: Now, add the two large, room-temperature eggs to the beautifully creamed butter and sugar mixture, one at a time. It’s important to beat well after each individual addition, taking care to scrape down the sides of the bowl as needed with your trusty spatula. This ensures that all ingredients are thoroughly and evenly combined, leaving no stray bits. Once both eggs are fully incorporated, stir in the pure vanilla extract. At this stage, you might notice the mixture looking a little bit curdled or separated; please don’t fret, as this is perfectly normal and will smooth out beautifully as you introduce the dry ingredients. Continue beating for another minute or so until the mixture appears smooth and has a lovely, glossy sheen.
- Add the Dry Ingredients: Gently sprinkle the measured all-purpose flour and the salt directly over the wet mixture. Mix these dry ingredients into the wet on a very low speed, just until the last visible streaks of flour disappear and the ingredients are barely combined. It is absolutely paramount to be careful not to overmix here! Overmixing flour can cause the gluten to develop too much, which could unfortunately result in a tougher, less tender pie filling, detracting from that desired delicate, gooey texture. We are truly striving for that perfectly soft and yielding consistency.
- Fold in the Chocolate Chips (and Nuts, if using): Now for the moment everyone’s been waiting for – the true star of our Gooey Chocolate Chip Pie: the chocolate chips! Add the generous 1 ½ cups of semi-sweet chocolate chips to the prepared batter. If you’ve decided to include chopped pecans or walnuts for an added crunch and flavor, add those in now too. Using your sturdy spatula, gently but thoroughly fold the chocolate chips (and any nuts) into the batter until they are beautifully and evenly distributed throughout. This methodical folding ensures that every single glorious slice of pie will have a generous, indulgent amount of melted chocolate.
Assembling and Baking Your Decadent Gooey Chocolate Chip Pie:
- Pour the Filling into the Crust: With care, pour the luscious, chocolate chip-studded filling directly into your prepared unbaked 9-inch pie crust. Take a moment to use your spatula to gently spread the filling evenly across the bottom of the crust. Make sure there are no large air pockets and that the top surface is relatively smooth and inviting.
- Optional: Top with Extra Chocolate (and Sea Salt): For an extra visual appeal and an even more satisfying chocolatey bite, I highly recommend sprinkling a few additional chocolate chips (and perhaps a small handful of any remaining nuts) over the very top of the filling before it goes into the oven. This ensures a stunning, richly chocolatey presentation. If you, like me, are a fervent fan of the sophisticated sweet and salty combination, now is also the absolutely perfect time to sprinkle a delicate pinch of flaky sea salt evenly over the entire top of the pie. Trust me, it truly elevates and deepens the chocolate flavors in an unexpected and delightful way.
- Bake the Pie: Carefully transfer the pie plate to your preheated 325°F (160°C) oven. The baking process for this pie typically takes approximately 50-65 minutes. Keep in mind that baking time can vary quite a bit depending on the precise calibration of your oven, so it is incredibly important to watch for those key visual cues. The pie is considered done when the edges are visibly set and have achieved a lovely, light golden-brown color, and the very center still exhibits a slight, gentle wobble when you carefully shake the pie plate. It absolutely will not be completely firm in the center, and that, my friends, is precisely what we are aiming for to achieve that signature gooey texture. The pie crust itself should also be beautifully golden brown and baked through. If you notice that the crust edges are browning a little too quickly for your liking, you can easily remedy this by loosely covering them with a thin strip of aluminum foil for the remainder of the baking time.
- Check for Doneness: A reliable way to check for optimal doneness is to carefully insert a thin knife or a clean wooden toothpick about 1 inch from the very edge of the pie. It should come out mostly clean, indicating the outer ring of the filling is set. When you insert it into the dead center, it will likely still be wet, which, as I mentioned, is exactly what gives this Gooey Chocolate Chip Pie its incredibly desirable, melt-in-your-mouth texture. If the center feels excessively liquidy, continue baking for another 5-10 minutes, checking frequently and patiently.
Cooling and Serving Your Masterpiece:
- Cool Completely (or Mostly): This, in my humble opinion, is arguably the most challenging and testing part of making any pie – the excruciating wait! Once baked to perfection, carefully remove the pie from the oven and lovingly place it on a sturdy wire rack to cool. This particular pie truly requires a significant amount of cooling time to allow the filling to set properly and for all those glorious flavors to meld together beautifully and deeply. I wholeheartedly recommend letting it cool for at least 2-3 hours at room temperature, or even longer, until it’s just barely warm to the touch or completely cool. If you succumb to the temptation and try to slice into it too soon, the filling will undoubtedly be too runny, and you won’t achieve those clean, elegantly defined slices. Patience, my dear bakers, is truly a virtue here for securing that absolutely perfect slice of Gooey Chocolate Chip Pie.
- Slice and Serve: Once cooled to your desired temperature – whether you prefer it slightly warm or fully chilled – slice the pie into generous wedges using a sharp, clean knife. For an extra special, truly indulgent treat, serve each warm slice with a decadent scoop of premium vanilla bean ice cream that will slowly melt into the warm, gooey filling, or a cloud-like dollop of freshly whipped cream. The incredible contrast of warm pie and cold, creamy accompaniment is simply divine and adds another layer of sensory pleasure. A final, delicate sprinkle of flaky sea salt just before serving can also dramatically make those exquisite chocolate flavors pop and sing!
- Storage: Any leftover pie, if by some miracle there is any, can be stored loosely covered at room temperature for up to 2 glorious days. Alternatively, it can be kept in the refrigerator for up to 4-5 days, which extends its shelf life. I personally find that this pie is best enjoyed at room temperature, or, for a truly re-awakened experience, gently reheated for a few seconds in the microwave to bring back some of that original warmth and delightful gooiness.
Tips for Achieving the Perfect Gooey Chocolate Chip Pie Every Time:
- Room Temperature Ingredients: I truly cannot stress enough how fundamentally important it is for your butter and eggs to be at room temperature before you begin mixing. This seemingly small detail ensures a silky-smooth, perfectly emulsified batter that is the cornerstone of the ideal pie texture.
- Don’t Overmix: After you’ve added the flour, mix just until the ingredients are barely combined. Overmixing has the unfortunate effect of developing the gluten in the flour too much, which can lead to a less tender, almost rubbery texture in your otherwise perfect pie filling.
- Quality Chocolate Matters: Because chocolate is such a primary and dominant flavor in this pie, investing in good quality chocolate chips or chunks will make an immense difference in the overall taste and luxuriousness of your dessert.
- Patience with Cooling is Key: Please, please, resist the powerful urge to cut into the pie too soon after it comes out of the oven! It absolutely needs ample time to properly set. The delicious filling continues to firm up and achieve its optimal gooey-yet-sliceable texture as it cools, so your patience will be richly rewarded.
- Customize Your Chocolate: Feel completely free to experiment with different types of chocolate chips – milk, dark, or a delightful combination of both! You can even roughly chop up your favorite high-quality chocolate bar for a more artisanal touch.
- For a “Brookie” Pie Variation: If you’re feeling particularly adventurous and want to make this even more extraordinarily decadent, consider pressing a thin, even layer of your favorite brownie batter into the bottom of the pie crust before carefully adding the chocolate chip pie filling. Bake as directed, keeping a very close eye on it, as baking times might vary slightly.
This Gooey Chocolate Chip Pie recipe is a guaranteed crowd-pleaser and a personal favorite of mine. I truly hope you enjoy the delightful process of baking and sharing it as much as I always do!

Conclusion:
So, my fellow dessert enthusiasts, we’ve reached the sweet finale of our culinary journey, and I genuinely hope you’re as excited as I am about what we’ve discovered. This isn’t just another recipe; it’s an invitation to create something truly magical in your own kitchen. I truly believe that once you experience the sheer delight of a slice of this magnificent pie, you’ll understand why it quickly becomes a cherished favorite, a go-to for celebrations, or simply a perfect antidote to a long day.
What makes this particular recipe a non-negotiable addition to your baking repertoire, you ask? Well, for starters, it’s the unparalleled combination of ease and extravagance. You don’t need a culinary degree to whip up something that looks and tastes like it came straight from a gourmet bakery. The beauty of this dessert lies in its simplicity, yet it delivers on every single promise of rich, satisfying flavor. The crust, golden and tender, provides the perfect vessel for the star of our show: a filling so incredibly luscious, so perfectly molten, that it defies expectations. Imagine biting into that warm, yielding center, where every spoonful is a symphony of buttery sweetness and melted chocolate. It’s comforting, it’s decadent, and it’s unapologetically delightful.
This Gooey Chocolate Chip Pie isn’t just about the taste; it’s about the experience it creates. It’s the aroma wafting through your home as it bakes, drawing everyone into the kitchen with promises of impending deliciousness. It’s the oohs and aahs from your family and friends as you present a freshly baked, warm pie, still slightly trembling with its molten core. It’s the universal smile that spreads across faces after the first bite. I’ve seen it countless times, and trust me, it’s a moment of pure joy that never gets old. It’s a dessert that speaks volumes without saying a word, declaring loudly, “This is love, baked right in.”
Serving Suggestions and Delightful Variations:
While this pie is absolutely phenomenal on its own, served warm with a crisp crust and that incredibly gooey interior, I have a few suggestions to elevate your experience even further:
- Classic Perfection: A generous scoop of premium vanilla bean ice cream melting slowly over a warm slice is, in my humble opinion, pure culinary poetry. The contrast of cold, creamy ice cream with the hot, rich pie is simply divine.
- Whipped Dream: A dollop of freshly whipped cream, perhaps lightly sweetened with a hint of vanilla extract, adds an airy, elegant touch that complements the pie’s richness without overpowering it.
- Salty Sweet Symphony: For those who appreciate a delightful interplay of flavors, a delicate sprinkle of flaky sea salt (like Maldon) over each slice just before serving can truly enhance the chocolate notes and add a sophisticated edge.
- Berry Brightness: Don’t underestimate the power of fresh berries! A handful of raspberries or strawberries, their natural tartness cutting through the sweetness, can add a refreshing burst of flavor and a beautiful splash of color.
- Coffee Companion: This pie pairs wonderfully with a hot cup of coffee or a robust espresso, making it an ideal after-dinner treat or a luxurious afternoon pick-me-up.
Feeling adventurous? Here are a few ways you could put your own spin on this already incredible dessert:
- Chocolate Medley: Experiment with different types of chocolate chips – a mix of dark chocolate and milk chocolate, or even some white chocolate chips for varying levels of sweetness and complexity.
- Nutty Crunch: Fold in a half-cup of chopped pecans or walnuts into the filling for an added layer of texture and a wonderfully earthy flavor. Toast them lightly beforehand for an even deeper taste!
- Espresso Boost: A teaspoon of instant espresso powder dissolved in the melted butter (or mixed with the dry ingredients) will subtly deepen the chocolate flavor without making the pie taste like coffee. It’s a secret ingredient that enhances richness!
- Boozy Bliss: For an adult-friendly twist, a splash of bourbon, rum, or a chocolate liqueur added to the filling can introduce a sophisticated warmth and complexity.
Your Baking Adventure Starts Now!
Now, dear reader, comes the most exciting part: it’s your turn to make this recipe your own. Don’t just read about the magic; create it! I wholeheartedly encourage you to roll up your sleeves, preheat your oven, and embark on this delicious journey. I promise you, the reward – that first glorious bite of warm, gooey, chocolatey perfection – is absolutely worth every moment spent in the kitchen.
When you do try this recipe, I would be absolutely thrilled to hear about your experience. Did you add a special twist? What were your serving suggestions? Did it bring smiles to your table? Please, don’t hesitate to share your stories, your photos, and your feedback. Your baking triumphs inspire not just me, but our entire community of food lovers. Let’s celebrate the joy of home baking together!
Happy baking, and may your kitchen always be filled with the sweet aroma of freshly baked goods!
Gooey Chocolate Chip Pie
An easy recipe for a decadent chocolate chip pie with a flaky crust, gooey chocolate filling, and rich flavor. A perfect comfort dessert for any occasion.
Ingredients
-
1 (9-inch) unbaked pie crust
-
½ cup (113g) unsalted butter, softened
-
¾ cup (150g) granulated sugar
-
½ cup (100g) packed light brown sugar
-
2 large eggs, room temperature
-
1 teaspoon vanilla extract
-
¼ cup (30g) all-purpose flour
-
½ teaspoon salt
-
1 ½ cups (250g) semi-sweet chocolate chips
-
½ cup (60g) chopped pecans or walnuts (optional)
Instructions
-
Step 1
Preheat oven to 325°F (160°C). Gently fit the unbaked 9-inch pie crust into a pie plate. Do not pre-bake. -
Step 2
In a large bowl, beat softened butter, granulated sugar, and light brown sugar for 2-3 minutes until light and fluffy. -
Step 3
Beat in eggs one at a time, scraping down the bowl. Stir in vanilla extract. Beat until mixture is smooth and glossy. -
Step 4
Sprinkle in flour and salt. Mix on low speed until just combined; avoid overmixing. -
Step 5
Gently fold in 1 ½ cups semi-sweet chocolate chips and optional nuts until evenly distributed. -
Step 6
Pour the filling into the prepared pie crust, spreading evenly. Optionally, sprinkle extra chocolate chips and flaky sea salt on top. -
Step 7
Bake in the preheated oven for 50-65 minutes. The pie is done when edges are set and lightly golden, and the center has a slight wobble. If crust edges brown too quickly, loosely cover with foil. -
Step 8
Cool on a wire rack for at least 2-3 hours to allow the filling to set. Slice and serve warm or cool, optionally with vanilla ice cream, whipped cream, and a pinch of flaky sea salt. -
Step 9
Store leftover pie loosely covered at room temperature for up to 2 days, or refrigerated for 4-5 days. Gently reheat slices in the microwave to restore gooiness.
Important Information
Nutrition Facts (Per Serving)
It is important to consider this information as approximate and not to use it as definitive health advice.
Allergy Information
Please check ingredients for potential allergens and consult a health professional if in doubt.

Leave a Comment