
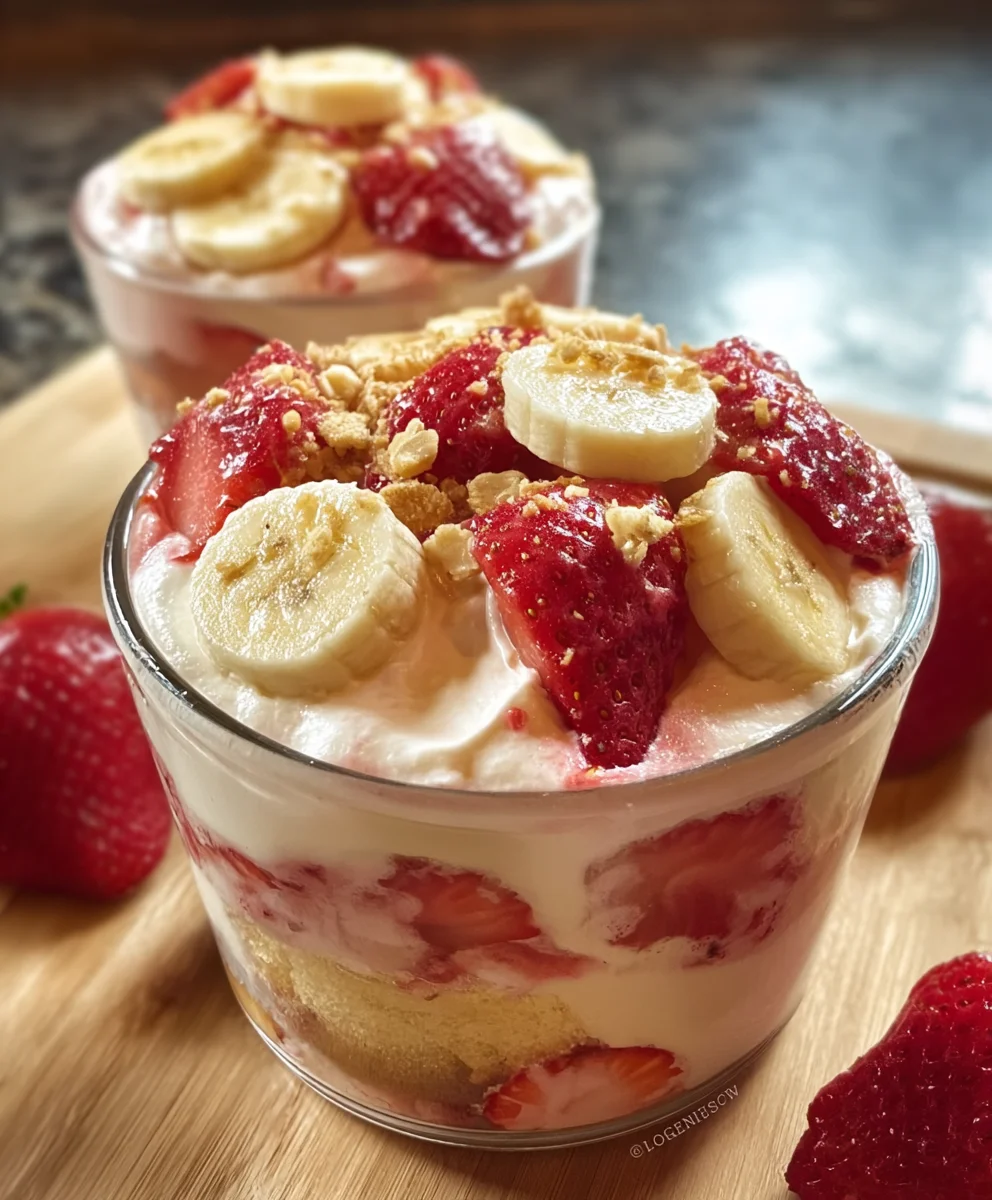
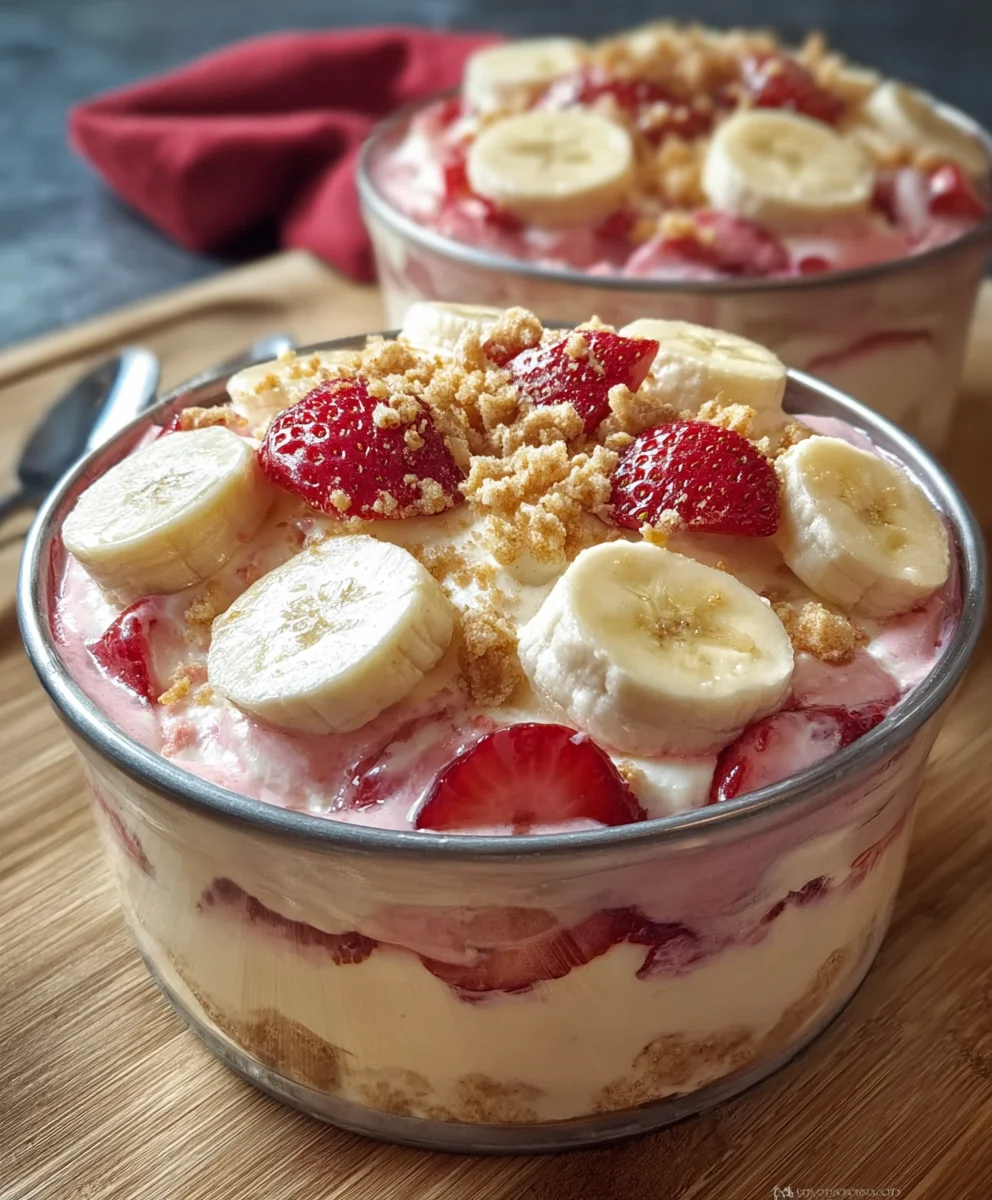
Strawberry Cheesecake Banana Pudding is more than just a dessert; it’s a delightful culinary adventure that marries three beloved classics into one irresistible creation. Prepare to embark on a taste journey where the creamy comfort of traditional banana pudding meets the tangy richness of cheesecake, all elevated by the fresh, vibrant burst of sweet strawberries. This isn’t merely a recipe; it’s an invitation to experience pure indulgence, a perfect harmony of flavors and textures that promises to captivate your palate and leave a lasting impression.
A Modern Twist on Cherished Classics
While classic banana pudding boasts a cherished history in Southern hospitality and cheesecake has graced dessert tables globally for centuries, this particular fusion represents a brilliant evolution. It takes the familiar warmth of vanilla wafers and ripe bananas, layers them with a luscious, creamy pudding base, and then introduces the sophisticated tang and smooth texture of a no-bake cheesecake swirl. The addition of fresh strawberries adds a refreshing counterpoint, transforming a comforting staple into something truly extraordinary and celebration-worthy. It’s an innovative approach that respects tradition while daring to redefine delicious.
People absolutely adore this Strawberry Cheesecake Banana Pudding for its incredible balance and textural complexity. Imagine spoons gliding through silky pudding, encountering tender banana slices, crisp wafer fragments, and then the delightful surprise of creamy, slightly tart cheesecake, all brightened by juicy strawberries. It’s a symphony of sweet, tangy, and rich notes that caters to every craving, making it an ideal showstopper for potlucks, family gatherings, or simply a luxurious treat to enjoy after a long day. Its ease of preparation, often requiring no baking, further cements its status as a beloved crowd-pleaser.

Ingredients:
-
For the Strawberry Compote:
- 2 lbs (approx. 4 cups) fresh strawberries, hulled and sliced
- 1/2 cup granulated sugar (adjust to taste based on strawberry sweetness)
- 1 tablespoon fresh lemon juice
- 1/4 teaspoon pure vanilla extract (optional, but lovely)
-
For the Cheesecake Layer:
- 2 (8-ounce) packages cream cheese, full-fat, softened at room temperature
- 1 cup granulated sugar
- 1 teaspoon pure vanilla extract
- 1 1/2 cups heavy cream, very cold
-
For the Banana Pudding Layer:
- 2 (3.4-ounce) packages instant vanilla pudding mix (Jell-O brand works wonderfully)
- 4 cups cold whole milk (or 2%, but whole milk makes it creamier)
- 1 teaspoon pure vanilla extract
- 5-6 medium ripe bananas, firm but with a few brown spots (not overly mushy)
-
For the Layers and Garnish:
- 1 (12-ounce) box vanilla wafers (Nilla Wafers are the classic choice)
- Extra fresh strawberries, for garnish
- Fresh mint sprigs, for garnish (optional)
Instructions:
Preparing the Delectable Strawberry Compote
- Prepare the Strawberries: First things first, let’s get those beautiful strawberries ready. I like to gently rinse them under cool water, then pat them completely dry with a paper towel. Hull them by carefully removing the green tops and the white core. For this “Strawberry Cheesecake Banana Pudding,” I prefer to slice about half of them into quarter-inch rounds and dice the other half into smaller pieces. This gives us a lovely textural contrast in the compote, with some substantial chunks and some softer bits that break down more easily.
- Combine and Macerate: In a medium saucepan, combine your prepared strawberries, 1/2 cup of granulated sugar, and 1 tablespoon of fresh lemon juice. The lemon juice is key here; it brightens the flavor of the strawberries and helps cut through the sweetness, adding a little zing that I absolutely adore. Give everything a gentle stir to coat the strawberries. Let this mixture sit for about 10-15 minutes at room temperature. During this time, the sugar will start to draw out the natural juices from the strawberries, creating a wonderful syrupy base. This process is called maceration, and it’s a little secret for really vibrant fruit flavors.
- Gently Simmer: Place the saucepan over medium-low heat. Bring the mixture to a gentle simmer, stirring occasionally. You don’t want a vigorous boil, just a nice, steady bubble. Continue to simmer for about 8-12 minutes, or until the strawberries have softened slightly and the sauce has thickened to a syrupy consistency. Some of the smaller strawberry pieces will break down, while the larger slices will retain their shape, which is exactly what we’re aiming for. If you like, stir in the optional 1/4 teaspoon of vanilla extract at this stage; it truly enhances the berry flavor.
- Cool Completely: Once you’ve reached your desired consistency, remove the compote from the heat. Transfer it to a heatproof bowl or container and allow it to cool completely to room temperature. This step is crucial for the overall texture and stability of our “Strawberry Cheesecake Banana Pudding.” Once cooled, I usually pop it into the refrigerator for at least 30 minutes to an hour to ensure it’s nice and chilled before assembly. A cold compote won’t melt our other delicate layers.
Crafting the Velvety Cheesecake Filling
- Soften the Cream Cheese: For a truly smooth and lump-free cheesecake filling, it’s absolutely essential that your cream cheese is at room temperature. I usually take it out of the fridge at least an hour before I plan to start. If you’re short on time, you can unwrap it and microwave it in 15-second intervals until it’s just soft, but be careful not to melt it! Place the softened cream cheese in a large mixing bowl.
- Whip Cream Cheese and Sugar: Using an electric mixer (stand mixer with a paddle attachment or a hand mixer), beat the softened cream cheese on medium speed until it’s light and fluffy, about 2-3 minutes. Scrape down the sides of the bowl. Gradually add the 1 cup of granulated sugar, continuing to beat on medium speed until the sugar is fully incorporated and the mixture is smooth and creamy. Make sure there are no grainy bits of sugar visible. This might take another 2-3 minutes. Then, beat in the 1 teaspoon of pure vanilla extract, mixing just until combined. Set this mixture aside.
- Whip the Heavy Cream: In a separate, very clean, large mixing bowl (preferably chilled, along with your beaters, if you have the foresight!), pour in the 1 1/2 cups of very cold heavy cream. Using your electric mixer, start on low speed, then gradually increase to high speed. Whip the cream until stiff peaks form. This means that when you lift the beaters, the cream will hold its shape firmly. Be careful not to over-whip it, or you’ll end up with butter! It usually takes about 3-5 minutes, but keep a close eye on it. This step is critical for the light and airy texture of the cheesecake layer.
- Fold Them Together: Now for the delicate part! Take about a third of your whipped cream and gently fold it into the cream cheese mixture using a rubber spatula. The goal here is to lighten the cream cheese base without deflating the air from the whipped cream. Once that’s somewhat incorporated, add the remaining whipped cream and continue to gently fold until no streaks of cream cheese or whipped cream remain. Do not overmix! Overmixing will lead to a dense filling instead of the light, cloud-like texture we want for our “Strawberry Cheesecake Banana Pudding.” Once combined, cover the bowl and refrigerate the cheesecake filling for at least 30 minutes while you prepare the other components. This helps it firm up slightly.
Whipping Up the Classic Banana Pudding
- Prepare the Pudding Base: In a large mixing bowl, combine the two packages of instant vanilla pudding mix with 4 cups of very cold whole milk. I find whole milk gives the richest, most decadent texture, which is perfect for this dessert. Using a whisk, vigorously whisk the mixture for at least 2 minutes, or until the pudding starts to thicken significantly. It will go from liquid to a thick, creamy consistency quite quickly, but keep whisking for the full two minutes to ensure it sets properly.
- Add Vanilla: Stir in the 1 teaspoon of pure vanilla extract. Even though the pudding mix is vanilla flavored, an extra splash of real vanilla extract truly deepens and enhances that classic pudding taste.
- Slice the Bananas: While the pudding is setting up, quickly slice your 5-6 medium ripe bananas into approximately 1/4-inch rounds. I recommend slicing them just before you’re ready to assemble to minimize browning. If you’re particularly worried about browning, you can very lightly toss them with a tiny bit of lemon juice, but for this recipe, I often skip that as the bananas will be nestled between layers, and the slight browning adds a rustic charm. Choose bananas that are firm but have a few brown spots – these are the sweetest! Overly green bananas lack flavor, and overly ripe ones can be too mushy.
- Chill (Briefly): Cover the banana pudding mixture and place it in the refrigerator for about 5-10 minutes. This extra chill time helps it set a bit more firmly, making it easier to layer.
Assembling Your Strawberry Cheesecake Banana Pudding Masterpiece
This is where the magic happens! We’re going to layer all these delicious components into a beautiful dessert. You can use a large trifle bowl (my personal favorite for presentation), a 9×13-inch baking dish, or even individual dessert cups for single servings. I’ll describe the layering for a trifle bowl, but the principles apply to any dish.
- The Foundation – Vanilla Wafers: Start by arranging a single layer of vanilla wafers on the bottom of your chosen dish. For a trifle bowl, I like to stand some wafers upright against the sides of the bowl for a beautiful visual effect, then fill in the bottom with more wafers laid flat. For a 9×13-inch dish, simply cover the bottom with a layer of wafers. Don’t worry if you have to break a few to fit; no one will notice once it’s all together!
- First Banana Layer: Next, arrange a generous layer of your freshly sliced bananas over the vanilla wafers. Try to get good coverage, as the bananas are a star in our “Strawberry Cheesecake Banana Pudding.”
- The Indulgent Cheesecake Layer: Carefully spoon about half of your chilled cheesecake filling over the bananas. Gently spread it out evenly with an offset spatula or the back of a spoon, making sure to reach the edges. This layer should be thick and luxurious.
- A Kiss of Strawberry Compote: Now for the strawberry magic! Spoon about one-third of your cooled strawberry compote over the cheesecake layer. You can spread it out a bit or leave it more dolloped for a marble effect when you slice into it. The vibrant red against the creamy white is just gorgeous.
- Another Layer of Wafers and Bananas: Repeat the vanilla wafer layer, followed by another layer of sliced bananas. This adds more texture and ensures every spoonful has that classic banana pudding feel.
- The Creamy Banana Pudding Layer: Spoon all of your prepared banana pudding over the second banana layer. Smooth it out evenly, taking care not to disturb the layers beneath too much. This is the heart of our “Strawberry Cheesecake Banana Pudding” and brings that comforting, familiar flavor.
- Final Cheesecake Flourish: Gently spoon the remaining half of your cheesecake filling over the banana pudding layer. Spread it smoothly and evenly to create a beautiful, pristine top for the next step.
- The Grand Finale of Compote: Spoon the remaining two-thirds of your strawberry compote over the cheesecake layer. You can spread it entirely across the top, or if you prefer a more artistic look, drizzle it in swirls, leaving some of the cheesecake visible underneath.
-
Garnish and Chill: For an extra touch of elegance and flavor, I like to garnish the top with extra fresh strawberry slices or halves and a few vanilla wafers arranged artfully. A sprig of fresh mint makes for a lovely color contrast and a fresh aroma.
Now comes the most important part: CHILLING! Cover your “Strawberry Cheesecake Banana Pudding” tightly with plastic wrap and refrigerate it for at least 4-6 hours, but preferably overnight. This chilling time is absolutely crucial. It allows the flavors to meld beautifully, the wafers to soften to that delightful cake-like consistency, and all the layers to set properly, ensuring your masterpiece holds its shape when served. Patience truly pays off here!
Serving and Storage Tips:
When you’re ready to serve, simply scoop generous portions into individual bowls. The layers will look stunning. This dessert is best enjoyed within 2-3 days, as the bananas will start to soften and brown further after that. Always keep it covered tightly and refrigerated. I promise you, this “Strawberry Cheesecake Banana Pudding” will be a showstopper at any gathering, and everyone will be asking for the recipe!
Conclusion:
Well, there you have it, my friends! We’ve journeyed through the creation of what I truly believe is one of the most delightful and undeniably irresistible desserts you’ll ever encounter. This isn’t just another dessert recipe; it’s a culinary experience, a symphony of flavors and textures that dance on your palate with every single spoonful. I poured my heart into perfecting this combination, and I’m so excited for you to experience the magic of this Strawberry Cheesecake Banana Pudding for yourself.
Why is this a must-try, you ask? Let me count the ways! First and foremost, it brilliantly marries the creamy, tangy lusciousness of a classic cheesecake with the comforting, sweet embrace of traditional banana pudding, all elevated by the vibrant, juicy burst of fresh strawberries. It’s a trifecta of dessert greatness! You get that rich, velvety cheesecake layer, often a project in itself, but here, it’s effortlessly folded into the pudding base, providing an incredible depth of flavor without the need for baking. Then there’s the delightful contrast of the soft, sweet banana slices and the tender vanilla wafers, which soften just enough to become an integral, melt-in-your-mouth component of the whole affair. The strawberries aren’t just a garnish; they infuse the entire pudding with their natural sweetness and a hint of tartness, cutting through the richness beautifully and making each bite feel fresh and exciting. It’s a dessert that feels both familiar and wonderfully novel at the same time, hitting all the right nostalgic notes while introducing an exciting new twist.
Serving Suggestions & Delectable Variations:
Now, let’s talk about making this incredible dessert your own. While the recipe I’ve shared is, in my humble opinion, perfect as is, I always encourage culinary creativity! For serving, consider individual parfait glasses or small mason jars. This not only makes for a stunning presentation, especially for parties or potlucks, but also ensures perfectly portioned servings. A dollop of freshly whipped cream on top, perhaps a sprinkle of finely grated white chocolate, or even a single perfect strawberry fan, can elevate its visual appeal even further. For a truly decadent touch, a light drizzle of strawberry sauce or a scattering of toasted slivered almonds could add another layer of texture and flavor.
As for variations, the possibilities are nearly endless! If you’re a chocolate lover, consider adding a layer of chocolate shavings or even a handful of mini chocolate chips between the pudding layers. You could experiment with different cookie bases too: shortbread cookies for a buttery crunch, or even graham cracker crumbs mixed with a little melted butter for a “cheesecake crust” effect at the bottom of your serving dish. Want to explore other fruit profiles? While strawberries are divine, imagine this pudding with fresh raspberries, blueberries, or even a mix of berries for a “berry cheesecake banana pudding.” For a tropical twist, a few slices of kiwi or mango could be surprisingly delightful, though they might shift the flavor profile away from the classic banana pudding feel. Don’t shy away from adding a hint of lemon zest to the pudding mixture itself if you crave an extra zing that complements the strawberries beautifully. And for those looking for a slightly less sweet option, you could reduce the sugar slightly in the pudding or opt for unsweetened whipped cream on top.
This dessert is truly an experience waiting to happen in your kitchen. It’s incredibly easy to assemble, requires no baking, and, most importantly, promises to bring smiles to everyone who tries it. Whether you’re whipping it up for a casual family dinner, a celebratory gathering, or simply to treat yourself to something extraordinary, this Strawberry Cheesecake Banana Pudding will undoubtedly be the star of the show. I genuinely hope you take the plunge and give this recipe a try. It’s one of those recipes that quickly becomes a cherished favorite, a go-to for when you want to impress without stress. Once you’ve made it, please, please, please come back here and share your experiences! Tell me about your favorite variations, your serving ideas, or simply how much you loved it in the comments below. Your feedback and creativity inspire me, and I can’t wait to hear how this delightful pudding brightens your day!
Frequently Asked Questions (FAQs):
How far in advance can I make this Strawberry Cheesecake Banana Pudding?
You can definitely prepare this dessert ahead of time! In fact, it often tastes even better after it’s had at least 4-6 hours in the refrigerator for the flavors to meld and the wafers to soften to that perfect pudding consistency. You can assemble the entire pudding up to 24 hours in advance. If you plan to serve it beyond that, I recommend adding the fresh banana slices and possibly some of the fresh strawberry garnish closer to serving time to ensure they look their absolute best and prevent any potential browning of the bananas.
How do I prevent the bananas from browning in the pudding?
The best way to minimize banana browning is to slice them right before you’re ready to layer them into the pudding. You can also lightly toss the banana slices with a tiny bit of lemon juice or pineapple juice before adding them. However, with this recipe, the bananas are typically layered within the creamy pudding, which acts as a protective barrier, greatly slowing down the oxidation process. If you’re making it a day ahead, as mentioned, they usually hold up very well within the pudding layers.
Can I use frozen strawberries instead of fresh ones?
While fresh strawberries are highly recommended for their vibrant flavor and firm texture, you can use frozen strawberries if fresh are out of season or unavailable. If using frozen, make sure to thaw them completely and drain any excess liquid before incorporating them into the pudding. The texture might be slightly softer, but the flavor will still be delicious. You could also make a quick strawberry compote with frozen strawberries to use as a layer, which would be incredibly flavorful.
What kind of vanilla wafers are best for this recipe?
Classic Nilla Wafers are the traditional choice for banana pudding and work wonderfully here, softening beautifully within the creamy layers. However, you can experiment with other plain, crisp cookies like shortbread cookies, ladyfingers, or even digestive biscuits. If you’re looking for a gluten-free option, ensure you find a suitable gluten-free vanilla wafer or biscuit.
Can I make this dessert healthier or sugar-free?
You can certainly make some modifications to adjust the health profile. For a sugar-free version, use sugar-free pudding mixes, a sugar substitute for any added sugar in the cream cheese mixture, and sugar-free whipped topping. For a slightly healthier option, you could use reduced-fat cream cheese, skim milk for the pudding, and light whipped topping. Keep in mind that altering ingredients might slightly change the texture and flavor, but it’s definitely doable!
How long does Strawberry Cheesecake Banana Pudding last in the refrigerator?
When stored properly in an airtight container in the refrigerator, this pudding will generally last for 3-4 days. After that, the bananas might start to brown more noticeably, and the wafers might become too soggy. It’s best enjoyed within the first 2 days for optimal texture and freshness.
Is this recipe suitable for a large gathering or potluck?
Absolutely! This Strawberry Cheesecake Banana Pudding is a fantastic choice for large gatherings or potlucks. It’s a crowd-pleaser that appeals to almost everyone, easy to transport (especially if made in a large trifle bowl or a deep casserole dish), and can be made ahead of time, freeing you up on the day of the event. Just be prepared for requests for the recipe!
Irresistible Strawberry Cheesecake Banana Pudding
Strawberry Cheesecake Banana Pudding is a delightful culinary adventure that marries creamy traditional banana pudding with tangy richness of no-bake cheesecake and the fresh burst of sweet strawberries. This irresistible dessert is a perfect harmony of flavors and textures, ideal for any gathering.
Ingredients
-
2 lbs (approx. 4 cups) fresh strawberries, hulled and sliced
-
1/2 cup granulated sugar (for compote)
-
1 tablespoon fresh lemon juice
-
1/4 teaspoon pure vanilla extract (optional, for compote)
-
2 (8-ounce) packages cream cheese, full-fat, softened
-
1 cup granulated sugar (for cheesecake)
-
1 teaspoon pure vanilla extract (for cheesecake)
-
1 1/2 cups heavy cream, very cold
-
2 (3.4-ounce) packages instant vanilla pudding mix
-
4 cups cold whole milk
-
1 teaspoon pure vanilla extract (for pudding)
-
5-6 medium ripe bananas, sliced
-
1 (12-ounce) box vanilla wafers
-
Extra fresh strawberries, for garnish
-
Fresh mint sprigs, for garnish (optional)
Instructions
-
Step 1
Rinse, hull, and slice strawberries (half rounds, half diced). In a saucepan, combine strawberries, 1/2 cup sugar, and 1 tbsp lemon juice; let macerate 10-15 mins. Simmer gently 8-12 mins until softened and syrupy. Stir in 1/4 tsp vanilla (optional). Cool completely, then chill 30-60 mins. -
Step 2
Beat softened cream cheese until fluffy. Gradually add 1 cup sugar and 1 tsp vanilla; beat until smooth. In a separate, very clean, chilled bowl, whip 1 1/2 cups very cold heavy cream until stiff peaks form. Gently fold whipped cream into cream cheese mixture until just combined. Refrigerate 30 mins. -
Step 3
Whisk 2 (3.4-ounce) instant vanilla pudding mixes with 4 cups cold whole milk for 2 mins until thick. Stir in 1 tsp vanilla extract. Slice 5-6 medium ripe bananas (1/4-inch rounds). Chill pudding 5-10 mins. -
Step 4
Layer vanilla wafers at the bottom of a trifle bowl or 9×13-inch dish. Add a layer of sliced bananas. Spoon half of the cheesecake filling over bananas, spread evenly. Spoon one-third of the strawberry compote over cheesecake. Repeat with another layer of vanilla wafers, then remaining bananas. Spoon all of the banana pudding over the second banana layer. Spoon remaining cheesecake filling over banana pudding. Spoon remaining strawberry compote over cheesecake. -
Step 5
Garnish with extra fresh strawberries, vanilla wafers, and mint sprigs (optional). Cover tightly and refrigerate for at least 4-6 hours, preferably overnight, for flavors to meld and layers to set.
Important Information
Nutrition Facts (Per Serving)
It is important to consider this information as approximate and not to use it as definitive health advice.
Allergy Information
Please check ingredients for potential allergens and consult a health professional if in doubt.


Leave a Comment