
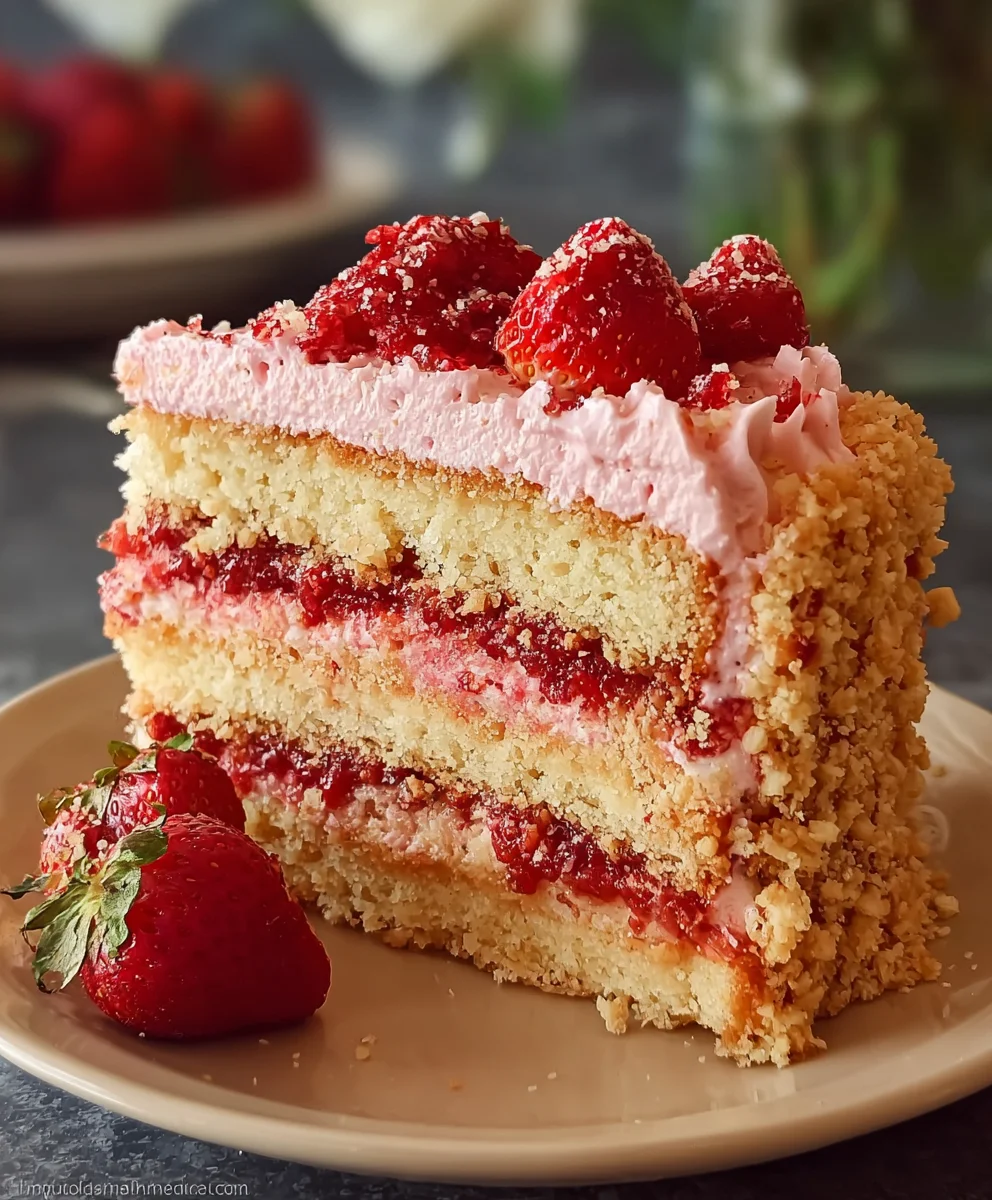
Strawberry Crunch Cake is a dessert sensation that promises an unforgettable culinary journey with every single bite. Imagine a symphony of textures and flavors: the delicate, moist cake, swathed in a luscious, creamy frosting, all crowned with an absolutely irresistible, vibrant strawberry crunch topping. This beloved creation isn’t just a cake; it’s a delightful homage to childhood nostalgia, often drawing inspiration from the iconic strawberry shortcake ice cream bars that many of us cherished during warmer months. It evokes happy memories while delivering a sophisticated flavor profile.
There’s a reason this particular dessert has captivated hearts worldwide. People adore the Strawberry Crunch Cake for its perfect balance of sweetness and tang, delivered by the fresh strawberry essence. However, it’s the textural mastery that truly sets it apart. The ingenious contrast between the light, fluffy cake and the surprising, satisfying crispiness of the golden strawberry crumb topping creates a sensational experience that keeps you reaching for another slice. It’s a showstopper for any gathering, elegant yet fun, and always a guaranteed crowd-pleaser. Join me as we delve into crafting this magnificent treat, ensuring every layer contributes to a truly spectacular dessert experience.

Ingredients:
- For the Vanilla Cake Layers: These layers form the delicious foundation of our incredible Strawberry Crunch Cake. Using good quality ingredients here will truly make a difference in the final taste and texture!
- 2 ½ cups (300g) all-purpose flour, sifted
- 1 tablespoon baking powder – crucial for that lovely lift!
- ½ teaspoon salt – balances the sweetness beautifully.
- 1 cup (226g) unsalted butter, softened to room temperature – this is key for a smooth batter.
- 2 cups (400g) granulated sugar
- 4 large eggs, at room temperature – again, essential for emulsion and a uniform cake.
- 1 tablespoon vanilla extract (use a good quality one, it shines through!)
- 1 ½ cups (360ml) whole milk, at room temperature
- Red or pink food coloring (optional, for a lovely pink cake layer that hints at the strawberry surprise inside)
- For the Strawberry Crunch Topping: This is the star component that gives our Strawberry Crunch Cake its name and iconic texture!
- 1 (14.4 oz) package vanilla sandwich cookies (like Golden Oreos or similar) – for the golden crunch base.
- 1 (14.4 oz) package strawberry sandwich cookies (like Strawberry Oreos or similar) – for the delightful strawberry flavor and pink hue.
- ½ cup (113g) unsalted butter, melted
- 1 (3 oz) package strawberry gelatin powder (Jell-O brand works great) – intensifies that strawberry flavor and helps bind the crunch.
- For the Cream Cheese Frosting: This rich and tangy frosting provides the perfect counterpoint to the sweet cake and crunch, bringing everything together in our delectable Strawberry Crunch Cake.
- 16 oz (450g) full-fat cream cheese, softened to room temperature – absolutely vital for a smooth, lump-free frosting.
- 1 cup (226g) unsalted butter, softened to room temperature
- 4 cups (480g) powdered sugar (confectioners’ sugar), sifted – prevents a gritty texture.
- 1 teaspoon vanilla extract
- Pinch of salt – enhances all the flavors.
- 2-3 tablespoons heavy cream (optional, for thinning if needed and for extra creaminess)
Preparing the Delicious Strawberry Crunch Cake Layers
- Preheat and Prepare Your Pans: First things first, let’s get ready to bake! Preheat your oven to 350°F (175°C). Lightly grease and flour three 8-inch round cake pans. You can also line the bottoms with parchment paper for extra assurance that your cakes won’t stick. This small step ensures your beautiful cake layers come out perfectly, ready to form the base of your stunning Strawberry Crunch Cake.
- Combine Dry Ingredients: In a medium bowl, whisk together your sifted all-purpose flour, baking powder, and salt. Sifting the flour beforehand is a really important step as it helps to aerate the flour and remove any lumps, resulting in a lighter, more tender cake crumb. Set this dry mixture aside for now.
- Cream Butter and Sugar: In the bowl of a stand mixer fitted with the paddle attachment (or using a large bowl with a hand mixer), beat the softened unsalted butter on medium speed for about 1-2 minutes until it’s light and creamy. Gradually add the granulated sugar, continuing to beat for another 3-5 minutes until the mixture is truly light, fluffy, and pale in color. This creaming process incorporates air into the butter and sugar, which is fundamental for a light and airy cake texture. Don’t rush this step!
- Add Eggs and Vanilla: Scrape down the sides of the bowl. Add the large eggs one at a time, beating well after each addition until fully incorporated. It’s crucial that your eggs are at room temperature, as this helps them emulsify better with the butter mixture, preventing a curdled batter. Stir in the vanilla extract with the last egg. The batter might look slightly curdled at this point, but don’t worry, it will come together as you add the dry and wet ingredients.
- Alternate Dry and Wet Ingredients: With the mixer on low speed, gradually add the dry ingredient mixture to the wet mixture, alternating with the room temperature whole milk. Begin and end with the dry ingredients. A typical pattern is to add about one-third of the flour mixture, mix until just combined, then half of the milk, mix, another third of the flour, the remaining milk, and finally the last third of the flour. Be careful not to overmix the batter! Overmixing develops the gluten in the flour too much, which can lead to a tough and dense cake. Mix only until just combined and no streaks of flour remain.
- Add Optional Food Coloring: If you’re opting for a beautiful pink cake layer to complement the strawberry theme of our Strawberry Crunch Cake, now is the time to gently fold in a few drops of red or pink food coloring until you achieve your desired hue.
- Divide and Bake: Divide the batter evenly among your three prepared 8-inch cake pans. I like to use a kitchen scale for this to ensure even layers, which makes assembly much easier. Bake for 25-30 minutes, or until a wooden skewer or toothpick inserted into the center of a cake comes out clean. Baking times can vary slightly depending on your oven, so keep an eye on them.
- Cool the Cake Layers: Once baked, remove the cakes from the oven and let them cool in their pans on a wire rack for about 10-15 minutes. This allows them to firm up slightly. Then, carefully invert the cakes onto the wire rack, remove the pans, and peel off any parchment paper. Allow them to cool completely before frosting. This is very important; attempting to frost warm cakes will lead to a melty, messy disaster! Patience is key for a perfect Strawberry Crunch Cake.
Crafting the Irresistible Strawberry Crunch Topping
- Prepare the Vanilla Cookie Base: Take your package of vanilla sandwich cookies. Place them in a large zip-top bag and seal it, pressing out as much air as possible. Use a rolling pin, meat mallet, or even the bottom of a heavy pan to crush the cookies into fine crumbs. You want a mix of fine crumbs and some slightly larger pieces for texture – this adds to the “crunch” in our Strawberry Crunch Cake! Alternatively, you can pulse them in a food processor until you reach your desired consistency. Transfer the crushed vanilla cookies to a medium bowl.
- Prepare the Strawberry Cookie Base: Repeat the same process with your strawberry sandwich cookies. Crush them until you have a mix of fine crumbs and small pieces. Add these crushed strawberry cookies to the same bowl as the vanilla crumbs. The combination of both types of cookies provides a wonderful depth of flavor and color.
- Melt the Butter: In a microwave-safe bowl or a small saucepan, melt the ½ cup of unsalted butter until it’s completely liquid. Be careful not to overheat it.
- Combine and Infuse Flavor: Pour the melted butter over the crushed cookie mixture. Add the entire package of strawberry gelatin powder directly to the crumbs. Using a spoon or your hands (it’s a bit messy but fun!), mix everything together thoroughly until all the crumbs are evenly coated and the gelatin powder is well distributed. The gelatin powder not only boosts the strawberry flavor significantly but also helps to bind the crumbs together and create that signature crunchy texture once it sets. You’ll notice the color become a more vibrant pink.
- Toast for Extra Crunch (Optional but Recommended): For an even crispier crunch, spread the mixture onto a baking sheet lined with parchment paper. Bake in a 300°F (150°C) oven for about 8-10 minutes, stirring halfway through. This gentle toasting helps dry out the crumbs further, intensifying their crispiness and flavor, which is a fantastic enhancement for our Strawberry Crunch Cake topping. Let it cool completely after toasting; it will crisp up more as it cools.
- Store Until Ready: Once cooled, you can keep the crunch topping in an airtight container at room temperature until you’re ready to assemble your cake. It can even be made a day or two in advance!
Whipping Up the Velvety Cream Cheese Frosting
- Prepare Ingredients for Optimal Texture: Ensure both your full-fat cream cheese and unsalted butter are at room temperature. This cannot be stressed enough! Cold cream cheese or butter will result in a lumpy, difficult-to-work-with frosting, no matter how long you beat it. Take them out of the fridge at least 1-2 hours before you plan to start.
- Cream Butter and Cream Cheese: In the bowl of a stand mixer fitted with the paddle attachment (or using a large bowl with a hand mixer), beat the softened butter on medium speed until creamy, about 2 minutes. Add the softened cream cheese and continue beating on medium speed for another 2-3 minutes, scraping down the sides of the bowl frequently. You want this mixture to be perfectly smooth and lump-free.
- Add Powdered Sugar: Gradually add the sifted powdered sugar, one cup at a time, with the mixer on low speed. Once each addition is incorporated, increase the speed to medium and beat until smooth. Sifting the powdered sugar beforehand is important to prevent a grainy texture in your frosting. Continue until all the sugar is added and the frosting is thick and creamy.
- Incorporate Vanilla and Salt: Stir in the vanilla extract and a pinch of salt. The salt really helps to cut through the sweetness and enhance the cream cheese tanginess, making the frosting even more delicious.
- Adjust Consistency (Optional): If your frosting seems too thick for spreading, you can add heavy cream, one tablespoon at a time, until it reaches your desired consistency. Be careful not to add too much at once, as it can quickly become too thin. Beat for an additional minute or two on medium-high speed until the frosting is light, fluffy, and perfectly spreadable. This perfect frosting is what will hold your Strawberry Crunch Cake together beautifully.
Assembling Your Stunning Strawberry Crunch Cake
- Level Your Cake Layers: Before you begin, ensure your cooled cake layers are completely flat. If your cakes have domed tops, use a serrated knife or a cake leveler to carefully trim them so they are level. This creates a much more stable and professional-looking cake.
- First Cake Layer and Frosting: Place one leveled cake layer on your serving plate or cake stand. If you want to prevent the cake from sliding, you can put a small dollop of frosting in the center of the plate before placing the first layer down. Spread about ¾ to 1 cup of the cream cheese frosting evenly over the top of this first layer, extending to the edges.
- Second Cake Layer and Frosting: Carefully place the second cake layer on top of the frosted first layer. Gently press down to ensure it’s secure. Spread another ¾ to 1 cup of frosting evenly over this second layer.
- Third Cake Layer and Crumb Coat: Place the final cake layer on top. Now, apply a very thin layer of frosting all over the entire cake – top and sides. This is known as the “crumb coat.” The purpose of the crumb coat is to trap any loose crumbs, preventing them from getting into your final frosting layer. Don’t worry about perfection here; it’s just the base.
- Chill the Crumb-Coated Cake: Transfer the crumb-coated cake to the refrigerator for at least 15-20 minutes, or until the frosting is firm to the touch. This step is incredibly important for a clean, crumb-free finish on your beautiful Strawberry Crunch Cake.
- Apply Final Frosting Layer: Once the crumb coat is firm, take the cake out of the fridge. Apply the remaining cream cheese frosting to the top and sides of the cake. Use an offset spatula or a bench scraper to smooth the frosting as much as possible. Take your time to get a nice, even coating. This final layer of creamy frosting provides the perfect canvas for our crunchy topping.
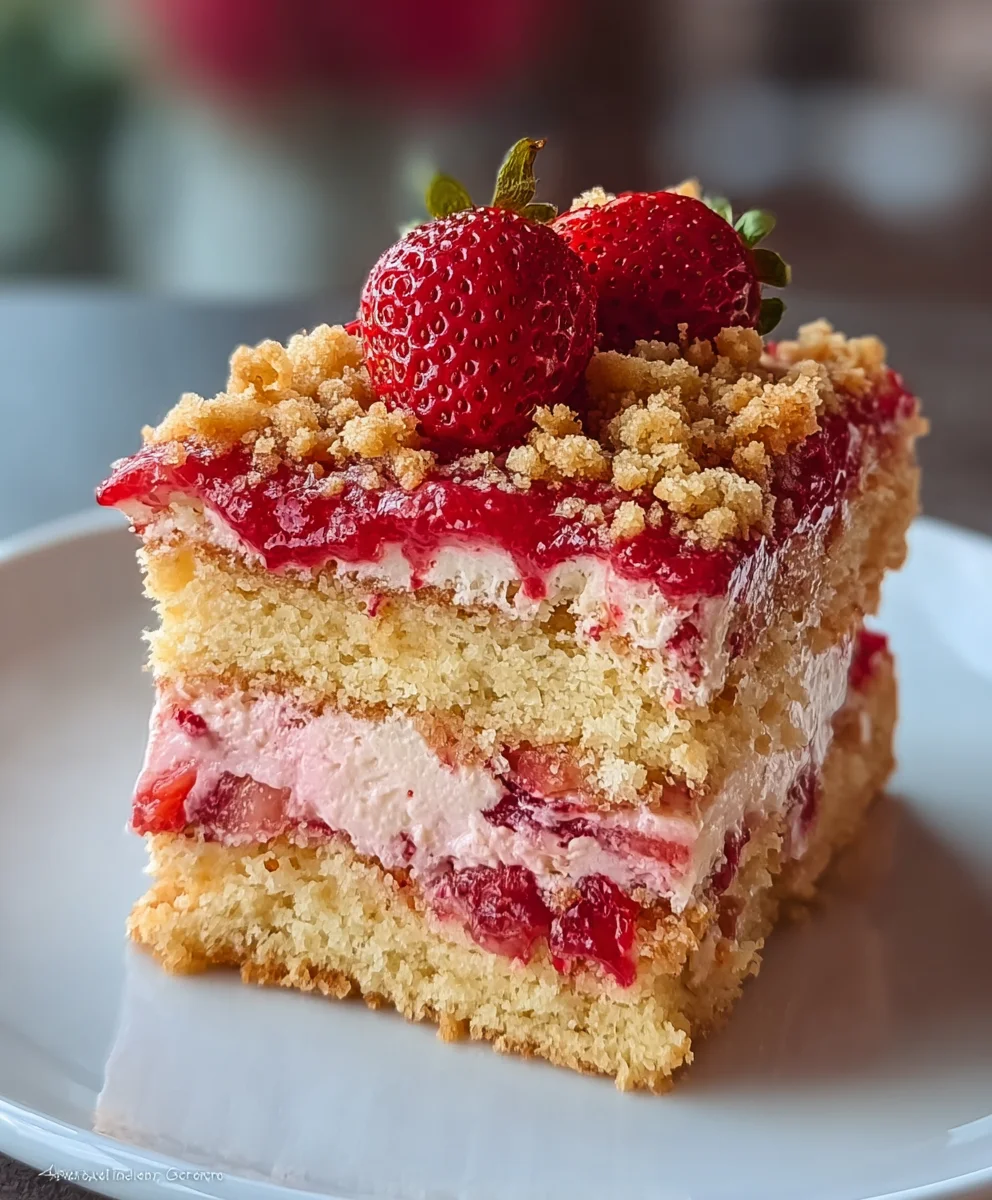
- Apply the Strawberry Crunch Topping: This is where your Strawberry Crunch Cake truly comes to life! Carefully pick up handfuls of your prepared strawberry crunch topping and gently press it onto the sides of the cake. It’s easiest to do this by holding the cake with one hand (if possible) or by carefully tilting it, and pressing the crunch with your other hand. You can also sprinkle some on the top edge of the cake. Don’t be shy; load it up for maximum crunch and visual appeal! I like to have a small tray underneath to catch any fallen crumbs, which can then be reused.
- Final Chill and Serve: Once your Strawberry Crunch Cake is fully assembled and adorned with its signature crunch, place it back in the refrigerator for at least 30 minutes to allow the frosting to set and the crunch to adhere firmly. This also gives the flavors a chance to meld together beautifully.
- Slice and Enjoy: When you’re ready to serve, remove the cake from the refrigerator about 15-20 minutes beforehand to allow the frosting to soften slightly for easier slicing. Use a sharp, warm knife to cut clean slices. Each slice of this delightful Strawberry Crunch Cake offers a perfect balance of moist cake, tangy cream cheese frosting, and that utterly irresistible strawberry crunch. Enjoy your masterpiece!
Conclusion:
So, we’ve journeyed through every delicious step of crafting the ultimate Strawberry Crunch Cake, and I truly hope you’re as excited as I am about the prospect of bringing this masterpiece to life in your own kitchen. This isn’t just any dessert; it’s an experience. Imagine sinking your fork into layers of moist, tender cake, followed by the vibrant burst of fresh strawberries, all beautifully complemented by that irresistible, golden, buttery crunch topping. It’s a symphony of textures and flavors that captivates from the very first bite. The subtle sweetness, the creamy frosting, the refreshing fruit, and that delightful crunch – each element plays a crucial role in making this a truly unforgettable treat. Whether you’re a seasoned baker or just starting your culinary adventures, this recipe offers such rewarding results that you’ll feel like a professional patissier, without needing years of training.
Now, once you’ve pulled this magnificent creation from your oven and allowed it to cool completely, the real fun begins – enjoying it! While a slice of this Strawberry Crunch Cake is absolutely divine on its own, there are so many wonderful ways to elevate the experience and make it uniquely yours. For a truly decadent treat that will impress any guest, I love serving it with a generous scoop of high-quality vanilla bean ice cream, allowing the cold, creamy ice cream to slowly melt into the cake and create an even richer, more luscious mouthful. A dollop of freshly whipped cream, perhaps infused with a hint of vanilla or almond extract, also works wonders, adding another layer of lightness and luxury that contrasts beautifully with the cake’s density. Don’t be afraid to experiment with the fruit itself; while fresh, ripe strawberries are quintessential and provide that signature flavor, a light drizzle of homemade strawberry coulis or a scattering of mixed berries like raspberries or blueberries could also add a fantastic, colorful twist. For a seasonal variation, consider swapping out some of the strawberries for peaches or a mix of summer berries when they are in peak season, giving you a ‘Summer Fruit Crunch Cake’ that’s equally delightful and perfect for warm weather gatherings.
Thinking beyond the traditional round cake, this recipe is incredibly versatile and can be adapted for various presentations. You could easily portion the batter into cupcake liners and bake them into individual Strawberry Crunch Cupcakes, topping them with the frosting and crunch mixture for adorable, perfectly sized treats that are ideal for parties or bake sales. Or, for a stunning centerpiece that feeds a crowd, layer cubes of the baked cake, generous dollops of the cream cheese frosting, and ample amounts of the crunch mixture in a beautiful glass trifle dish. This creates an elegant dessert that’s not only visually appealing but also incredibly easy to serve. If you’re catering to specific dietary needs, many of the components can be thoughtfully substituted. For instance, using a high-quality gluten-free cake mix and ensuring your golden sandwich cookies for the crunch topping are certified gluten-free can make this accessible to more friends and family members. Similarly, with a few clever swaps for dairy-free cream cheese and plant-based butter alternatives, you could even create a vegan-friendly version, proving that the magic of the Strawberry Crunch Cake truly knows no bounds and can be enjoyed by everyone.
I genuinely believe that every kitchen deserves the joy of baking this particular Strawberry Crunch Cake. It’s a recipe that not only delivers on incredible flavor and texture but also brings a vibrant burst of color and a smile to everyone’s face. The cheerful hues alone are enough to brighten any table, making it an ideal dessert for birthdays, potlucks, holiday celebrations, or just a delightful weekend treat to share with loved ones. There’s something so immensely satisfying about creating something so beautiful, so fragrant, and so utterly delicious from scratch with your own hands. So, I wholeheartedly encourage you to roll up your sleeves, gather your ingredients, and dive into making this absolutely phenomenal dessert. When you do, please don’t keep your culinary triumph a secret! I would absolutely love to hear about your experience. Share your photos on social media, tag us, or simply drop a comment below. Tell me about your favorite serving suggestions, any innovative variations you tried, or the delighted reactions from your happy taste-testers. Your insights and creations inspire me, and I can’t wait to see your own unique take on this spectacular Strawberry Crunch Cake. Happy baking, my friends!
People Also Ask (FAQs):
Can I make the Strawberry Crunch Cake ahead of time?
Yes, absolutely! The cake layers can be baked a day or two in advance. Once cooled, wrap them tightly in plastic wrap and store at room temperature (or refrigerate if your kitchen is warm). The crunch topping can also be made ahead and stored in an airtight container at room temperature. The cream cheese frosting is best made fresh or stored in the fridge for up to 3 days and re-whipped until fluffy just before assembly. For optimal flavor and texture, I recommend assembling the entire cake the day you plan to serve it, or the evening before, to allow the flavors to meld beautifully.
How should I store leftover Strawberry Crunch Cake?
Due to the cream cheese frosting and the fresh strawberries, it’s essential to store any leftover Strawberry Crunch Cake in an airtight container in the refrigerator. It will stay wonderfully fresh and delicious for 3-4 days. To help maintain the crispness of the crunch topping, if possible, try to keep it covered but not completely sealed to avoid excess moisture building up within the container.
Can I use frozen strawberries for this recipe?
While fresh, ripe strawberries offer the best texture and vibrant flavor for this cake, you can certainly use frozen strawberries in a pinch. If you opt for frozen, make sure to thaw them completely and drain any excess liquid very thoroughly to prevent the cake layers from becoming soggy or watery. I’d even recommend patting them dry with paper towels before using them. Just keep in mind that their texture might be a bit softer than fresh ones.
What if I don’t have Strawberry Jell-O for the crunch topping?
The Strawberry Jell-O powder is quite key to achieving both the vibrant pink color and the characteristic strawberry flavor of the crunch topping. If you don’t have it, you could try using a few drops of red or pink food coloring along with a tiny bit of strawberry extract to achieve a similar color and aroma. However, the texture and the distinct Jell-O flavor profile will be slightly different. Alternatively, you could simply skip the Jell-O and make a plain vanilla crunch, or experiment with another flavored gelatin powder if you prefer a different fruit twist.
Can I make this a gluten-free Strawberry Crunch Cake?
Yes, you absolutely can! To make this recipe gluten-free, simply substitute your favorite gluten-free all-purpose flour blend for the regular flour in the cake layers. Ensure your chosen gluten-free flour blend includes xanthan gum, or add it according to the package directions. For the crunch topping, you will need to ensure your golden sandwich cookies are a certified gluten-free variety. All other ingredients are typically naturally gluten-free, but it’s always a good practice to double-check labels to be completely safe for those with sensitivities.
Strawberry Crunch Cake
This delightful Strawberry Crunch Cake features moist vanilla cake layers, a rich cream cheese frosting, and an irresistible, crunchy topping made from vanilla and strawberry sandwich cookies. It’s a perfect balance of sweet and tangy, offering a sensational textural experience reminiscent of iconic strawberry shortcake ice cream bars.
Ingredients
-
For the Vanilla Cake Layers:
-
2 ½ cups (300g) all-purpose flour, sifted
-
1 tbsp baking powder
-
½ tsp salt
-
1 cup (226g) unsalted butter, softened
-
2 cups (400g) granulated sugar
-
4 large eggs, room temp
-
1 tbsp vanilla extract
-
1 ½ cups (360ml) whole milk, room temp
-
Red or pink food coloring (optional)
-
For the Strawberry Crunch Topping:
-
1 (14.4 oz) package vanilla sandwich cookies
-
1 (14.4 oz) package strawberry sandwich cookies
-
½ cup (113g) unsalted butter, melted
-
1 (3 oz) package strawberry gelatin powder
-
For the Cream Cheese Frosting:
-
16 oz (450g) full-fat cream cheese, softened
-
1 cup (226g) unsalted butter, softened
-
4 cups (480g) powdered sugar, sifted
-
1 tsp vanilla extract
-
Pinch of salt
-
2-3 tbsp heavy cream (optional)
Instructions
-
Step 1
Preheat oven to 350°F (175°C). Grease and flour three 8-inch round cake pans. Whisk flour, baking powder, and salt. In a stand mixer, cream softened butter and granulated sugar until light and fluffy (3-5 min). Beat in eggs one at a time, then vanilla. Gradually alternate adding dry mixture and milk to the wet ingredients, mixing until just combined. Fold in food coloring if desired. Divide batter evenly among pans and bake for 25-30 minutes, or until a toothpick comes out clean. Cool cakes in pans for 10-15 minutes, then transfer to a wire rack to cool completely. -
Step 2
Crush vanilla and strawberry sandwich cookies into crumbs. Combine crushed cookies in a bowl. Pour in melted butter and strawberry gelatin powder, mixing thoroughly until evenly coated. For extra crispiness, spread crumbs on a baking sheet and bake at 300°F (150°C) for 8-10 minutes, stirring once. Cool completely. -
Step 3
Ensure cream cheese and butter are at room temperature. In a stand mixer, beat softened butter until creamy (2 min). Add softened cream cheese and beat until smooth (2-3 min). Gradually add sifted powdered sugar, then vanilla extract and a pinch of salt. Beat until thick and fluffy, adding 2-3 tbsp heavy cream if needed for desired consistency. -
Step 4
{‘@type’: ‘HowToStep’, ‘name’: ‘Assemble the Cake’, ‘text’: “Level cooled cake layers. Place the first layer on a serving plate and spread with ¾-1 cup cream cheese frosting. Repeat with the second cake layer. Place the third layer on top. Apply a thin ‘crumb coat’ of frosting over the entire cake. Chill for 15-20 minutes until firm. Apply the remaining frosting evenly to the top and sides of the cake. Gently press the prepared strawberry crunch topping onto the sides and top edge of the cake.”} -
Step 5
Chill the assembled cake for at least 30 minutes to allow the frosting to set and flavors to meld. Remove from refrigerator 15-20 minutes before serving. Slice with a sharp, warm knife and enjoy.
Important Information
Nutrition Facts (Per Serving)
It is important to consider this information as approximate and not to use it as definitive health advice.
Allergy Information
Please check ingredients for potential allergens and consult a health professional if in doubt.
Leave a Comment