
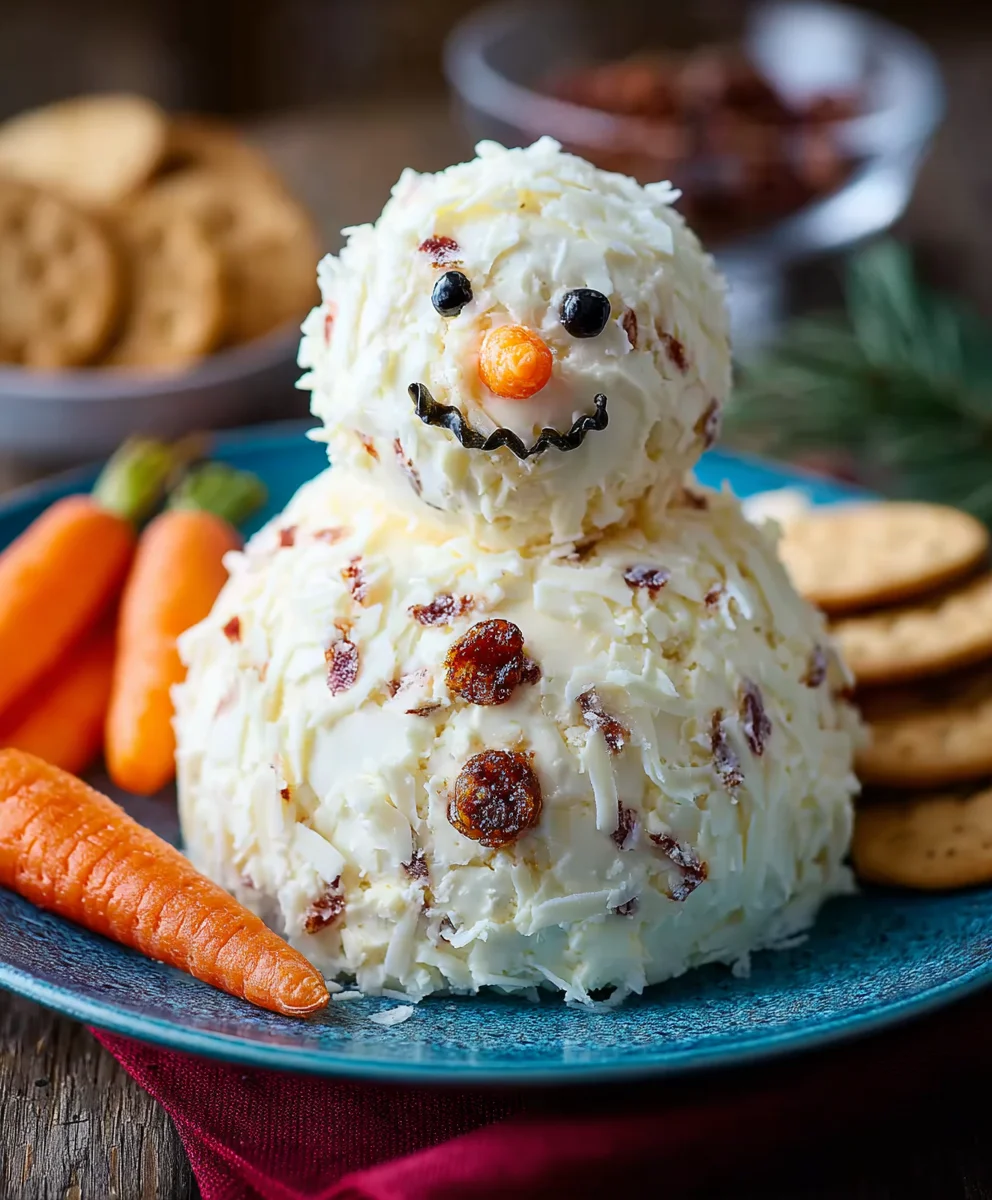
Ranch Snowman Cheeseball is not just an appetizer; it’s a festive centerpiece that promises to delight guests of all ages during your holiday gatherings. Imagine the murmurs of appreciation as your beautifully crafted edible snowman takes its place on the buffet, ready to be enjoyed. For me, the holiday season is all about creating memorable moments, and few things capture that spirit quite like a delightful dish that is both incredibly delicious and visually stunning. This charming creation elevates a classic party favorite into a whimsical work of art, perfect for setting a joyful tone.
The cheeseball itself has a rich history as a beloved party staple, evolving from simple savory spreads to elaborate, artfully shaped creations designed to impress. While the classic cheeseball has graced countless tables since the mid-20th century, this particular iteration elevates the tradition with a whimsical, winter wonderland twist. People absolutely adore this Ranch Snowman Cheeseball not only for its irresistible creamy texture and tangy, herbaceous ranch flavor but also for its sheer charm and festive appeal. It’s wonderfully versatile, pairing perfectly with crackers, pretzels, or vegetable sticks, making it a guaranteed crowd-pleaser. Plus, its make-ahead convenience means less stress for you on event day, allowing you more time to soak in the joyous atmosphere. I am truly excited to share this delightful recipe with you, as it consistently brings smiles and conversation to any festive occasion.

Ingredients:
- Two (2) 8-ounce packages of cream cheese, softened to room temperature
- One (1) stick (1/2 cup) unsalted butter, softened
- Two (2) tablespoons of dry Ranch seasoning mix (from a packet or homemade)
- One (1) teaspoon Worcestershire sauce
- 1/2 teaspoon garlic powder
- 1/2 teaspoon onion powder
- 1/4 teaspoon black pepper, freshly ground is best
- Pinch of salt (optional, as Ranch seasoning can be salty)
- One (1) cup finely shredded sharp cheddar cheese
- One (1) cup finely shredded Monterey Jack cheese (or a mild cheddar for less assertive flavor)
- For Decoration:
- Three (3) mini pretzel sticks (for arms)
- One (1) small baby carrot, trimmed and shaped for the nose
- Two (2) small slices of black olive (for eyes)
- Three (3) small round slices of black olive or tiny red bell pepper pieces (for buttons)
- One (1) thin strip of red bell pepper (for the scarf)
- One (1) small piece of black olive or red bell pepper for the hat brim, plus a tiny piece for the top of the hat (optional, can also use a small round cracker for the brim)
- Fresh parsley, finely minced (for “snow” around the base, optional)
- For Serving: Assorted crackers, pita chips, pretzel crisps, and fresh vegetable sticks (celery, carrots, cucumber, bell peppers)
Preparing the Ranch Snowman Cheeseball Base
- Ensure your ingredients are properly softened. This is absolutely crucial for a smooth, lump-free Ranch Snowman Cheeseball. I always take my cream cheese and butter out of the refrigerator at least an hour, sometimes two, before I plan to start mixing. If you’re short on time, you can carefully soften the cream cheese in its foil wrapper in the microwave on low power for 15-30 seconds, checking frequently. For butter, you can cut it into smaller pieces to speed up the softening process, or even grate it directly into the bowl. The goal is to have both components pliable enough to cream together effortlessly, creating a wonderfully cohesive base for our festive snowman.
- Combine cream cheese and butter. In a large mixing bowl, using an electric mixer (either a stand mixer with a paddle attachment or a hand mixer), beat together the softened cream cheese and softened butter on medium speed. You want to whip these two together until they are incredibly smooth and creamy, with no lumps of cream cheese remaining. This usually takes about 2-3 minutes. Make sure to stop occasionally and scrape down the sides and bottom of the bowl with a rubber spatula to ensure everything is thoroughly incorporated. This step lays the foundation for the perfect texture of your Ranch Snowman Cheeseball.
- Introduce the savory flavors. Now it’s time to infuse our cheeseball base with that irresistible ranch flavor! Add the dry Ranch seasoning mix, Worcestershire sauce, garlic powder, onion powder, and black pepper to the cream cheese and butter mixture. If you’re using a store-bought ranch packet, be mindful of its salt content; I sometimes add a tiny pinch of salt if I feel it needs it, but often the seasoning mix itself provides enough. Beat these ingredients in on low speed until they are just combined, then increase to medium and continue mixing for another minute or so, ensuring the spices are evenly distributed throughout. This is where the magic of the Ranch Snowman Cheeseball truly begins to shine.
- Fold in the shredded cheeses. Reduce the mixer speed to low, or remove the bowl from the mixer and use a sturdy spatula. Add the finely shredded sharp cheddar cheese and Monterey Jack cheese to the mixture. Gently fold the cheeses into the cream cheese base until they are just incorporated. Be careful not to overmix at this stage, as overmixing can make the texture of the shredded cheese less distinct. I find that using finely shredded cheese helps it blend more seamlessly and makes for easier shaping later on. The combination of sharp cheddar and mild Monterey Jack offers a beautiful balance of flavor and color, enhancing the overall appeal of our Ranch Snowman Cheeseball.
- Chill the mixture for firmness. Once all the ingredients are thoroughly combined, cover the bowl tightly with plastic wrap and refrigerate the cheeseball mixture for at least 1-2 hours. This chilling period is absolutely essential. It allows the flavors to meld beautifully and, more importantly, it firms up the mixture significantly. A firm mixture is much easier to handle and shape into our adorable snowman components without it becoming a sticky mess. Don’t skip this step – patience here will pay off when you start to build your Ranch Snowman Cheeseball!
Shaping the Ranch Snowman Cheeseball
-
Divide and conquer for shaping. After the chilling period, remove the cheeseball mixture from the refrigerator. It should be firm enough to handle easily. Now, we need to divide the mixture into three distinct portions to form the body, mid-section, and head of our snowman. I aim for proportions that create a classic snowman silhouette:
- Roughly half (50%) of the mixture for the largest base ball.
- About 30% of the mixture for the medium-sized middle ball.
- The remaining 20% for the smallest top ball (the head).
You don’t need to be exact with measurements; a good estimate by eye works perfectly for that charming, rustic look.
- Form the base of your Ranch Snowman Cheeseball. Take the largest portion of the mixture and, using your clean hands, gently roll it into a smooth, round ball. Work quickly but gently, as the heat from your hands can start to soften the cheese. Aim for a nice, even sphere that will serve as the sturdy foundation for your snowman. Place this ball on your chosen serving platter or a plate lined with parchment paper. This will be the widest part of your festive creation.
- Shape the middle section. Next, take the medium-sized portion of the mixture. Again, roll it between your palms to form another smooth, round ball, slightly smaller than the base. Pay attention to making it as round as possible, as this will be a prominent part of your snowman’s body. Once shaped, gently place this ball directly on top of the larger base ball, pressing down ever so slightly to ensure it adheres and creates a stable stack. You want a gentle connection, not a squash!
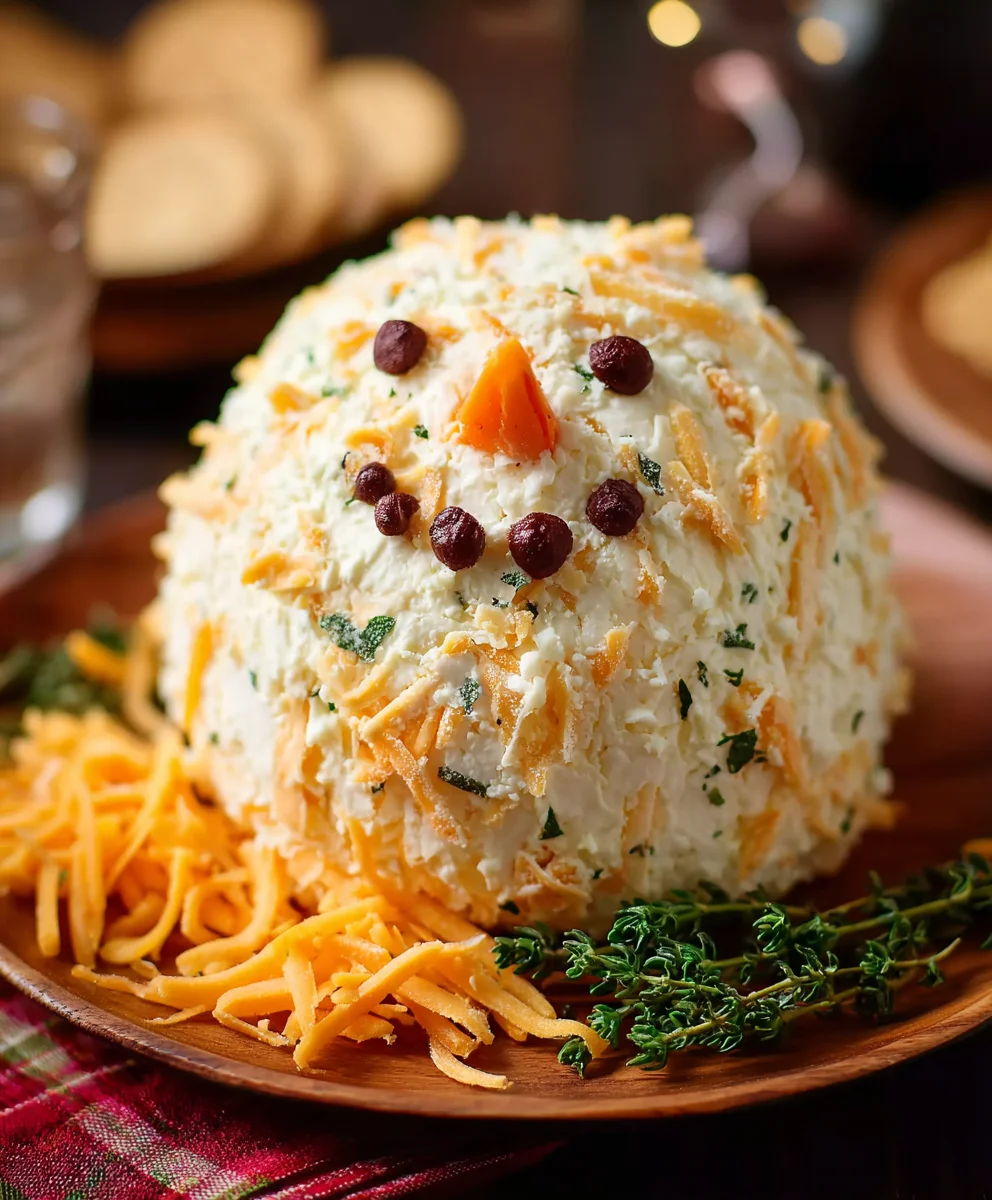
- Create the snowman’s head. Finally, take the smallest portion of the cheeseball mixture. Roll this into the smallest, most perfect sphere you can manage. This will become the charming head of your Ranch Snowman Cheeseball. Carefully position it on top of the middle ball, again pressing lightly to secure it. At this point, you should have three distinct, decreasingly sized balls stacked vertically, beginning to resemble our beloved winter friend.
- Re-chill for structural integrity. Once your snowman is assembled, I highly recommend chilling the entire structure again for at least 30 minutes. This will allow the stacked balls to firm up and bond together even more securely, preventing any slippage or collapse when you start to decorate. Cover it loosely with plastic wrap to prevent any surface drying. A well-chilled structure is key to a beautiful, long-lasting Ranch Snowman Cheeseball display.
Decorating Your Ranch Snowman Cheeseball
- Gather your delightful decorations. Before you start adorning your snowman, lay out all your decorative components. This makes the assembly process much smoother and more enjoyable. Have your baby carrot (for the nose), black olive slices (for eyes and buttons), red bell pepper strips (for the scarf and maybe hat details), and mini pretzel sticks (for arms) all ready and easily accessible. I also like to have a small paring knife handy for any last-minute shaping or trimming of the decorations. This preparation ensures you can focus on the artistry of building your Ranch Snowman Cheeseball.
- Fashion a charming hat for your snowman. To give your snowman some character, let’s add a hat. You can use a small, round cracker as the brim, or for a more edible option, cut a thin, round slice from a black olive or a piece of red bell pepper. Place this “brim” on top of the snowman’s head, slightly off-center for a playful tilt. For the top of the hat, you can use a small, rectangular piece of black olive or red bell pepper, or even a tiny piece of a pretzel stick, positioning it on the brim. This really brings your Ranch Snowman Cheeseball to life!
- Add expressive eyes. Take two small slices of black olive. Using your fingers or the tip of a small knife, gently press them into the smallest (head) cheeseball to create the snowman’s eyes. Position them realistically, slightly above where the nose will go. The dark contrast of the olives against the creamy cheeseball really makes the eyes pop and adds personality.
- Give him a classic carrot nose. Select a small baby carrot. You’ll want to trim one end to a point that can be easily inserted into the cheeseball. The other end should be slightly wider to create that iconic carrot nose shape. Gently push the pointed end of the carrot into the center of the head ball, between and slightly below the eyes. Make sure it’s secure enough not to fall out. This traditional touch is essential for any snowman, especially our delicious Ranch Snowman Cheeseball.
- Create a cheerful mouth. For the mouth, you have a few creative options. You can use several tiny, thin strips of red bell pepper, curved slightly to form a smiling shape. Alternatively, small, round slices of black olive can be arranged in an arc for a dotted smile. Gently press these pieces into the cheeseball below the carrot nose. I personally love the red bell pepper for a burst of color and a truly happy expression.
- Attach sturdy pretzel stick arms. Now, let’s give our snowman some arms! Take two mini pretzel sticks. Gently insert one end of each pretzel stick into the sides of the middle cheeseball section, angling them slightly upwards or outwards as if the snowman is waving or holding something. The saltiness of the pretzels also offers a nice textural contrast to the creamy cheeseball, making them both decorative and delicious.
- Add delightful buttons. For the snowman’s buttons, take three small, round slices of black olive or tiny pieces of red bell pepper. Arrange them vertically down the front of the middle cheeseball section. Space them out evenly to give a neat and tidy appearance. These small details really complete the classic snowman look for our Ranch Snowman Cheeseball.
- Drape a festive scarf (optional but highly recommended). To add an extra touch of charm and color, create a scarf! I find a thin, flexible strip of red bell pepper works wonderfully. Gently drape it around the “neck” where the head meets the middle body section. You can even cut a few small fringes at the ends of the bell pepper strip to mimic the look of a real fabric scarf. This really elevates the holiday spirit of your Ranch Snowman Cheeseball. If you don’t have bell pepper, a long chive or even a thin strand of green onion could work for a different aesthetic.
- Sprinkle “snow” around the base (optional). For a truly picturesque presentation, finely mince some fresh parsley. Gently sprinkle this “snow” around the base of your Ranch Snowman Cheeseball on the serving platter. The vibrant green not only adds a lovely contrast but also gives the illusion that your snowman is sitting in a fresh dusting of snow. This small detail can make a big difference in the overall festive appeal. Alternatively, a light dusting of finely grated Parmesan cheese could also serve as “snow.”
- Final chill before its grand debut. Once your Ranch Snowman Cheeseball is fully decorated, cover it loosely again with plastic wrap or a dome cover and return it to the refrigerator for at least 30 minutes, or until you’re ready to serve. This final chill allows all the decorative elements to set firmly into the cheeseball, ensures it maintains its shape, and keeps the flavors at their peak. It’s the perfect make-ahead appetizer, ready to impress your guests with its delightful appearance and incredible taste!
Serving Your Ranch Snowman Cheeseball and Handy Tips
- Present your masterpiece. When it’s time to serve, carefully place your fully decorated Ranch Snowman Cheeseball on a large, beautiful serving platter. Ensure there’s ample space around it for all the delicious accompaniments. The presentation is almost as important as the taste, especially for such a festive centerpiece! You want your guests to admire its charm before diving in.
- Arrange a delicious array of dippers. Surround your snowman with a generous assortment of dippers. My personal favorites include various crackers (buttery round crackers, whole wheat crackers, rice crackers), crispy pita chips, and pretzel crisps which offer a great textural crunch. Don’t forget the fresh vegetables! Celery sticks, carrot sticks, cucumber slices, and colorful bell pepper strips (red, yellow, orange) not only add a healthy option but also bring vibrant colors to your holiday spread. The combination of textures and flavors from the dippers really complements the creamy, savory Ranch Snowman Cheeseball.
- Make-ahead magic. This Ranch Snowman Cheeseball is an absolute dream for entertaining because you can prepare almost everything in advance. You can mix the cheeseball base and shape the individual balls up to 2-3 days ahead of time. Just make sure to store the un-stacked, un-decorated balls tightly wrapped in plastic wrap in the refrigerator. On the day of your event, simply stack them, decorate, and chill for a final firm-up. This allows you to focus on other preparations, reducing stress and ensuring a fresh, delightful appetizer.
- Storage savvy. If by some miracle you have leftovers (it’s rare, I know!), cover the Ranch Snowman Cheeseball tightly with plastic wrap and store it in the refrigerator. It will remain delicious for up to 3-4 days. Just be aware that the pretzel stick arms might soften slightly over time, so you might want to replace them if you’re serving leftovers.
-
Customization and creative flair. One of my favorite things about this Ranch Snowman Cheeseball recipe is how adaptable it is!
- Cheese Varieties: While cheddar and Monterey Jack are my go-to, feel free to experiment with other cheeses. A blend including some smoked gouda or pepper jack (if you like a little kick) could be fantastic. Just ensure they are finely shredded for the best texture.
- Spice it Up: If you love a bit more zing, consider adding a pinch of cayenne pepper or a tiny dash of hot sauce to the cream cheese mixture. For an herbal twist, finely minced fresh dill or chives mixed into the base would also be wonderful.
- Decoration Extravaganza: Get creative with your snowman’s accessories! Instead of an olive hat, a small, round slice of salami could make a unique brim. Mini chocolate chips or capers could be used for eyes if olives aren’t preferred. For a truly festive look, you could even tie a small ribbon around its neck instead of a bell pepper scarf. Small herbs like rosemary sprigs could act as tiny tree branches for arms. The possibilities are endless to make your Ranch Snowman Cheeseball uniquely yours and a true showstopper!
- Flavor Boost: For an extra layer of savory depth, you could incorporate 1/4 cup of finely crumbled cooked bacon into the cheeseball mixture. Just ensure the bacon is very crisp and cooled before adding it.
No matter how you customize it, this Ranch Snowman Cheeseball is guaranteed to be a hit at any gathering, bringing joy and deliciousness to your festive table!
Conclusion:
And there you have it, my friends! We’ve journeyed through the steps of creating what I genuinely believe will become a staple in your holiday entertaining repertoire: the utterly charming and incredibly delicious Ranch Snowman Cheeseball. I can’t emphasize enough just how much of a game-changer this recipe is. It’s not merely a dish; it’s an experience, a conversation starter, and a true testament to how simple ingredients can come together to create something truly magical. What makes this recipe an absolute must-try isn’t just its undeniable visual appeal, though let’s be honest, that snowman design is pretty irresistible. It’s the perfect blend of creamy textures and savory ranch flavor that makes every single bite a pure delight. Imagine the smiles when your guests walk in and see this adorable, edible centerpiece gracing your snack table. It brings a touch of whimsical joy to any gathering, instantly setting a festive mood.
I know many of you are looking for dishes that are both impressive and easy to prepare, especially during the busy holiday season, and this Ranch Snowman Cheeseball truly delivers on both fronts. The minimal prep time and straightforward instructions mean you won’t be slaving away in the kitchen for hours, yet the end result looks like you’ve put in a professional level of effort. It’s the kind of recipe that allows you to relax and enjoy your own party, rather than stressing over the food. The rich, tangy ranch seasoning, combined with the smooth cream cheese and sharp cheddar, creates a flavor profile that is universally loved. It’s hearty enough to be satisfying but light enough not to spoil anyone’s appetite for the main course. Honestly, I’ve seen this cheeseball disappear faster than any other appetizer at a gathering, and the compliments always pour in. It’s a true crowd-pleaser, appealing to both kids and adults alike, making it the perfect centerpiece for any holiday party, family gathering, or even a cozy winter night in.
Elevate Your Ranch Snowman Cheeseball Experience!
Now, let’s talk about taking your Ranch Snowman Cheeseball to the next level. While it’s fantastic on its own, the beauty of this recipe lies in its versatility. For serving suggestions, think beyond the basic cracker. Imagine pairing this creamy delight with a vibrant assortment of fresh vegetables like crisp cucumber slices, crunchy carrot sticks, bright bell pepper strips, or even tender blanched broccoli florets. The freshness of the veggies provides a wonderful contrast to the richness of the cheeseball. For those who love a bit more crunch, consider serving it with pretzel crisps, bagel chips, or even homemade crostini brushed with a hint of garlic butter. The possibilities are truly endless!
And don’t be afraid to experiment with variations to truly make this recipe your own. Want to add a smoky kick? Mix in some finely crumbled cooked bacon bits into the cheese mixture. Craving a little heat? A pinch of red pepper flakes or a dash of hot sauce can really liven things up. For an herbaceous twist, consider adding fresh chopped chives or dill along with the ranch seasoning. You could even swap out a portion of the cheddar cheese for a different variety, like a smoked gouda for depth, or a Monterey Jack for extra meltiness. If you’re feeling extra festive, you could even make smaller “snowball” cheeseballs using the same mixture, perfect for individual servings, or create a whole snowman family! For a different holiday, simply adjust the decorations – a pumpkin stem and leaf for autumn, or a heart for Valentine’s Day. The snowman design is wonderfully adaptable, but the core flavor of the Ranch Cheeseball remains a winning formula.
So, my friends, I implore you: give this delightful Ranch Snowman Cheeseball a try. Seriously, you won’t regret it. It’s more than just an appetizer; it’s a memorable, joyful addition to your festive table that will have everyone asking for the recipe. Once you’ve whipped up your own adorable edible snowman, please, please, please come back and share your experience with me! I absolutely love seeing your culinary creations. Did you add a special touch? Did your guests rave about it? Snap a photo, share your thoughts, and let us all bask in the collective joy of making and enjoying delicious food. Your feedback and photos truly inspire me and the entire community. I’m confident that this Ranch Snowman Cheeseball will bring a huge smile to your face, and to the faces of everyone who gets to enjoy it with you. Happy cooking, and even happier eating!
FAQs About Ranch Cheeseballs (People Also Ask):
How far in advance can I make a cheeseball?
You can prepare your cheeseball up to 3-5 days in advance. Make sure to wrap it tightly in plastic wrap and store it in the refrigerator. If you’re decorating it with things like crackers or fresh vegetables, it’s best to add those right before serving to keep them fresh and crisp. The cheese mixture itself holds up beautifully when properly stored.
Can I freeze a cheeseball?
Yes, you can freeze a cheeseball! Prepare the cheeseball mixture as directed, shape it into a ball (or your snowman shapes), and wrap it very tightly with several layers of plastic wrap, then an additional layer of aluminum foil. It can be frozen for up to 1 month. To thaw, simply transfer it to the refrigerator overnight. Once thawed, you can roll it in any desired coatings (if not already incorporated) and decorate as usual before serving. This is a great tip for holiday meal prep!
What do you serve with a ranch cheeseball?
A ranch cheeseball is incredibly versatile! Classic accompaniments include an assortment of crackers (buttery, whole wheat, or seeded), pretzel crisps, bagel chips, and pita bread. For healthier options, a colorful platter of fresh vegetables like carrot sticks, celery sticks, cucumber slices, bell pepper strips, cherry tomatoes, and broccoli florets are perfect. You can also serve it with breadsticks or even sliced apples for a sweet and savory contrast.
How do I keep my cheeseball from cracking?
To prevent your cheeseball from cracking, ensure your cream cheese is softened to room temperature before mixing. This creates a smoother, more pliable mixture. When shaping, press the mixture firmly and evenly. If cracks do appear while chilling, you can gently smooth them over with your fingers or a small spatula before decorating. Also, avoid chilling it too quickly; a gradual chill in the refrigerator is best.
Can I use a different type of cheese in the ranch cheeseball?
Absolutely! While cheddar is a classic choice, feel free to experiment. You could use Monterey Jack for a milder, meltier texture, or even a smoked cheddar or gouda for a deeper, smoky flavor. A blend of cheeses often works best for a complex taste. Just ensure your chosen cheeses are good shredding varieties and complement the ranch flavor profile. A good ratio of cream cheese to shredded cheese is key for the right consistency.
Easy Ranch Snowman Cheeseball: Your Festive Appetizer
A charming and delicious Ranch Snowman Cheeseball, perfect for holiday gatherings. This festive appetizer features a creamy, tangy, and herbaceous ranch-flavored cheeseball shaped into an adorable snowman, served with various dippers. It’s a crowd-pleaser that can be prepared ahead of time.
Ingredients
-
2 (8-ounce) packages cream cheese, softened
-
1 stick (1/2 cup) unsalted butter, softened
-
2 tablespoons dry Ranch seasoning mix
-
1 teaspoon Worcestershire sauce
-
1/2 teaspoon garlic powder
-
1/2 teaspoon onion powder
-
1/4 teaspoon black pepper
-
Pinch of salt (optional)
-
1 cup finely shredded sharp cheddar cheese
-
1 cup finely shredded Monterey Jack cheese
-
3 mini pretzel sticks (for arms)
-
1 small baby carrot, trimmed (for nose)
-
2 small slices black olive (for eyes)
-
3 small round slices black olive or tiny red bell pepper pieces (for buttons)
-
1 thin strip red bell pepper (for scarf)
-
1 small piece black olive or red bell pepper for hat brim (optional)
-
Tiny piece black olive or red bell pepper for hat top (optional)
-
Fresh parsley, finely minced (for “snow”, optional)
-
Assorted crackers (for serving)
-
Pita chips (for serving)
-
Pretzel crisps (for serving)
-
Fresh vegetable sticks (for serving)
Instructions
-
Step 1
Prepare Cheeseball Base: In a large bowl, beat softened cream cheese and butter until smooth. Add Ranch seasoning, Worcestershire sauce, garlic powder, onion powder, and black pepper; mix until well combined. Gently fold in shredded cheddar and Monterey Jack cheeses. -
Step 2
Chill Base: Cover mixture tightly with plastic wrap and refrigerate for at least 1-2 hours to firm up. -
Step 3
Shape Snowman: Divide the chilled mixture into three portions (approx. 50% for base, 30% for middle, 20% for head). Roll each portion into a smooth, round ball. Stack largest to smallest on a serving platter, pressing gently to secure. -
Step 4
Re-chill Structure: Refrigerate the assembled snowman for at least 30 minutes, covering loosely, to firm its structure. -
Step 5
{‘@type’: ‘HowToStep’, ‘text’: “Decorate: Arrange decorations. Use a small round cracker or olive slice for a hat brim, and an olive piece for the hat top (optional); place olive slices for eyes and a trimmed baby carrot for the nose. Form a mouth with small red bell pepper strips or olive pieces. Insert two mini pretzel sticks for arms into the sides of the middle section. Add three small olive or bell pepper pieces as buttons down the front. Drape a thin strip of red bell pepper around the ‘neck’ for a scarf.”} -
Step 6
Optional “Snow”: Finely mince fresh parsley and sprinkle it around the base of the snowman on the serving platter. -
Step 7
Final Chill & Serve: Cover loosely and chill for another 30 minutes, or until ready to serve. Present with an assortment of crackers, pita chips, pretzel crisps, and fresh vegetable sticks.
Important Information
Nutrition Facts (Per Serving)
It is important to consider this information as approximate and not to use it as definitive health advice.
Allergy Information
Please check ingredients for potential allergens and consult a health professional if in doubt.

Leave a Comment