
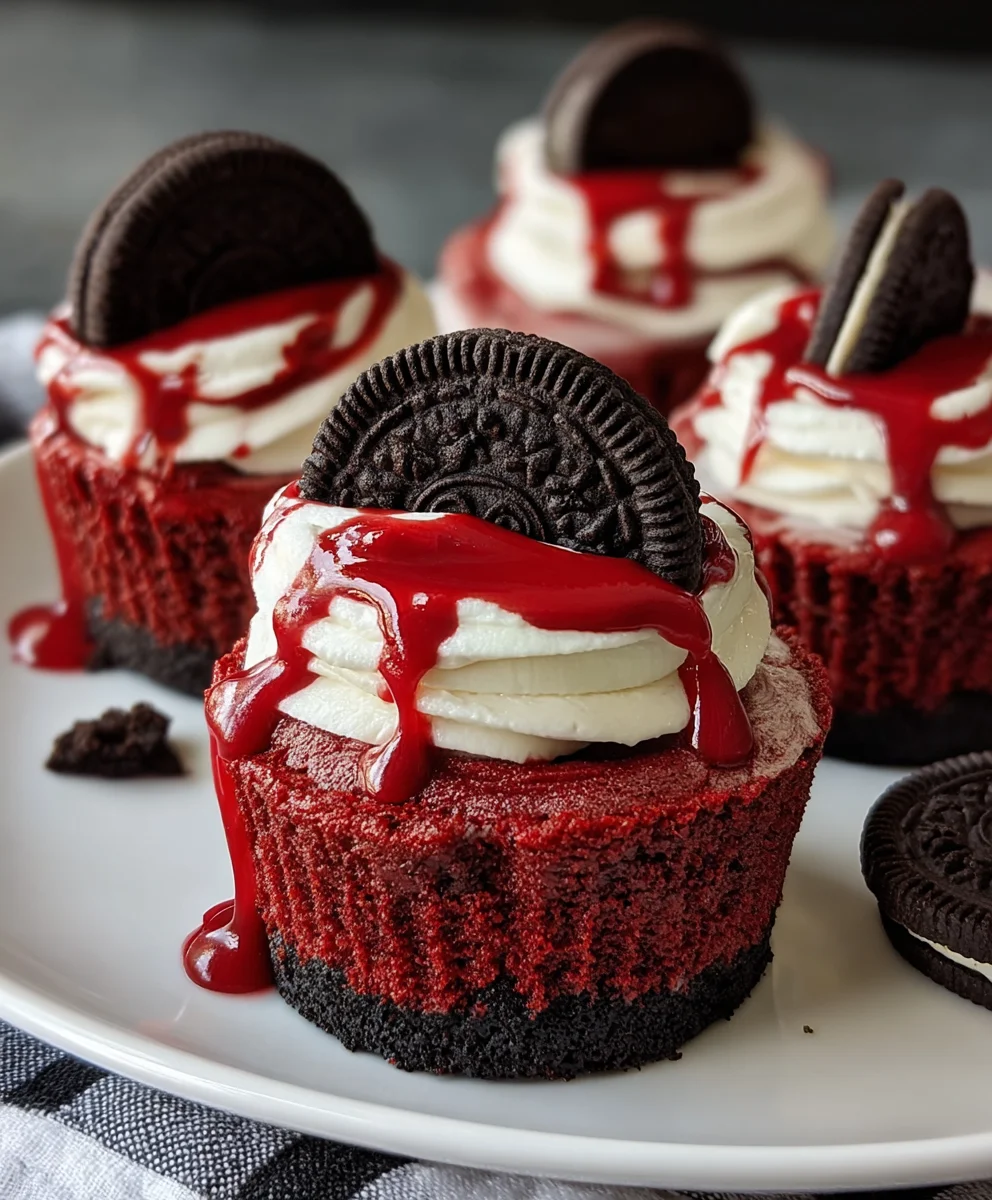
Mini Red Velvet Oreo Cheesecakes are truly a celebration in every bite, promising to be the showstopper at your next gathering or the perfect indulgent treat just for you. Imagine sinking your teeth into a vibrant, creamy dream, where the classic allure of red velvet meets the irresistible crunch of an Oreo, all nestled in a perfectly portioned cheesecake. I am absolutely thrilled to share this recipe with you, as it combines some of the dessert world’s most beloved elements into one unforgettable experience.
A Fusion of Classic Comforts
The magic of red velvet, with its subtle cocoa notes and striking crimson hue, has charmed palates for generations, often gracing Southern tables and holiday feasts. Pair that with the iconic Oreo cookie, a symbol of joyful indulgence, and the luxurious smoothness of a baked cheesecake, and you have a dessert masterpiece. This creation isn’t just about combining flavors; it’s about crafting an experience. People adore these individual delights not only for their exquisite balance of sweet and tangy, the delightful interplay of creamy and crunchy textures, but also for their sheer convenience and stunning visual appeal. These Mini Red Velvet Oreo Cheesecakes are incredibly easy to make, offer perfect portion control, and consistently bring smiles to every face. I promise you, they are simply irresistible!

Ingredients:
- For the Oreo Crust:
- 1 ½ cups (approximately 15-18 whole cookies) Oreo sandwich cookies, finely crushed (about 180g). I find crushing them in a food processor yields the most uniform and delightful crumbs for our base, ensuring every bite of our Mini Red Velvet Oreo Cheesecakes starts with that perfect crunch.
- ¼ cup (56g) unsalted butter, melted. Good quality butter really makes a difference here, binding those glorious crumbs into a sturdy foundation.
- 1 tablespoon granulated sugar (optional, but I love adding it for an extra hint of sweetness and to help crisp up the crust a bit more).
- For the Red Velvet Cheesecake Filling:
- 24 ounces (three 8-ounce blocks) full-fat cream cheese, softened to room temperature. This is crucial! Cold cream cheese will result in lumpy batter, and we want nothing but silky smoothness for our Mini Red Velvet Oreo Cheesecakes.
- 1 cup (200g) granulated sugar. This sweetens our creamy base just right.
- 2 large eggs, also at room temperature. Room temperature eggs emulsify better, leading to a smoother, more uniform cheesecake batter.
- 2 teaspoons pure vanilla extract. I always opt for a good quality vanilla; it really elevates the flavor profile.
- 1 tablespoon unsweetened cocoa powder (Dutch-processed is preferred for a richer, deeper color and less acidity, complementing the red velvet beautifully).
- 1 ½ tablespoons red food coloring (liquid or gel, gel yields a more vibrant color with less liquid, which is my preference for intense red velvet). Adjust to your desired shade, but remember the “red” in red velvet is a key characteristic!
- ¼ cup (60ml) sour cream or full-fat plain Greek yogurt. This is my secret ingredient for adding a delightful tang and ensuring a wonderfully moist and tender cheesecake texture.
- A pinch of salt (about ¼ teaspoon) to balance the sweetness and enhance the overall flavor.
- ½ cup (about 6-8 whole cookies) roughly chopped Oreo cookies, for mixing into the filling. This adds an incredible texture and an extra burst of Oreo flavor throughout the cheesecake itself.
- For the Cream Cheese Frosting:
- 4 ounces (½ block) full-fat cream cheese, softened. Again, room temperature is key for a lump-free, fluffy frosting.
- ¼ cup (56g) unsalted butter, softened.
- 1 ½ cups (180g) powdered sugar (confectioners’ sugar), sifted. Sifting prevents lumps and ensures a smooth, elegant finish.
- ½ teaspoon pure vanilla extract.
- 1-2 tablespoons milk or heavy cream, as needed for desired consistency.
- For Garnish (Optional but highly recommended!):
- Extra Oreo cookies, crushed or whole, for topping our gorgeous Mini Red Velvet Oreo Cheesecakes.
Preparing the Oreo Crust
- Preheat Your Oven and Prep Muffin Tins: First things first, preheat your oven to 325°F (160°C). Then, line a 12-cup standard muffin tin with paper cupcake liners. If you’re using a mini muffin tin, you’ll likely get double the yield, so adjust accordingly. I find that paper liners make these mini cheesecakes incredibly easy to remove and serve. A little spray of non-stick cooking spray inside each liner can also help, though it’s often not strictly necessary.
- Crush the Oreos: In a food processor, pulse the whole Oreo cookies (both cookie and cream filling!) until they form fine, even crumbs. I aim for a texture similar to fine sand. If you don’t have a food processor, you can place the cookies in a sturdy Ziploc bag and crush them with a rolling pin or the bottom of a heavy pan. Just ensure they are very finely crushed for the best crust.
- Combine Crust Ingredients: Transfer the finely crushed Oreo crumbs to a medium bowl. Pour in the melted unsalted butter and add the optional tablespoon of granulated sugar. Stir everything together with a fork or spoon until the crumbs are evenly moistened and resemble wet sand. Every crumb should have a coating of butter; this is what holds our crust together.
- Form the Crusts: Divide the Oreo mixture evenly among the prepared muffin cups. I usually use about 1-2 tablespoons per liner, depending on how thick I want my crust. Using the back of a spoon or a small measuring cup (like a ¼ cup measuring cup), firmly press the crumbs down into an even layer at the bottom of each liner. Pressing firmly is key here; it ensures the crust doesn’t crumble apart when you bite into your finished Mini Red Velvet Oreo Cheesecakes.
- Pre-Bake the Crusts: Bake the pressed crusts in your preheated oven for 5-7 minutes. This short bake time helps to set the crust, making it sturdier and preventing it from becoming soggy once the cheesecake filling is added. Once baked, remove the muffin tin from the oven and set it aside to cool slightly while we prepare our stunning red velvet filling.
Crafting the Red Velvet Cheesecake Filling
- Cream the Cream Cheese: In a large mixing bowl, using an electric mixer (either a stand mixer with a paddle attachment or a hand mixer), beat the softened cream cheese on medium speed until it is completely smooth and creamy, with no lumps remaining. This usually takes about 2-3 minutes. Do not rush this step! A perfectly smooth cream cheese base is the foundation for an exquisite cheesecake. Scrape down the sides of the bowl frequently to ensure everything is incorporated.
- Add Sugar and Vanilla: Gradually add the granulated sugar to the creamed cream cheese, beating on medium-low speed until it’s just combined and smooth. Then, mix in the pure vanilla extract. Continue to scrape down the bowl as needed. We want to incorporate the sugar thoroughly without overmixing and incorporating too much air.
- Incorporate Cocoa Powder and Red Food Coloring: In a small bowl, whisk together the unsweetened cocoa powder and red food coloring until a smooth paste forms. This helps to prevent streaks of unmixed cocoa or food coloring in your cheesecake batter. Add this vibrant red cocoa paste to the cream cheese mixture and beat on low speed until the color is uniformly distributed and you have a beautiful, deep red hue. This is where the “Red Velvet” magic truly happens for our Mini Red Velvet Oreo Cheesecakes!
- Mix in Eggs: Add the eggs one at a time, beating on low speed just until each egg is incorporated. It’s really important here to avoid overmixing after adding the eggs. Overmixing can incorporate too much air into the batter, which can cause the cheesecakes to puff up excessively during baking and then crack as they cool. Scrape down the sides and bottom of the bowl after each egg.
- Add Sour Cream and Salt: Gently fold in the sour cream (or Greek yogurt) and the pinch of salt. Mix on the lowest speed or by hand with a spatula until just combined. The sour cream adds that signature tang and helps create an incredibly creamy and luscious texture.
- Fold in Chopped Oreos: Finally, gently fold in the roughly chopped Oreo cookies. I prefer to fold them in by hand with a spatula to avoid breaking them up too much. We want those distinct chunks of Oreo throughout the filling to provide delightful texture and flavor surprises in every bite of our Mini Red Velvet Oreo Cheesecakes.
Baking the Mini Red Velvet Oreo Cheesecakes
- Fill the Muffin Cups: Divide the red velvet cheesecake batter evenly among the prepared muffin cups with the pre-baked Oreo crusts. I usually fill them about ¾ full. A cookie scoop can be very helpful here for even distribution and less mess. Take a moment to admire the beautiful, vibrant red batter!
- Prepare for Baking: Carefully place the muffin tin back into the 325°F (160°C) oven. While some full-sized cheesecakes benefit from a water bath, for mini cheesecakes, I usually skip it to keep things simple. The smaller size helps them bake more evenly without drying out.
- Bake the Cheesecakes: Bake for approximately 18-22 minutes, or until the edges are set but the centers still have a slight jiggle when you gently shake the pan. They will continue to set as they cool. Remember that every oven is a little different, so keep an eye on them. For these Mini Red Velvet Oreo Cheesecakes, we’re looking for that perfect balance of set edges and a creamy center.
- Cool Gradually: Once baked, turn off the oven and prop open the oven door slightly (you can use a wooden spoon to keep it ajar). Allow the cheesecakes to cool in the oven for an additional 15-20 minutes. This gradual cooling process helps prevent cracking and ensures a smooth, beautiful top on your cheesecakes.
- Chill Completely: Remove the muffin tin from the oven and transfer it to a wire rack to cool completely at room temperature for about 30 minutes. Once cooled, transfer the entire muffin tin to the refrigerator and chill the Mini Red Velvet Oreo Cheesecakes for at least 3-4 hours, or preferably overnight. Chilling is absolutely essential! It allows the cheesecakes to fully set, develop their flavor, and makes them much easier to handle and frost. Patience is a virtue when making cheesecakes!
Whipping Up the Cream Cheese Frosting
- Cream Butter and Cream Cheese: In a medium mixing bowl, using an electric mixer, beat the softened cream cheese and softened unsalted butter together on medium speed until the mixture is light, fluffy, and completely smooth. Again, no lumps allowed! Scrape down the bowl thoroughly to ensure everything is well combined. This combination of butter and cream cheese creates a classic, rich, and tangy frosting that perfectly complements our Mini Red Velvet Oreo Cheesecakes.
- Add Powdered Sugar and Vanilla: Gradually add the sifted powdered sugar, ½ cup at a time, beating on low speed until fully incorporated after each addition. Once all the sugar is in, add the vanilla extract. Increase the speed to medium-high and beat for another 2-3 minutes until the frosting is light, airy, and wonderfully fluffy.
- Adjust Consistency: If the frosting seems too thick, add milk or heavy cream, 1 tablespoon at a time, beating until you reach your desired piping consistency. If it’s too thin, you can add a little more sifted powdered sugar. The goal is a frosting that’s firm enough to hold its shape but soft enough to pipe beautifully onto our Mini Red Velvet Oreo Cheesecakes.
Assembling and Decorating
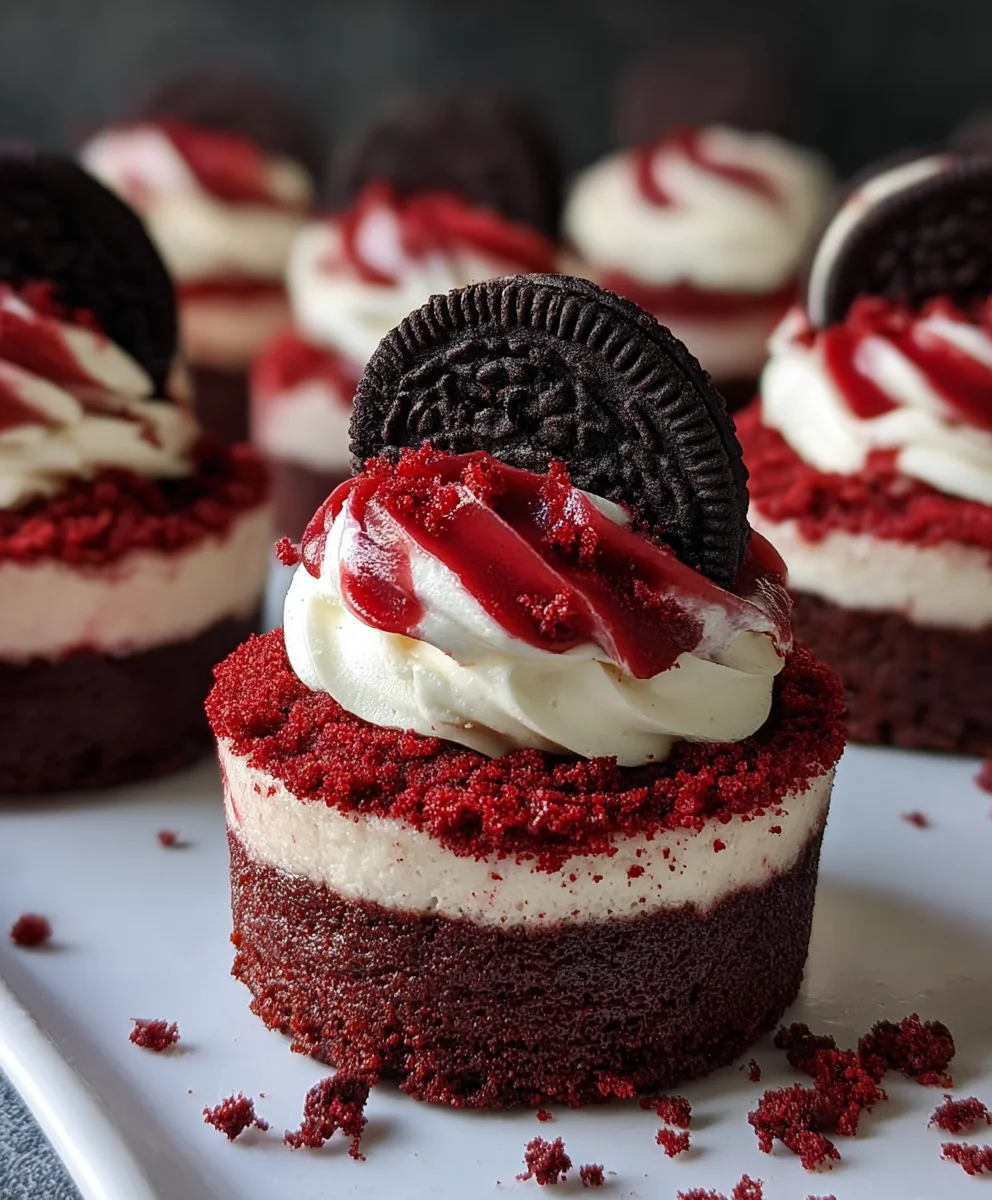
- Remove from Liners: Once the Mini Red Velvet Oreo Cheesecakes are thoroughly chilled and set, carefully remove them from their paper liners. They should pop out easily if they were chilled sufficiently.
- Frost the Cheesecakes: Transfer the prepared cream cheese frosting to a piping bag fitted with your favorite decorative tip (a star tip works wonderfully for a classic look!). Pipe a generous swirl of frosting onto the top of each chilled Mini Red Velvet Oreo Cheesecake. You can also simply use an offset spatula to spread a dollop of frosting on top for a more rustic look.
- Garnish (Optional, but highly recommended!): For that extra touch of deliciousness and visual appeal, garnish each frosted cheesecake with a half or quarter of an Oreo cookie, or a sprinkle of extra crushed Oreos. This not only enhances the “Oreo” aspect of our “Mini Red Velvet Oreo Cheesecakes” but also adds a lovely textural contrast.
- Serve and Store: Your beautiful Mini Red Velvet Oreo Cheesecakes are now ready to be served! They are best enjoyed chilled. Store any leftover cheesecakes in an airtight container in the refrigerator for up to 3-4 days. While they are tempting to eat immediately, their flavors truly meld and deepen over time, making them even more delightful the next day. These little treats are perfect for parties, celebrations, or simply to satisfy a serious cheesecake craving!
Conclusion:
And there you have it, my friends! We’ve journeyed through the steps of creating a dessert that truly stands out from the crowd. These aren’t just any ordinary treats; they are a delightful fusion of beloved flavors and textures, meticulously crafted to bring a burst of joy with every single bite. I truly believe that once you experience the creamy, tangy bliss of the cheesecake, the subtle cocoa notes of the red velvet, and the unmistakable crunch of the Oreo crust, you’ll understand exactly why this recipe for Mini Red Velvet Oreo Cheesecakes is an absolute must-try. It’s the kind of dessert that looks incredibly impressive, yet is surprisingly approachable for home bakers of all skill levels. From the moment you pull them from the oven, filling your kitchen with an irresistible aroma, to the very first forkful, you’ll be completely smitten.
What makes these miniature cheesecakes so utterly irresistible, you ask? It’s that perfect harmony of sweet and tart, rich and light, all encased in a convenient, individual serving. No more messy slicing or awkward portions – each one is a perfect, self-contained indulgence. They are a triumph of texture, delivering a velvety smooth filling that melts in your mouth, juxtaposed with the delightful crispness of the Oreo base. Imagine the compliments you’ll receive when you present these beauties at your next gathering! They’re not just desserts; they’re conversation starters, mood lifters, and genuine crowd-pleasers. I often find myself reaching for one of these whenever I need a little pick-me-up or want to share a sweet moment with loved ones. Their vibrant color and intricate layers make them visually stunning, promising a taste sensation even before they touch your lips.
Serving Suggestions & Creative Variations to Elevate Your Experience
While these Mini Red Velvet Oreo Cheesecakes are absolutely divine on their own, a little extra flourish can elevate them even further. For a simple yet elegant presentation, consider serving them chilled, perhaps with a delicate dusting of cocoa powder or a few fresh raspberries artfully placed on top. The tartness of the berries provides a wonderful counterpoint to the richness of the cheesecake. They also pair wonderfully with a steaming cup of coffee or a tall glass of cold milk, making them ideal for an afternoon treat or a sophisticated after-dinner delight. If you’re hosting a special occasion, arrange them on a tiered dessert stand for a truly show-stopping display that will have your guests reaching for more.
But why stop there? The beauty of a great recipe lies in its adaptability. Don’t be afraid to get creative with your toppings and variations! A drizzle of white chocolate ganache or a spoonful of raspberry coulis can add another layer of flavor and visual appeal. For those who love a bit of extra indulgence, a dollop of freshly whipped cream or a scattering of miniature chocolate chips can be heavenly. You could even experiment with different Oreo flavors for the crust – imagine a mint Oreo base for a festive twist, or a golden Oreo for a vanilla-forward alternative. For a holiday theme, a sprinkle of festive red and green sprinkles or a tiny candy cane shard around Christmas time would be absolutely charming. If you’re feeling particularly adventurous, try infusing your cream cheese filling with a hint of orange zest or a touch of almond extract to introduce new dimensions of flavor. The possibilities are truly endless, and each variation promises a uniquely delicious experience.
Your Turn: Bake, Share, and Inspire!
Now, it’s your turn! I genuinely hope you feel inspired to roll up your sleeves and try making these incredible Mini Red Velvet Oreo Cheesecakes. Trust me when I say, the joy of creating something so delicious and beautiful with your own hands is immensely rewarding. Don’t just take my word for it; embark on this baking adventure yourself! I promise you won’t regret it. Once you’ve whipped up your batch, I would absolutely love to hear about your experience. Did you add any unique twists? What were your favorite serving suggestions? Please, share your stories, your triumphs, and even your funny baking mishaps in the comments below! Better yet, snap a photo of your magnificent creations and share them with the world. Let’s build a community of enthusiastic bakers who appreciate the finer things in life, especially when those things come in the form of a perfectly portioned, incredibly delicious red velvet cheesecake. Happy baking, my friends!
Mini Red Velvet Oreo Cheesecakes
A delightful fusion of classic red velvet, crunchy Oreo, and creamy cheesecake, these irresistible mini treats are perfect for any gathering or a personal indulgence. Easy to make, perfectly portioned, and stunningly visual.
Ingredients
-
1 ½ cups (180g) finely crushed Oreo sandwich cookies (approx. 15-18 cookies)
-
¼ cup (56g) unsalted butter, melted
-
1 tbsp granulated sugar (optional)
-
24 oz (three 8-oz blocks) full-fat cream cheese, softened
-
1 cup (200g) granulated sugar
-
2 large eggs, room temperature
-
2 tsp pure vanilla extract
-
1 tbsp unsweetened cocoa powder (Dutch-processed preferred)
-
1 ½ tbsp red food coloring (liquid or gel)
-
¼ cup (60ml) sour cream or full-fat plain Greek yogurt
-
¼ tsp salt
-
½ cup (approx. 6-8 whole cookies) roughly chopped Oreo cookies
-
4 oz (½ block) full-fat cream cheese, softened
-
¼ cup (56g) unsalted butter, softened
-
1 ½ cups (180g) powdered sugar, sifted
-
½ tsp pure vanilla extract
-
1-2 tbsp milk or heavy cream, as needed
-
Extra Oreo cookies, crushed or whole (for garnish)
Instructions
-
Step 1
Preheat oven to 325°F (160°C). Line a 12-cup standard muffin tin with parchment paper liners (not foil); mini muffin tins will double the yield. -
Step 2
Finely crush 1 ½ cups Oreo cookies. In a medium bowl, combine crushed Oreos with ¼ cup melted butter and 1 tbsp optional granulated sugar. Stir until crumbs are evenly moistened. -
Step 3
Divide Oreo mixture evenly among liners (1-2 tbsp each). Press firmly into an even layer. Bake for 5-7 minutes to set. Remove and cool slightly. -
Step 4
In a large bowl, beat 24 oz softened full-fat cream cheese on medium speed until completely smooth (2-3 mins), scraping down bowl. -
Step 5
Gradually add 1 cup granulated sugar and 2 tsp pure vanilla extract. In a small bowl, whisk 1 tbsp cocoa powder and 1 ½ tbsp red food coloring to form a paste. Add to cream cheese mixture and beat on low until uniformly deep red. -
Step 6
Add 2 large eggs one at a time, beating on low just until incorporated. Avoid overmixing. Gently fold in ¼ cup sour cream (or Greek yogurt) and ¼ tsp salt. Finally, gently fold in ½ cup roughly chopped Oreo cookies. -
Step 7
Divide the red velvet cheesecake batter evenly among the pre-baked Oreo crusts, filling cups about ¾ full. Bake for 18-22 minutes, until edges are set but centers still have a slight jiggle. -
Step 8
Turn off the oven, prop door open, and cool cheesecakes in the oven for 15-20 minutes. Transfer to a wire rack to cool completely at room temperature (about 30 minutes). Then, chill in the refrigerator for at least 3-4 hours, or preferably overnight, until fully set. -
Step 9
In a medium bowl, beat 4 oz softened cream cheese and ¼ cup softened unsalted butter until light and fluffy. Gradually add 1 ½ cups sifted powdered sugar and ½ tsp pure vanilla extract. Beat on medium-high for 2-3 minutes until light and airy. Adjust consistency with 1-2 tbsp milk or heavy cream if needed. -
Step 10
Once chilled, carefully remove cheesecakes from liners. Pipe or spread frosting generously onto each cheesecake. Garnish with extra crushed or whole Oreo cookies. -
Step 11
Serve chilled. Store leftover cheesecakes in an airtight container in the refrigerator for up to 3-4 days.
Important Information
Nutrition Facts (Per Serving)
It is important to consider this information as approximate and not to use it as definitive health advice.
Allergy Information
Please check ingredients for potential allergens and consult a health professional if in doubt.


Leave a Comment