
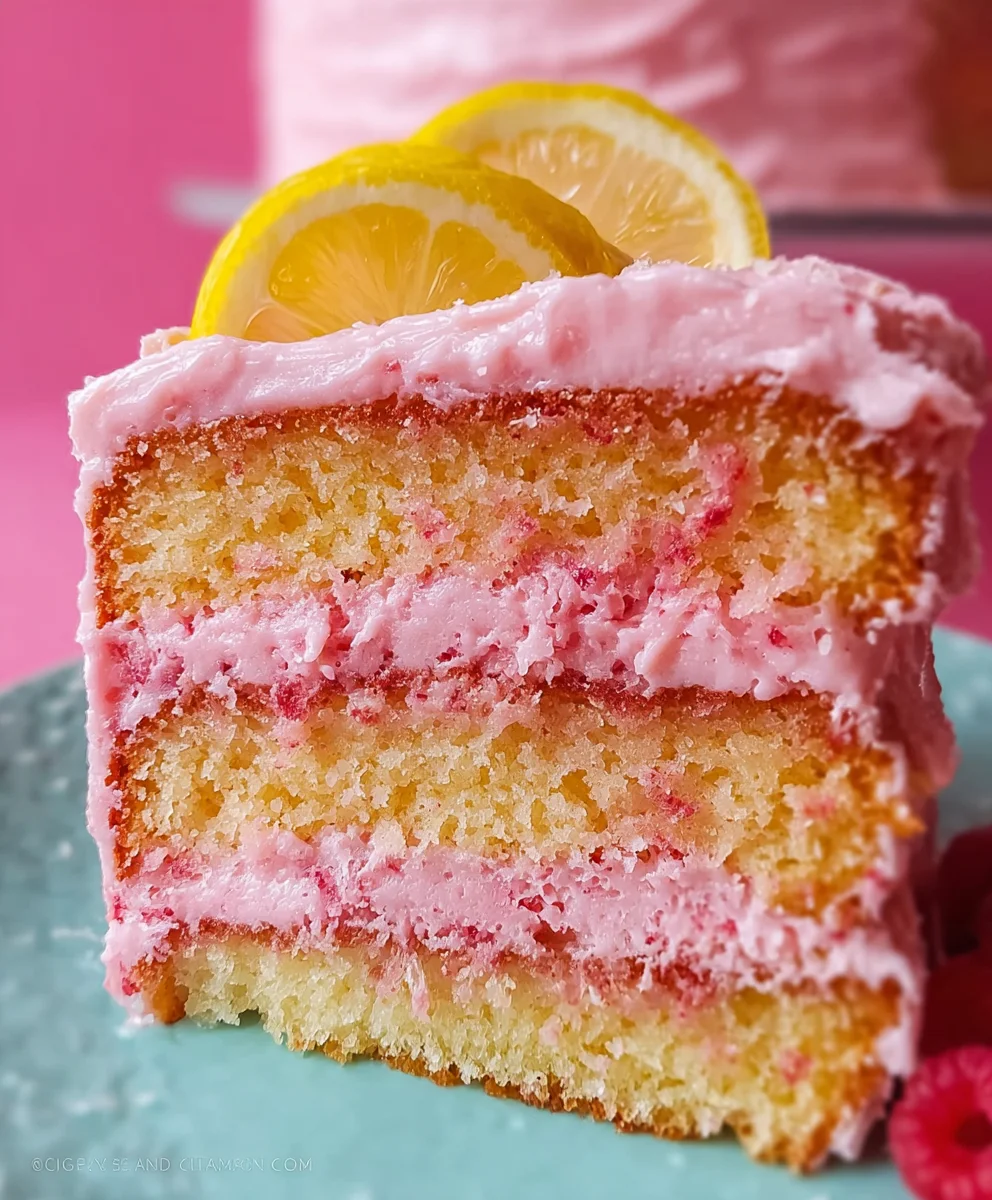
Pink Lemonade Cake is more than just a dessert; it’s a vibrant celebration on a plate, a delightful culinary experience that promises to transport your taste buds straight to a warm, sunny day. I absolutely love how it brightens any occasion, from a casual afternoon tea to a festive gathering. Imagine slicing into a cake with layers of tender, moist crumb, infused with that unmistakable zesty lemonade tang and a hint of sweet berry, all crowned with a luscious, creamy frosting. It’s a visual and gastronomic treat that instantly captures attention and leaves a lasting impression, and honestly, it’s one of my personal favorites to bake!
While the exact origins of this specific cake might be a modern twist, it draws its inspiration from the beloved pink lemonade, a beverage with a charming, albeit often debated, history rooted in early American fairs and circuses. This cake carries forward that same spirit of whimsical delight and refreshing appeal. People absolutely adore this dish not only for its striking pastel hue but primarily for its incredible flavor profile. The perfect harmony of tart lemon and subtle sweetness, combined with a wonderfully light and fluffy texture, makes it an an irresistible choice for anyone seeking a dessert that is both familiar and exciting.
Why This Pink Lemonade Cake Will Be Your New Favorite
Today, I am thrilled to share my go-to recipe for this fantastic Pink Lemonade Cake. Whether you’re planning a spring brunch, a summer barbecue, or simply looking for a cheerful pick-me-up, this cake delivers every single time. It’s remarkably simple to prepare, yet sophisticated enough to impress, proving that deliciousness doesn’t have to be complicated. Get ready to bake a cake that everyone, including you, will rave about!

Ingredients:
For the Pink Lemonade Cake Layers:
- 3 cups (360g) all-purpose flour, sifted
- 1 tablespoon baking powder
- 1/2 teaspoon salt
- 1 cup (226g) unsalted butter, softened to room temperature
- 2 cups (400g) granulated sugar
- 4 large eggs, at room temperature
- 1 cup (240ml) whole milk, at room temperature
- 1/2 cup (120ml) fresh lemon juice, approximately 3-4 medium lemons
- 2 tablespoons fresh lemon zest, approximately 2-3 medium lemons
- 1 teaspoon pure vanilla extract
- 1/2 teaspoon pink gel food coloring (adjust to desired shade)
For the Pink Lemonade Buttercream Frosting:
- 2 cups (452g) unsalted butter, softened to room temperature
- 8 cups (960g) powdered sugar (confectioners’ sugar), sifted
- 1/2 cup (120ml) fresh lemon juice, approximately 3 medium lemons
- 2 tablespoons fresh lemon zest
- 1 teaspoon pure vanilla extract
- 1/4 teaspoon salt
- 1-3 tablespoons whole milk or heavy cream, if needed for consistency
- 1/4 teaspoon pink gel food coloring (adjust to desired shade)
For the Pink Lemonade Glaze (Optional, for extra tang and moisture):
- 1/2 cup (100g) granulated sugar
- 1/4 cup (60ml) fresh lemon juice
- 1/4 cup (60ml) water
For Decoration (Optional):
- Fresh lemon slices or wedges
- Fresh raspberries or strawberries
- Edible pink sugar sprinkles
Instructions:
Phase 1: Preparing the Pink Lemonade Cake Layers
- Prepare Your Oven and Pans: First things first, let’s get organized! Preheat your oven to a cozy 350°F (175°C). This ensures your oven is at a consistent temperature when the cakes go in, which is crucial for even baking. Next, generously grease and flour three 8-inch round cake pans. If you prefer, you can line the bottoms with parchment paper circles for extra assurance that your beautiful cake layers will release cleanly. I always find a good non-stick cooking spray with flour works wonders here, coating every nook and cranny.
- Combine Dry Ingredients: In a medium-sized bowl, whisk together the sifted all-purpose flour, baking powder, and salt. Sifting the flour is a little extra step that makes a big difference, preventing lumps and ensuring a truly light and airy cake texture. Set this mixture aside for now.
- Cream Butter and Sugar: In the bowl of a stand mixer fitted with the paddle attachment (or using a large bowl with an electric hand mixer), cream together the softened unsalted butter and granulated sugar on medium speed. This step is incredibly important for the texture of your Pink Lemonade Cake. You want to beat them together for a good 3-5 minutes, until the mixture is light, fluffy, and noticeably pale in color. This process incorporates air, which contributes to the cake’s tender crumb. Scrape down the sides of the bowl occasionally to ensure everything is evenly combined.
- Add Eggs: With the mixer still running on medium speed, add the eggs one at a time, beating well after each addition. Allow each egg to fully incorporate into the butter-sugar mixture before adding the next. This prevents the mixture from curdling and ensures a smooth, emulsified batter. Once all eggs are added, beat for another minute until the mixture is cohesive and creamy.
- Prepare Wet Ingredients: In a separate small bowl or measuring cup, whisk together the whole milk, fresh lemon juice, fresh lemon zest, pure vanilla extract, and the pink gel food coloring. This is where the “Pink” in our Pink Lemonade Cake truly comes to life! Start with a small amount of food coloring and add more gradually until you achieve your desired lovely pink hue. Remember, a little goes a long way with gel food coloring.
- Alternate Wet and Dry: Now, we’ll combine the wet and dry ingredients with the creamed butter mixture. With the mixer on low speed, alternately add the dry ingredient mixture and the wet milk-lemon mixture to the butter mixture, beginning and ending with the dry ingredients. Start by adding about one-third of the dry ingredients, mix until just combined, then add half of the wet mixture, mix, then another third of the dry, the remaining half of the wet, and finally the last third of the dry. Do not overmix! Overmixing develops the gluten in the flour, which can lead to a tough cake. Mix only until just combined and no streaks of flour remain. A few small lumps are perfectly fine.
- Divide and Bake: Divide the beautiful pink batter evenly among your three prepared 8-inch cake pans. Use a spatula to gently smooth the tops. Place the pans into your preheated oven and bake for 25-30 minutes, or until a wooden skewer or toothpick inserted into the center of a cake comes out clean. The cakes should feel springy to the touch. The aroma filling your kitchen will be absolutely delightful – a true sign of a delicious Pink Lemonade Cake in the making!
- Cool the Cakes: Once baked, remove the cakes from the oven and let them cool in their pans on a wire rack for about 10-15 minutes. This crucial resting period allows the cakes to firm up slightly before you attempt to remove them. After this initial cooling, invert the cakes onto the wire rack to cool completely. It’s essential that the cakes are entirely cool before frosting, otherwise, your lovely buttercream will simply melt and slide off. This can take 1-2 hours, so plan accordingly.
Phase 2: Preparing the Pink Lemonade Buttercream Frosting
- Cream the Butter: In the bowl of a stand mixer fitted with the paddle attachment, or using a large bowl with an electric hand mixer, beat the softened unsalted butter on medium-high speed for 3-5 minutes until it becomes very light, fluffy, and pale. This aeration is key to a truly light and creamy buttercream, making your Pink Lemonade Cake frosting melt-in-your-mouth delicious.
- Add Powdered Sugar: Gradually add the sifted powdered sugar to the butter, about 1 cup at a time, mixing on low speed until just combined after each addition. Once all the powdered sugar is incorporated, increase the speed to medium-high and beat for another 2-3 minutes. Make sure to scrape down the sides of the bowl frequently to ensure everything is thoroughly mixed.
- Incorporate Flavorings: With the mixer on low, add the fresh lemon juice, fresh lemon zest, pure vanilla extract, and salt. Mix until fully combined.
- Add Color and Adjust Consistency: Now for the “Pink” part of our Pink Lemonade Cake frosting! Add the pink gel food coloring, starting with a small amount (like 1/4 teaspoon) and adding more gradually until you reach your desired lovely pink shade. Increase the mixer speed to medium-high and beat the buttercream for another 3-5 minutes. This final whip will make the frosting incredibly light and fluffy. If your buttercream seems too thick, add whole milk or heavy cream one tablespoon at a time until you reach your desired spreadable consistency. If it’s too thin, you can add a little more sifted powdered sugar. The goal is a perfectly pipeable and spreadable frosting that holds its shape beautifully.
Phase 3: Preparing the Pink Lemonade Glaze (Optional)
- Prepare the Glaze: In a small saucepan, combine the granulated sugar, fresh lemon juice, and water. Heat over medium heat, stirring constantly, until the sugar has completely dissolved. Bring the mixture to a gentle simmer for about 1-2 minutes, then remove it from the heat. This simple glaze will add an extra punch of lemony flavor and moisture to your Pink Lemonade Cake layers, elevating the experience.
- Cool the Glaze: Allow the glaze to cool slightly, but it should still be warm when you apply it to the cakes.
Phase 4: Assembling and Decorating Your Pink Lemonade Cake
- Level the Cake Layers: Once your cake layers are completely cool, use a serrated knife or a cake leveler to carefully level the tops of each cake layer. This creates a flat surface, making your assembled Pink Lemonade Cake stable and professional-looking. Don’t worry if it’s not absolutely perfect; the frosting will hide minor imperfections!
- Apply the Glaze (Optional): If you chose to make the optional Pink Lemonade Glaze, gently brush or spoon a portion of the warm glaze evenly over the top of each cooled cake layer. This will soak into the cake, adding moisture and an intense burst of lemon flavor. Let it absorb for a few minutes before moving on.
- First Layer and Filling: Place one leveled cake layer on your serving platter or cake stand. Spread about 1 to 1.5 cups of the Pink Lemonade Buttercream Frosting evenly over the top of this layer, right to the edges. You can use an offset spatula for this.
- Stack and Repeat: Carefully place the second cake layer on top of the first, pressing down gently to ensure it’s level. Spread another 1 to 1.5 cups of frosting over this layer. Finally, place the third cake layer on top. You should now have a beautiful stack of pink cake layers.
- The Crumb Coat: Now for the crumb coat, a vital step for a pristine finish on your Pink Lemonade Cake! Apply a very thin layer of buttercream all over the top and sides of the stacked cake. This thin layer will trap any loose crumbs, preventing them from showing up in your final frosting layer. Don’t worry about perfection here; it’s just a preliminary coat. Once applied, refrigerate the cake for 15-20 minutes, or until the crumb coat is firm to the touch. This chilling time helps set the crumbs and provides a stable base for your final frosting layer.
- Final Frosting: Remove the chilled cake from the refrigerator. Now, apply a generous, thicker layer of the remaining Pink Lemonade Buttercream Frosting all over the top and sides of the cake. Use your offset spatula or a bench scraper to smooth the frosting, creating a clean and polished look. Take your time, working around the cake until you are happy with the finish. For extra elegance, you can create swirls or peaks with your spatula or use a piping bag with a decorative tip to add beautiful borders.
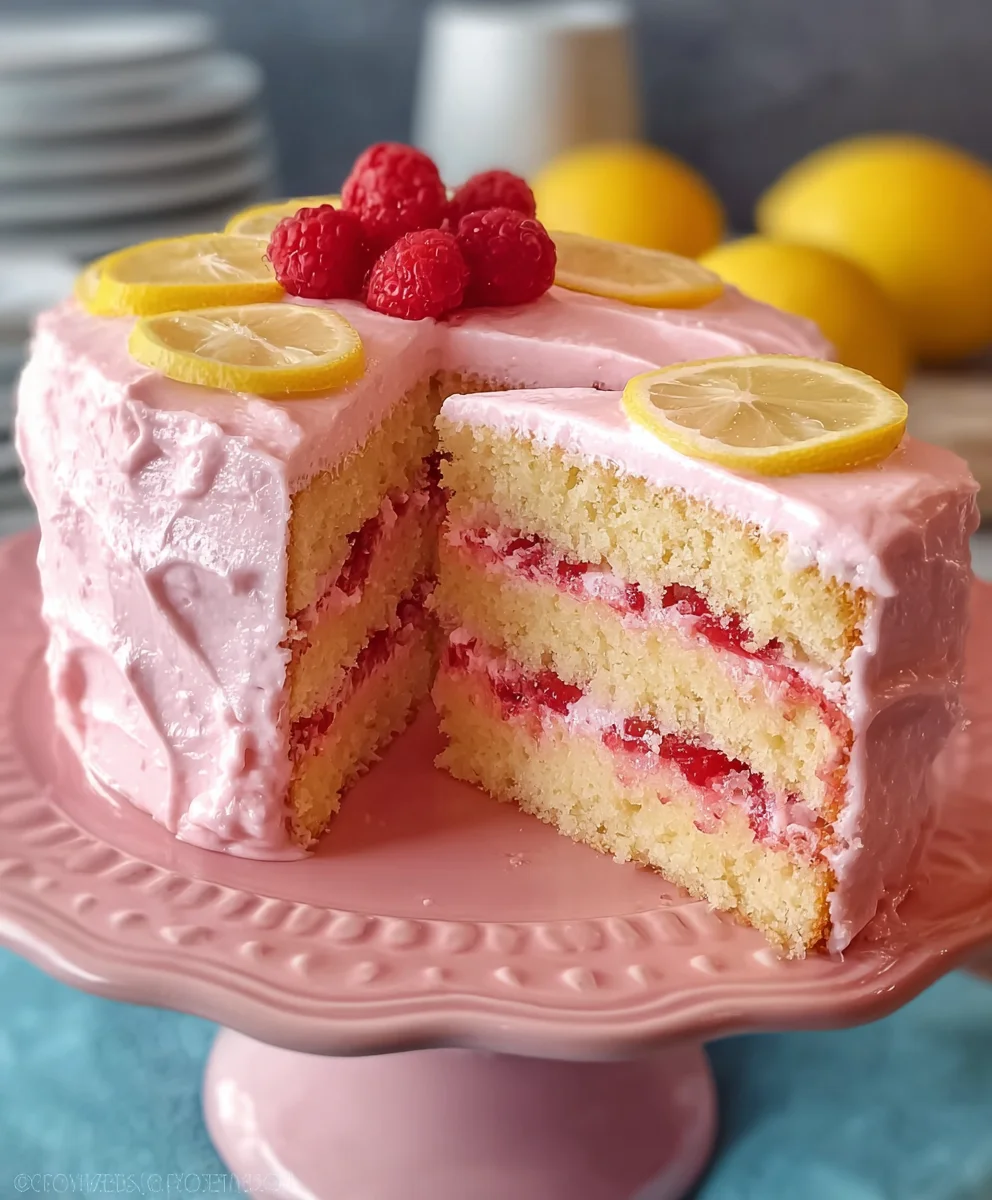
- Decorate Your Pink Lemonade Cake: This is where you can let your creativity shine! Garnish your stunning Pink Lemonade Cake with fresh lemon slices or wedges, strategically placed fresh raspberries or strawberries for a pop of contrasting color, or a dusting of edible pink sugar sprinkles. The vibrant colors and fresh fruit truly enhance the “Pink Lemonade” theme.
- Serve and Enjoy: Once decorated, your magnificent Pink Lemonade Cake is ready to be admired and, most importantly, devoured! Slice it up and serve it to your eagerly awaiting guests. This cake is best served at room temperature, allowing the buttercream to be perfectly soft and creamy. Any leftovers can be stored in an airtight container at room temperature for up to 2 days, or in the refrigerator for up to 5 days. Enjoy every zesty, sweet bite!
Conclusion:
And there you have it, my friends! We’ve journeyed through the creation of what I sincerely believe is one of the most delightful and visually stunning desserts you could ever bring to your table. If you’ve been looking for a recipe that truly stands out, one that promises both an incredible taste experience and a breathtaking presentation, then this is absolutely your sign to dive in. I can confidently say that this cake isn’t just another dessert; it’s an experience, a burst of sunshine on a plate, a truly memorable treat that leaves a lasting impression. The carefully balanced tartness from the fresh lemon, perfectly melded with just the right amount of sweetness, creates a symphony of flavors that is both refreshing and utterly indulgent. Every single bite delivers a tender, moist crumb, topped with a luscious, airy frosting that melts in your mouth, leaving behind that iconic, zesty tang. It’s that beautiful combination of sophisticated flavor and comforting sweetness that makes it an undeniable crowd-pleaser, perfect for any occasion that calls for something a little extra special.
I’ve seen faces light up time and again when this beautiful creation is unveiled, and I promise you, that feeling of pride and joy in sharing something so exquisite is truly unmatched. It’s surprisingly approachable to make, despite its elegant appearance, and I’ve poured all my best tips and tricks into the guide to ensure your success. So, if you’ve been on the fence, let me gently nudge you over – this is one recipe you simply must add to your baking repertoire. It’s more than just a cake; it’s a centerpiece, a conversation starter, and a true testament to the joy of homemade baking. The vibrant color alone is enough to cheer up any room, but it’s the incredible flavor profile that will have everyone asking for the recipe, I guarantee it.
Elevate Your Serving:
While this cake is an absolute showstopper all on its own, there are several ways you can elevate its presentation and flavor profile even further, depending on your mood or the occasion. For a simple yet elegant finish, I love to garnish each slice with a few fresh raspberries or blueberries, perhaps a delicate sprig of fresh mint for a pop of green and an aromatic touch. A light dusting of powdered sugar just before serving can also add a touch of refined elegance. If you’re feeling a little more decadent, a small scoop of premium vanilla bean ice cream or a dollop of freshly whipped cream on the side makes for a truly luxurious pairing, especially on a warm evening. For an extra citrusy kick, you could even offer a small side of homemade lemon curd, allowing guests to add a personalized burst of tartness to their slice. Imagine serving slices of this magnificent Pink Lemonade Cake alongside tall glasses of sparkling pink lemonade – a truly cohesive and delightful theme for any summer gathering or celebratory brunch. For children’s parties, consider cutting smaller, bite-sized squares and arranging them artfully on a platter with colorful sprinkles, making them easy to pick up and enjoy.
Endless Variations to Explore:
The beauty of a recipe like this lies in its adaptability. Once you’ve mastered the core cake, feel free to get creative! For instance, you could transform this into charming cupcakes, adjusting the baking time accordingly, making them perfect for individual servings at a picnic or potluck. Or, for a slightly different flavor profile, consider using lime instead of lemon to create a “Key Limeade Cake” – equally refreshing but with its own unique twist. If you’re a fan of cream cheese, a lemon-infused cream cheese frosting would be an incredible alternative to the buttercream, offering a richer, tangier counterpoint to the cake’s sweetness. You could also experiment with adding a very subtle hint of rosewater to the batter or frosting for a delicate floral note that beautifully complements the lemon. For an adult-friendly version, a tiny splash of limoncello in the frosting or brushed onto the cake layers can add a sophisticated boozy undertone. Don’t be afraid to play with natural food colorings too; a touch of beet juice or pureed raspberries could intensify the pink hue if you desire an even more vibrant shade. Consider layering the cake with thin slices of fresh fruit, like strawberries or peaches, between the cake and frosting layers for added texture and flavor, particularly when seasonal produce is at its peak. This cake is truly a versatile canvas for your culinary imagination!
So, my dear readers, I genuinely hope you feel inspired to bring this incredible recipe to life in your own kitchen. I pour my heart into developing these recipes, and nothing makes me happier than hearing about your experiences. I truly believe that the act of baking is a form of love, and this Pink Lemonade Cake is a testament to that sentiment. Please don’t hesitate to give it a try. Gather your ingredients, put on your favorite apron, and prepare to create something truly magical. Once you’ve baked it, shared it, and savored every last crumb, I would absolutely love to hear from you! Please come back and leave a comment below sharing your thoughts, your successes, and any fun variations you might have tried. Even better, snap a photo and share your beautiful creation on social media – don’t forget to tag me so I can see your masterpieces! Your feedback and shared experiences are what truly fuel my passion and help this wonderful baking community grow. Happy baking, everyone!
Pink Lemonade Cake Recipe: Sweet & Tangy Delight!
Pink Lemonade Cake is a vibrant celebration on a plate, offering a delightful culinary experience that transports taste buds to a warm, sunny day. This recipe creates tender, moist layers infused with zesty lemon and sweet berry, topped with creamy pink buttercream. For a stronger flavor alternative, you can use frozen pink lemonade concentrate, just remember to reduce the whole milk in the cake layers by ¼ cup to balance the liquid.
Ingredients
-
— For the Pink Lemonade Cake Layers —
-
3 cups (360g) all-purpose flour
-
1 tablespoon baking powder
-
1/2 teaspoon salt
-
1 cup (226g) unsalted butter, softened
-
2 cups (400g) granulated sugar
-
4 large eggs
-
1 cup (240ml) whole milk
-
1/2 cup (120ml) fresh lemon juice
-
2 tablespoons fresh lemon zest
-
1 teaspoon pure vanilla extract
-
1/2 teaspoon pink gel food coloring (adjust)
-
— For the Pink Lemonade Buttercream Frosting —
-
2 cups (452g) unsalted butter, softened
-
8 cups (960g) powdered sugar
-
1/2 cup (120ml) fresh lemon juice
-
2 tablespoons fresh lemon zest
-
1 teaspoon pure vanilla extract
-
1/4 teaspoon salt
-
1-3 tablespoons whole milk or heavy cream (optional, for consistency)
-
1/4 teaspoon pink gel food coloring (adjust)
-
— For the Pink Lemonade Glaze (Optional) —
-
1/2 cup (100g) granulated sugar
-
1/4 cup (60ml) fresh lemon juice
-
1/4 cup (60ml) water
-
— For Decoration (Optional) —
-
Fresh lemon slices or wedges
-
Fresh raspberries or strawberries
-
Edible pink sugar sprinkles
Instructions
-
Step 1
Preheat oven to 350°F (175°C). Grease and flour three 8-inch round cake pans. -
Step 2
Whisk 360g all-purpose flour, 1 tbsp baking powder, and 1/2 tsp salt in a medium bowl. Set aside. -
Step 3
In a stand mixer, cream 226g softened unsalted butter and 400g granulated sugar on medium speed for 3-5 minutes until light and fluffy. Scrape sides. -
Step 4
Add 4 large eggs one at a time, beating well after each. Beat for another minute. -
Step 5
In a separate bowl, whisk 240ml whole milk, 120ml fresh lemon juice, 2 tbsp fresh lemon zest, 1 tsp pure vanilla extract, and 1/2 tsp pink gel food coloring. -
Step 6
With mixer on low, alternately add dry ingredients and wet mixture to the butter mixture, starting and ending with dry. Mix until just combined; do not overmix. -
Step 7
Divide batter evenly among prepared pans. Bake for 25-30 minutes, or until a toothpick comes out clean. -
Step 8
Cool in pans on a wire rack for 10-15 minutes, then invert onto rack to cool completely (1-2 hours). -
Step 9
In a stand mixer, beat 452g softened unsalted butter on medium-high speed for 3-5 minutes until light and fluffy. -
Step 10
Gradually add 960g sifted powdered sugar on low speed, then beat on medium-high for 2-3 minutes. Scrape sides. -
Step 11
Add 120ml fresh lemon juice, 2 tbsp fresh lemon zest, 1 tsp pure vanilla extract, and 1/4 tsp salt. Mix until combined. -
Step 12
Add 1/4 tsp pink gel food coloring (adjust) and beat on medium-high for 3-5 minutes until fluffy. If needed, add 1-3 tbsp milk or cream for consistency. -
Step 13
In a small saucepan, combine 100g granulated sugar, 60ml fresh lemon juice, and 60ml water. Heat, stirring, until sugar dissolves. Simmer 1-2 minutes, then remove from heat. Allow glaze to cool slightly, keeping it warm for application. -
Step 14
Once cakes are cool, level the tops with a serrated knife. -
Step 15
Gently brush warm glaze over each cooled cake layer. Let absorb. -
Step 16
Place one cake layer on a platter. Spread 1 to 1.5 cups frosting evenly over top. -
Step 17
Place second layer, spread frosting. Place third layer. -
Step 18
Apply a thin layer of buttercream over the entire cake. Refrigerate for 15-20 minutes until firm. -
Step 19
Apply a generous, thicker layer of frosting to the chilled cake. Smooth with an offset spatula or bench scraper. -
Step 20
Garnish with fresh lemon slices, raspberries/strawberries, or edible pink sugar sprinkles. -
Step 21
Serve at room temperature. Store leftovers in an airtight container at room temperature for up to 2 days, or refrigerated for up to 5 days. Enjoy every zesty, sweet bite!
Important Information
Nutrition Facts (Per Serving)
It is important to consider this information as approximate and not to use it as definitive health advice.
Allergy Information
Please check ingredients for potential allergens and consult a health professional if in doubt.


Leave a Comment