
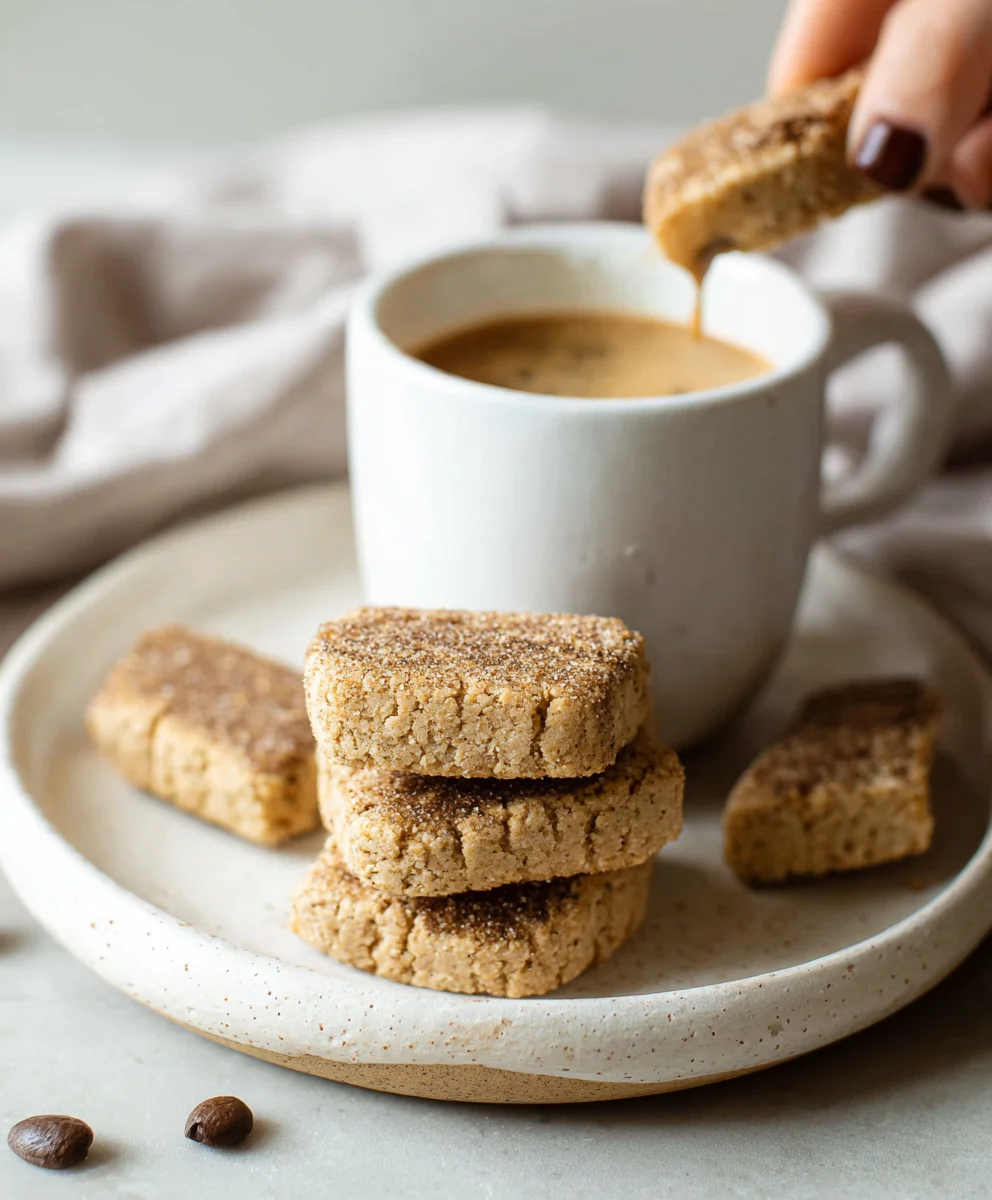
Coffee Cookies offer an unparalleled delight, merging two of the world’s most cherished indulgences: the rich, aromatic depth of coffee and the comforting sweetness of a freshly baked cookie. Have you ever wished your morning coffee ritual could extend into a delightful, edible treat? Or perhaps you’re simply searching for a unique dessert that stands out from the usual fare, one that truly tantalizes the senses?
A Global Love Affair in Every Bite
While the precise historical genesis of these delectable Coffee Cookies as a specific confection might be relatively recent, the harmonious pairing of coffee with sweet treats dates back centuries, rooted in cultures worldwide that appreciate coffee’s complex flavors alongside sugary complements. This particular recipe takes that age-old tradition and elevates it, bringing the invigorating essence of your favorite brew directly into a comforting, handheld form.
People absolutely adore this dish for countless reasons. Beyond their unique and sophisticated taste – a perfect balance of bitter coffee notes and inherent sweetness – these cookies often boast an incredibly satisfying texture, ranging from wonderfully chewy to delicately crisp, depending on the recipe. They are not merely a snack; they are an experience, offering a delightful twist that enhances any coffee break, brunch spread, or afternoon indulgence. I find them to be the ultimate companion to a warm cup of joe, or simply a magnificent standalone treat when you crave something truly special.

Ingredients:
- For the Coffee Cookies:
- Unsalted Butter: 1 cup (226g), softened to room temperature
- Granulated Sugar: 1 ½ cups (300g)
- Light Brown Sugar: ½ cup (100g), packed
- Large Eggs: 2, at room temperature
- Pure Vanilla Extract: 2 teaspoons
- All-Purpose Flour: 3 cups (360g), spooned and leveled
- Baking Soda: 1 teaspoon
- Salt: ½ teaspoon
- Espresso Powder (or strong instant coffee powder): 2 tablespoons. I find that espresso powder gives a richer, deeper coffee flavor without adding extra liquid, making it perfect for these Coffee Cookies.
- Optional: Mini Chocolate Chips or finely chopped dark chocolate: 1 cup (170g). Chocolate is a fantastic companion to coffee, and these add a lovely texture and complementary flavor.
- For the Optional Coffee Glaze:
- Powdered Sugar (confectioners’ sugar): 1 ½ cups (180g)
- Espresso Powder (or strong instant coffee powder): 1 teaspoon
- Hot Water or Milk: 2-3 tablespoons, as needed
- Pure Vanilla Extract: ¼ teaspoon
Preparing the Coffee Cookie Dough
- Cream the Butter and Sugars: Begin by placing your softened unsalted butter, granulated sugar, and packed light brown sugar into a large mixing bowl. If you have a stand mixer, fit it with the paddle attachment; otherwise, an electric hand mixer will work wonderfully. Beat these ingredients together on medium-high speed for about 3-4 minutes. You’re looking for a mixture that is light, fluffy, and significantly paler in color. This process is called creaming, and it’s absolutely critical because it incorporates air into the butter and sugar, which contributes immensely to the final texture of our Coffee Cookies, making them delightfully soft and tender. Don’t rush this step; it’s truly the foundation of a great cookie!
- Incorporate Eggs and Vanilla: After the butter and sugars are perfectly creamed, take a moment to scrape down the sides of the bowl with a rubber spatula, ensuring everything is well mixed. Now, add your two large eggs, one at a time. Beat well after each egg addition until it’s fully incorporated into the mixture. This step ensures an even emulsion and prevents the dough from separating. Finally, stir in the pure vanilla extract. Continue to beat on medium speed for another minute, making sure all the wet ingredients are thoroughly combined and the mixture is smooth. I always love how fragrant the dough becomes at this stage!
- Whisk Together Dry Ingredients: In a separate, medium-sized bowl, combine the all-purpose flour, baking soda, salt, and the star of our show, the espresso powder (or instant coffee powder). Whisk these dry ingredients together thoroughly. It’s important to make sure the espresso powder is evenly distributed and there are no clumps, as this guarantees that every bite of your Coffee Cookies will have that rich, consistent coffee flavor we’re aiming for. A well-whisked dry mixture means a uniform cookie.
- Gently Combine Wet and Dry: With your mixer set to low speed, begin to gradually add the dry ingredient mixture to the wet ingredients in the larger bowl. Mix only until just combined. This is a crucial point: be careful not to overmix! Overmixing develops the gluten in the flour too much, which can lead to tough, dense cookies instead of the soft, chewy Coffee Cookies we desire. As soon as you see no more streaks of dry flour, stop the mixer immediately. A few tiny specks of flour are fine; they’ll disappear as the dough rests.
- Fold in Optional Add-ins: If you’ve decided to include mini chocolate chips or finely chopped dark chocolate – and I highly recommend it for an extra layer of flavor and texture – now is the time to gently fold them into the dough. Use your rubber spatula for this step, incorporating them by hand. This ensures they are evenly distributed without overworking the dough. The combination of chocolate and coffee in these Coffee Cookies is truly magical, creating a delightful harmony of flavors that will impress anyone lucky enough to try them.
Chilling the Coffee Cookie Dough
- Prepare for Chilling: Gather the freshly mixed cookie dough into a compact ball or disc. This dough can be a little sticky at first, but don’t worry, that’s normal. Wrap the dough tightly in plastic wrap. I always make sure there are no air pockets to prevent the dough from drying out.
- Refrigerate Thoroughly: Place the wrapped dough in the refrigerator for at least 2 hours. However, for the absolute best results and a more profound coffee flavor, I strongly recommend chilling it for 4 hours or even better, overnight. This chilling step is non-negotiable for our Coffee Cookies! It allows the butter to firm up, which prevents the cookies from spreading too much during baking, giving them a thicker, chewier texture. More importantly, it gives the flavors, especially the wonderful espresso, time to meld and deepen, resulting in a more complex and satisfying taste. A well-chilled dough is also much easier to scoop and handle. I often prepare my dough the evening before I plan to bake; it’s a fantastic way to break up the recipe and enjoy fresh-baked cookies with minimal effort the next day.
Baking the Coffee Cookies
- Preheat Oven and Prep Baking Sheets: Once your cookie dough has been sufficiently chilled and is firm to the touch, preheat your oven to 375°F (190°C). While the oven is heating, line two large baking sheets with parchment paper or silicone baking mats. This crucial step prevents the cookies from sticking and ensures even baking and easy cleanup. Trust me, parchment paper is your best friend when baking cookies!
- Scoop the Dough: Using a 1.5-tablespoon cookie scoop (or if you don’t have one, two spoons work just fine), scoop uniform balls of the chilled dough. Roll each portion gently between your palms to create neat, smooth spheres. Consistency in size is key here, as it ensures all your Coffee Cookies bake evenly. We want every cookie to be perfectly golden and tender.
- Arrange on Baking Sheets: Place the scooped cookie dough balls about 2 inches apart on the prepared baking sheets. It’s important not to overcrowd the sheets, as the cookies will spread while baking, and they need space to do so without merging into one giant cookie. I typically fit 10-12 cookies comfortably on a standard baking sheet. If you’re using multiple sheets, rotate them halfway through the baking time for even results.
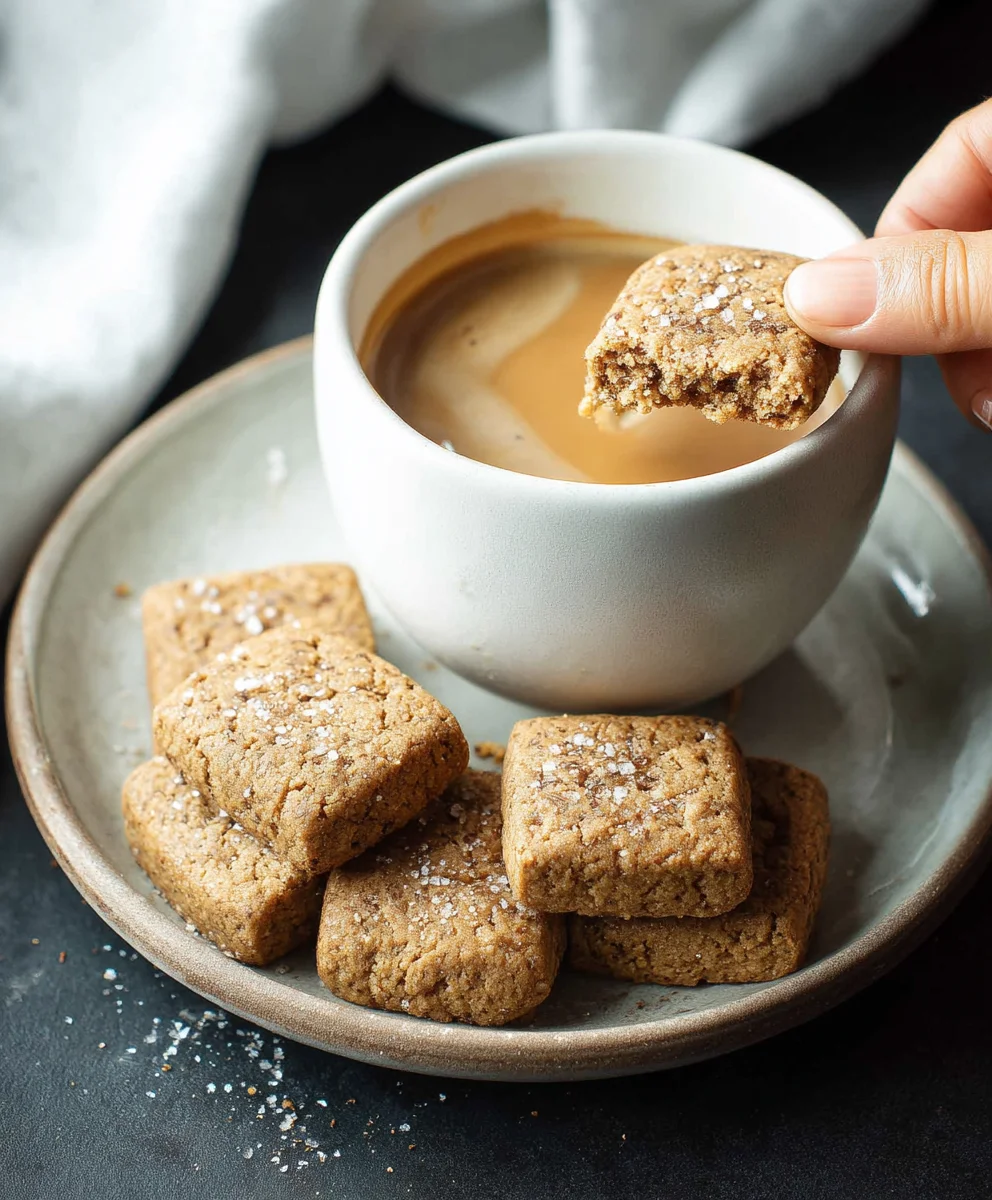
- Bake to Perfection: Bake one sheet at a time in the preheated oven for 9-12 minutes. The exact timing can vary slightly depending on your oven, so keep a close eye on them. You’re looking for the edges to be lightly golden and set, while the centers still look slightly soft and puffed. They might appear a little underdone in the middle, but don’t worry, they will continue to set as they cool. For my oven, 10 minutes usually hits that sweet spot for a wonderfully soft and chewy Coffee Cookie with just the right amount of crispness at the edges.
- Cooling Process: As soon as the cookies are out of the oven, remove the baking sheets and let the Coffee Cookies cool on the sheets for about 5 minutes. This brief resting period on the hot sheet allows them to continue cooking slightly and firm up, making them less fragile. After 5 minutes, carefully transfer the warm cookies to a wire rack to cool completely. Allowing them to cool on a rack ensures air circulation, preventing the bottoms from becoming soggy and helping them develop that perfect texture. Patience is a virtue here; resisting the urge to devour them hot is hard, but a fully cooled cookie is truly the best!
Preparing the Optional Coffee Glaze and Finishing Touches
- Whisk Glaze Ingredients: In a small bowl, combine the powdered sugar, espresso powder, and the ¼ teaspoon of pure vanilla extract. Gradually add the hot water or milk, starting with 2 tablespoons. Whisk constantly until you achieve a smooth, pourable glaze consistency. If the glaze is too thick, add a tiny bit more liquid, about a half teaspoon at a time, until it reaches your desired consistency. If it’s too thin, simply add a bit more powdered sugar. We’re aiming for a consistency that will beautifully coat the back of a spoon and drip slowly off. This coffee glaze adds an extra layer of intense coffee flavor and a gorgeous, professional sheen to our already irresistible Coffee Cookies.
- Glaze the Cooled Cookies: Once your Coffee Cookies have cooled completely to room temperature, you can proceed with glazing them. You have a couple of options: for a delicate look, use a spoon or a whisk to drizzle the glaze decoratively over the tops of the cookies. For a more pronounced glaze, gently dip the top surface of each cookie into the glaze, letting any excess drip off back into the bowl. After glazing, carefully place the cookies back on the wire rack. I always put a sheet of parchment paper underneath the rack to catch any drips and make cleanup a breeze. Allow the glaze to set completely, which usually takes about 30 minutes to an hour, depending on the thickness of your glaze and the humidity in your kitchen.
Serving and Storing Your Delicious Coffee Cookies
- Enjoy Immediately: These homemade Coffee Cookies are an absolute delight when enjoyed fresh. The rich, aromatic coffee flavor combined with their soft, chewy texture makes them an irresistible treat that’s perfect for any occasion. They pair wonderfully with a freshly brewed cup of coffee or espresso, a comforting mug of tea, or even a simple glass of cold milk. They’re an excellent pick-me-up for an afternoon slump or a comforting dessert after a lovely meal. Don’t be surprised if they disappear quickly!
- Proper Storage for Freshness: To maintain the optimal freshness and delightful chewiness of your Coffee Cookies, store the completely cooled cookies (whether glazed or unglazed) in an airtight container at room temperature. They will remain wonderfully fresh for up to 5-7 days. A little trick I often use to keep cookies extra soft and fresh is to place a slice of regular sandwich bread in the container with them; the cookies will absorb moisture from the bread, helping them stay tender. Just remember to replace the bread every couple of days.
- Freezing Unbaked Dough for Future Treats: If you find yourself with extra dough or simply want to plan ahead for fresh-baked Coffee Cookies on demand, freezing the unbaked dough is a fantastic option. Scoop the unbaked cookie dough balls onto a parchment-lined baking sheet and place them in the freezer until they are solid, which usually takes about 1-2 hours. Once frozen, transfer the solid dough balls to a freezer-safe zip-top bag or an airtight container. They can be stored in the freezer for up to 3 months. When you’re ready to bake, simply place the frozen dough balls directly onto a prepared baking sheet and add an extra 2-3 minutes to the standard baking time. It’s a lifesaver for unexpected guests or sudden cookie cravings!
- Freezing Baked Coffee Cookies: You can also freeze your baked Coffee Cookies if you have a surplus or want to prepare them in advance. Ensure they are completely cooled (and the glaze fully set, if applicable). For best results, arrange them in a single layer on a baking sheet and freeze until solid. Once frozen, transfer them to a freezer-safe bag or an airtight container, separating layers with parchment paper to prevent sticking. They will keep well for up to 2-3 months. To enjoy, simply thaw them at room temperature. They will taste almost as good as freshly baked!
- Gifting Your Homemade Delights: These homemade Coffee Cookies make truly thoughtful and cherished gifts. Package them beautifully in a decorative tin, a clear cello bag tied with a pretty ribbon, or a charming box. Sharing your baking is a wonderful way to show you care, and a batch of these unique coffee-infused cookies is sure to bring a smile to anyone’s face. I love sharing my passion for baking, and these cookies are always a hit with friends and family!
Conclusion:
And there you have it, my friends! We’ve reached the grand finale of our baking journey, and I genuinely hope you’re feeling as excited as I am about the incredible potential awaiting you in your kitchen. If there’s one thing I want you to take away from this recipe, it’s that these aren’t just any ordinary cookies. Oh no, these are a revelation, a sensory delight, and honestly, a testament to the fact that some of the best things in life come from combining simple, beloved ingredients in just the right way. This recipe isn’t merely about following steps; it’s about crafting an experience, a moment of pure bliss that transcends the everyday.
I wholeheartedly believe this recipe is a must-try for so many reasons. Firstly, the sheer ease of it! You don’t need to be a seasoned pastry chef to achieve perfection here. The steps are straightforward, the ingredients accessible, and the payoff is simply immense. But beyond the simplicity, it’s the unparalleled flavor profile that truly sets these apart. Imagine a cookie that captures the rich, aromatic essence of your favorite morning brew, but softened and sweetened into a tender, chewy, and utterly irresistible bite. That unique balance of slightly bitter coffee notes dancing with the sweet, buttery dough is what makes these so profoundly addictive. It’s a sophisticated twist on a classic, elevating the humble cookie to something truly special. Every single crumb offers a harmonious symphony of flavors, guaranteed to put a smile on your face and brighten even the gloomiest of days. It’s truly a cookie designed to comfort and excite all at once.
Elevate Your Cookie Experience: Serving Suggestions & Creative Variations
Now, while these beautiful Coffee Cookies are absolutely divine on their own, there are so many ways to enjoy them and make them even more spectacular. For the ultimate pairing, serve them alongside a freshly brewed cup of hot coffee or a frothy latte – the flavors will echo and enhance each other in a truly magical way. They also make an exquisite partner for a glass of cold milk, providing a wonderful contrast, or even a robust cup of Earl Grey tea for an afternoon treat. Don’t limit yourself to just a simple plate! Imagine crumbling a few of these over a scoop of vanilla bean ice cream for an instant dessert upgrade, or using them as an edible garnish for a creamy panna cotta. They also make fantastic gifts; wrap a batch in a pretty box or cellophane bag, and you’ve got a thoughtful, homemade present that anyone would adore.
But let’s talk about getting creative! This recipe is a fantastic canvas for your own culinary imagination. Feeling a chocolate craving? Fold in a handful of dark chocolate chips, white chocolate chunks, or even a mix of both into the dough for an extra layer of indulgence. For a textural contrast, try adding chopped toasted walnuts, pecans, or almonds. If you want to amp up the coffee flavor even more, consider adding a teaspoon of espresso powder directly into the dry ingredients. Or, for a hint of warmth, a pinch of cinnamon, nutmeg, or cardamom would be absolutely delightful. You could even drizzle a simple glaze made from powdered sugar and a touch of strong espresso over the cooled cookies for an elegant finish. The possibilities are truly endless, allowing you to tailor these delightful treats to your exact preferences or whatever ingredients you happen to have on hand. Don’t be afraid to experiment; that’s where some of the most exciting discoveries are made!
Your Journey to Irresistible Coffee Cookies Starts Now!
So, what are you waiting for? I wholeheartedly encourage you to roll up your sleeves, gather your ingredients, and dive into making these incredible Coffee Cookies. I promise you, the aroma filling your kitchen alone will be worth the effort, and the first bite will confirm that you’ve created something truly special. Whether you’re baking for yourself, for your family, or to share with friends, these cookies are guaranteed to bring joy and comfort. There’s a profound satisfaction that comes from baking something delicious from scratch, and this recipe offers that in spades. You’re not just making cookies; you’re creating memories, sharing warmth, and indulging in a little bit of homemade magic.
I would absolutely love to hear about your experience! Once you’ve baked your batch, please don’t hesitate to share your thoughts, your favorite variations, or even photos of your beautiful creations. Connect with me and let me know how these Coffee Cookies turned out for you. Your feedback is truly invaluable and inspires me endlessly. Happy baking, and enjoy every single delightful bite!
Irresistible Coffee Cookies
Merging the rich, aromatic depth of coffee with the comforting sweetness of a freshly baked cookie, these treats offer a unique dessert experience for coffee lovers.
Ingredients
-
2½ cups (313g) all-purpose flour
-
2 tbsp (30ml) finely ground coffee
-
1 tsp (5ml) ground cinnamon
-
1 cup (227g) salted butter, softened
-
½ cup (110g) dark brown sugar, packed
-
2 tsp (10ml) pure vanilla extract
-
Turbinado sugar (optional, for topping)
Instructions
-
Step 1
In a large bowl, cream softened salted butter, packed dark brown sugar, and pure vanilla extract together until light and fluffy. Scrape down the sides of the bowl as needed. -
Step 2
In a separate medium bowl, whisk together the all-purpose flour, finely ground coffee, and ground cinnamon until well combined and lump-free. -
Step 3
Gradually add the dry ingredient mixture to the wet ingredients, mixing on low speed until just combined. Be careful not to overmix; stop as soon as no dry streaks of flour remain. -
Step 4
Form the dough into a disc or log, wrap tightly in plastic wrap, and refrigerate for at least 2 hours, or preferably overnight, to allow flavors to deepen and dough to firm up. -
Step 5
Once chilled, preheat oven to 375°F (190°C). Line baking sheets with parchment paper. Slice the dough into ½-inch thick rounds or scoop into uniform balls. If desired, sprinkle the tops with turbinado sugar. -
Step 6
Place dough pieces 2 inches apart on prepared baking sheets. Bake for 9-12 minutes, or until edges are lightly golden and centers are still slightly soft. Baking time may vary by oven. -
Step 7
Remove from oven and let cookies cool on the baking sheets for 5 minutes before transferring them to a wire rack to cool completely. This helps them firm up and prevents sogginess. -
Step 8
Enjoy fresh. Store cooled cookies in an airtight container at room temperature for up to 5-7 days. Unbaked dough can be frozen for up to 3 months for future baking.
Important Information
Nutrition Facts (Per Serving)
It is important to consider this information as approximate and not to use it as definitive health advice.
Allergy Information
Please check ingredients for potential allergens and consult a health professional if in doubt.


Leave a Comment