
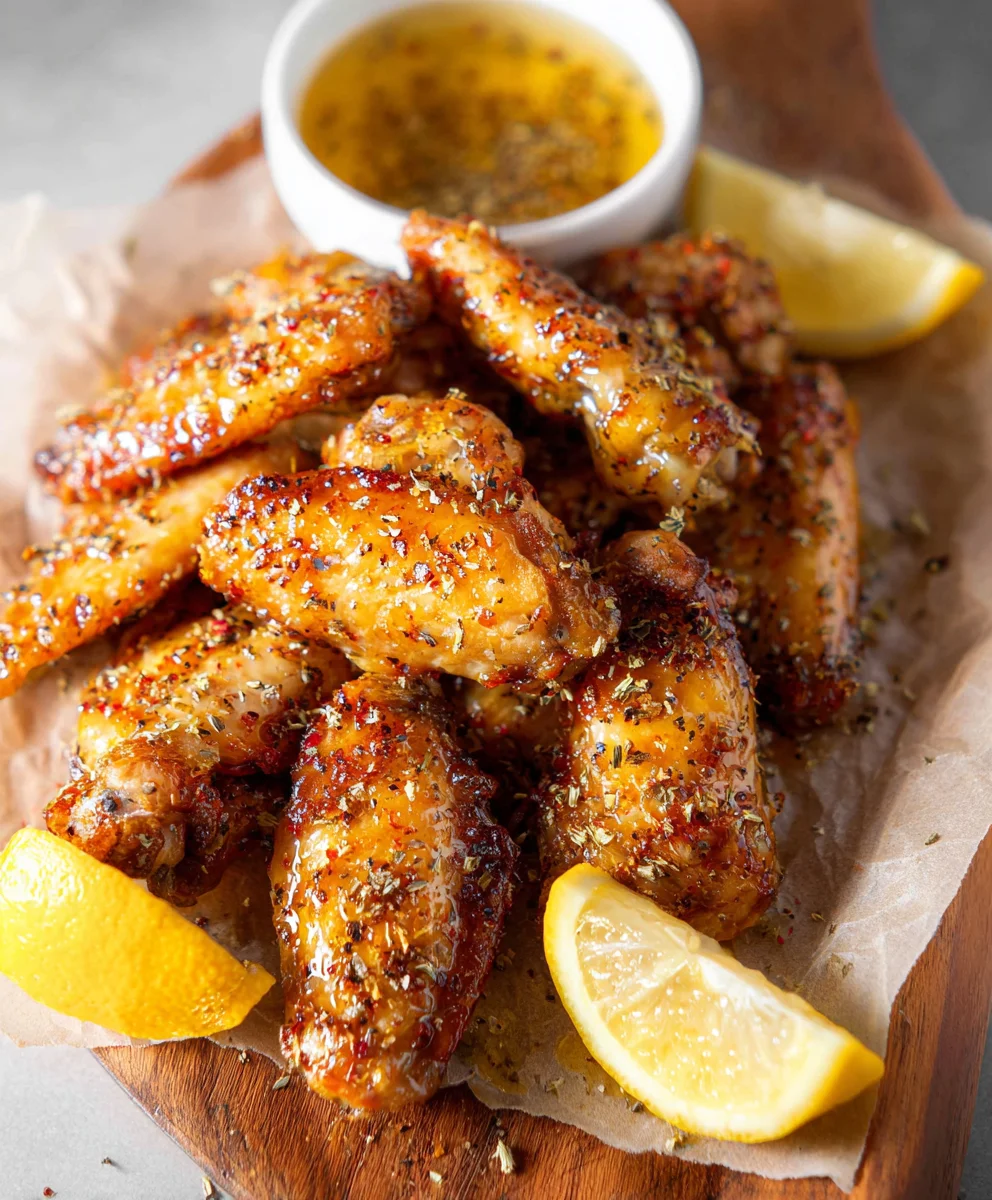
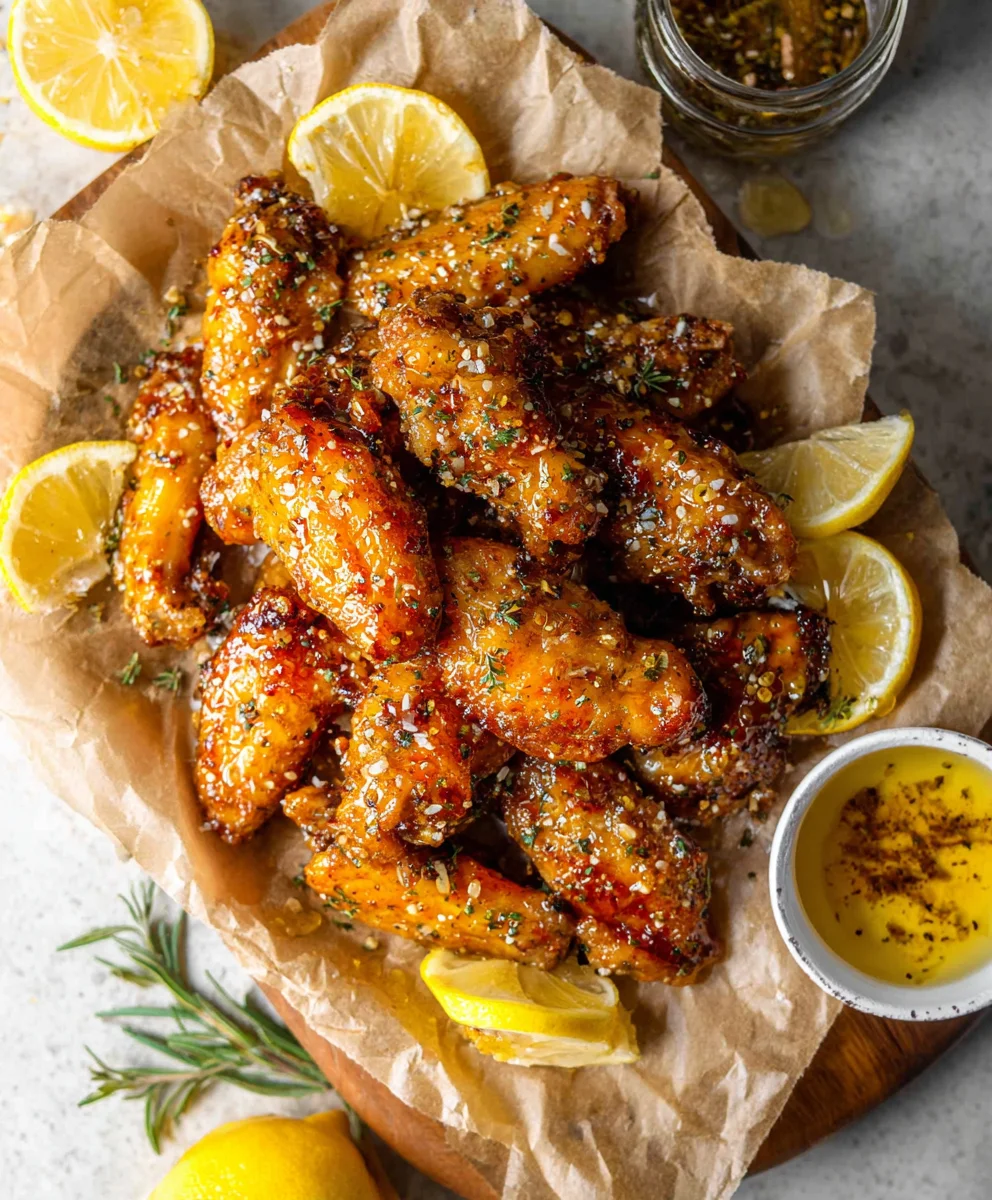
Honey Lemon Pepper Wings are more than just a game-day snack; they are a symphony of sweet, tangy, and savory that will have your taste buds singin extractg. I don’t know about you, but there’s something undeniably comforting and exciting about a plate piled high with perfectly cooked chicken wings, and these particular Honey Lemon Pepper Wings hit all the right notes. People adore them for their incredible balance of flavors – the subtle sweetness of honey perfectly complements the zesty punch of lemon and the warm, aromatic kick of black pepper. What truly makes these Honey Lemon Pepper Wings special is the way the glaze caramelizes to a beautiful, sticky finish, coating every morsel in pure deliciousness, ensuring a satisfying crunch with every bite. They’re incredibly versatile, making them the star of any gathering or a delightful treat for a solo indulgence.

Ingredients:
- 2 pounds chicken wings, separated into drum extractettes and flats
- 3 tablespoons potato starch
- 1 tablespoon baking powder
- 1 teaspoon garlic powder
- 1 teaspoon onion powder
- ¼ teaspoon paprika
- Oil spray (for greasing baking sheet and wings)
- ½ cup honey
- 1 lemon, zested (about 1 tablespoon of zest)
- ¼ cup fresh lemon juice, plus more to taste
- 1 tablespoon minced fresh garlic
- 1 tablespoon unsalted butter
- 1-2 teaspoons ground black pepper, to taste
- 1 pinch salt
Preparing the Chicken Wings
To start crafting these irresistible Honey Lemon Pepper Wings, the first crucial step is to get your chicken wings ready. Begin extract by patting your chicken wings thoroughly dry with paper towels. This step is absolutely essential for achieving that signature crispy skin we all love. Any moisture left on the wings will steam them rather than crisp them in the oven, so don’t skip this! Once dry, place the wings in a large bowl. In a separate small bowl, whisk together the potato starch, baking powder, garlic powder, onion powder, and paprika. This dry rub mixture is key to creating a super crispy exterior. The baking powder, in particular, helps to create tiny bubbles on the surface of the chicken as it cooks, leading to an incredibly light and airy crunch. The potato starch absorbs excess moisture and helps with browning, while the garlic powder, onion powder, and paprika add a foundational layer of savory flavor.
Now, generously coat the dried chicken wings with this dry rub mixture. Make sure each wing is evenly coated. You can do this by tossing them in the bowl with your hands or by placing the wings and the rub in a large resealable bag and shaking it until well combined. Once the wings are coated, arrange them in a single layer on a baking sheet that has been lightly greased with oil spray or lined with parchment paper. It’s important to give them plenty of space; overcrowding the baking sheet will prevent them from crisping up properly. If necessary, use two baking sheets.
Baking for Ultimate Crispiness
Preheat your oven to a hot 400°F (200°C). This high temperature is vital for achieving that satisfyingly crispy texture on the outside of the wings. Place the baking sheet with the seasoned wings into the preheated oven. Let them bake for approximately 25-30 minutes. At this point, you’ll want to flip each wing over. This ensures that all sides of the wings get an equal amount of heat exposure and crisp up beautifully. Continue baking for another 20-25 minutes, or until the wings are golden brown and incredibly crispy. The exact cooking time can vary depending on the size of your wings and your oven, so keep an eye on them. You’re looking for a deep golden color and a firm texture. Once they are perfectly crispy, carefully remove them from the oven.
Crafting the Honey Lemon Pepper Glaze
While the wings are in their final stages of baking, it’s time to prepare the star of the show: the honey lemon pepper glaze. In a medium saucepan, melt the butter over medium heat. Once the butter is melted and shimmering, add the minced fresh garlic to the pan. Sauté the garlic for about 1 minute, stirring constantly, until it becomes fragrant. Be careful not to let the garlic burn, as burnt garlic can turn bitter and ruin the delicate flavor of the glaze.
Next, pour in the honey and the fresh lemon juice. Add the lemon zest at this stage as well. The lemon zest contributes a vibrant, fresh citrus aroma and a more intense lemon flavor than juice alone. Stir everything together until the honey is completely melted and the mixture is well combined. Bring the glaze to a gentle simmer. Allow it to simmer for about 2-3 minutes, stirring occasionally. This brief simmer helps to slightly thicken the glaze and meld the flavors together. Now, add the ground black pepper and the pinch of salt to the glaze. Stir thoroughly to distribute the pepper and salt evenly throughout the sauce. Taste the glaze at this point and adjust the seasonings as needed. If you prefer a tangier glaze, add a little more lemon juice. If you like it sweeter, a touch more honey can be added. For more pepper punch, add another teaspoon of ground pepper.
Glazing and Finishing the Wings
Once your chicken wings are perfectly crispy and have been removed from the oven, it’s time to bring them together with the glorious glaze. In a large bowl, add the hot, crispy chicken wings. Pour the warm honey lemon pepper glaze over the wings. Use a spatula or large spoon to gently toss the wings, ensuring that each and every wing is thoroughly coated in the luscious glaze. Work quickly while the wings are still hot and the glaze is warm, as this will help the glaze adhere beautifully.
For an extra burst of flavor and a restaurant-worthy presentation, you can return the glazed wings to the baking sheet for a final, brief bake. Place the glazed wings back onto the baking sheet and pop them back into the 400°F (200°C) oven for about 5 minutes. This short blast of heat will help the glaze to caramelize slightly and cling even more beautifully to the wings. It also ensures the glaze is warm and inviting when served. Once the 5 minutes are up, carefully remove the baking sheet from the oven. The wings should be glistening and utterly irresistible.
Serving Your Masterpiece
Allow the Honey Lemon Pepper Wings to cool for just a minute or two before serving. This allows the glaze to set slightly, preventing it from being too runny when you pick up a wing. Serve them immediately while they are still warm and delightfully sticky. These wings are fantastic on their own as a satisfying appetizer or a main course. For a complete meal, consider serving them with a side of celery sticks and blue cheese dressing, as is traditional for wings, or perhaps a fresh, crisp salad to balance the richness. The bright, zesty lemon combined with the subtle heat of the pepper and the sweetness of the honey creates a flavor profile that is both complex and incredibly addictive. Enjoy every single bite of these sensational Honey Lemon Pepper Wings!
Conclusion:
And there you have it – a foolproof guide to creating incredibly delicious Honey Lemon Pepper Wings! We’ve walked through each step, from selecting the best chicken wings to achieving that perfect crispy exterior and the irresistible sweet and tangy glaze. These Honey Lemon Pepper Wings are more than just a recipe; they’re a crowd-pleaser, a game-day essential, and a fantastic weeknight treat. Don’t be afraid to experiment and make them your own!
For serving, these wings shine on their own, but they also pair beautifully with classic accompaniments like celery sticks, carrot sticks, and a cooling ranch or blue cheese dip. Consider serving them as an appetizer at your next party or as the main event alongside a fresh salad and some garlic bread. The beauty of this recipe lies in its adaptability. Feel free to adjust the lemon and pepper quantities to suit your preference. For a spicier kick, add a pinch of cayenne pepper to the glaze. If you prefer a richer, more caramelized flavor, a touch of brown sugar alongside the honey can work wonders.
We hope you enjoy making and devouring these fantastic Honey Lemon Pepper Wings as much as we do. So, gather your ingredients, get cooking, and prepare for rave reviews!
Frequently Asked Questions about Honey Lemon Pepper Wings:
Q1: How can I ensure my Honey Lemon Pepper Wings are extra crispy?
To achieve maximum crispiness, ensure your wings are patted completely dry before seasoning and baking or frying. A double-fry method can also yield incredibly crispy results if you’re frying them. For baking, using a wire rack set inside a baking sheet allows air to circulate, promoting a crispier skin.
Q2: Can I make the Honey Lemon Pepper glaze ahead of time?
Yes, absolutely! You can prepare the glaze a day or two in advance and store it in an airtight container in the refrigerator. Gently warm it up on the stovetop or in the microwave before tossing with your cooked wings.
Q3: What if I don’t have fresh lemons?
If fresh lemons aren’t available, you can substitute them with bottled lemon juice. However, the flavor won’t be as bright and fresh. Start with about 2 tablespoons of lemon juice and adjust to your taste. You can also add a little lemon zest if you have it, as zest contains a lot of lemon’s aromatic oils.
Honey Lemon Pepper Beef Wings – Easy Recipe
These Honey Lemon Pepper Beef Wings are an easy and delicious appetizer or main course, featuring a crispy coating and a sweet, tangy, and peppery glaze.
Ingredients
-
2 pounds beef wings
-
3 tablespoons potato starch
-
1 tablespoon baking powder
-
1 teaspoon garlic powder
-
1 teaspoon onion powder
-
1/4 teaspoon paprika
-
oil spray
-
1/2 cup honey
-
1 lemon zested
-
1/4 cup fresh lemon juice, plus more to taste
-
1 tablespoon minced fresh garlic
-
1 tablespoon unsalted butter
-
1-2 teaspoons ground black pepper, to taste
-
1 pinch salt
Instructions
-
Step 1
Pat beef wings dry. Whisk together potato starch, baking powder, garlic powder, onion powder, and paprika in a separate bowl. Generously coat the dried beef wings with the dry rub mixture. Arrange wings in a single layer on a baking sheet lightly greased with oil spray. -
Step 2
Preheat oven to 400°F (200°C). Bake wings for 25-30 minutes. Flip each wing and continue baking for another 20-25 minutes, or until golden brown and crispy. -
Step 3
While wings bake, prepare the glaze. Melt butter in a saucepan over medium heat. Sauté minced garlic for 1 minute until fragrant. Pour in honey, lemon juice, and lemon zest. Stir until honey is melted. Simmer for 2-3 minutes. -
Step 4
Add ground black pepper and salt to the glaze. Stir well and taste, adjusting seasonings as needed (more lemon juice for tang, more honey for sweetness, more pepper for heat). -
Step 5
In a large bowl, add the hot, crispy beef wings. Pour the warm glaze over the wings and toss gently to coat each wing thoroughly. For extra caramelization, return glazed wings to the baking sheet and bake for a final 5 minutes at 400°F (200°C). -
Step 6
Let wings cool for 1-2 minutes before serving warm. Serve as an appetizer or main course, optionally with celery sticks and blue cheese dressing, or a side salad.
Important Information
Nutrition Facts (Per Serving)
It is important to consider this information as approximate and not to use it as definitive health advice.
Allergy Information
Please check ingredients for potential allergens and consult a health professional if in doubt.
Leave a Comment