
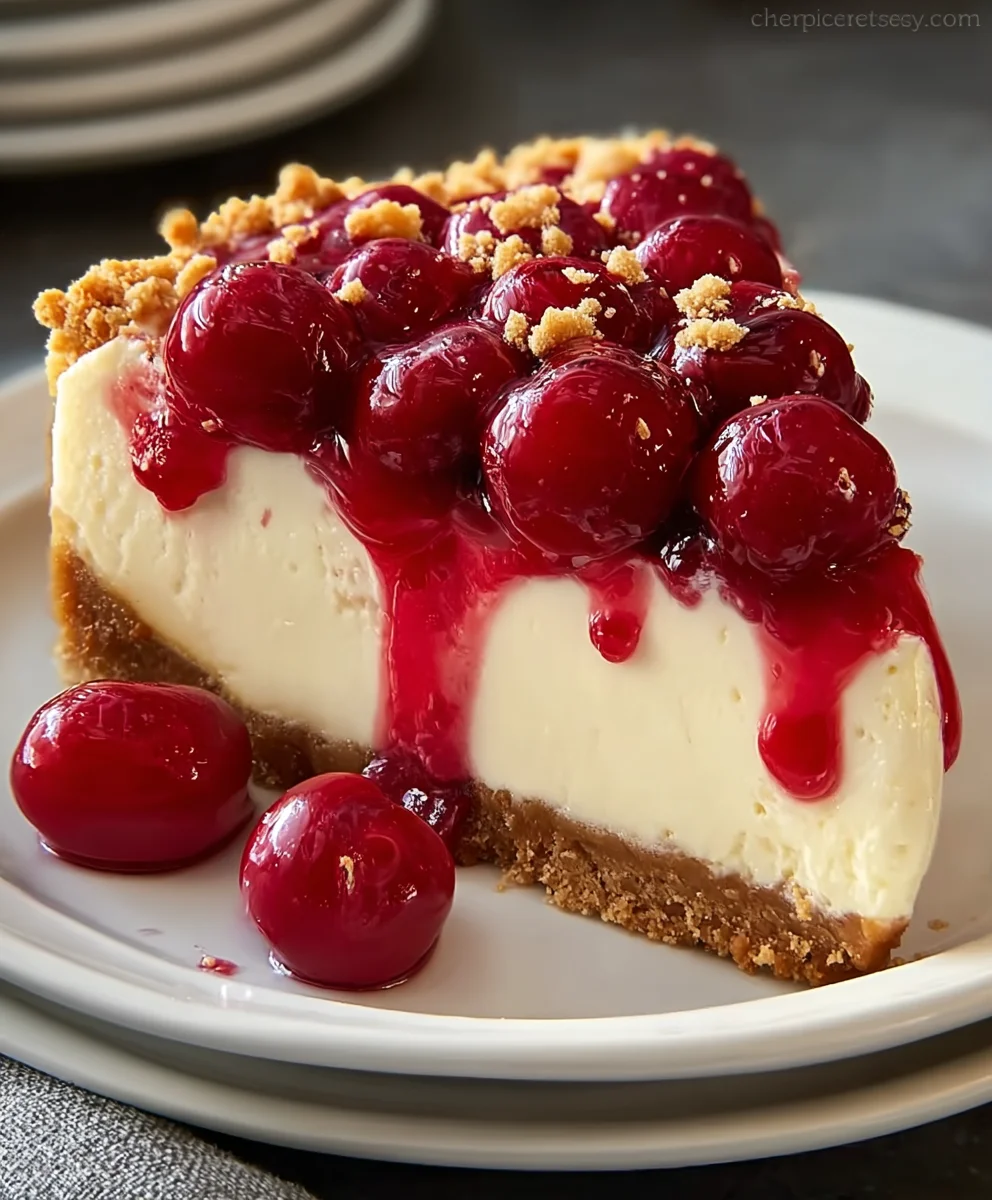
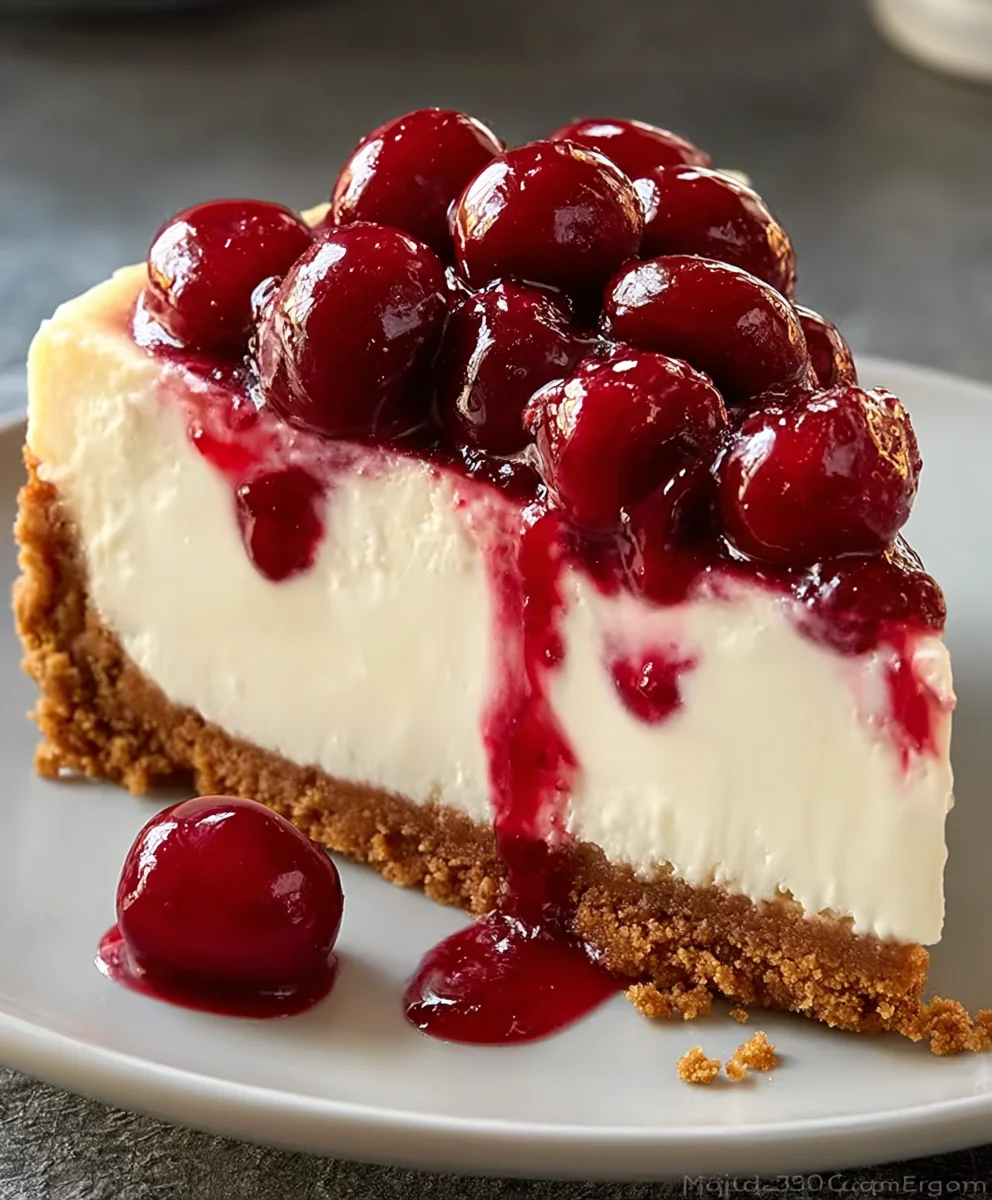
Cherry Cheesecake is more than just a dessert; it’s a culinary icon, a symphony of flavors and textures that has graced tables for generations. From its humble beginnings as a simple cheese tart in ancient Greece to its modern, decadent form, cheesecake has evolved into a beloved global treat. The addition of vibrant, sweet-tart cherries transforms it into something truly special, often evoking nostalgic memories of family gatherings or classic American diners.
What makes a perfect Cherry Cheesecake so universally adored? I believe it’s the masterful contrast: the rich, velvety smooth cream cheese filling, often with a hint of tang, perfectly complemented by the burst of juicy, glistening cherries. This delightful topping, nestled atop a crisp, buttery graham cracker crust, creates an unforgettable experience with every single bite. It’s a dish that effortlessly combines elegance with comforting familiarity, making it suitable for both grand celebrations and intimate weeknight indulgences. Preparing your own homemade Cherry Cheesecake from scratch is not only a rewarding experience but also guarantees a dessert that will truly impress.

Ingredients:
-
For the Graham Cracker Crust:
- 1 ½ cups (about 10-12 full sheets) graham cracker crumbs (I like to crush them myself for the freshest flavor!)
- ¼ cup granulated sugar
- ½ cup (1 stick) unsalted butter, melted
-
For the Creamy Cheesecake Filling:
- 3 (8-ounce) packages full-fat cream cheese, softened to room temperature – this is crucial for a smooth filling!
- 1 ½ cups granulated sugar
- ¼ cup sour cream, at room temperature
- 1 tablespoon pure vanilla extract
- 1 teaspoon fresh lemon zest (from about 1 medium lemon)
- 4 large eggs, at room temperature
-
For the Cherry Topping:
- 1 (21-ounce) can cherry pie filling – a good quality one will make all the difference!
- Optional: Fresh mint sprigs or additional whipped cream for garnish
Preparing the Crust for Your Cherry Cheesecake
- Preheat the Oven and Prepare Your Pan: First things first, let’s get that oven ready. Preheat your oven to 350°F (175°C). Then, grab a 9-inch springform pan. I find it helpful to lightly spray the bottom and sides with non-stick cooking spray, just to ensure nothing sticks later on. This also helps the parchment paper adhere better if you choose to use it on the bottom.
-
Make the Graham Cracker Crumbs: If you’re using whole graham crackers, now’s the time to turn them into beautiful crumbs. You can do this in a couple of ways:
- Food Processor Method: Place the graham cracker sheets into a food processor and pulse until fine crumbs form. This is my preferred method for consistent texture and speed.
- Bag and Rolling Pin Method: If you don’t have a food processor, no worries! Place the crackers in a large, heavy-duty plastic bag (like a freezer bag), seal it, and use a rolling pin to crush them until they’re fine crumbs. Just make sure there are no large chunks left behind.
Once you have your 1 ½ cups of fine crumbs, transfer them to a medium-sized mixing bowl.
- Combine Crust Ingredients: To the graham cracker crumbs, add the ¼ cup of granulated sugar and mix well. Then, pour in the ½ cup of melted unsalted butter. Using a fork or your clean hands, mix everything together until the crumbs are evenly moistened and resemble wet sand. This wet-sand consistency is key, as it indicates the butter has fully coated the crumbs, which will help them bind together beautifully when baked.
- Press the Crust into the Pan: Now, transfer the buttered crumbs into your prepared springform pan. Using the bottom of a flat-bottomed glass or your fingers, press the mixture firmly and evenly onto the bottom of the pan and about 1 to 1 ½ inches up the sides. Make sure the edges are nice and even, forming a sturdy base for your creamy Cherry Cheesecake. A well-pressed crust won’t crumble when you slice into your masterpiece.
- Pre-bake the Crust: Place the springform pan with the crust into your preheated oven. Bake for 8-10 minutes, or until the edges are lightly golden and the crust smells fragrant. This pre-baking step helps to set the crust, preventing it from becoming soggy once the filling is added. Once baked, remove the pan from the oven and set it aside on a wire rack to cool slightly while you prepare the glorious cheesecake filling. Keep the oven on, as we’ll be needing it again soon.
Crafting the Creamy Cherry Cheesecake Filling
- Prepare for the Water Bath: While your crust cools, let’s get ready for the water bath, which is a secret weapon for a perfectly smooth, crack-free Cherry Cheesecake. Tear off two large sheets of heavy-duty aluminum foil (or three regular sheets). Crisscross them on your counter. Place your springform pan (with the baked crust) in the center of the foil. Carefully fold the foil up around the sides of the pan, making sure to crimp it tightly to create a watertight seal. This is incredibly important to prevent any water from seeping into your crust during baking. Trust me, you don’t want a soggy bottom!
- Beat the Cream Cheese: In a large mixing bowl, using an electric mixer fitted with the paddle attachment, beat the softened cream cheese on medium speed for about 2-3 minutes. You want to beat it until it’s incredibly smooth, light, and fluffy, with no lumps whatsoever. This step is vital for a silky-smooth texture in your Cherry Cheesecake. Scrape down the sides and bottom of the bowl frequently to ensure everything is evenly incorporated.
- Add Sugar Gradually: With the mixer on low speed, gradually add the 1 ½ cups of granulated sugar to the cream cheese mixture, about ½ cup at a time. Beat until just combined after each addition. Once all the sugar is in, increase the speed to medium and continue beating for another 2 minutes, until the mixture is truly smooth and creamy. Make sure to scrape down the bowl again to catch any unmixed sugar.
- Incorporate Sour Cream, Vanilla, and Lemon Zest: Reduce the mixer speed to low. Add the ¼ cup of room temperature sour cream, 1 tablespoon of pure vanilla extract, and 1 teaspoon of fresh lemon zest to the cream cheese mixture. Mix until just combined. The sour cream adds a beautiful tang and extra richness, while the vanilla and lemon zest enhance the overall flavor profile, giving your Cherry Cheesecake a bright, complex taste.
- Add Eggs One at a Time: Now for the eggs! This is where gentle handling is key. Add the 4 large eggs, one at a time, mixing on low speed only until each egg is just incorporated. After each egg, stop the mixer and scrape down the sides of the bowl before adding the next one. Do not overmix the eggs! Overmixing introduces too much air into the batter, which can cause your cheesecake to puff up too much during baking and then crack as it cools. We’re aiming for a dense, creamy texture, not an airy one.
- Final Batter Check: Once the last egg is just mixed in, give the batter one final gentle stir with a spatula to ensure everything is perfectly combined from the bottom of the bowl. The batter should be thick, smooth, and pourable. You’ve just created the foundation for an incredible, classic Cherry Cheesecake filling!
The Baking Process
- Pour the Filling: Carefully pour the cheesecake batter into your prepared, foil-wrapped springform pan with the pre-baked crust. Gently tap the pan on the counter a few times to release any large air bubbles that might be trapped within the batter. This helps ensure a smooth top.
- Set Up the Water Bath: Place the foil-wrapped springform pan into a larger roasting pan. Now, carefully pour very hot (but not boiling) water into the roasting pan around the springform pan. The water should come up about halfway to two-thirds of the way up the sides of the springform pan. The water bath is essential because it creates a moist, even heat environment, which prevents the cheesecake from drying out, baking too quickly, and developing cracks. It’s truly a game-changer for a perfectly smooth surface on your Cherry Cheesecake.
- Bake Your Cherry Cheesecake: Carefully transfer the roasting pan with the cheesecake and water bath into your preheated 350°F (175°C) oven. Bake for 60-75 minutes. The baking time can vary depending on your oven, so keep an eye on it.
- Check for Doneness: How do you know when it’s ready? The edges of the cheesecake should appear set, but the very center (about a 2-inch circle) should still have a slight jiggle to it when you gently shake the pan. It’s important not to overbake! The residual heat will continue to cook the center as it cools. If it doesn’t jiggle at all, it might be overbaked, increasing the chance of cracks.
- Begin the Gradual Cooling Process (Crucial for No Cracks!): Once the cheesecake is done, turn off the oven, but leave the cheesecake inside with the oven door propped open a few inches (you can use a wooden spoon to keep it ajar). Let the cheesecake cool in the oven for 1 hour. This gradual cooling is critical for preventing those dreaded cracks. A sudden change in temperature is the enemy of a smooth cheesecake top.
- Cool to Room Temperature: After an hour in the cooling oven, carefully remove the roasting pan from the oven. Very carefully lift the springform pan out of the water bath. Remove the foil from around the pan (it’s served its purpose!). Place the cheesecake (still in its springform pan) on a wire rack to cool completely to room temperature, which will take another 2-3 hours.
Chilling for Perfection
- Chill Thoroughly: Once your cheesecake has reached room temperature, cover the top loosely with plastic wrap. Transfer the cheesecake to the refrigerator and chill for a minimum of 6-8 hours, or ideally, overnight. This chilling period is absolutely essential. It allows the cheesecake to fully set, firm up, and allows all those wonderful flavors to meld together and deepen. You simply cannot rush this step if you want to experience the best possible Cherry Cheesecake.
- Release from the Pan: After chilling, run a thin knife around the edge of the cheesecake before unlatching and removing the springform pan sides. This prevents the cheesecake from sticking and tearing on the sides as you release it. If you find the cheesecake is a little too firm to cut perfectly, you can let it sit at room temperature for 15-20 minutes before serving.
Assembling and Serving Your Cherry Cheesecake
- Add the Cherry Topping: Just before serving, spoon the cherry pie filling evenly over the top of the chilled cheesecake. You can go for a rustic look, or carefully spread it to cover the entire surface. The vibrant red of the cherries against the creamy white cheesecake is truly a sight to behold! This classic topping completes your magnificent Cherry Cheesecake.
- Slice and Serve: To get clean slices, use a sharp, thin knife. For the neatest cuts, dip your knife in hot water and wipe it clean between each slice. This will glide through the dense cheesecake beautifully.
- Garnish and Enjoy: Serve your delicious slices of Cherry Cheesecake. You can add a dollop of freshly whipped cream to each slice, or a sprig of fresh mint for a touch of elegance and contrasting color.
- Storage: Store any leftover cheesecake, covered, in the refrigerator for up to 4-5 days. It tends to taste even better the next day as the flavors continue to develop!
<h2>Conclusion:</h2>
<p>And there you have it, my dear friends! We’ve reached the delicious culmination of our journey together, and I truly hope you’re feeling inspired to roll up your sleeves and bring this incredible dessert to life in your own kitchen. This isn’t just another recipe; it’s an invitation to create something truly special, a dessert that consistently wows and delights everyone lucky enough to taste it. <strong>The beauty of this particular recipe lies in its perfect balance of simplicity and sophistication.</strong> It’s remarkably straightforward to follow, even if you’re a novice baker, yet the final result is so undeniably elegant and flavorful that it tastes like it came straight from a gourmet patisserie. The rich, creamy texture of the filling, the subtle tang that cuts through the sweetness, and the delightful crunch of the crust create a symphony of sensations that is absolutely irresistible. It’s a testament to classic flavors, refined into a recipe that guarantees success every single time. Trust me when I say, once you experience the joy of making and sharing this dessert, it will undoubtedly earn a permanent spot in your culinary repertoire.</p>
<h4>A True Culinary Gem</h4>
<p>What makes this <strong>Cherry Cheesecake</strong> a definite must-try? It’s the harmonious marriage of textures and tastes. Imagine a perfectly golden-brown, buttery graham cracker crust, providing that essential foundation of crunch. Layered atop that is a velvety smooth, almost cloud-like cream cheese filling, whipped to airy perfection, with just the right amount of sweetness to complement its signature tang. And then, of course, the vibrant, glistening cherry topping – bursting with juicy, slightly tart cherries, it adds a stunning visual appeal and a burst of fruitiness that elevates the entire experience. It’s the kind of dessert that looks impressive on any holiday table, perfect for a celebratory dinner, or simply a luxurious treat for a quiet evening at home. It’s robust enough to withstand being transported to a potluck, yet delicate enough to feel truly indulgent. This recipe eliminates the guesswork, guiding you step-by-step to achieve that picture-perfect, delectable slice every single time.</p>
<h4>Elevate Your Experience: Serving Suggestions & Creative Variations</h4>
<p>While this cheesecake is absolutely divine on its own, there are so many wonderful ways to enjoy it and personalize it even further. For serving, I always recommend ensuring it’s perfectly chilled. A slice of this cold, creamy goodness is an ideal counterpoint to a hot cup of freshly brewed coffee or a rich espresso after dinner. For a truly decadent experience, a small scoop of high-quality vanilla bean ice cream or a dollop of freshly whipped cream alongside your slice can take it to another level of indulgence. A sprinkling of dark chocolate shavings or a few fresh mint leaves can add a lovely visual and aromatic touch, enhancing the overall presentation.</p>
<p>But don’t stop there! This recipe is incredibly versatile, inviting you to experiment with your own creative twists. While the cherry topping is iconic and utterly delicious, consider seasonal fruit options. In the summer, a medley of fresh, mixed berries – raspberries, blueberries, and blackberries – can create a beautiful and equally delicious topping. A homemade peach compote in late summer or a luscious, spiced apple topping in the fall would also be absolutely divine. If you’re a chocolate lover, a rich chocolate ganache poured over the top, perhaps with a scattering of chocolate curls, transforms it into a chocolate cherry dream. Caramel sauce, a drizzle of lemon curd, or even a different type of fruit preserve can all offer exciting new dimensions of flavor.</p>
<p>You can also play with the crust! While graham crackers are a classic choice, imagine an Oreo cookie crust for a richer, more chocolatey base, or a shortbread cookie crust for a buttery, crisp foundation. For a different flavor profile in the cheesecake itself, a touch of almond extract can enhance the cherry notes beautifully, or a bit of orange or lemon zest can add a bright, citrusy lift to the cream cheese filling. For individual servings, try baking them in muffin tins lined with paper cups for mini cheesecakes, or layer the components in small glasses for elegant cheesecake parfaits – perfect for portion control and party presentation.</p>
<h4>Your Turn to Create & Share!</h4>
<p>Now that you’re armed with all the tips and tricks, I wholeheartedly encourage you to give this recipe a try. Don’t be intimidated; the process is incredibly rewarding, and the aroma filling your kitchen will be a treat in itself. <strong>There’s a unique satisfaction that comes from baking something from scratch</strong>, and even more so when the end product is as universally loved as this cheesecake. Imagine the smiles on the faces of your family and friends when they taste your creation!</p>
<p>Once you’ve embarked on this delicious adventure, I would absolutely love to hear about your experience! Did you stick to the classic cherry, or did you venture into a creative variation? What was your favorite part of the process? Did you serve it with coffee, or perhaps a decadent scoop of ice cream? Please feel free to share your thoughts, your successes, and even your “lessons learned” in the comments below. Better yet, snap a photo of your magnificent creation and share it with us! Your unique take and personal touch are what make cooking and baking such a wonderful, communal experience. <strong>Let’s inspire each other with our culinary endeavors!</strong> Happy baking, everyone!</p>
Irresistible Cherry Cheesecake Recipe – Easy & Delicious!
Cherry Cheesecake is a culinary icon, a symphony of flavors and textures. This decadent dessert combines a rich, velvety smooth cream cheese filling with the vibrant burst of juicy cherries, all nestled atop a crisp, buttery graham cracker crust. Perfect for any celebration or weeknight indulgence, this homemade Cherry Cheesecake is a truly impressive treat.
Ingredients
-
1 ½ cups graham cracker crumbs
-
¼ cup granulated sugar (for crust)
-
½ cup unsalted butter, melted
-
3 (8-ounce) packages full-fat cream cheese, softened
-
1 cup granulated sugar (for filling)
-
¼ cup sour cream, at room temperature
-
1 teaspoon pure vanilla extract
-
1 teaspoon fresh lemon zest
-
4 large eggs, at room temperature
-
1 (21-ounce) can cherry pie filling
-
Optional: Fresh mint sprigs for garnish
-
Optional: Whipped cream for garnish
Instructions
-
Step 1
Preheat oven to 350°F (175°C). Lightly spray a 9-inch springform pan. -
Step 2
In a bowl, combine graham cracker crumbs, ¼ cup sugar, and melted butter. Mix until evenly moistened, resembling wet sand. -
Step 3
Press the crumb mixture firmly and evenly onto the bottom and 1 to 1 ½ inches up the sides of the prepared springform pan. Bake for 8-10 minutes until lightly golden. Remove and cool slightly on a wire rack, keeping the oven on. -
Step 4
Prepare for a water bath: Wrap the springform pan tightly with 2-3 sheets of heavy-duty aluminum foil, crimping securely to create a watertight seal. -
Step 5
In a large mixing bowl, beat the softened cream cheese on medium speed for 2-3 minutes until incredibly smooth, light, and fluffy, with no lumps. Scrape down the sides of the bowl frequently. -
Step 6
With the mixer on low speed, gradually add 1 cup granulated sugar to the cream cheese mixture. Beat until just combined after each addition, then increase speed to medium and beat for another 2 minutes until smooth. Scrape the bowl. -
Step 7
Reduce mixer speed to low. Add sour cream, 1 teaspoon pure vanilla extract, and 1 teaspoon fresh lemon zest. Mix until just combined. -
Step 8
Add the 4 large eggs one at a time, mixing on low speed only until each egg is just incorporated. Do not overmix. Give the batter a final gentle stir with a spatula to ensure everything is combined. -
Step 9
Carefully pour the cheesecake batter into the foil-wrapped springform pan with the pre-baked crust. Gently tap the pan on the counter a few times to release any large air bubbles. -
Step 10
Place the foil-wrapped springform pan into a larger roasting pan. Carefully pour very hot (but not boiling) water into the roasting pan around the springform pan, coming halfway to two-thirds up its sides. -
Step 11
Carefully transfer the roasting pan with the cheesecake and water bath to the preheated 350°F (175°C) oven. Bake for 60-75 minutes. The edges should appear set, but the very center (about a 2-inch circle) should still have a slight jiggle when gently shaken. -
Step 12
Once baked, turn off the oven. Prop the oven door open a few inches (using a wooden spoon) and let the cheesecake cool in the oven for 1 hour. This gradual cooling is crucial for preventing cracks. -
Step 13
After 1 hour, carefully remove the roasting pan from the oven. Lift the springform pan out of the water bath and remove the foil. Place the cheesecake (still in its springform pan) on a wire rack to cool completely to room temperature, which will take another 2-3 hours. -
Step 14
Once at room temperature, loosely cover the cheesecake with plastic wrap. Transfer it to the refrigerator and chill for a minimum of 6-8 hours, or ideally, overnight, to allow it to fully set and flavors to deepen. -
Step 15
After chilling, run a thin knife around the edge of the cheesecake before unlatching and removing the springform pan sides. -
Step 16
Just before serving, spoon the cherry pie filling evenly over the top of the chilled cheesecake. For clean slices, use a sharp knife dipped in hot water and wiped clean between each cut. -
Step 17
Serve your delicious slices, garnished with a dollop of freshly whipped cream or a sprig of fresh mint, if desired. Store any leftover cheesecake, covered, in the refrigerator for up to 4-5 days.
Important Information
Nutrition Facts (Per Serving)
It is important to consider this information as approximate and not to use it as definitive health advice.
Allergy Information
Please check ingredients for potential allergens and consult a health professional if in doubt.

Leave a Comment