
Fried Ravioli – the very name conjures images of golden-brown perfection, a dish that has masterfully bridged the gap between traditional Italian comfort and an irresistible, crunchy snack. If you’ve ever craved a warm, savory bite with a profoundly satisfying crunch, then you are absolutely in for a delightful culinary treat. Originating from the vibrant Italian-American culinary scene, particularly renowned in St. Louis, this delightful appetizer has blossomed into a beloved staple enjoyed far beyond its birthplace. It takes the familiar, comforting cheese-filled pasta and transforms it into something truly extraordinary through the magic of frying, creating a textural sensation that is simply unparalleled and highly addictive.
Why We Can’t Get Enough of This Golden Treat
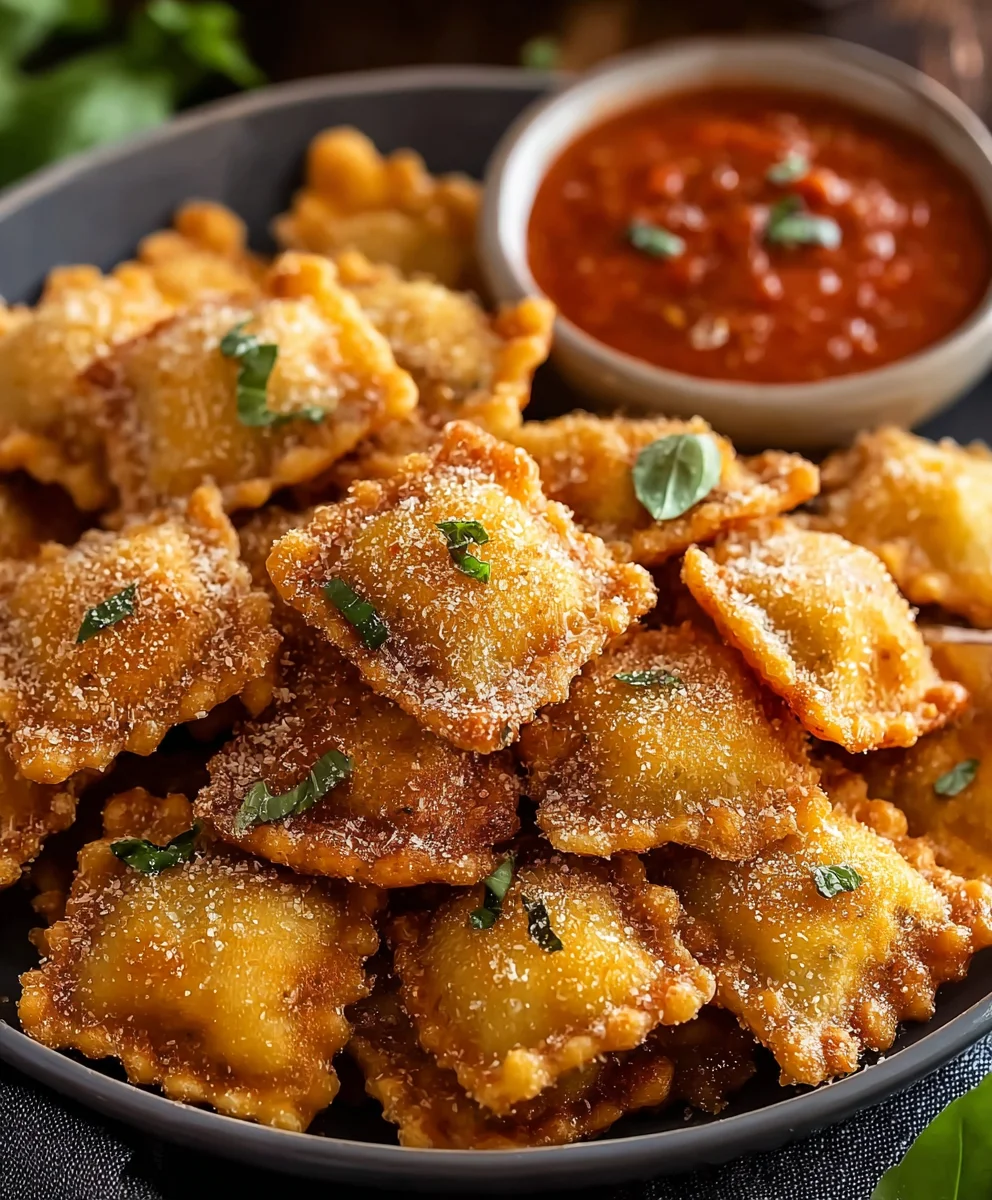
What makes Fried Ravioli so incredibly popular and universally adored? It’s the delightful contrast that keeps everyone coming back for more: a perfectly crisp, golden-brown exterior, often seasoned with Italian herbs, gives way to a soft, tender, and often gooey cheese filling. Dipped in a rich marinara sauce, it’s a symphony of flavors and textures that captivates taste buds of all ages. Whether you’re hosting a casual gathering, looking for a delicious game-day snack, or simply seeking a comforting treat to brighten your evening, this recipe offers a surprisingly simple path to a dish that consistently wows. Prepare to elevate your appetizer game with this universally adored, crispy delight!

Ingredients:
- 18-24 ounces fresh or frozen cheese ravioli: I highly recommend using a high-quality fresh ravioli if you can find it, as it tends to have a more tender texture inside after frying. If using frozen, make sure to completely thaw it beforehand and pat it very dry. A good cheese filling, like a ricotta and Parmesan blend, is classic for Fried Ravioli, but feel free to experiment with spinach and ricotta, or even a meat-filled variety for a different twist.
- 1 cup all-purpose flour: This is our initial dredge. It helps create a surface for the egg wash to cling to, which in turn helps the breadcrumbs adhere.
- 2 large eggs: The binder! Whisked until smooth, these eggs are what make our breading stick to every delicious piece of ravioli.
- 1/4 cup milk or water: Added to the eggs to thin them out slightly, ensuring a more even and less clumpy coating.
- 2 cups seasoned Italian breadcrumbs: For that signature crispy, golden-brown crust! If you can’t find seasoned breadcrumbs, plain panko breadcrumbs work wonderfully; just be sure to add your own blend of dried herbs and spices (like oregano, basil, garlic powder, and onion powder) directly to them. Panko often provides an even crunchier texture, which I absolutely adore for Fried Ravioli.
- 1/2 cup grated Parmesan cheese: Mixed into the breadcrumbs, this adds a wonderful salty, savory depth and helps achieve that beautiful golden color during frying. It’s a non-negotiable for me!
- 1 teaspoon garlic powder: For enhancing the savory notes in our breading.
- 1/2 teaspoon onion powder: Another fantastic aromatic addition to our breading mixture.
- 1/2 teaspoon dried oregano: Classic Italian herb flavor, crucial for our Italian-inspired appetizer.
- 1/4 teaspoon black pepper: A little kick to wake up the flavors.
- 1/2 teaspoon salt: Essential for seasoning our breading layer properly. Remember, bland breading makes for bland Fried Ravioli!
- 4-6 cups vegetable oil, canola oil, or peanut oil for frying: You’ll need enough oil to submerge the ravioli completely, or at least halfway, depending on your pan size. These oils have a high smoke point, making them ideal for deep-frying.
- 1 (24-ounce) jar marinara sauce: For dipping, of course! Warm it up gently on the stove or in the microwave. A good quality store-bought sauce is perfectly fine, or you can use your favorite homemade recipe.
- Fresh parsley, chopped: For garnish, adding a touch of freshness and color to our finished dish.
- Extra grated Parmesan cheese: For serving, because you can never have too much cheese!
Preparation Phase: Setting Up for Success
Before we even think about touching that hot oil, getting everything organized is absolutely key to a smooth and enjoyable cooking experience. This is where we lay the foundation for truly spectacular Fried Ravioli.
Choosing Your Ravioli for the Best Fried Ravioli Experience
- Select Your Ravioli: As mentioned in the ingredients, the type of ravioli you choose can significantly impact the final texture of your Fried Ravioli. If opting for fresh ravioli, simply remove it from the packaging. If you’ve gone with frozen ravioli, it is absolutely crucial to thaw it completely first. You can do this by placing it in the refrigerator overnight or by spreading it out on a baking sheet at room temperature for an hour or two.
- Pat Dry Thoroughly: Regardless of whether your ravioli was fresh or frozen, it’s incredibly important to gently pat each piece completely dry with paper towels. Moisture is the enemy of crispiness when frying! Excess water on the surface of the ravioli will not only prevent the breading from sticking properly but can also cause the hot oil to splatter dangerously. Take your time with this step; it truly makes a difference in achieving that perfectly crispy crust for your Fried Ravioli.
Crafting the Perfect Breading Station
A well-organized breading station is your best friend when making Fried Ravioli. This “assembly line” approach ensures efficiency and minimizes mess. I usually set mine up from left to right if I’m right-handed, moving from dry to wet to dry again.
- Prepare the Flour Dredge: In a shallow dish or pie plate, combine the 1 cup of all-purpose flour with 1/2 teaspoon of salt and 1/4 teaspoon of black pepper. Whisk these ingredients together until well combined. This initial seasoning is important; we want flavor in every layer!
- Whisk the Egg Wash: In a second shallow dish, crack the 2 large eggs. Add the 1/4 cup of milk or water. Using a fork or a small whisk, beat the eggs and liquid together until they are completely smooth and uniform. You want no visible streaks of egg white or yolk; a consistent mixture ensures a consistent coating. This egg wash acts as the glue for our breadcrumbs, making it a critical component for achieving that iconic crispy exterior on your Fried Ravioli.
- Mix the Seasoned Breadcrumbs: In a third shallow dish (this one needs to be wide enough to comfortably coat a ravioli), combine the 2 cups of seasoned Italian breadcrumbs, the 1/2 cup of grated Parmesan cheese, 1 teaspoon of garlic powder, 1/2 teaspoon of onion powder, 1/2 teaspoon of dried oregano, and the remaining 1/4 teaspoon of black pepper. Stir all these ingredients together thoroughly until they are evenly distributed. This seasoned breadcrumb mixture is where a huge amount of the flavor and crunch for your Fried Ravioli comes from, so don’t skimp on the seasonings or the Parmesan! If you’re using plain panko, this is your moment to truly infuse it with delicious Italian herbs and spices.
Whipping Up a Delightful Dipping Sauce
While the focus is on the glorious Fried Ravioli, a fantastic dipping sauce elevates the entire experience. A classic warm marinara is my absolute go-to, but don’t be afraid to get creative!
- Warm the Marinara Sauce: Pour the jar of marinara sauce into a small saucepan. Heat it gently over low heat, stirring occasionally, until it is warmed through. You don’t want it boiling vigorously, just a nice, comforting warmth. Alternatively, you can warm it in a microwave-safe bowl. Having the sauce ready and warm when the ravioli come out of the fryer means you can serve them immediately, ensuring maximum crispness and enjoyment.
- Consider Optional Dipping Sauces: While marinara is traditional, don’t hesitate to offer other options. A creamy Alfredo sauce makes a decadent dip, or for a lighter, fresher take, a pesto aioli or even a simple balsamic glaze can be wonderful. Having a variety allows guests to customize their Fried Ravioli experience.
Breading the Ravioli: The Crispy Foundation
This is where our beautiful ravioli gets its armor, the crunchy shell that makes Fried Ravioli so irresistible. Work with one ravioli at a time, being gentle but firm to ensure a complete and even coating.
-
First Layer: The Flour Dredge
Take one thoroughly dried ravioli and place it into the dish with the seasoned flour. Gently turn it over, making sure it’s completely coated on all sides. Lightly shake off any excess flour. We’re aiming for a thin, even layer, not a thick, pasty one. This flour layer provides a dry, starchy surface that the egg wash can easily adhere to, which is crucial for the subsequent breadcrumb layer to stick properly and create that signature crisp exterior on your Fried Ravioli.
-
Second Layer: The Egg Wash
Carefully transfer the floured ravioli to the dish with the whisked egg wash. Use a fork or your fingers to gently turn it, ensuring every surface is completely submerged and coated in the egg mixture. Lift it out, allowing any excess egg wash to drip back into the dish. This is the “glue” layer, absolutely essential for the breadcrumbs to cling on and form that perfect crunchy coating for our Fried Ravioli.
-
Third Layer: The Seasoned Breadcrumbs
Immediately transfer the egg-washed ravioli to the dish with the seasoned breadcrumbs. Gently press the ravioli into the breadcrumbs, then sprinkle more breadcrumbs over the top. Turn and press again, ensuring that the entire surface of the ravioli is completely covered with a generous, even layer of breadcrumbs. There should be no wet spots visible. Once fully coated, gently shake off any loose, unadhered breadcrumbs. This final layer is responsible for the incredible crunch and much of the savory flavor of your finished Fried Ravioli.
-
Repeat and Organize
Place the fully breaded ravioli on a clean baking sheet lined with parchment paper or a wire rack. Continue this breading process with the remaining ravioli, ensuring they are not touching each other on the baking sheet to prevent sticking. Working in an assembly line fashion, moving from flour to egg to breadcrumbs, will make this process much more efficient and keep your hands relatively clean – though I always recommend having a damp cloth nearby for quick hand wipes!
-
The Chilling Secret (Optional, but Recommended)
For the absolute best results and to help the breading really adhere and prevent it from falling off during frying, I highly recommend chilling the breaded ravioli. Place the baking sheet with the breaded ravioli into the refrigerator for at least 30 minutes, or even up to an hour. This short chill time allows the breading to set and firm up, leading to a much crispier and more intact crust on your Fried Ravioli. It’s a small step that makes a big difference!
Frying the Ravioli: Achieving Golden Perfection
Now for the exciting part! Frying transforms our breaded ravioli into those golden, crispy delights we’re craving. Safety first: always be cautious when working with hot oil.
-
Prepare Your Frying Station
Choose a heavy-bottomed pot or Dutch oven (I prefer cast iron for even heat distribution) that is deep enough to hold at least 3-4 inches of oil safely. Pour in your chosen frying oil (vegetable, canola, or peanut oil). You’ll need enough oil so that the ravioli can be mostly, if not fully, submerged. Set the pot on your stovetop over medium-high heat. Attach a deep-fry thermometer to the side of the pot; this is crucial for maintaining the correct oil temperature. Also, set up a cooling rack over a baking sheet lined with paper towels near your frying station. This will be where your beautiful Fried Ravioli will drain after cooking.
-
Heat the Oil to the Perfect Temperature
Allow the oil to heat gradually to 350°F (175°C). Monitoring the temperature with a thermometer is non-negotiable for perfectly cooked Fried Ravioli. If the oil isn’t hot enough, the ravioli will absorb too much oil and become greasy. If it’s too hot, the breading will burn before the ravioli inside has a chance to heat through. Patience is key here; don’t rush the heating process.
-
Fry in Batches
Once the oil reaches 350°F (175°C), carefully lower 3-4 breaded ravioli into the hot oil using a slotted spoon or tongs. Do not overcrowd the pot! Frying too many at once will drastically drop the oil temperature, leading to greasy, soggy Fried Ravioli instead of crispy ones. Give them space to swim and get perfectly golden. If you notice the oil temperature dropping too much, allow it to come back up to temperature slightly before adding the next batch.
-
Cook Until Golden Brown and Crispy
Fry the ravioli for about 2-3 minutes per side, or until they are a beautiful, uniform golden brown and wonderfully crispy. Use tongs to gently flip them halfway through to ensure even browning on all sides. The precise cooking time will depend on the size of your ravioli and the exact oil temperature, so rely on visual cues. You’re looking for that unmistakable rich, golden hue and a firm, crisp texture when you gently prod them. This is the magic moment where your Fried Ravioli truly comes to life!
-
Drain and Season Immediately
Once perfectly golden and crispy, carefully remove the Fried Ravioli from the hot oil using a slotted spoon or spider. Transfer them directly to the prepared cooling rack set over paper towels. This allows excess oil to drain off, keeping them from becoming greasy. While they are still hot, sprinkle them lightly with a pinch of salt. This helps to enhance all the wonderful flavors we’ve built into the breading. Continue frying the remaining ravioli in batches, ensuring the oil returns to 350°F (175°C) between each batch. This meticulous attention to detail ensures every piece of Fried Ravioli is just as perfect as the last.
Serving Your Irresistible Fried Ravioli
You’ve done the hard work, and now it’s time to enjoy the fruits of your labor! Serving your Fried Ravioli while hot and fresh is paramount for the ultimate experience.
-
Arrange and Garnish
Once all the Fried Ravioli have been fried and briefly drained, transfer them to a serving platter. Pile them high to create an inviting presentation! Immediately sprinkle generously with extra grated Parmesan cheese and a shower of freshly chopped parsley. The parsley adds a vibrant pop of color and a fresh aroma that beautifully contrasts with the rich fried goodness.
-
Serve with Warm Marinara
Place the warm marinara sauce in a small serving bowl right alongside the platter of Fried Ravioli. Encourage guests to dip generously. The warmth of the sauce against the hot, crispy ravioli creates an incredibly satisfying textural and flavor combination. This classic pairing is a match made in appetizer heaven, guaranteeing rave reviews for your homemade Fried Ravioli.
-
Enjoy Immediately!
Fried Ravioli are best enjoyed hot and fresh, straight from the fryer. The crispy exterior and warm, cheesy interior are at their peak deliciousness in the first few minutes. Don’t hesitate – gather your friends and family and dig in! This dish is perfect for parties, game nights, or just a fun and indulgent snack. Prepare for them to disappear quickly!
Conclusion:
So, there you have it! We’ve journeyed together through the simple yet utterly transformative process of creating these delightful bites. If you’ve ever doubted the power of a humble pasta, prepare to have your mind, and your taste buds, completely blown away. This isn’t just another appetizer; it’s an experience, a revelation of texture and flavor that elevates the familiar into something truly extraordinary. The magic of taking soft, delicate ravioli and giving it a glorious, golden-brown, crispy shell is something you simply must witness and taste for yourself. The satisfying crunch that gives way to a warm, cheesy, or savory filling is nothing short of culinary bliss. It’s the kind of dish that disappears from the plate almost as quickly as it’s served, leaving everyone clamoring for more. I truly believe that mastering the art of making Fried Ravioli is a valuable addition to any home cook’s repertoire, whether you’re hosting a casual get-together, looking for a unique game-day snack, or simply craving something undeniably delicious to treat yourself and your loved ones. It’s a guaranteed crowd-pleaser that consistently earns rave reviews, solidifying its status as a must-try recipe for its unique combination of comfort and excitement.
But the journey doesn’t end with a perfect batch of crispy parcels! Part of the joy of cooking, for me, is the endless potential for customization and creative pairings. While a classic, vibrant marinara sauce is undoubtedly the reigning champion accompaniment, I wholeheartedly encourage you to experiment and find your own perfect match. Imagine dipping these golden nuggets into a creamy pesto aioli, perhaps one you’ve whipped up with fresh basil, garlic, and a hint of lemon – the bright, herbaceous notes provide a wonderful counterpoint to the richness of the fried pasta. Or, for those who appreciate a tangy kick, a homemade ranch dressing or a zesty garlic-yogurt dip can be surprisingly delightful. Don’t shy away from a touch of heat either; a sprinkle of red pepper flakes over your finished Fried Ravioli, or mixed into your dipping sauce, can add a welcome warmth that truly awakens the palate.
When it comes to garnishes, a generous dusting of freshly grated Parmesan or Pecorino Romano cheese right as they come out of the pan is absolutely essential for that extra layer of savory depth. And a scattering of finely chopped fresh parsley or basil not only adds a beautiful pop of color but also a burst of fresh flavor. Think beyond just cheese-filled ravioli too! This method works brilliantly with various fillings. Spinach and ricotta ravioli will give you a lovely earthy undertone, while a savory meat-filled option offers a heartier bite. Even mushroom or butternut squash ravioli can be absolutely divine when given the crispy treatment. And for those looking for a slightly lighter take, consider using an air fryer! While it won’t replicate the deep-fried crispness exactly, an air-fried version still achieves a wonderfully golden and satisfyingly crunchy exterior with much less oil. For a complete meal, I often serve my Fried Ravioli alongside a crisp, light green salad with a vinaigrette dressing – it balances the richness beautifully. This recipe truly is a canvas for your culinary imagination, offering endless possibilities for personal touches and making it truly your own.
So, now it’s your turn! I genuinely hope that reading this has ignited a spark of culinary adventure within you. Don’t hesitate to gather your ingredients, clear your counter, and embark on this delicious endeavor. You’ll be amazed at how simple it is to transform humble store-bought ravioli into something that tastes straight out of a gourmet Italian appetizer menu. The satisfaction of pulling those perfectly golden, irresistibly crunchy bites from the oil, knowing you created them yourself, is truly unparalleled. I would absolutely love to hear about your experience! Did you stick to the classic marinara, or did you venture into a new dipping sauce territory? Did you try a different ravioli filling, or perhaps discover a new favorite seasoning combination? Please, don’t keep your successes – and even your learning moments – to yourself. Share your photos, your tips, and your creative variations with me and our community. Cooking is a journey best shared, and your insights can inspire others to try their hand at this fantastic recipe. Tag us, comment below, or simply tell a friend about the delightful discovery you’ve made. Get ready to impress your family and friends, or simply treat yourself to an unforgettable snack. Happy frying, and most importantly, happy eating!

Ultimate Fried Ravioli: Crispy, Cheesy & Irresistible
Fried Ravioli – the very name conjures images of golden-brown perfection, a dish that has masterfully bridged the gap between traditional Italian comfort and an irresistible, crunchy snack. Originating from the vibrant Italian-American culinary scene, particularly renowned in St. Louis, this delightful appetizer has blossomed into a beloved staple enjoyed far beyond its birthplace. It takes the familiar, comforting cheese-filled pasta and transforms it into something truly extraordinary through the magic of frying, creating a textural sensation that is simply unparalleled and highly addictive.
Ingredients
-
18-24 oz fresh or frozen cheese ravioli (thaw if frozen, pat dry)
-
1 cup all-purpose flour
-
1/2 tsp salt (for flour dredge)
-
1/4 tsp black pepper (for flour dredge)
-
2 large eggs
-
1/4 cup milk or water
-
2 cups seasoned Italian breadcrumbs
-
1/2 cup grated Parmesan cheese
-
1 tsp garlic powder (for breadcrumbs)
-
1/2 tsp onion powder (for breadcrumbs)
-
1/2 tsp dried oregano (for breadcrumbs)
-
1/4 tsp black pepper (for breadcrumbs)
-
1/2 tsp salt (for breadcrumbs)
-
4-6 cups vegetable, canola, or peanut oil for frying
-
1 (24 oz) jar marinara sauce
-
Fresh parsley, chopped (for garnish)
-
Extra grated Parmesan cheese (for serving)
Instructions
-
Step 1
Prepare Ravioli & Dipping Sauce: If using frozen ravioli, thaw completely. Gently pat all ravioli very dry with paper towels. Warm marinara sauce in a small saucepan over low heat or in the microwave. -
Step 2
Set Up Breading Station: In a shallow dish, combine flour with 1/2 tsp salt and 1/4 tsp black pepper. In a second dish, whisk eggs with milk or water. In a third dish, combine seasoned breadcrumbs, 1/2 cup Parmesan, garlic powder, onion powder, oregano, 1/4 tsp black pepper, and 1/2 tsp salt. -
Step 3
Bread Ravioli: Dredge each dry ravioli in flour (shaking off excess), then dip in egg wash, and finally coat thoroughly in the seasoned breadcrumbs, pressing gently to adhere. Place breaded ravioli on a parchment-lined baking sheet, ensuring they don’t touch. For best results, chill for at least 30 minutes. -
Step 4
Prepare for Frying: Set up a heavy-bottomed pot or Dutch oven with 3-4 inches of frying oil. Attach a deep-fry thermometer and heat oil to 350°F (175°C). Place a wire rack over paper towels nearby for draining. -
Step 5
Fry Ravioli: Carefully lower 3-4 breaded ravioli into the hot oil. Do not overcrowd. Fry for 2-3 minutes per side, or until golden brown and crispy. -
Step 6
Drain & Season: Remove fried ravioli with a slotted spoon and transfer to the wire rack to drain. Lightly sprinkle with a pinch of salt while hot. Repeat with remaining ravioli, ensuring oil returns to 350°F between batches. -
Step 7
Serve: Arrange fried ravioli on a platter, garnish with fresh parsley and extra grated Parmesan. Serve immediately with warm marinara sauce for dipping.
Important Information
Nutrition Facts (Per Serving)
It is important to consider this information as approximate and not to use it as definitive health advice.
Allergy Information
Please check ingredients for potential allergens and consult a health professional if in doubt.
Leave a Comment