
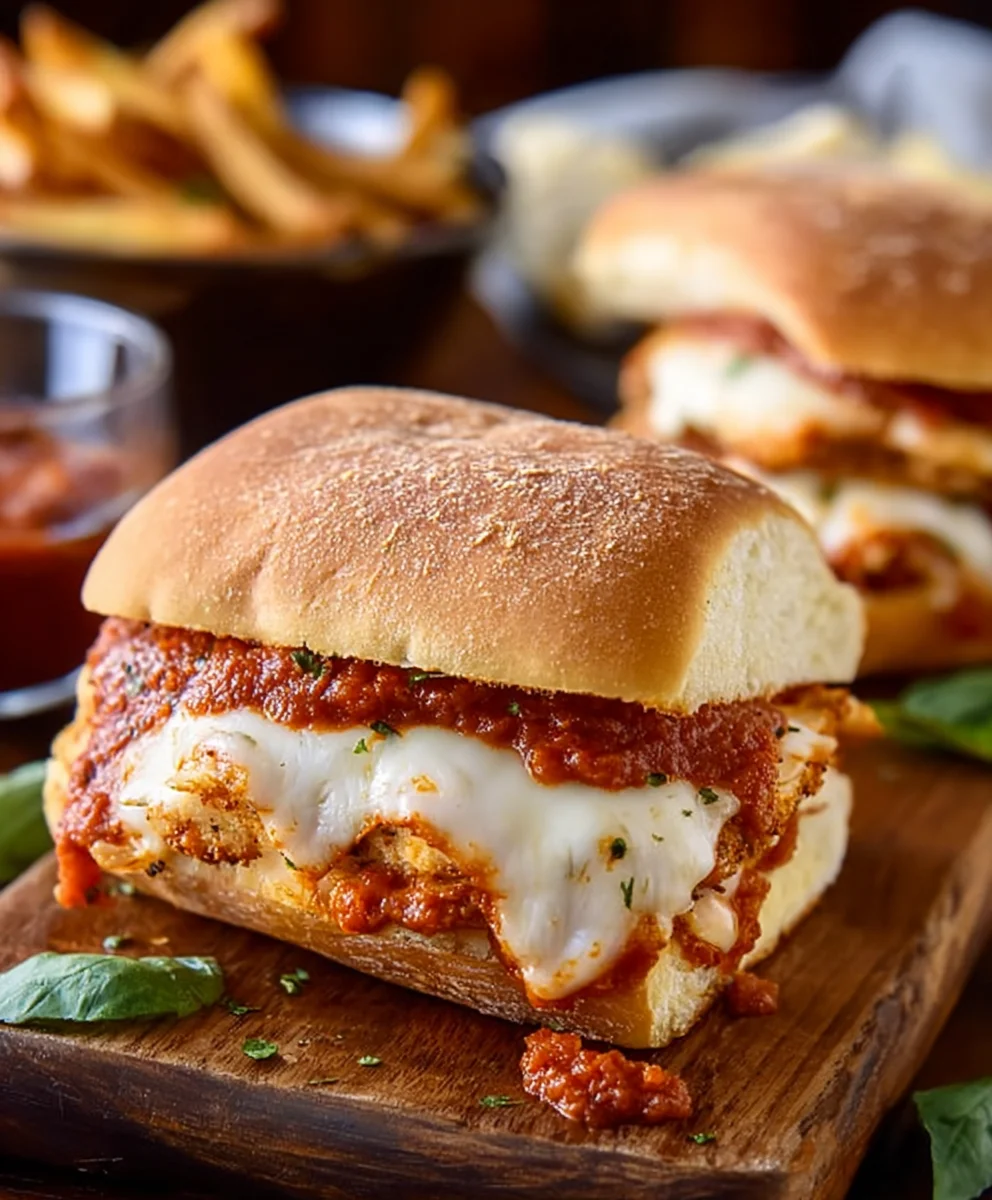
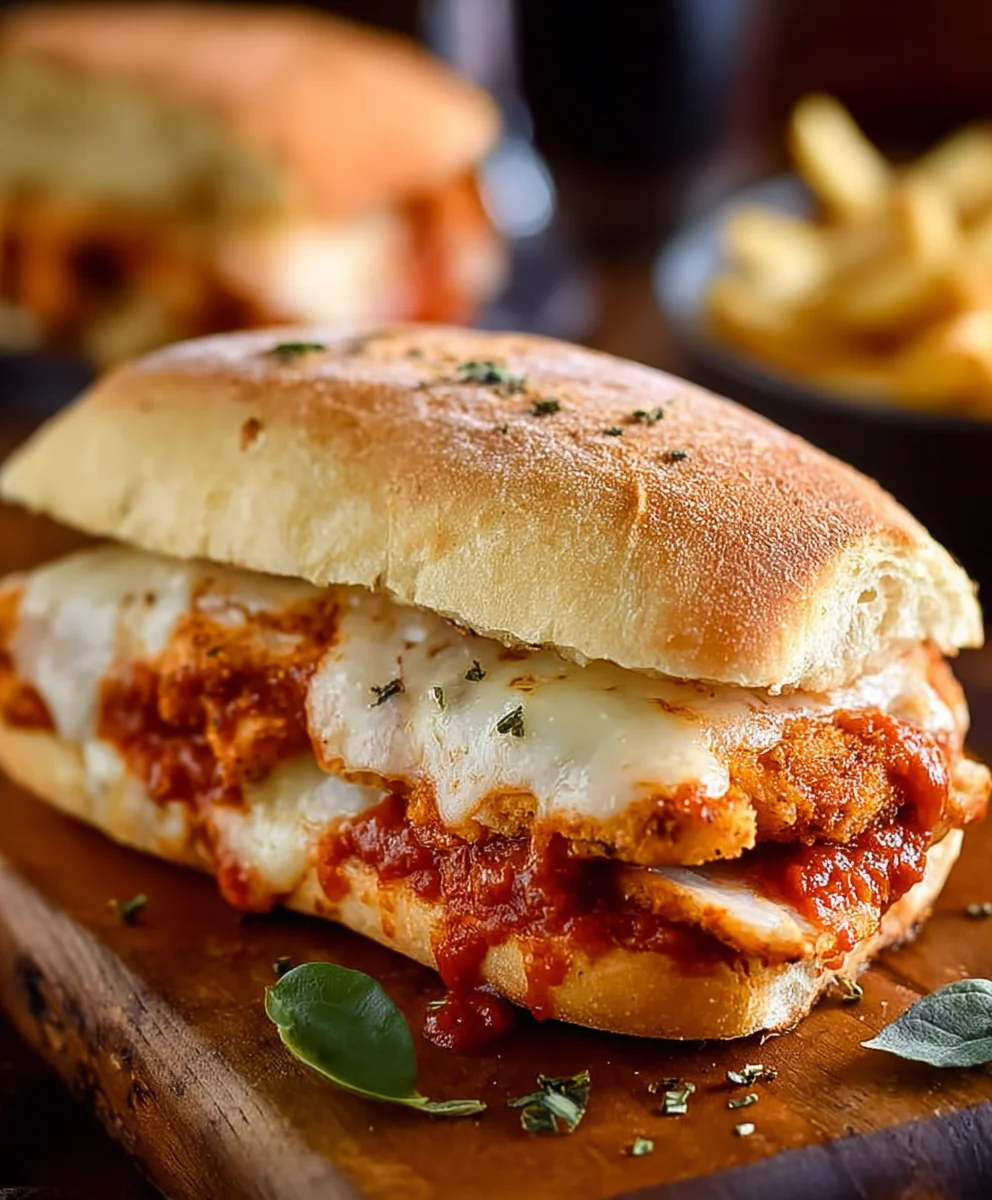
Easy Chicken Parmesan Sandwiches are about to revolutionize your lunch or dinner routine, offering all the beloved flavors of a classic Italian-American favorite in a delightfully convenient package. Picture this: succulent chicken cutlets, perfectly crispy on the outside and tender within, generously coated in a rich, tangy marinara sauce, then blanketed with melted mozzarella and grated Parmesan cheese, all nestled within a toasted, crusty hero roll. It’s a truly irresistible combination!
While the full Chicken Parmesan entrée proudly stands as a cornerstone of Italian-American cuisine, a testament to the beautiful melding of traditional Italian tastes with hearty American portions, transforming it into a sandwich elevates its accessibility without sacrificing any of that cherished comfort. People adore this dish for its incredible satisfying nature – the harmonious blend of textures and tastes, from the satisfying crunch of the bread to the juicy chicken and the gooey, savory cheese. But the sandwich form makes it an incredibly convenient and less intimidating meal to prepare and enjoy than the full plated version.
Who doesn’t love a delicious meal that’s both familiar and exciting, without requiring hours of culinary effort? That’s precisely why I’m thrilled to share my go-to recipe for these incredible Easy Chicken Parmesan Sandwiches. Prepare for a meal that delivers maximum flavor with minimal fuss, making it perfect for busy weeknights or a fun, casual weekend gathering.

Ingredients:
-
For the Chicken Cutlets:
-
4 boneless, skinless chicken breasts (about 1.5 to 2 lbs total), butterflied and pounded to about ½-inch thick, or 4 pre-made breaded chicken cutlets
-
½ cup all-purpose flour
-
2 large eggs, lightly beaten with 1 tablespoon water or milk
-
1 ½ cups Panko breadcrumbs (for extra crispiness)
-
½ cup grated Parmesan cheese (for breading)
-
1 teaspoon garlic powder
-
1 teaspoon Italian seasoning
-
½ teaspoon sea salt
-
¼ teaspoon freshly ground black pepper
-
½ cup olive oil, for pan-frying (more if needed)
-
-
For the Sandwich Assembly:
-
4 good quality hoagie or sub rolls, split lengthwise
-
1 ½ cups your favorite marinara sauce, warmed
-
12-16 slices fresh mozzarella cheese (about 8 oz total), thinly sliced or torn (I love how it melts!)
-
Optional: 4 slices provolone cheese (if you prefer, or in addition to the mozzarella for an extra cheesy layer)
-
½ cup pepperoni slices (about 2 oz), for that delightful pizza-sandwich twist
-
¼ cup sliced hot peppers (such as jarred pickled jalapeños or banana peppers), drained, for a kick!
-
1 large garden tomato (or a ripe beefsteak/Roma), cut into 4 thick slices
-
¼ cup fresh basil leaves, torn or left whole, for vibrant flavor
-
2 tablespoons extra virgin olive oil, for brushing rolls
-
¼ cup grated Parmesan cheese, for topping
-
Equipment You’ll Need:
-
Large shallow dishes or plates for breading
-
Large non-stick skillet or cast-iron pan
-
Baking sheet
-
Aluminum foil
-
Parchment paper (optional, for easy cleanup)
-
Meat mallet or rolling pin
-
Tongs or spatula
-
Pastry brush (optional, for oiling rolls)
Preparing Your Chicken Cutlets (Choose Your Path to Easy!):
Making delicious chicken cutlets from scratch for your “Easy Chicken Parmesan Sandwiches” might sound like a task, but I promise it’s simpler than you think and totally worth the effort for the freshest flavor and perfect texture. However, if time is truly of the essence, or you’re aiming for the absolute quickest route to dinner, store-bought pre-breaded cutlets are a fantastic shortcut!
Path 1: Crafting Crispy Cutlets from Scratch
-
Pound the Chicken: Begin by placing each chicken breast half between two sheets of plastic wrap or in a large freezer bag. Using a meat mallet or a heavy rolling pin, pound the chicken to an even ½-inch thickness. This ensures even cooking and tender results. It’s a great way to relieve a little stress, too!
-
Set Up Your Breading Station: Grab three shallow dishes or wide plates. In the first dish, place the all-purpose flour. In the second dish, whisk the two large eggs with 1 tablespoon of water or milk until well combined. In the third dish, combine the Panko breadcrumbs, ½ cup grated Parmesan cheese, garlic powder, Italian seasoning, sea salt, and black pepper. Mix these dry ingredients thoroughly – this is where a lot of your flavor comes from!
-
Bread the Chicken: Take one pounded chicken cutlet and dredge it first in the flour, shaking off any excess. You want a light, even coating. Next, dip it into the egg wash, allowing any extra to drip off. Finally, press the cutlet firmly into the Panko-Parmesan mixture, making sure both sides are completely coated. Don’t be shy; really press the breadcrumbs onto the chicken to ensure maximum crispiness. Repeat this process with the remaining chicken cutlets.
-
Pan-Fry to Golden Perfection: Heat ½ cup of olive oil in a large non-stick skillet or cast-iron pan over medium-high heat until shimmering. You’re looking for the oil to be hot enough that a drop of water sizzles immediately. Carefully place two breaded chicken cutlets into the hot oil, making sure not to overcrowd the pan. Cooking them in batches ensures a nice, even crisp. Fry for 4-5 minutes per side, or until they are golden brown, crispy, and cooked through (internal temperature of 165°F or 74°C). The Panko gives such a satisfying crunch!
-
Drain and Rest: Once cooked, transfer the golden-brown chicken cutlets to a wire rack set over a paper towel-lined baking sheet to drain any excess oil. This helps keep them extra crispy while you finish the remaining cutlets. You want them to be perfect for layering into your sandwiches!
Path 2: Embracing the “Easy” with Pre-Made Cutlets
If you’re truly leaning into the “Easy Chicken Parmesan Sandwiches” keyword, store-bought breaded chicken cutlets are your best friend. Many grocery stores offer excellent fresh or frozen options that are perfect for this recipe.
-
Prepare According to Package: Follow the instructions on your chosen pre-made breaded chicken cutlets for cooking. Often, this involves baking them in the oven at a high temperature (around 400°F / 200°C) for 15-20 minutes, or pan-frying them until heated through and crispy.
-
Ensure Crispiness: Regardless of the method, my personal tip is to make sure they are nice and crispy on the outside. This texture contrast is crucial for a great Chicken Parmesan Sandwich. If baking, a few extra minutes under the broiler (watch carefully!) can achieve this. If pan-frying, don’t be afraid to use a decent amount of olive oil to get that beautiful golden crust.
-
Keep Warm: Once cooked, keep the cutlets warm while you prepare the rolls and other fillings. A wire rack in a warm oven (around 200°F / 95°C) works perfectly to maintain their crispiness without overcooking.
Assembling Your Easy Chicken Parmesan Sandwiches:
Now for the fun part – building these incredible sandwiches! This is where all those wonderful “REAL INGREDIENTS” come into play, creating layers of flavor and texture that make these Chicken Parmesan Sandwiches truly special. Get ready for a delicious aroma to fill your kitchen.
-
Preheat Your Oven and Prep Baking Sheet: Adjust your oven rack to the middle position and preheat to 375°F (190°C). Line a large baking sheet with parchment paper for easy cleanup, or simply use aluminum foil. This step is key for getting that melty cheese just right without making a mess.
-
Prepare the Rolls: Lay your hoagie or sub rolls, split side up, on the prepared baking sheet. Drizzle or brush the cut sides with extra virgin olive oil. This not only adds flavor but also helps create a lovely golden-brown crunch when toasted. If you skip this, the bread can get a bit soggy, and we definitely don’t want that for our ultimate sandwich experience!
-
Toast the Rolls (Optional, but Recommended!): For an extra layer of texture and to prevent the rolls from getting too soft from the sauce, you can pop them into the preheated oven for 3-5 minutes, or until they are lightly golden and slightly crisp. Keep a close eye on them – bread can go from perfectly toasted to burnt very quickly! This step makes a huge difference in the overall integrity of the sandwich.
-
Spread the Sauce: Remove the rolls from the oven. Evenly spread about ¼ cup of your warmed marinara sauce onto the bottom half of each toasted roll. Don’t go overboard, or you risk a messy sandwich, but ensure there’s enough to give a rich, tomatoey base. I always make sure the sauce reaches almost to the edges, coating every bite.
-
Place the Chicken: Carefully place one cooked chicken cutlet onto the sauced bottom half of each roll. If your cutlets are very large, you might need to trim them slightly to fit, or even overlap two smaller pieces. The goal is to have the chicken cover most of the roll for a satisfying bite every time.
-
Layer with Provolone (Optional): If you’re using provolone, now is the time to add a slice or two over the chicken. While I specifically called out fresh mozzarella as my favorite, a layer of provolone underneath the mozzarella can add another dimension of classic deli flavor and extra melty goodness. It’s an excellent way to get super cheesy!
-
Add the Pepperoni: This is where we get into the “pizza-sandwich hybrid” territory! Generously scatter some pepperoni slices over each chicken cutlet. I usually aim for about 10-12 slices per sandwich, ensuring a delightful spicy, savory kick in every bite. The pepperoni will get wonderfully crisp around the edges as the sandwiches bake.
-
Layer the Hot Peppers: For those who love a bit of a kick, now’s the time to add a layer of hot peppers. Whether you prefer sliced jalapeños for a spicier bite or milder banana peppers for a tangy zest, distribute them evenly over the pepperoni. My husband loves this addition for that extra zing, and I find it really elevates the flavor profile.
-
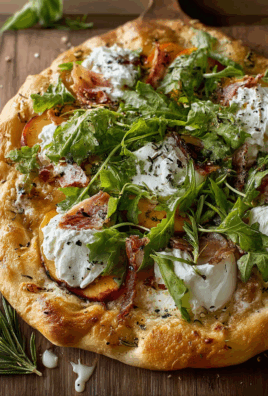
Crown with Fresh Mozzarella: This is the star of the show for me! Layer the fresh mozzarella slices or torn pieces generously over the hot peppers and pepperoni. I find that using fresh mozzarella, especially good quality, makes a world of difference. It melts into this beautiful, creamy, gooey blanket that is simply irresistible. Don’t be shy; pile it on for ultimate cheesy bliss!
-
Final Touch of Sauce: Drizzle a little more marinara sauce (just a tablespoon or so) over the mozzarella. This ensures the cheese stays moist and flavorful as it melts, and it adds another pop of tomato goodness. Plus, a little sauce peaking through the melted cheese just looks so appetizing!
Baking Your Sandwiches to Perfection:
The baking process is where the magic happens! The cheese will get gloriously melty, the pepperoni will crisp up, and all the flavors will meld together into one harmonious, delicious bite. This is also where those fresh herbs and tomatoes come in to brighten everything up.
-
Into the Oven They Go: Carefully transfer the baking sheet with your assembled open-faced sandwiches back into the preheated 375°F (190°C) oven. This precise temperature is perfect for melting the cheese without drying out the chicken or the rolls.
-
Bake Until Golden and Bubbly: Bake for 10-15 minutes, or until the fresh mozzarella is completely melted, bubbly, and beginning to turn a light golden brown in spots. You want that beautiful stretch when you take your first bite! Keep an eye on them, as oven temperatures can vary. If you like an extra crispy top, you can turn on the broiler for the last minute or two, but watch it like a hawk – cheese can burn quickly under the broiler.
-
Prepare the Top Buns: While the sandwiches are baking, you can lightly toast the top halves of the rolls if you haven’t already. Just a minute or two in the oven on a separate tray (or alongside the sandwiches if you have space) or under the broiler, then remove them before they get too dark. This ensures both halves of your sandwich have a satisfying texture.
-
Remove from Oven: Once the cheese is perfectly melted and bubbly, carefully remove the baking sheet from the oven. The smell filling your kitchen right now will be absolutely incredible!
Final Touches and Serving:
Almost there! These final steps add a burst of freshness and elevate your “Easy Chicken Parmesan Sandwiches” from delicious to absolutely unforgettable. It’s all about balancing those rich, savory flavors with bright, fresh elements.
-
Add Fresh Basil: Immediately after removing the sandwiches from the oven, sprinkle a generous amount of fresh basil leaves over the hot, melted cheese. The heat from the sandwich will slightly wilt the basil, releasing its aromatic oils and infusing the sandwich with a wonderfully fresh, herbaceous note. I love how the vibrant green contrasts with the rich red and white – it’s a feast for the eyes as well as the palate!
-
Layer with Garden Tomato: Now, place a thick slice of garden tomato on top of the basil on each sandwich. During summer, a thick slice of garden tomato truly takes these over the top. The cool, juicy freshness of the tomato provides a fantastic counterpoint to the warm, savory chicken and melted cheese. If you don’t have a garden tomato, a ripe Roma or beefsteak tomato will work beautifully – just make sure it’s firm and flavorful.
-
A Sprinkle of Parmesan: For an extra layer of classic Italian flavor and a touch of saltiness, grate a little more fresh Parmesan cheese over the top of the tomato and basil. This adds a nice finishing touch and truly brings home the “Parmesan” in Chicken Parmesan Sandwiches.
-
Close the Sandwiches: Gently place the top halves of the rolls onto your magnificently loaded chicken parmesan bases. You might need to press down ever so slightly, but try not to squash all the deliciousness out!
-
Serve Immediately: These Easy Chicken Parmesan Sandwiches are best enjoyed hot and fresh. The cheese is at its peak meltiness, the chicken is crispy, and the fresh elements are vibrant. I usually slice them in half diagonally for easier handling and a more appealing presentation. Serve them with a side salad or some crispy potato chips for a complete and utterly satisfying meal.
There you have it! A truly easy, yet incredibly flavorful and satisfying Chicken Parmesan Sandwich recipe that incorporates all those wonderful fresh and creative ingredients I love. Enjoy every single bite!
Conclusion:
There you have it – my absolute favorite way to turn a classic Italian-American comfort dish into an incredibly satisfying, handheld meal. These aren’t just any sandwiches; these are your ticket to culinary happiness, a symphony of flavors and textures that will undoubtedly earn a permanent spot in your recipe rotation. I truly believe that once you try these, you’ll understand why I’m so passionate about them. The crispy, golden-brown chicken, perfectly seasoned and cooked, creates an amazing foundation. Then, imagine that tender chicken breast smothered in a rich, vibrant marinara sauce, bubbling gently and infusing every bite with deep, savory goodness. And let’s not forget the star of the show – a generous blanket of melted mozzarella and Parmesan cheese, stretchy and gooey, creating that irresistible pull-apart moment that makes every bite pure bliss. All of this gloriousness is nestled within a toasted, crusty roll, providing the ideal counterpoint to the succulent filling. It’s the kind of meal that feels indulgent but is surprisingly straightforward to put together, making it perfect for both busy weeknights and leisurely weekend gatherings.
What I particularly adore about this recipe is its incredible versatility. While the core concept of an Easy Chicken Parmesan Sandwiches is inherently perfect, there’s always room to personalize and elevate it to suit your taste or what you have on hand. For serving suggestions, think about pairing these magnificent sandwiches with something fresh and light to balance the richness. A simple green salad with a zesty vinaigrette would be absolutely fantastic, cutting through the richness beautifully. Alternatively, a refreshing pasta salad, perhaps with cherry tomatoes, fresh basil, and a light lemon dressing, could be a wonderful companion. If you’re feeling a bit more indulgent, a side of perfectly crispy homemade potato wedges or even some sweet potato fries would be a match made in heaven. Don’t shy away from roasted vegetables either; asparagus, broccoli, or bell peppers tossed with a little olive oil and garlic would add both nutrition and flavor.
Now, for variations, the possibilities are truly endless, and I encourage you to get creative! Instead of a classic hoagie roll, try a crusty ciabatta for a chewier texture, or even a brioche bun for a touch of sweetness. If you want to add more vegetables to the filling itself, consider sautéing some thinly sliced bell peppers, onions, or mushrooms and layering them on top of the chicken before adding the cheese. For those who love a bit of heat, a sprinkle of red pepper flakes into the marinara sauce or directly onto the chicken before the cheese melts would add a delightful kick. You could also experiment with different cheese blends; a mix of provolone and mozzarella offers a slightly different flavor profile and an equally impressive melt. For a fun, party-friendly option, consider making these into sliders – simply use smaller rolls and chicken cutlets, perfect for entertaining. And if you’re looking to lighten things up a bit, you could bake the chicken instead of frying it, or even use whole wheat buns. For a fantastic vegetarian twist, swap out the chicken for breaded and fried eggplant slices, creating an equally delicious Eggplant Parmesan Sandwich that satisfies all the same cravings.
I genuinely cannot wait for you to bring these sensational sandwiches to life in your own kitchen. I promise you, the aroma alone will be enough to get your taste buds tingling, and that first bite? Pure culinary magic. Please, do yourself a favor and carve out some time to try this recipe. And when you do, I would absolutely love to hear about your experience! Share your photos, your tweaks, your serving suggestions, and your overall thoughts in the comments section below or tag me on social media. Your feedback inspires me, and I love seeing how you make these recipes your own. So go on, gather your ingredients, fire up your stove, and get ready to create something truly delicious. Happy cooking!
FAQs:
Can I prepare the chicken ahead of time for these sandwiches?
Absolutely! To save time, you can bread and fry or bake the chicken cutlets up to a day in advance. Store them in an airtight container in the refrigerator. When ready to assemble, simply warm them through in a preheated oven or air fryer before adding the sauce and cheese.
What kind of bread is best for Chicken Parmesan Sandwiches?
For the best experience, I recommend a sturdy, crusty roll that can hold up to the moist filling without getting soggy. Hoagie rolls, hero rolls, sub rolls, or even ciabatta bread are excellent choices. Tightly textured French bread baguettes can also work if sliced into individual portions. Make sure to lightly toast the bread for added texture and to create a barrier against moisture.
How do I prevent the sandwich from getting soggy?
Preventing sogginess is key! Here are a few tips:
- Toast the bread: Lightly toasting the inside of the rolls creates a barrier.
- Don’t over sauce: Use enough marinara to flavor, but don’t drown the chicken.
- Assemble just before serving: This is the most crucial step. The longer the sandwich sits, the more likely the bread is to absorb moisture.
- Drain excess grease: If your chicken is fried, make sure to drain it well on paper towels.
What are some good side dishes to serve with Chicken Parmesan Sandwiches?
These sandwiches are quite hearty, so lighter sides work well. A simple green salad with a vinaigrette, a fresh pasta salad, roasted vegetables (like asparagus or broccoli), or even a light coleslaw are fantastic options. For something a bit more indulgent, crispy French fries or onion rings are always a crowd-pleaser.
Can I bake the chicken instead of frying it?
Yes, you can definitely bake the chicken for a lighter version! After breading the chicken cutlets, place them on a baking sheet lined with parchment paper or a wire rack. Bake in a preheated oven at 400°F (200°C) for 15-20 minutes, flipping halfway, or until golden brown and cooked through. You can also finish them under the broiler for extra crispiness.
How do I store and reheat leftover Chicken Parmesan Sandwiches?
It’s best to store the components separately if possible (chicken with sauce/cheese in one container, bread in another) to prevent sogginess. If assembled, wrap the sandwich tightly in foil. Reheat in a preheated oven at 350°F (175°C) for about 15-20 minutes, or until warmed through and the cheese is bubbly. Microwaving is an option, but it may make the bread soft and the chicken less crispy.
Can I make this recipe gluten-free?
Absolutely! To make this recipe gluten-free, simply use gluten-free breadcrumbs for coating the chicken and serve it on your favorite gluten-free sandwich rolls. Ensure your marinara sauce is also gluten-free, though most are inherently so.
What kind of sauce should I use for Chicken Parmesan Sandwiches?
A good quality marinara sauce is essential. You can use your favorite store-bought brand for convenience, or if you have time, a homemade marinara will elevate the flavor even further. Look for a sauce with a rich tomato flavor and good seasoning. You can also customize it by adding fresh basil, oregano, or a pinch of red pepper flakes.
Easy Chicken Parmesan Sandwiches
Quick and delicious chicken parmesan sandwiches, featuring crispy chicken cutlets (homemade or pre-made), rich marinara, gooey fresh mozzarella, and a delightful pizza-sandwich twist with beef pepperoni and hot peppers. Finished with fresh basil and a juicy tomato slice for an unforgettable meal.
Ingredients
-
4 boneless, skinless chicken breasts (about 1.5 to 2 lbs total), butterflied and pounded to about ½-inch thick, or 4 pre-made breaded chicken cutlets
-
½ cup all-purpose flour
-
2 large eggs, lightly beaten with 1 tablespoon water or milk
-
1 ½ cups Panko breadcrumbs
-
½ cup grated Parmesan cheese (for breading)
-
1 teaspoon garlic powder
-
1 teaspoon Italian seasoning
-
½ teaspoon sea salt
-
¼ teaspoon freshly ground black pepper
-
½ cup olive oil, for pan-frying (more if needed)
-
4 good quality hoagie or sub rolls, split lengthwise
-
1 ½ cups your favorite marinara sauce, warmed
-
12-16 slices fresh mozzarella cheese (about 8 oz total), thinly sliced or torn
-
Optional: 4 slices provolone cheese
-
½ cup beef pepperoni slices (about 2 oz)
-
¼ cup sliced hot peppers (such as jarred pickled jalapeños or banana peppers), drained
-
1 large garden tomato, cut into 4 thick slices
-
¼ cup fresh basil leaves, torn or left whole
-
2 tablespoons extra virgin olive oil, for brushing rolls
-
¼ cup grated Parmesan cheese, for topping
Instructions
-
Step 1
Choose your path: 1) For homemade, pound chicken breasts to ½-inch thick. Set up 3 shallow dishes: one with ½ cup all-purpose flour; one with 2 large eggs lightly beaten with 1 tbsp water or milk; and one with 1½ cups Panko breadcrumbs, ½ cup grated Parmesan cheese, 1 tsp garlic powder, 1 tsp Italian seasoning, ½ tsp sea salt, and ¼ tsp freshly ground black pepper. Dredge chicken in flour, then egg, then Panko mixture, pressing firmly. Pan-fry in ½ cup olive oil over medium-high heat for 4-5 minutes per side until golden brown and cooked through (165°F/74°C). Drain on a wire rack. 2) For pre-made, cook store-bought breaded chicken cutlets according to package directions until crispy. Keep warm. -
Step 2
Preheat oven to 375°F (190°C). Line a baking sheet. Place split hoagie or sub rolls on the sheet, cut side up. Brush cut sides with 2 tablespoons extra virgin olive oil. (Optional: Toast rolls in the oven for 3-5 minutes until lightly golden.) -
Step 3
Spread about ¼ cup of warmed marinara sauce on the bottom half of each roll. Place one cooked chicken cutlet on each sauced roll. Layer with optional provolone slices, ½ cup beef pepperoni slices, and ¼ cup sliced hot peppers. Top generously with 12-16 slices of fresh mozzarella cheese. Drizzle a tablespoon more of marinara sauce over the mozzarella. -
Step 4
Carefully transfer the baking sheet with assembled sandwiches back into the preheated 375°F (190°C) oven. Bake for 10-15 minutes, or until the mozzarella is completely melted, bubbly, and beginning to turn a light golden brown. (Optional: Lightly toast the top halves of the rolls separately if desired.) -
Step 5
Remove from oven. Immediately sprinkle ¼ cup fresh basil leaves over the hot, melted cheese. Place one thick slice of garden tomato on top of the basil on each sandwich. Grate ¼ cup more fresh Parmesan cheese over the top. Gently place the top halves of the rolls onto your sandwiches. Serve immediately, optionally sliced diagonally.
Important Information
Nutrition Facts (Per Serving)
It is important to consider this information as approximate and not to use it as definitive health advice.
Allergy Information
Please check ingredients for potential allergens and consult a health professional if in doubt.
Leave a Comment