
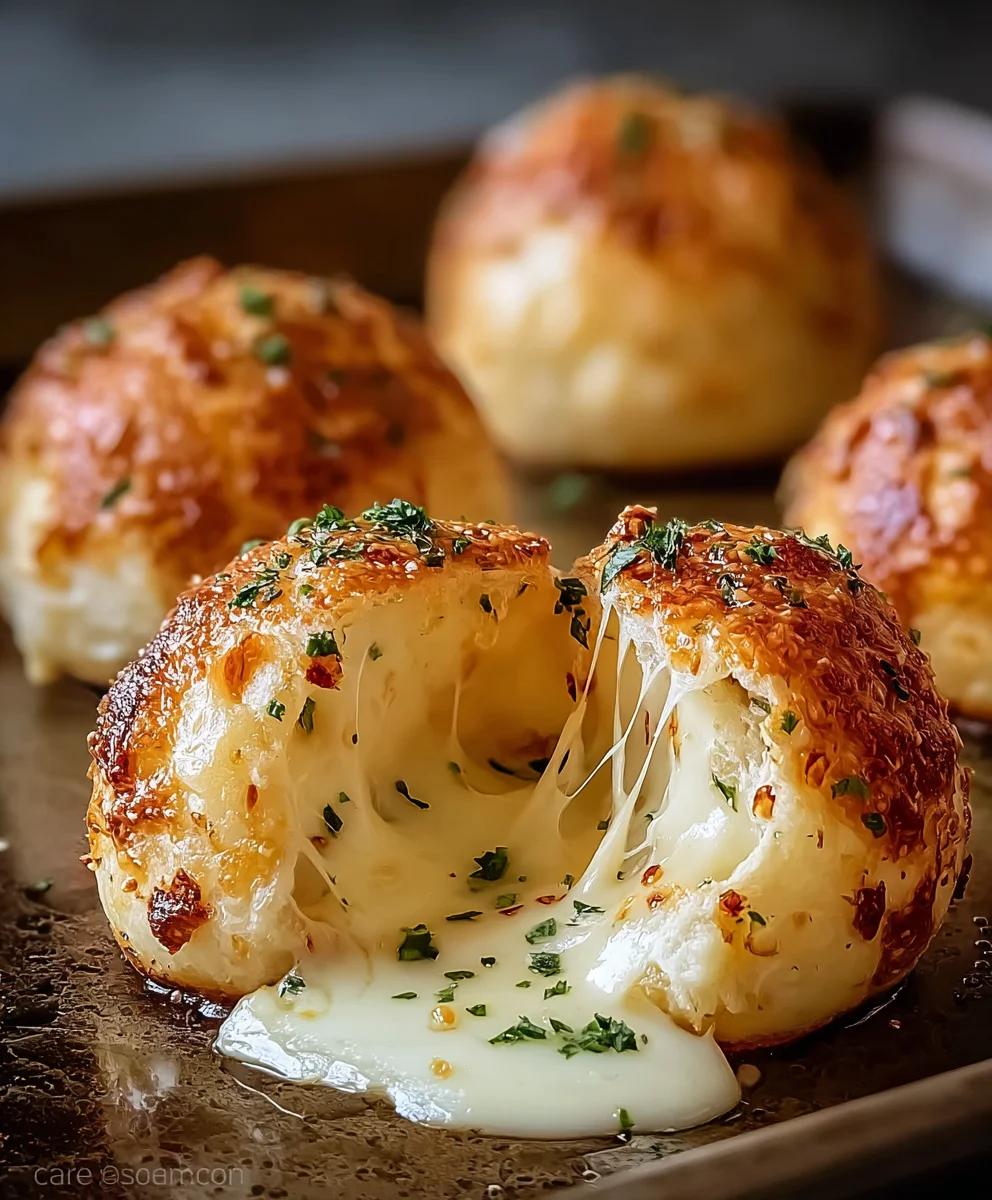
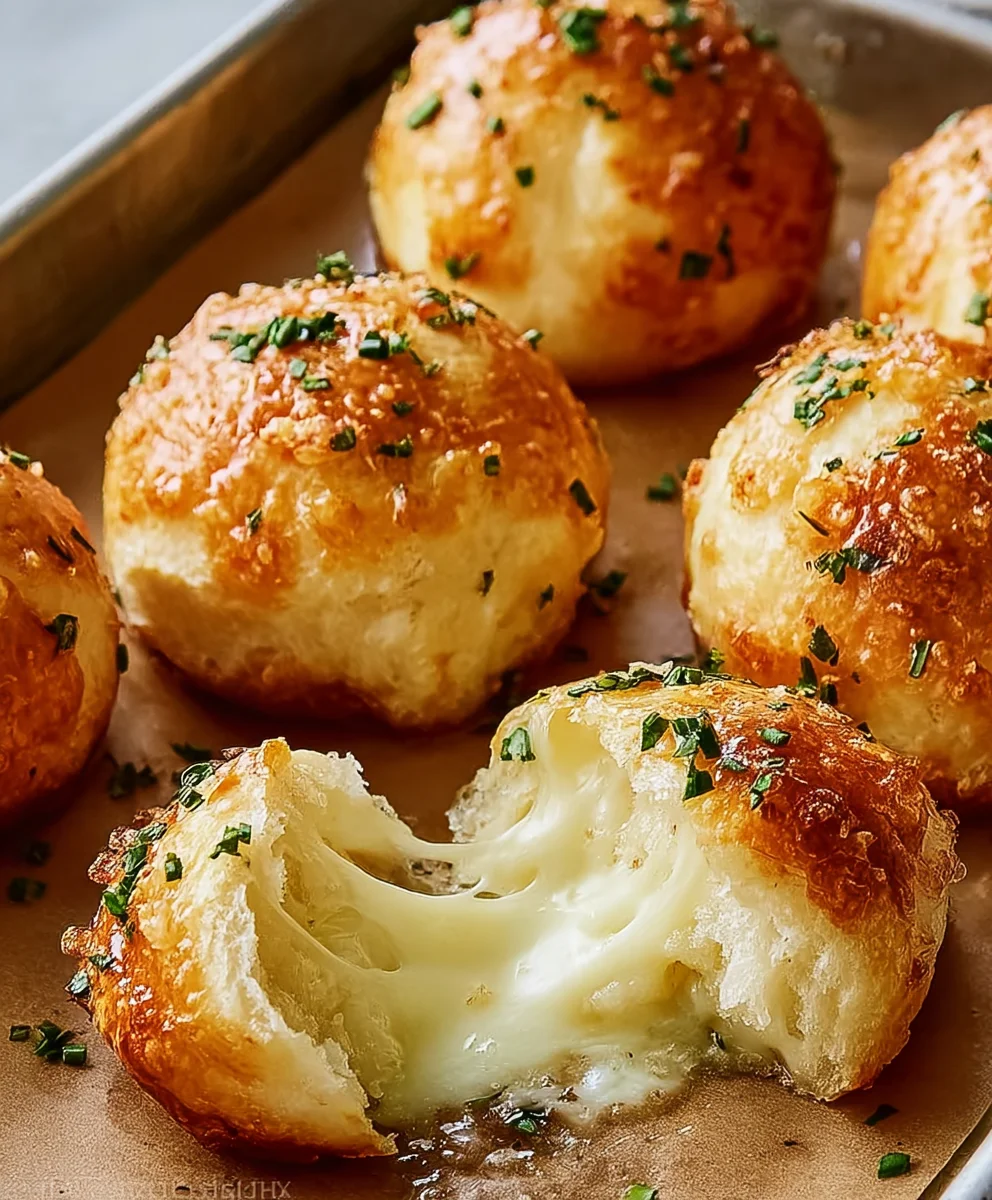
Cheese Bombs – just the name itself conjures images of pure, unadulterated cheesy bliss, doesn’t it? I’ve lost count of how many times these delightful morsels have stolen the show at my potlucks, family gatherings, and even quiet movie nights. There’s something undeniably magical about a warm, golden-brown roll, baked to perfection, that yields an irresistible explosion of molten cheese with every single bite. While their precise origin story might spark friendly debate among snack enthusiasts, these glorious bundles have undoubtedly cemented their place in the pantheon of beloved comfort foods, evolving from simpler cheese-stuffed breads into the irresistible appetizers we adore today.
Why Everyone Admires These Cheesy Delights
People absolutely rave about these; it’s the ultimate combination of a crispy exterior giving way to a soft, fluffy bread interior, all lovingly cradling a gooey, savory core of melted cheese. They are incredibly easy to prepare, making them a fantastic option whether you’re a seasoned chef or a kitchen novice looking for a quick win. You simply can’t go wrong with these incredible Cheese Bombs! They’re the perfect crowd-pleaser, delivering maximum flavor with minimal fuss, and are guaranteed to disappear faster than you can say ‘extra cheddar’. Get ready to become everyone’s favorite chef!

Ingredients:
Creating these delightful Pillsbury Biscuit Garlic Butter Cheese Bombs is surprisingly straightforward, relying on just a few key components to deliver maximum flavor and gooey satisfaction. Here’s exactly what you’ll need to gather:
- Pillsbury Refrigerated Biscuits: You’ll want a standard 8-count can of refrigerated biscuits. Options like “Grands! Flaky Layers” or standard “Homestyle” biscuits work wonderfully, providing that perfect soft, golden base for our cheese bombs. The specific type can influence the final texture, with flaky layers offering a lighter bite and homestyle providing a more substantial, bread-like experience. Make sure they are chilled until you’re ready to use them, as cold biscuits are easier to handle and separate without tearing.
- Mozzarella Cheese: This is the heart of our cheese bombs! For the best gooey pull, I highly recommend using a low-moisture, part-skim mozzarella. You can either use pre-packaged mozzarella cheese sticks (which are incredibly convenient to cut into suitable pieces), or purchase a block of mozzarella and cut it into approximately 1-inch cubes or small logs. Avoid fresh mozzarella for this recipe, as its higher water content can lead to a less desirable texture and potentially make the biscuits soggy. Shredded mozzarella can also work in a pinch, though it can be a bit trickier to form into a tight ball within the biscuit.
- Unsalted Butter: This forms the rich base of our savory garlic butter mixture. Using unsalted butter gives you complete control over the overall sodium content of the dish. If you only have salted butter on hand, simply omit any additional salt from the garlic butter mixture later on. You’ll need enough to melt down and generously brush over each cheese bomb, contributing to their golden-brown exterior and irresistible buttery aroma.
- Garlic: The essential aromatic that gives our cheese bombs their signature savory kick. Freshly minced garlic cloves will provide the most potent and aromatic flavor. Aim for finely minced garlic to ensure even distribution and prevent large, overpowering chunks. If fresh garlic isn’t available, high-quality garlic powder can be used as a convenient substitute, though you might adjust the quantity to taste, as powder is more concentrated.
- Dried Herbs: To elevate the savory profile of our garlic butter, a sprinkle of dried herbs is absolutely necessary. Italian seasoning blend is a fantastic choice, offering a harmonious mix of oregano, basil, thyme, and rosemary. Alternatively, you can use individual dried herbs like dried parsley, oregano, or a combination that you love. These herbs not only add depth of flavor but also beautiful flecks of green, enhancing the visual appeal of your finished cheese bombs.
- Marinara Sauce: While optional, a warm, tangy marinara sauce is the quintessential accompaniment for dipping these glorious cheese bombs. The vibrant tomato flavor cuts through the richness of the cheese and butter, creating a perfectly balanced bite. Choose your favorite brand of jarred marinara, or if you’re feeling ambitious, a homemade sauce would be divine.
Prepping for Perfection: Setting the Stage
Before we dive into assembling our delicious cheese bombs, a little preparation goes a long way in ensuring a smooth and enjoyable cooking experience. I always find that having everything prepped and ready to go makes the process much more relaxed, almost like a culinary dance! This initial phase sets us up for success, ensuring each cheese bomb bakes evenly and achieves that coveted golden, cheesy perfection.
- Preheat Your Oven: My first step is always to preheat the oven to 375°F (190°C). This allows the oven to reach and stabilize at the correct temperature before the cheese bombs go in. An accurately preheated oven is crucial for even baking, ensuring your biscuits rise properly and cook through without burning on the outside or remaining doughy inside. Trust me, patience here pays off!
- Prepare Your Baking Sheet: Next, I take a large baking sheet and line it with parchment paper or a silicone baking mat. This simple step is a game-changer! It prevents the cheese bombs from sticking to the pan, makes cleanup a breeze, and, most importantly, helps prevent any potential cheese leaks from baking directly onto your sheet, which can be a nightmare to scrub off. If you don’t have parchment paper, a light spray of non-stick cooking spray will work, but parchment is highly recommended for these gooey delights.
- Prep the Mozzarella: Now, let’s get that glorious mozzarella ready. If you’re using mozzarella cheese sticks, unwrap them all and cut each stick into two or three equal pieces, depending on their length and how much cheese you want in each bomb. For a block of mozzarella, slice it into approximately 1-inch cubes or small rectangular logs. The goal is to have pieces that are substantial enough to create a gooey center but not so large that they’re difficult to fully encase within the biscuit dough. Uniformity in size will also help ensure even melting within the oven.
- Mince the Garlic and Measure Herbs: If using fresh garlic, finely mince the cloves. The smaller the pieces, the better they’ll incorporate into the butter and distribute their flavor. If opting for garlic powder, have it measured out. Similarly, measure out your dried herbs. Having these aromatics ready will make the garlic butter assembly swift and seamless.
Crafting Your Cheese Bombs: The Art of Encasement
This is where the magic truly begins – transforming simple biscuits and cheese into irresistible cheese bombs! The key here is gentle handling and thorough sealing to ensure all that delicious mozzarella stays tucked inside its cozy biscuit blanket during baking. I find this part quite therapeutic, almost like wrapping little gifts of cheesy goodness.
- Separate the Biscuits: Carefully open your can of Pillsbury refrigerated biscuits. I always love that satisfying pop! Gently separate each biscuit from the others. Lay them out on a clean, dry surface, leaving a little space between each one. If they’re particularly sticky, a very light dusting of flour on your work surface can help, but generally, the dough is quite manageable.
- Flatten Each Biscuit: Take one biscuit at a time and gently flatten it into a disk, approximately 3-4 inches in diameter. You can use your fingers or the palm of your hand to press it down. The goal is to create a slightly thinner, wider base than the original biscuit, making it easier to wrap around the cheese without tearing. Be careful not to press too thin in the center, as this can lead to weak spots where the cheese might escape.
- Place the Mozzarella: Now, position one piece of your prepped mozzarella cheese (a cube or a piece of a cheese stick) right in the center of the flattened biscuit dough. Don’t place it too close to the edges, as you’ll need that dough to seal.
- Wrap and Seal the Cheese: This is a crucial step for preventing cheese leaks! Carefully bring the edges of the biscuit dough up and around the mozzarella cheese. Pinch the seams together tightly at the top to completely enclose the cheese, forming a small ball. I like to twist the top slightly and then press firmly to ensure a secure seal. Once sealed, gently roll the dough ball between your palms to smooth out the seams and create a nice, round shape. Think of it like making a tiny dough dumpling. A well-sealed cheese bomb is a happy cheese bomb!
- Arrange on Baking Sheet: Place each perfectly formed cheese bomb seam-side down on your prepared baking sheet. Make sure to leave about 1 to 2 inches of space between each cheese bomb to allow for even airflow and expansion during baking. Overcrowding can lead to uneven browning and biscuits that stick together. Repeat steps 6 through 9 for all remaining biscuits and mozzarella pieces.
The Garlic Butter Glaze: Infusing Flavor
This savory garlic butter mixture is truly the secret weapon that elevates these cheese bombs from good to utterly irresistible. It not only contributes to the golden-brown crust but also infuses every bite with a wonderfully aromatic and savory flavor. The combination of rich butter, pungent garlic, and earthy herbs creates a coating that’s pure magic.
- Melt the Butter: In a small microwave-safe bowl or a small saucepan over low heat, melt the unsalted butter completely. You want it fully liquid, but not browned or sputtering. Just a gentle melt is perfect.
- Combine with Aromatics: Once the butter is melted, stir in the minced fresh garlic (or garlic powder) and your chosen dried herbs (like Italian seasoning or dried parsley). If you like a little kick, a tiny pinch of red pepper flakes can be a wonderful addition, though it’s entirely optional. Mix everything together thoroughly, ensuring the garlic and herbs are well distributed throughout the butter. The warmth of the melted butter will help to release the fragrant oils from the garlic and herbs, creating an incredibly aromatic mixture.
- Brush Generously: Using a pastry brush, generously brush the top and sides of each cheese bomb with the garlic butter mixture. Don’t be shy here! The more coating, the more flavor and the richer the golden-brown crust. I like to ensure every visible part of the biscuit is coated. This not only adds flavor but also helps the biscuits achieve that beautiful, inviting sheen as they bake.
Baking to Golden Perfection: The Grand Finale
The moment of truth! Into the oven they go, where they’ll transform from simple dough balls into golden, puffed, and gloriously cheesy masterpieces. Watching them bake is part of the fun, as the aroma of garlic and butter fills your kitchen, building anticipation for the first delicious bite.
- Bake Until Golden: Carefully transfer the baking sheet with your prepared cheese bombs into the preheated 375°F (190°C) oven. Bake for approximately 12-18 minutes. The exact baking time can vary depending on your oven’s calibration and the specific type of Pillsbury biscuit you’re using.
- Monitor for Doneness: Keep a close eye on them, especially towards the end of the baking cycle. You’re looking for the biscuits to puff up, become beautifully golden brown on the outside, and for the cheese inside to be molten and gooey. If they start browning too quickly on top but you suspect the inside isn’t fully cooked, you can loosely tent the baking sheet with aluminum foil for the last few minutes.
- Check for Internal Temperature (Optional but Recommended): For absolute certainty that the biscuit dough is cooked through, you can gently insert a thin probe thermometer into the center of one of the biscuits (avoiding the cheese). The internal temperature should register around 200-210°F (93-99°C). However, visually checking for a deep golden-brown exterior and puffed appearance is usually sufficient for biscuits.
- Remove and Rest: Once they’ve reached that perfect golden hue and look deliciously puffed, carefully remove the baking sheet from the oven.
Serving Suggestions & Enjoyment: The Payoff
The moment you’ve been waiting for! These Cheese Bombs are best enjoyed warm, fresh out of the oven, when the cheese is at its peak gooeyness and the garlic butter is still glistening. The aroma alone is enough to get stomachs rumbling, and the taste is even better. This isn’t just a snack; it’s an experience!
- Cool Slightly: Allow the cheese bombs to cool on the baking sheet for just 2-3 minutes before transferring them. This brief resting period helps the cheese set ever so slightly, making them easier to handle, and prevents you from burning your fingers (or your tongue!) on the molten cheese inside.
- Warm the Marinara Sauce: While the cheese bombs are resting, warm your marinara sauce. You can do this gently in a small saucepan on the stovetop over low heat, stirring occasionally, or in a microwave-safe bowl for about 30-60 seconds, until heated through.
- Serve Immediately: Arrange the warm Pillsbury Biscuit Garlic Butter Cheese Bombs on a serving platter. Provide a small bowl of the warm marinara sauce for dipping. I find that a small ramekin of marinara per person or a couple of larger bowls for sharing works best. Encourage guests (or yourself!) to break them open to reveal that satisfying, stretchy mozzarella pull. The combination of the savory biscuit, gooey cheese, and tangy marinara is truly a match made in heaven.
- Garnish (Optional): For an extra touch of freshness and visual appeal, a sprinkle of fresh chopped parsley or a dusting of grated Parmesan cheese over the top of the cheese bombs just before serving can make them even more enticing.
Tips for Success and Troubleshooting: Mastering Your Cheese Bombs
While these cheese bombs are quite forgiving, a few pointers can ensure every batch is perfect. From preventing leaks to achieving optimal texture, these tips come from experience and aim to make your cooking process as smooth as possible, ensuring you get that Instagram-worthy cheese pull every single time.
- Preventing Cheese Leaks: The most common issue is cheese oozing out. The key is in the sealing. Make sure you firmly pinch all seams of the biscuit dough together to create a complete enclosure. Rolling the formed ball gently between your palms helps to reinforce these seams. Also, avoid overfilling; use a cheese piece that’s proportionate to the biscuit size. If a little cheese does escape, don’t fret! It just means a crispy, cheesy bit on the baking sheet to snack on first.
- Even Browning: If your oven tends to have hot spots, you might find some cheese bombs browning faster than others. Halfway through baking, you can rotate the baking sheet 180 degrees to promote more even browning across the entire batch.
- Biscuit Choices: While most Pillsbury biscuits work, the larger “Grands!” varieties offer more dough, making them slightly easier to wrap around larger pieces of cheese. Flaky layer biscuits will yield a lighter, more ethereal texture, while homestyle biscuits will be denser and more bread-like. Experiment to find your personal favorite!
- Garlic Intensity: Adjust the amount of garlic to your preference. If you’re a garlic fiend like me, feel free to add a bit more. If you prefer a milder flavor, scale it back. Remember that fresh garlic tends to be more potent than garlic powder.
- Herb Variations: Don’t limit yourself to just Italian seasoning! Consider dried oregano for a more Mediterranean twist, or dried dill for a unique herby note. Even a touch of dried rosemary, finely crushed, can add a wonderful depth.
- Biscuit Dough Handling: Work quickly but gently with the biscuit dough. The colder the dough, the less sticky and easier it is to handle. If the dough starts to warm up and become difficult, pop the remaining biscuits back into the fridge for a few minutes.
- Brushing Technique: Ensure you brush the garlic butter thoroughly over the entire surface of each cheese bomb. This not only imparts flavor but also contributes significantly to the golden color and slightly crisp exterior of the baked biscuit.
Storage and Reheating: Enjoying Later
While these Pillsbury Biscuit Garlic Butter Cheese Bombs are undeniably best enjoyed fresh from the oven, sometimes you have leftovers, or you might want to prepare them slightly ahead of time. Knowing how to properly store and reheat them ensures you can savor their deliciousness later without sacrificing too much quality.
- Storing Cooked Cheese Bombs: If you have any leftover cheese bombs, allow them to cool completely to room temperature. Once cool, place them in an airtight container. They can be stored in the refrigerator for up to 2-3 days. Storing them in an airtight container prevents them from drying out and absorbing other odors from your fridge.
- Reheating for Best Results: For the best reheating experience, I recommend using an oven or a toaster oven.
- Oven/Toaster Oven Method: Preheat your oven or toaster oven to 350°F (175°C). Place the chilled cheese bombs on a baking sheet (you don’t necessarily need parchment paper this time, as they’re already cooked). Bake for about 8-12 minutes, or until they are heated through and the cheese is gooey again. This method helps to crisp up the exterior of the biscuit, making them almost as good as fresh.
- Microwave Method (Quickest, but Less Crisp): If you’re in a hurry, you can microwave a cheese bomb for 20-40 seconds, or until warmed through. Be aware that the microwave will make the biscuit softer and less crisp, and the cheese might not be as beautifully gooey as when reheated in the oven. It’s a convenient option but sacrifices some texture.
- Freezing Cooked Cheese Bombs: You can also freeze cooked cheese bombs! Allow them to cool completely. Arrange them in a single layer on a baking sheet and freeze until solid (this prevents them from sticking together). Once frozen, transfer them to a freezer-safe bag or airtight container. They can be stored for up to 1-2 months.
- Reheating from Frozen: To reheat from frozen, place them on a baking sheet in a preheated oven at 350°F (175°C). Bake for approximately 15-25 minutes, or until thoroughly heated through and golden. Keep an eye on them to prevent over-browning.
- Prepping Ahead (Unbaked): If you want to get a head start, you can assemble the cheese bombs, brush them with the garlic butter, and then place them on a baking sheet. Cover the baking sheet tightly with plastic wrap and refrigerate for a few hours. If you refrigerate them, you might need to add a couple of extra minutes to the baking time, as they’ll be going into the oven from a colder state.
Conclusion:
There are some recipes that just hit different, aren’t there? Some that you try once and immediately know they’re going to become a regular in your rotation. This, my friends, is one of them. What we’ve just crafted together isn’t just a snack; it’s a culinary experience, a small burst of happiness designed to elevate any occasion. We’re talking about a recipe that’s deceptively simple, yet delivers a profound impact of flavor and texture. The golden-brown exterior, hinting at the delightful crunch to come, gives way to an interior that’s molten, gooey, and unapologetically cheesy. It’s warm, comforting, and utterly irresistible. This isn’t just food; it’s a hug from the inside, a perfect bite of savory goodness that promises to satisfy even the most intense cravings. It’s the kind of dish that disappears from the plate almost as quickly as it arrives, leaving behind smiles and happy murmurs. So, if you’re looking for something that’s easy to prepare, guaranteed to impress, and delivers on every single flavor promise, then you absolutely, unequivocally, have to give this recipe a shot. Trust me, your taste buds will thank you.
Now, let’s talk about how to make these even more spectacular, or how to fit them seamlessly into your next gathering. While they are undeniably glorious enjoyed straight out of the oven, perhaps with a slight cooling period to prevent a lava-like explosion, their versatility truly shines. Imagine them as the star appetizer at your next party, served alongside a vibrant marinara dip, a zesty ranch dressing, or even a spicy sriracha mayo for those who like a kick. They’re also phenomenal as a side dish for a casual weeknight dinner. Picture them nestled beside a hearty bowl of chili, a vibrant green salad, or a comforting plate of pasta. For a truly indulgent experience, why not use them to sop up the last delicious drops of a rich stew or a creamy soup? And if you’re feeling adventurous, these little marvels can even be integrated into a larger meal; think about chopping them up and sprinkling them over a salad for a cheesy crouton alternative, or even stuffing them into a larger sandwich or wrap for an added layer of texture and flavor. The possibilities are genuinely endless, limited only by your imagination and your appetite!
But don’t stop there! This recipe is a fantastic canvas for your culinary creativity. While the basic version is a pure triumph, feel free to experiment and make it your own. For a different flavor profile, consider swapping out the cheddar for a mix of Gruyère and Swiss for a nuttier, more sophisticated taste, or a spicy pepper jack for an invigorating zing. You could fold in finely chopped herbs like chives or parsley into the dough or directly into the cheese filling for a fresh, aromatic twist. A pinch of garlic powder or onion powder can deepen the savory notes, while a hint of red pepper flakes will add a subtle warmth. Want to go even further? Imagine adding crispy bacon bits or finely diced ham to the cheese core before baking. Or, for a truly decadent treat, stuff them with cream cheese and a jalapeño sliver for a homemade popper experience. These Cheese Bombs are incredibly forgiving and adaptable, inviting you to play around with ingredients until you discover your perfect combination. The foundation we’ve built is solid, but the sky’s the limit when it comes to personalization.
So, what are you waiting for? I wholeheartedly encourage you to roll up your sleeves, gather your ingredients, and embark on this delicious adventure. There’s a unique satisfaction that comes from creating something so utterly delightful with your own hands. The aroma filling your kitchen as they bake, the anticipation building with each passing minute, and that first glorious bite – it’s an experience I truly want you to savor. Once you’ve created your batch of cheesy perfection, don’t keep it to yourself! I would absolutely love to hear about your experience. Did you stick to the classic recipe, or did you venture into exciting new variations? What dips did you pair them with? Who did you share them with? Take a photo, share your stories, and tag me on social media. Your culinary triumphs inspire not just me, but also countless other home cooks who are looking for their next favorite recipe. Let’s create a community of deliciousness together!
Frequently Asked Questions About Cheese Bombs:
Can I prepare these Cheese Bombs ahead of time?
Absolutely! This is one of the best features of this recipe, especially if you’re planning a party or need a quick snack during a busy week. You can prepare the dough and stuff the cheese, then arrange the unbaked bombs on a baking sheet lined with parchment paper. Cover them tightly with plastic wrap and refrigerate for up to 24 hours. When you’re ready to bake, simply take them out of the fridge and bake as directed, adding a few extra minutes to the baking time if they are very cold, to ensure they are fully cooked and melted through. You might also want to let them sit at room temperature for 15-20 minutes before baking to help them cook more evenly.
What’s the best type of cheese to use for the filling?
The “best” cheese often comes down to personal preference, but for optimal melt and flavor, I recommend a good quality semi-hard cheese that melts smoothly. Sharp cheddar is a classic for a reason – it offers a robust, tangy flavor and a fantastic gooey texture. Mozzarella is excellent for stretchiness and a milder taste. Provolone, Monterey Jack, Colby Jack, or even a mix of cheeses like Gruyère and Swiss can also work wonderfully, each offering a slightly different profile. Avoid very soft or crumbly cheeses, as they might leak during baking, and extremely hard cheeses which won’t melt as luxuriously. The key is to use a cheese that you love to eat and that melts beautifully!
How should I store leftover Cheese Bombs?
If you’re lucky enough to have any leftovers (they tend to disappear fast!), you can store them in an airtight container in the refrigerator for up to 2-3 days. When you’re ready to enjoy them again, I highly recommend reheating them gently. A quick warm-up in the oven (around 300°F/150°C for 5-10 minutes) or a toaster oven will bring them back to their gooey glory much better than a microwave, which can sometimes make the dough tough and the cheese less pleasant. The goal is to get that lovely crisp exterior and molten interior back!
Can I freeze these Cheese Bombs?
Yes, you can! Both baked and unbaked Cheese Bombs freeze well, making them perfect for meal prep or future cravings. For unbaked bombs: arrange them on a baking sheet and freeze until solid. Once frozen, transfer them to a freezer-safe bag or container for up to 1-2 months. When ready to bake, you can bake them from frozen (they’ll need a longer baking time, perhaps 25-30 minutes, or until golden and melted) or thaw them in the fridge overnight. For baked bombs: let them cool completely, then freeze them in a single layer on a baking sheet before transferring to a freezer bag. Reheat from frozen in the oven at 350°F/175°C for about 15-20 minutes, or until heated through.
What are some good dips or accompaniments for Cheese Bombs?
These savory delights are fantastic on their own, but they also shine with the right dipping partner! Classic choices include a warm marinara sauce, a creamy ranch dressing, or a tangy honey mustard. For those who like a bit of heat, a spicy sriracha mayo, a jalapeño dip, or even just a dash of your favorite hot sauce can be phenomenal. Don’t limit yourself to dips, though! They make an excellent side to a hearty chili, a flavorful soup, or a fresh green salad. You can also serve them with a charcuterie board as a warm element, or alongside grilled meats for a satisfying meal.
How can I make my Cheese Bombs spicy?
Adding a spicy kick to your Cheese Bombs is super easy and highly recommended for chili lovers! Here are a few ways: First, swap out regular cheddar for a spicy cheese like pepper jack or habanero cheddar. Second, finely chop fresh or pickled jalapeños, serranos, or even habaneros (depending on your heat tolerance) and mix them directly into the cheese filling before stuffing. Third, incorporate a pinch of red pepper flakes, cayenne pepper, or a dash of your favorite chili powder into the cheese mixture or sprinkle it on top of the dough before baking. Lastly, serve them with a spicy dip, as mentioned above. You can even combine a few of these methods for an extra fiery bomb!
Easy Cheese Bombs: Melty, Cheesy Perfection in Every Bite!
Pillsbury Biscuit Garlic Butter Cheese Bombs are a delightful, easy-to-make snack perfect for cheese lovers. Mozzarella cheese is wrapped in soft Pillsbury biscuits, then coated in a savory garlic butter mixture. These golden bites are baked to perfection and served with tangy marinara sauce for dipping. With minimal prep and a short bake time, they make a fantastic appetizer or snack for any occasion. Imagine biting into a warm, buttery pastry filled with gooey mozzarella, where each bite is enhanced by the savory mix of garlic and herbs. Pillsbury Biscuit Garlic Butter Cheese Bombs bring this dream to life! With a few ingredients and minimal effort, you can create a crowd-pleasing snack. These cheese-filled delights have a crispy exterior, a molten cheese center, and a burst of garlic butter flavor that makes them irresistible. Pillsbury Biscuit Garlic Butter Cheese Bombs are a quick snack, filled with gooey mozzarella and brushed with garlic-herb butter. Serve hot with marinara.
Ingredients
-
1 (8-count) can Pillsbury refrigerated biscuits (Grands! Flaky Layers or Homestyle)
-
8 oz low-moisture, part-skim mozzarella (cheese sticks, cut into 1-inch pieces, or 1-inch cubes from a block)
-
1/2 cup (1 stick) unsalted butter, melted
-
2-3 cloves garlic, finely minced (or 1 tsp garlic powder)
-
1 tsp Italian seasoning (or dried parsley, oregano)
-
1 cup marinara sauce, warmed (optional, for dipping)
Instructions
-
Step 1
Preheat oven to 375°F (190°C). Line a large baking sheet with parchment paper or a silicone baking mat. -
Step 2
Prepare mozzarella: Cut mozzarella cheese sticks into 2-3 equal pieces each, or slice a block of mozzarella into approximately 1-inch cubes or small rectangular logs. Mince garlic cloves (if using fresh) and measure out dried herbs. -
Step 3
Carefully open the can of biscuits and separate each one. Gently flatten each biscuit into a disk, about 3-4 inches in diameter. -
Step 4
Place one piece of prepped mozzarella cheese in the center of a flattened biscuit. Bring the edges of the dough up and around the cheese, pinching the seams together tightly to completely enclose the mozzarella. Gently roll the dough ball between your palms to smooth seams and create a round shape. -
Step 5
Place each formed cheese bomb seam-side down on the prepared baking sheet, leaving 1-2 inches of space between each for even baking. Repeat for all remaining biscuits and cheese. -
Step 6
Melt the unsalted butter in a small microwave-safe bowl or saucepan. Stir in the minced garlic (or garlic powder) and dried herbs until well combined. -
Step 7
Using a pastry brush, generously brush the top and sides of each cheese bomb with the garlic butter mixture, ensuring full coverage. -
Step 8
Bake in the preheated oven for approximately 12-18 minutes, or until the biscuits are puffed up, beautifully golden brown on the outside, and the cheese inside is molten and gooey. -
Step 9
Carefully remove the baking sheet from the oven. Allow the cheese bombs to cool on the baking sheet for 2-3 minutes before serving. While cooling, warm the marinara sauce (if using). -
Step 10
Serve the warm Pillsbury Biscuit Garlic Butter Cheese Bombs immediately with the warm marinara sauce for dipping. Garnish with fresh chopped parsley or grated Parmesan cheese, if desired.
Important Information
Nutrition Facts (Per Serving)
It is important to consider this information as approximate and not to use it as definitive health advice.
Allergy Information
Please check ingredients for potential allergens and consult a health professional if in doubt.


Leave a Comment