
Easter Dirt Cups are a springtime delight that everyone, young and old, absolutely adores! There’s something inherently playful and utterly delicious about these layered chocolate pudding and cookie crum extractb creations that just screams celebration. They’re not just a dessert; they’re a miniature edible garden, a playful nod to the season’s awakening and the joyful anticnon-alcoholic ipation of Easter. What makes these Easter Dirt Cups so special? It’s the simple, comforting combination of rich, creamy pudding and the satisfying crunch of crushed chocolate cookies, all topped with a whimsical candy worm or a festive Easter candy. They’re incredibly easy to assemble, making them perfect for involving little helpers in the kitchen, and their charming presentation always brings a smile. Get ready to dig into this fun, no-bake treat that’s guaranteed to be the star of your Easter dessert table!

Easter Dirt Cups
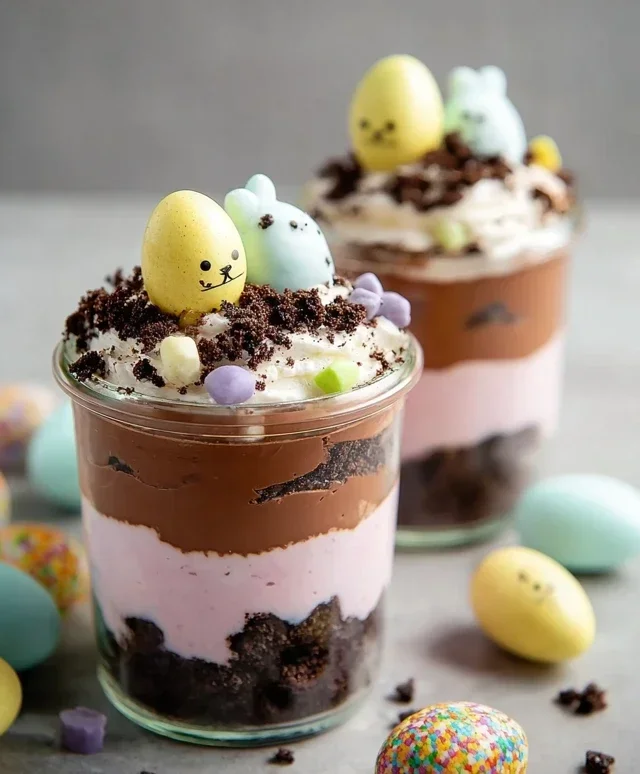
Easter is a time for joy, family, and of course, delicious treats! This year, I’m bringin extractg you a fun and festive recipe that’s sure to delight both kids and adults: Easter Dirt Cups. These charming cups are a playful twist on the classic dirt cup, infused with the colors and flavors of spring. They’re incredibly easy to make, making them a perfect activity to get the little ones involved in the kitchen. Imagin extracte layers of creamy pudding, chocolate cookie “dirt,” fluffy coconut “grass,” and adorable candy accents – it’s a miniature edible garden that tastes as good as it looks!
These dirt cups are incredibly versatile. You can customize the colors of your coconut grass to match your Easter color scheme, or even add a sprinkle of edible glitter for an extra touch of magic. The beauty of this recipe lies in its simplicity and its ability to spark creativity. So, gather your ingredients, put on some fun music, and let’s get ready to create some Easter magic in a cup!
Ingredients:
Preparing the Pudding Base
The first step in creating our delightful Easter Dirt Cups is to prepare the creamy vanilla pudding base. This is the foundation of our edible landscape, so we want it to be smooth and delicious. In a medium-sized bowl, pour in the contents of the 1 package (3.9 oz.) vanilla instant pudding mix. Next, add the 2 cups of cold milk. It’s important to use cold milk as this helps the pudding set up properly and achieve that perfect, luscious texture.
Using a whisk, vigorously beat the pudding mix and milk together for about 2 minutes, or until the mixture begin extracts to thicken. Don’t be tempted to stop too early! You’ll notice it will go from a runny liquid to a thicker, spoonable consistency. Once the pudding has thickened, gently fold in the thawed 1 container (8 oz.) of Cool Whip. Be sure the Cool Whip is fully thawed but not melted into a liquid. Folding it in means gently incorporating it with a spatula, as if you’re lifting and folding the mixture over itself. This process adds a wonderful lightness and fluffiness to the pudding, making it taste even more decadent. Continue folding until the Cool Whip is just combined and no streaks of white remain. This creates a delightful, cloud-like texture that’s a perfect contrast to the crunchy cookie “dirt.”
Creating the Easter Grass
Now, let’s add a touch of spring with some colorful Easter grass! This is where the food coloring comes in. We’ll be coloring the shredded coconut to resemble vibrant green grass peeking out from the dirt. You can use a few different methods for coloring. One easy way is to place your desired amount of shredded coconut into a resealable plastic bag. Add a few drops of food coloring – I suggest green, but you can also experiment with other pastel colors like yellow or even a light blue to create a whimsical meadow. Add a tiny bit of water, just a teaspoon or so, to help the food coloring distribute evenly. Then, seal the bag tightly and shake it vigorously. Continue shaking and massagin extractg the bag until the coconut is evenly colored. If the color isn’t as vibrant as you’d like, add another drop or two of food coloring and repeat the shaking process. For a multi-colored effect, you can divide the coconut into smaller bowls and color each portion a different shade of green or pastel. Spread the colored coconut out on a plate or a piece of parchment paper to dry slightly while you assemble the rest of the dirt cups. This ensures it doesn’t clump together too much and looks more like natural grass.
Assembling the Dirt Cups
It’s time for the fun part: assembling our Easter Dirt Cups! You’ll need some clear cups or small jars so you can see all the delightful layers. Start by crushing your 1 package of Oreo cookies. It’s best to remove the white filling from the cookies before crushing them. You can do this by scraping it out with a knife or your fingers. Then, place the cookies into a sturdy plastic bag and use a rolling pin or the bottom of a heavy glass to crush them into fine crum extractbs. These crum extractbs will be our delicious “dirt.”
Begin extract by placing a layer of the crushed Oreo cookies at the bottom of each cup. This creates the base layer of our dirt. Next, spoon a generous amount of the prepared vanilla pudding mixture over the cookie crum extractbs. Make sure to spread it evenly. After the pudding layer, add another layer of the crushed Oreo cookie “dirt.” Continue layering pudding and cookie crum extractbs until your cups are nearly full, leaving a little space at the top for decoration. Aim for at least two layers of each for a good visual and textural experience.
Adding the Finishing Touches
The final step is where our Easter Dirt Cups truly come to life! Sprinkle a good amount of the prepared colored shredded coconut over the top layer of cookie crum extractbs. This represents the lush Easter grass. You can be generous here, allowing some of it to spill over the edges for a more natural look. Now, it’s time for the Easter-themed decorations! Arrange your candy eggs artfully on top of the coconut grass, nestled in like they’ve just been laid. You can use a variety of candy eggs for different colors and sizes. Next, place your adorable Peeps marshmallow chicks or bunnies into the cups. They look like they’re hopping out of the Easter garden! You can gently press them into the coconut or let them stand proudly on top. Feel free to add any other Easter candies you love, such as jelly beans or chocolate bunnies, to further enhance the festive feel. The key is to have fun with it and create a miniature Easter scene in each cup.
These Easter Dirt Cups are not only a treat for the taste buds but also a feast for the eyes. They’re perfect for Easter parties, classroom treats, or just a fun weekend activity with the family. The combination of creamy pudding, crunchy cookies, and sweet marshmallow decorations is truly irresistible. Enjoy creating and devouring these delightful Easter treats!

Conclusion:
Making these Easter Dirt Cups is such a fun and rewarding way to celebrate the holiday! They’re incredibly simple to whip up, making them perfect for involving little ones in the kitchen. The delightful combination of creamy pudding, crum extractbly chocolate cookies, and sweet gummy worms always brings smiles. Whether you’re looking for a festive dessert for your Easter brunch, a classroom treat, or just a fun family activity, these dirt cups are a guaranteed hit. Don’t be afraid to get creative with your decorations and flavor combinations!
For serving, these are best enjoyed chilled, so make them a few hours in advance or even the day before. They look fantastic presented in individual clear cups, allowing everyone to see the layers of ‘dirt’ and ‘worms’. For a larger gathering, you could even assemble them in a big trifle dish. Get ready to impress your guests with these delightful Easter Dirt Cups!
Frequently Asked Questions:
Can I make these ahead of time?
Absolutely! In fact, it’s recommended. The flavors meld beautifully, and the cookies will soften slightly, creating that perfect ‘dirt’ texture. They can be stored in the refrigerator, covered, for up to 2 days.
What other candies can I use besides gummy worms?
The possibilities are endless! You could use jelly beans, chocolate chips, sprinkles, candy eggs, or even small pretzel sticks to resemble branches. Feel free to experiment with your favorite Easter candies to customize your dirt cups.
How can I make a dairy-free version?
For a dairy-free Easter Dirt Cup, simply use a dairy-free chocolate pudding mix and a plant-based milk alternative (like almond, soy, or oat milk). For the whipped topping, opt for a coconut-based or other dairy-free whipped topping.
Easter Dirt Cups
A festive and fun Easter dessert featuring chocolate cookie ‘dirt’, creamy pudding, and candy decorations.
Ingredients
-
1 package (3.9 oz.) vanilla instant pudding mix
-
2 cups cold milk
-
1 container (8 oz.) Cool Whip, thawed
-
Food coloring (purple and pink)
-
1 package Oreo cookies, finely crushed with filling removed
-
Shredded coconut
-
Candy eggs
-
Peeps marshmallow chicks or bunnies
Instructions
-
Step 1
Prepare the ‘dirt’: Place Oreo cookies into a food processor or a zip-top bag and crush them into fine crumbs, discarding the filling. -
Step 2
Tint the coconut: Divide shredded coconut into two small bowls. Add a few drops of purple food coloring to one bowl and pink to the other. Stir well until evenly colored. Set aside. -
Step 3
Make the pudding: In a medium bowl, whisk together the vanilla instant pudding mix and cold milk. Beat for 2 minutes until thickened. Let it stand for 5 minutes. -
Step 4
Fold in Cool Whip: Gently fold the thawed Cool Whip into the prepared pudding until well combined and no streaks remain. -
Step 5
Assemble the dirt cups: In clear cups or bowls, layer crushed Oreo cookie ‘dirt’ with the pudding mixture. Start with a layer of dirt, then pudding, and repeat. -
Step 6
Decorate for Easter: Top each dirt cup with more cookie ‘dirt’. Place candy eggs and Peeps marshmallows on top to resemble an Easter garden. Sprinkle with tinted coconut for a colorful finish.
Important Information
Nutrition Facts (Per Serving)
It is important to consider this information as approximate and not to use it as definitive health advice.
Allergy Information
Please check ingredients for potential allergens and consult a health professional if in doubt.


Leave a Comment