
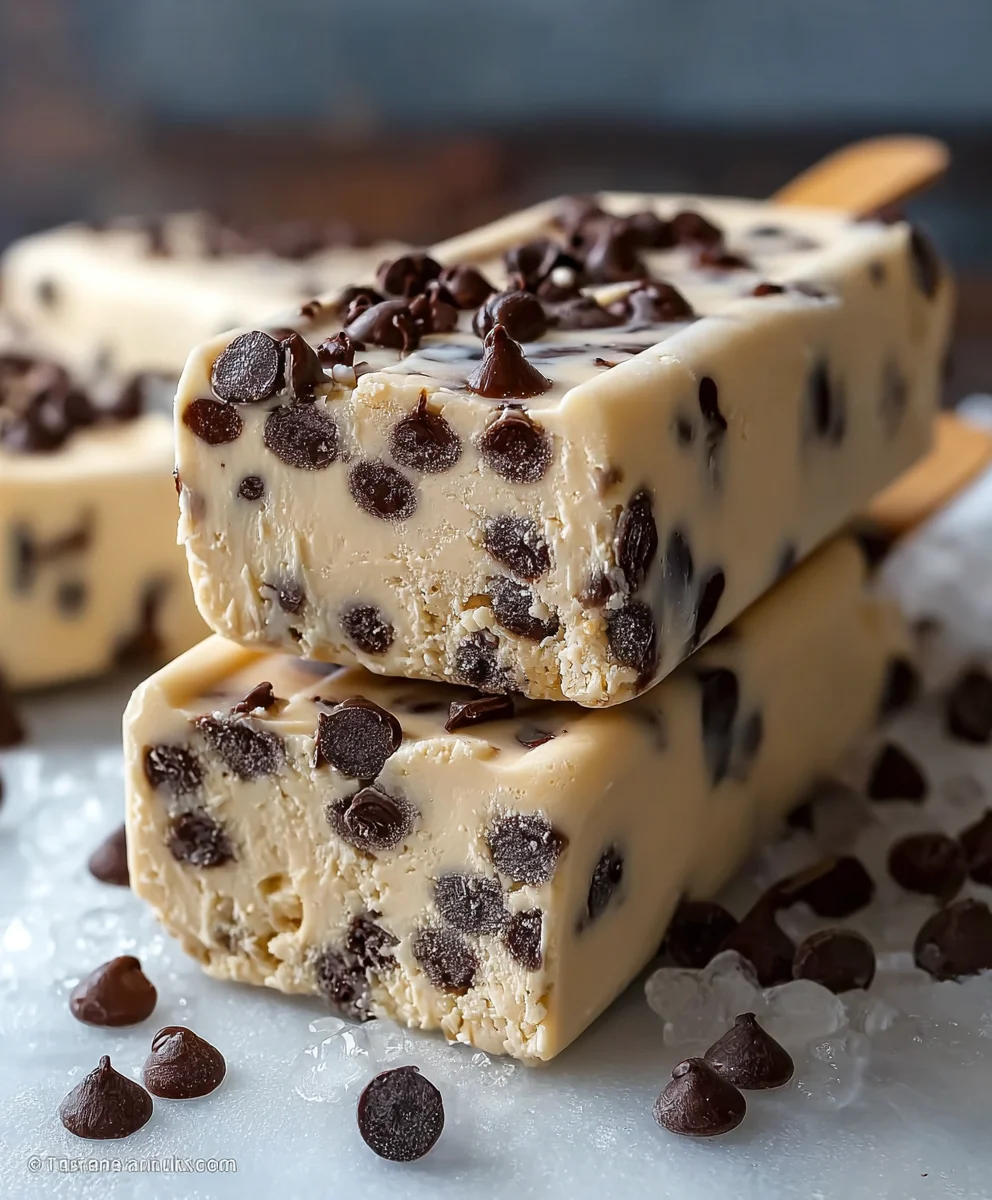
Chocolate Chip Cookie Dough Ice Cream Bars are, for many, the pinnacle of dessert innovation, a true dream come true for anyone who has ever wrestled with the delicious choice between a scoop of their favorite ice cream and a freshly baked cookie. I know I have! There’s something undeniably magical about taking two beloved classics – the humble chocolate chip cookie and rich, creamy ice cream – and expertly uniting them into one spectacular, convenient treat. This iconic combination captures the joyful essence of childhood, evoking nostalgic memories of sneaking raw cookie dough from the bowl and indulging in frozen delights on a warm day, a truly American classic evolved into a modern favorite.
Why We Can’t Get Enough of This Frozen Delight
What makes these Chocolate Chip Cookie Dough Ice Cream Bars so incredibly irresistible? It’s the delightful medley of textures and flavors: the cool, smooth ice cream perfectly contrasted with generous chunks of sweet, buttery, and slightly chewy cookie dough, all punctuated by delightful melty chocolate chips. They offer the ultimate satisfaction of a scoop shop favorite, reimagined into a portable bar that’s perfect for a summer afternoon, a quick dessert, or a cozy night in. Get ready to create a dessert that will truly impress and satisfy every sweet tooth!

Ingredients:
- For the Edible Cookie Dough:
- ½ cup (1 stick or 113g) unsalted butter, softened to room temperature: I always make sure my butter is perfectly softened, not melted, for the best creaming results. This is key for that classic cookie dough texture.
- ½ cup (100g) granulated sugar: This provides sweetness and helps with the texture.
- ¼ cup (50g) packed light brown sugar: The molasses in brown sugar adds a lovely depth of flavor and keeps the dough moist and chewy.
- 1 teaspoon vanilla extract: A good quality vanilla extract really elevates the flavor profile of our cookie dough.
- ½ teaspoon salt: Don’t skip the salt! It balances the sweetness and enhances all the other flavors.
- 1½ cups (180g) all-purpose flour: We’ll be heat-treating this to ensure it’s safe to eat raw.
- 2 tablespoons milk (any kind): Just a touch of liquid to bring the dough together to the perfect consistency.
- ¾ cup (about 130g) mini chocolate chips: I prefer mini chips here because they distribute more evenly in the dough and make for easier cutting of the bars.
- For the Ice Cream Layer:
- 1.5 quarts (about 1.4 liters) good quality vanilla ice cream: I find a premium vanilla ice cream truly makes these Chocolate Chip Cookie Dough Ice Cream Bars shine. Make sure it’s slightly softened for easy spreading.
- For the Chocolate Shell Topping:
- 1 cup (170g) semi-sweet chocolate chips or chopped chocolate: You can use milk chocolate if you prefer, but semi-sweet provides a nice contrast to the sweet cookie dough.
- 2 tablespoons coconut oil (refined or unrefined): This is my secret ingredient for that perfect, snappy magic shell texture. It helps the chocolate harden beautifully when it hits the cold ice cream.
- Optional Topping:
- Extra mini chocolate chips or sprinkles: For a pretty finishing touch on your Chocolate Chip Cookie Dough Ice Cream Bars.
Equipment You’ll Need:
- 9×13-inch baking pan: A sturdy metal pan is best for even chilling.
- Parchment paper or foil: Essential for lining the pan, making it super easy to lift out and cut your bars.
- Large microwave-safe bowl: For heat-treating the flour.
- Mixing bowls (at least two, one large): For combining ingredients.
- Electric mixer (stand or hand-held): Makes creaming the butter and sugars much easier and ensures a light, fluffy dough.
- Rubber spatula or wooden spoon: For scraping down bowls and folding in chips.
- Measuring cups and spoons: Accuracy is key in baking!
- Small saucepan or double boiler (if melting chocolate on stovetop): For the chocolate shell.
- Sharp knife: For cutting your beautiful bars.
- Airtight container: For storing any leftover bars.
Phase 1: Preparing the Edible Cookie Dough for Your Chocolate Chip Cookie Dough Ice Cream Bars
This is where the magic begins! We’re making a safe-to-eat cookie dough that will form the delicious base and crunchy bits of our Chocolate Chip Cookie Dough Ice Cream Bars.
-
Heat-Treat the Flour (Crucial Step for Edible Cookie Dough):
Before we do anything else, we need to make our flour safe for consumption. Raw flour can sometimes contain bacteria, so a quick heat treatment takes care of that. I like to spread my 1½ cups of all-purpose flour evenly on a large microwave-safe plate or in a microwave-safe bowl. I then microwave it on high for 1 minute and 15 seconds, stirring it halfway through (after about 40 seconds) to ensure even heating. You want the flour to reach an internal temperature of 160°F (71°C) if you have a thermometer, but simply heating it until it’s very warm to the touch is usually sufficient. Once heated, set it aside to cool completely. It’s important that it’s cool before adding it to the butter mixture, otherwise, it could melt your butter! This step ensures our Chocolate Chip Cookie Dough Ice Cream Bars are not just delicious, but also safe.
-
Cream the Butter and Sugars:
In a large mixing bowl, I like to combine my ½ cup of softened unsalted butter with the ½ cup of granulated sugar and the ¼ cup of packed light brown sugar. I’ll beat these together with an electric mixer on medium speed for about 2-3 minutes until the mixture becomes wonderfully light and fluffy, almost pale in color. This creaming process is crucial as it incorporates air, contributing to the ultimate texture of our cookie dough. Make sure to scrape down the sides of the bowl periodically to ensure everything is evenly combined.
-
Add the Flavorings:
Now, I’ll mix in the 1 teaspoon of vanilla extract and ½ teaspoon of salt. I beat them just until they are fully incorporated, usually another 30 seconds or so. This ensures the flavors are well distributed throughout our base for the Chocolate Chip Cookie Dough Ice Cream Bars.
-
Incorporate the Flour and Milk:
Once my heat-treated flour has cooled completely, I gradually add it to the butter mixture, mixing on low speed until just combined. Be careful not to overmix at this stage! Then, I’ll stir in the 2 tablespoons of milk, a little at a time, until the dough comes together and reaches a soft, pliable consistency. You might need slightly more or less milk depending on your flour and humidity, so add it gradually until it feels right – like classic cookie dough!
-
Fold in the Chocolate Chips:
Finally, I’ll gently fold in the ¾ cup of mini chocolate chips using a rubber spatula. I always use mini chips for this recipe because they spread out so nicely and ensure every bite of your Chocolate Chip Cookie Dough Ice Cream Bars has a perfect chocolatey crunch without being too clunky to cut.
-
Chill the Dough (Optional but Recommended for Scoops):
At this point, you have perfect edible cookie dough! You can divide this dough. About ⅓ of the dough will be pressed into the bottom of the pan, and the remaining ⅔ will be crumbled and scattered on top of the ice cream layer. If you want nice, distinct “nuggets” for the top, I recommend chilling the remaining ⅔ of the dough for about 30 minutes. This makes it easier to crumble into those lovely chunks that define Chocolate Chip Cookie Dough Ice Cream Bars.
Phase 2: Crafting the Creamy Vanilla Ice Cream Layer
The vanilla ice cream layer is the heart of our Chocolate Chip Cookie Dough Ice Cream Bars, providing a cool, creamy contrast to the rich cookie dough.
-
Prepare Your Pan:
First, I line my 9×13-inch baking pan with parchment paper or aluminum foil, leaving an overhang on the longer sides. This overhang acts as “handles,” making it incredibly easy to lift the entire block of bars out of the pan once they’re frozen solid. If you use foil, spray it lightly with non-stick cooking spray to prevent sticking.
-
Press in the Cookie Dough Base:
Take approximately one-third of your prepared edible cookie dough. Using your hands or the back of a spatula, press this portion evenly into the bottom of the prepared pan. You want a relatively thin, compact layer that covers the entire base. Don’t worry if it’s not perfectly smooth, but try to make it as even as possible for uniform bars. This forms the foundational layer of our Chocolate Chip Cookie Dough Ice Cream Bars. Once pressed, I pop this into the freezer for about 10-15 minutes while I prepare the ice cream. This helps it firm up and prevents it from mixing too much with the ice cream layer.
-
Soften the Ice Cream:
While the cookie dough base is chilling, I take my 1.5 quarts of vanilla ice cream out of the freezer. I let it sit on the counter for about 15-20 minutes until it’s softened enough to be easily spreadable, but not completely melted. It should be the consistency of very thick soft-serve. If it gets too soupy, it will be hard to work with and can create ice crystals, so keep an eye on it!
-
Spread the Ice Cream Layer:
Once the ice cream is at the perfect consistency, I spoon it evenly over the chilled cookie dough base in the pan. Using an offset spatula or the back of a large spoon, I gently spread it out, ensuring it forms a smooth, even layer across the entire surface. Work relatively quickly here to prevent the ice cream from melting too much.
-
Add the Remaining Cookie Dough Crumbles:
Now, take the remaining two-thirds of the cookie dough. If you chilled it, it should be firm enough to crumble easily. I break it into small, irregular pieces and sprinkle them generously over the softened vanilla ice cream layer. These will be the iconic “cookie dough” bits in your Chocolate Chip Cookie Dough Ice Cream Bars! Gently press the crumbles into the ice cream just slightly to ensure they adhere, but don’t press so hard that they sink completely.
-
Freeze Thoroughly:
Cover the pan loosely with plastic wrap or foil. Transfer the pan to the freezer and allow the bars to freeze for at least 4-6 hours, or preferably overnight. This long freeze time is essential for the bars to set up completely and become firm enough to cut cleanly. Patience is a virtue when making these Chocolate Chip Cookie Dough Ice Cream Bars!
Phase 3: The Decadent Chocolate Shell and Final Touches for Your Chocolate Chip Cookie Dough Ice Cream Bars
The snappy chocolate shell is the perfect finish, adding an extra layer of texture and rich chocolate flavor that truly makes these Chocolate Chip Cookie Dough Ice Cream Bars irresistible.
-
Prepare the Chocolate Shell:
When your ice cream bars are thoroughly frozen, it’s time to make the chocolate shell. In a microwave-safe bowl, combine the 1 cup of semi-sweet chocolate chips (or chopped chocolate) with the 2 tablespoons of coconut oil. I microwave this mixture in 30-second intervals, stirring well after each interval, until the chocolate is completely melted and smooth. This usually takes about 1.5 to 2 minutes total. Alternatively, you can melt them together in a small saucepan over low heat or in a double boiler. Make sure there are no lumps and the mixture is silky smooth. The coconut oil is what gives it that beautiful, hard “magic shell” consistency when it hits the cold ice cream.
-
Pour and Spread the Chocolate Shell:
Carefully remove the frozen bars from the freezer. Pour the warm, melted chocolate-coconut oil mixture evenly over the top of the frozen ice cream layer. Work quickly, as the chocolate will start to set almost immediately upon contact with the cold surface. Use an offset spatula or the back of a spoon to gently spread the chocolate into an even layer, covering all the cookie dough crumbles and ice cream. If you like, you can sprinkle some extra mini chocolate chips or sprinkles on top while the chocolate is still wet for added decoration and texture.
-
Final Freeze for the Shell:
Return the pan to the freezer immediately for another 30-60 minutes, or until the chocolate shell has completely hardened and is firm to the touch. This crucial step ensures that the chocolate sets into that satisfyingly crisp layer.
-
Cut Your Chocolate Chip Cookie Dough Ice Cream Bars:
Once the bars are thoroughly frozen and the chocolate shell is firm, use the parchment paper or foil overhangs to carefully lift the entire block out of the pan and onto a cutting board. Using a large, sharp knife, cut the block into individual bars. I find that warming my knife under hot water and wiping it dry between each cut helps create cleaner edges, especially through the chocolate shell. You can cut them into 12 generous bars (3 rows by 4 columns) or smaller squares, depending on your preference. This is the moment of truth for your perfect Chocolate Chip Cookie Dough Ice Cream Bars!
Tips for Perfect Chocolate Chip Cookie Dough Ice Cream Bars:
- Don’t Rush the Freezing: Seriously, this is the most important tip. Adequate freezing time, especially after adding each layer, prevents a messy outcome and ensures beautifully defined layers. Overnight freezing is always best.
- The Right Ice Cream Consistency: When spreading the ice cream, aim for soft-serve consistency. Too hard, and it’s impossible to spread; too soft, and it will just melt into your cookie dough base.
- Working with Cookie Dough: If your cookie dough gets too sticky, chill it for 15-20 minutes. It’ll be much easier to press into the pan and crumble.
- Clean Cuts: For super neat bars, warm your knife in hot water and wipe it dry before each cut. This helps the blade slice through the chocolate shell and frozen layers without cracking or dragging.
- Experiment with Chocolate: While semi-sweet is classic, feel free to use milk chocolate or even dark chocolate for the shell, depending on your preference.
- Garnish for Fun: A sprinkle of sea salt flakes on top of the wet chocolate shell can be absolutely divine, enhancing the chocolate flavor.
Storage Instructions:
These Chocolate Chip Cookie Dough Ice Cream Bars are best enjoyed when properly stored to maintain their texture and flavor. After cutting, I typically place the individual bars in an airtight container, separated by small pieces of parchment paper to prevent them from sticking together. This is especially helpful if you’re stacking them. They will keep beautifully in the freezer for up to 2-3 weeks. However, in my house, they rarely last more than a few days because they’re just too delicious to resist! Make sure the container is truly airtight to prevent freezer burn, which can make the ice cream layer icy and diminish the overall quality of your wonderful Chocolate Chip Cookie Dough Ice Cream Bars.
Conclusion:
And there you have it, my friends! We’ve journeyed through the creation of what I truly believe is one of the most irresistible treats you could ever whip up in your own kitchen. These aren’t just any dessert; they are a celebration of everything wonderful, a symphony of textures and flavors that dance on your palate. From the moment you take that first bite, you’ll understand exactly why I’m so passionate about this recipe. It’s the perfect harmony of creamy, dreamy ice cream, studded with those delightful pockets of chewy, sweet, and slightly salty chocolate chip cookie dough, all encased in a crisp, snappy chocolate shell. Imagine the joy of indulging in something that feels incredibly decadent, yet is surprisingly simple to assemble, without even needing to turn on your oven! The satisfaction of crafting a dessert that looks like it came from a gourmet bakery, but with the heartfelt touch of homemade goodness, is truly unmatched. This recipe is a must-try for anyone who adores cookies, ice cream, and chocolate – essentially, anyone with a sweet tooth and a desire for an experience that’s both comforting and exciting. It’s the kind of dessert that brings smiles, creates memories, and makes any occasion feel a little more special. Trust me, once you experience the sheer delight of these bars, there’s no going back.
Now, while these bars are absolutely divine just as they are, I love to offer up a few ideas to make them uniquely yours or to elevate the serving experience even further. For a truly luxurious touch, consider a light dusting of cocoa powder or a delicate sprinkle of flaky sea salt over the chocolate shell just before it sets – the salt enhances the chocolate and cookie dough flavors beautifully. You could also serve them alongside a small bowl of warm raspberry coulis or a rich, dark fudge sauce for an extra layer of decadence. If you’re feeling adventurous with variations, don’t hesitate to experiment with different ice cream flavors! Imagine a vibrant mint chip ice cream base, or perhaps a rich coffee ice cream for a sophisticated twist, instead of the classic vanilla. You could also get creative with the cookie dough itself; a peanut butter cookie dough or even a brown butter pecan dough would introduce exciting new dimensions. For those who adore texture, try pressing a layer of crushed pretzels or graham crackers into the bottom chocolate layer before adding the ice cream – it adds a delightful crunch and a salty contrast that’s simply divine. And for a festive touch, mix in some sprinkles into your cookie dough or drizzle white chocolate over the finished bars. The possibilities are truly endless, allowing you to tailor this sensational treat to your exact preferences or whatever ingredients you have on hand.
So, what are you waiting for? This is your invitation to dive into the wonderful world of homemade frozen treats. I wholeheartedly encourage you to roll up your sleeves, gather your ingredients, and give this recipe a try. You won’t regret it – in fact, I’m pretty confident it will become a new staple in your dessert repertoire. The process is enjoyable, the result is spectacular, and the smiles it brings are priceless. There’s something incredibly satisfying about making something so utterly delicious from scratch, and these Chocolate Chip Cookie Dough Ice Cream Bars are a testament to that. Once you’ve had a chance to whip up your own batch, I would absolutely love to hear about your experience! Did you stick to the classic? Did you try any of my suggested variations, or perhaps invent some of your own? What was your favorite part of making them, and more importantly, devouring them? Please, share your stories, your triumphs, and even your creative adaptations in the comments below. Your feedback and photos truly make my day and inspire others in our cooking community. Let’s spread the joy of these incredible, no-bake ice cream bars far and wide!
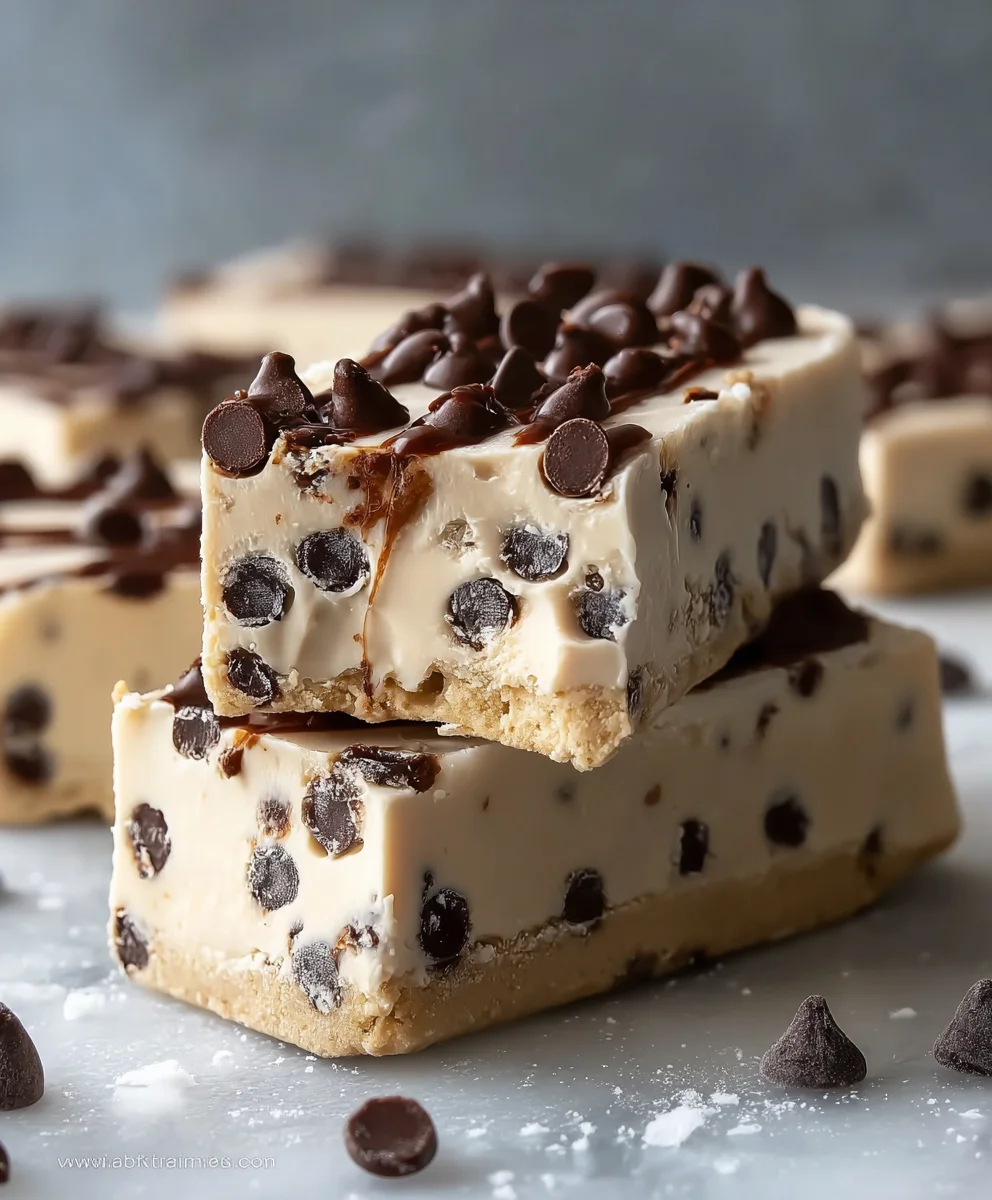
Chocolate Chip Cookie Dough Ice Cream Bars
Chocolate Chip Cookie Dough Ice Cream Bars are a must-try for any dessert enthusiast! With layers of edible cookie dough, creamy vanilla ice cream, and a rich chocolate coating, these bars offer an indulgent twist on classic flavors. Perfect for summer days or any time you’re craving a frozen treat, these bars are easy to make and even easier to enjoy. Keep bars frozen until ready to serve for the best texture.
Ingredients
-
½ cup (113g) unsalted butter, softened
-
½ cup (100g) granulated sugar
-
¼ cup (50g) packed light brown sugar
-
1 teaspoon vanilla extract
-
½ teaspoon salt
-
1½ cups (180g) all-purpose flour, heat-treated
-
2 tablespoons milk (any kind)
-
¾ cup (130g) mini chocolate chips
-
1.5 quarts (1.4 liters) vanilla ice cream, slightly softened
-
1 cup (170g) semi-sweet chocolate chips or chopped chocolate
-
2 tablespoons coconut oil
-
Extra mini chocolate chips or sprinkles (optional)
Instructions
-
Step 1
Heat-treat 1½ cups all-purpose flour: Microwave for 1 min 15 secs, stirring halfway, then cool completely. In a large bowl, cream ½ cup softened unsalted butter with ½ cup granulated sugar and ¼ cup packed light brown sugar for 2-3 minutes until light and fluffy. Mix in 1 tsp vanilla extract and ½ tsp salt. Gradually add cooled heat-treated flour and 2 tbsp milk until a soft, pliable dough forms. Fold in ¾ cup mini chocolate chips. Divide dough: use approximately ⅓ for the base, and chill the remaining ⅔ dough for 30 minutes if you prefer distinct crumbles for the top layer. -
Step 2
Line a 9×13-inch baking pan with parchment paper, leaving an overhang on the longer sides. Press ⅓ of the prepared cookie dough evenly into the bottom of the pan, then freeze for 10-15 minutes. Let 1.5 quarts vanilla ice cream sit at room temperature for 15-20 minutes until it reaches a spreadable, thick soft-serve consistency. Spoon the softened ice cream evenly over the chilled cookie dough base and spread smooth. Crumble the remaining ⅔ of the cookie dough (chilled, if applicable) generously over the ice cream layer, gently pressing the crumbles slightly to adhere. Cover loosely and freeze for at least 4-6 hours, or preferably overnight, until solid. -
Step 3
When the bars are thoroughly frozen, prepare the chocolate shell: In a microwave-safe bowl, combine 1 cup semi-sweet chocolate chips with 2 tbsp coconut oil. Microwave in 30-second intervals, stirring after each, until completely melted and smooth (about 1.5-2 minutes total). Remove the frozen bars from the freezer. Pour the warm, melted chocolate-coconut oil mixture evenly over the top, quickly spreading with an offset spatula. Optionally, sprinkle extra mini chocolate chips or sprinkles on top while the chocolate is still wet. Return to the freezer immediately for another 30-60 minutes until the chocolate shell has completely hardened. Lift the entire frozen block from the pan using the parchment paper overhangs onto a cutting board. Using a large, sharp knife (warm and wipe dry between cuts for cleaner edges), cut the block into 12 generous individual bars. Store any leftover bars in an airtight container, separated by parchment paper, in the freezer for up to 2-3 weeks.
Important Information
Nutrition Facts (Per Serving)
It is important to consider this information as approximate and not to use it as definitive health advice.
Allergy Information
Please check ingredients for potential allergens and consult a health professional if in doubt.

Leave a Comment