
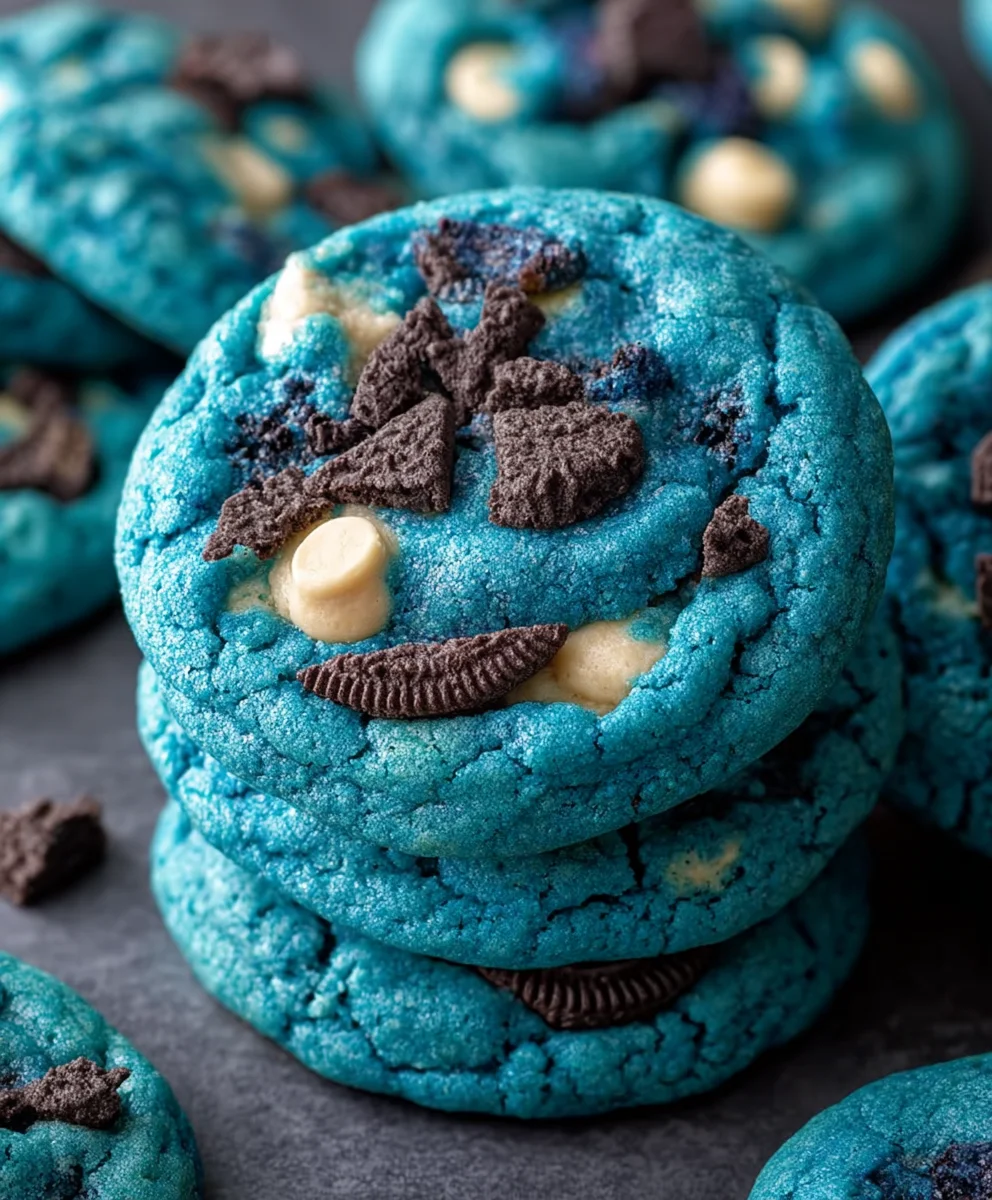
Blue Cookie Monster Cookies are more than just a treat; they’re a nostalgic journey back to childhood joy and pure, unadulterated fun. Who doesn’t remember the iconic Sesame Street character, his insatiable appetite for cookies, and that signature vibrant blue hue? These aren’t your average chocolate chip cookies. The magic lies in that unmistakable, cheerful blue color, reminiscent of the beloved Muppet himself, making them an instant hit at any gathering, from birthday parties to casual get-togethers. They spark smiles, ignite conversations, and, most importantly, deliver an explosion of delicious, buttery, slightly sweet cookie goodness with every bite. What truly sets these Blue Cookie Monster Cookies apart is their delightful combination of a soft, chewy center and slightly crisp edges, punctuated by colorful candy-coated chocolates and miniature chocolate chips, creating a visual and textural symphony that’s simply irresistible.

Ingredients:
- 3 cups (360g) all-purpose flour
- 2 teaspoons cornstarch
- 1 teaspoon baking soda
- 1/4 teaspoon salt
- 2 sticks (1 cup) unsalted butter, softened to room temperature
- 1 1/4 cups packed brown sugar
- 1/4 cup granulated sugar
- 2 large eggs, at room temperature
- 1 teaspoon pure vanilla extract
- Royal blue gel food coloring
- Electric blue gel food coloring
- Violet gel food coloring
- 2/3 cup white chocolate chips, plus extra for pressing if desired
- 2/3 cup finely chopped mini Chips Ahoy cookies
- 2/3 cup finely chopped Oreo cookies (including the cream filling)
Preparing the Cookie Dough
Step 1: Combine Dry Ingredients
Begin extract by whisking together your dry ingredients in a medium bowl. This ensures everything is evenly distributed, which is key for consistent leavening and texture. In this bowl, combine the 3 cups of all-purpose flour, 2 teaspoons of cornstarch, 1 teaspoon of baking soda, and 1/4 teaspoon of salt. The cornstarch is a little secret weapon here; it helps to create a more tender and slightly chewier cookie by interfering with gluten development. Set this bowl aside while you prepare the wet ingredients.
Step 2: Cream the Butter and Sugars
In a large bowl, or the bowl of a stand mixer fitted with the paddle attachment, cream together the softened butter and sugars. You’ll need 2 sticks (which is 1 cup) of unsalted butter, making sure it’s truly at room temperature – soft enough to easily indent with your finger, but not melted. Add 1 1/4 cups of packed brown sugar and 1/4 cup of granulated sugar to the butter. Beat these together on medium speed until the mixture is light, fluffy, and pnon-alcoholic ale yellow. This creaming process incorporates air into the dough, which contributes to the cookie’s rise and texture. Don’t rush this step; it can take 3-5 minutes.
Step 3: Incorporate Eggs and Vanilla
Once your butter and sugar mixture is well creamed, it’s time to add the eggs and vanilla extract. Add the 2 large eggs, one at a time, beating well after each addition until fully incorporated. It’s important that your eggs are also at room temperature; this helps them emulsify better with the fat, preventing a greasy dough. After the eggs are mixed in, stir in 1 teaspoon of pure vanilla extract for that classic cookie flavor.
Coloring and Adding Mix-Ins
Step 4: Divide and Color the Dough
Now for the fun part – the “Cookie Monster” colors! Divide your cookie dough evenly into three separate bowls. This is where you’ll add the gel food coloring. Gel coloring is best because it’s highly concentrated and won’t add excess liquid to your dough. In one bowl, add a generous amount of royal blue gel coloring. In the second bowl, add electric blue gel coloring, and in the third, add violet gel coloring. Use a spoon or spatula to gently mix the color into each portion of dough until you achieve vibrant, uniform shades of blue and purple. Be careful not to overmix, as this can develop the gluten too much. The goal is to get intense, eye-catching colors.
Step 5: Add the Mix-Ins
To each of the colored dough portions, add half of the remaining dry ingredients (from Step 1) and about half of the mix-ins. Gently mix until just combined. It’s important not to overmix at this stage. You want to see streaks of the different colors and chunks of the cookies and white chocolate. Then, add the remaining white chocolate chips, chopped mini Chips Ahoy cookies, and chopped Oreo cookies. Divide these mix-ins proportionally among the three colored dough bowls. Gently fold them in until evenly distributed. The combination of white chocolate, crunchy Chips Ahoy, and the creamy, chocolatey Oreos creates a delightful texture and flavor explosion in every bite.
Baking the Blue Cookie Monster Cookies
Step 6: Chill the Dough
This is a crucial step for great cookies, especially ones with this many mix-ins and vibrant colors. Cover each bowl of colored dough tightly with plastic wrap and refrigerate for at least 2 hours, or ideally overnight. Chilling the dough allows the fats to firm up, which prevents the cookies from spreading too much in the oven. It also gives the flavors time to meld and deepen. A cold dough is easier to handle and will result in thicker, chewier cookies with more defined color variations.
Step 7: Bake the Cookies
Preheat your oven to 350°F (175°C). Line baking sheets with parchment paper. Remove the chilled dough from the refrigerator. You can either gently swirl portions of each color together before rolling them into balls, or simply scoop random portions of each color and press them together slightly to create a marbled effect. Roll the dough into 1.5-inch balls. Place the dough balls about 2 inches apart on the prepared baking sheets. If you like, you can press a few extra white chocolate chips onto the tops of the cookies for a decorative touch before baking. Bake for 10-12 minutes, or until the edges are lightly golden brown and the centers are still slightly soft. Do not overbake; they will continue to set as they cool.
Step 8: Cool and Enjoy
Let the cookies cool on the baking sheets for 5-10 minutes before carefully transferring them to a wire rack to cool completely. This allows them to firm up properly. Once cooled, admire your beautiful, colorful “Blue Cookie Monster Cookies”! They are best enjoyed within a few days and stored in an airtight container at room temperature. The combination of vibrant colors, delightful crunch, and sweet chocolate will make these a hit with everyone.
Conclusion:
And there you have it! You’ve successfully created your very own batch of delicious Blue Cookie Monster Cookies. These vibrant and fun cookies are more than just a treat; they’re an experience. The perfect blend of chewy centers, slightly crisp edges, and bursts of chocolate and candy confetti will delight everyone who takes a bite. We hope you enjoyed the process as much as we did!
These cookies are wonderfully versatile. Serve them warm straight from the oven for an extra gooey center, or let them cool completely for a satisfying crunch. They make a fantastic addition to any dessert table, a delightful surprise for a bake snon-alcoholic ale, or simply a fun activity to do with kids. Imagin extracte them alongside a tall glass of cold milk, or even crum extractbled over ice cream for an indulgent sundae. Don’t be afraid to get creative with your toppings! You can sprinkle them with edible glitter after baking for extra sparkle, or even drizzle them with a little white chocolate.
We truly encourage you to give this recipe a try. It’s designed to be straightforward and rewarding, evegin extractor beginner bakers. Remember, the joy of baking is in the process and the delicious outcome. So go ahead, embrace the blue, and enjoy your fantastic Blue Cookie Monster Cookies!
Frequently Asked Questions:
How can I make these cookies even more “Cookie Monster”-like?
To really amplify the Cookie Monster vibe, consider adding more blue candies, mini chocolate chips, and perhaps even some mini blue M&Ms. You could also slightly underbake them for a softer, more dough-like texture, which is often associated with the character. A dusting of powdered sugar after cooling can also resemble fur!
Can I freeze the dough for later?
Absolutely! The dough for Blue Cookie Monster Cookies freezes exceptionally well. Once you’ve mixed the dough, scoop it into balls and place them on a baking sheet to freeze until solid. Then, transfer the frozen dough balls to an airtight container or freezer bag. You can bake them directly from frozen, just add a few extra minutes to the baking time.

Blue Cookie Monster Cookies – Fun & Easy Recipe
Brightly colored, fun, and easy-to-make cookies inspired by Cookie Monster, featuring a delightful mix of white chocolate chips and crumbled cookies.
Ingredients
-
3 cups (360g) all-purpose flour
-
2 teaspoons cornstarch
-
1 teaspoon baking soda
-
1/4 teaspoon salt
-
2 sticks (1 cup) unsalted butter, softened to room temperature
-
1 1/4 cups packed brown sugar
-
1/4 cup granulated sugar
-
2 large eggs, at room temperature
-
1 teaspoon pure vanilla extract
-
Royal blue gel food coloring
-
Electric blue gel food coloring
-
Violet gel food coloring
-
2/3 cup white chocolate chips, plus extra for pressing if desired
-
2/3 cup finely chopped mini Chips Ahoy cookies
-
2/3 cup finely chopped Oreo cookies (including the cream filling)
Instructions
-
Step 1
Combine dry ingredients: Whisk together 3 cups all-purpose flour, 2 teaspoons cornstarch, 1 teaspoon baking soda, and 1/4 teaspoon salt in a medium bowl. Set aside. -
Step 2
Cream butter and sugars: In a large bowl or stand mixer, beat 2 sticks (1 cup) softened unsalted butter with 1 1/4 cups packed brown sugar and 1/4 cup granulated sugar until light, fluffy, and pale yellow. This takes about 3-5 minutes. -
Step 3
Add eggs and vanilla: Beat in 2 large room temperature eggs, one at a time, until fully incorporated. Stir in 1 teaspoon pure vanilla extract. -
Step 4
Divide and color dough: Divide the dough evenly into three bowls. Add generous amounts of royal blue, electric blue, and violet gel food coloring to each bowl. Gently mix until uniform shades are achieved, being careful not to overmix. -
Step 5
Add mix-ins: Gently mix half of the dry ingredients into each colored dough portion until just combined. Then, divide and gently fold in the white chocolate chips, chopped mini Chips Ahoy cookies, and chopped Oreo cookies into each bowl. -
Step 6
Chill the dough: Cover each bowl tightly with plastic wrap and refrigerate for at least 2 hours, or ideally overnight. This step prevents excessive spreading and deepens flavors. -
Step 7
Bake the cookies: Preheat oven to 350°F (175°C). Line baking sheets with parchment paper. Roll dough into 1.5-inch balls, swirling colors together or pressing portions of different colors to create a marbled effect. Place balls on baking sheets, about 2 inches apart. Press extra white chocolate chips on top if desired. Bake for 10-12 minutes until edges are lightly golden and centers are soft. -
Step 8
Cool and enjoy: Let cookies cool on baking sheets for 5-10 minutes before transferring to a wire rack to cool completely. Store in an airtight container.
Important Information
Nutrition Facts (Per Serving)
It is important to consider this information as approximate and not to use it as definitive health advice.
Allergy Information
Please check ingredients for potential allergens and consult a health professional if in doubt.


Leave a Comment