
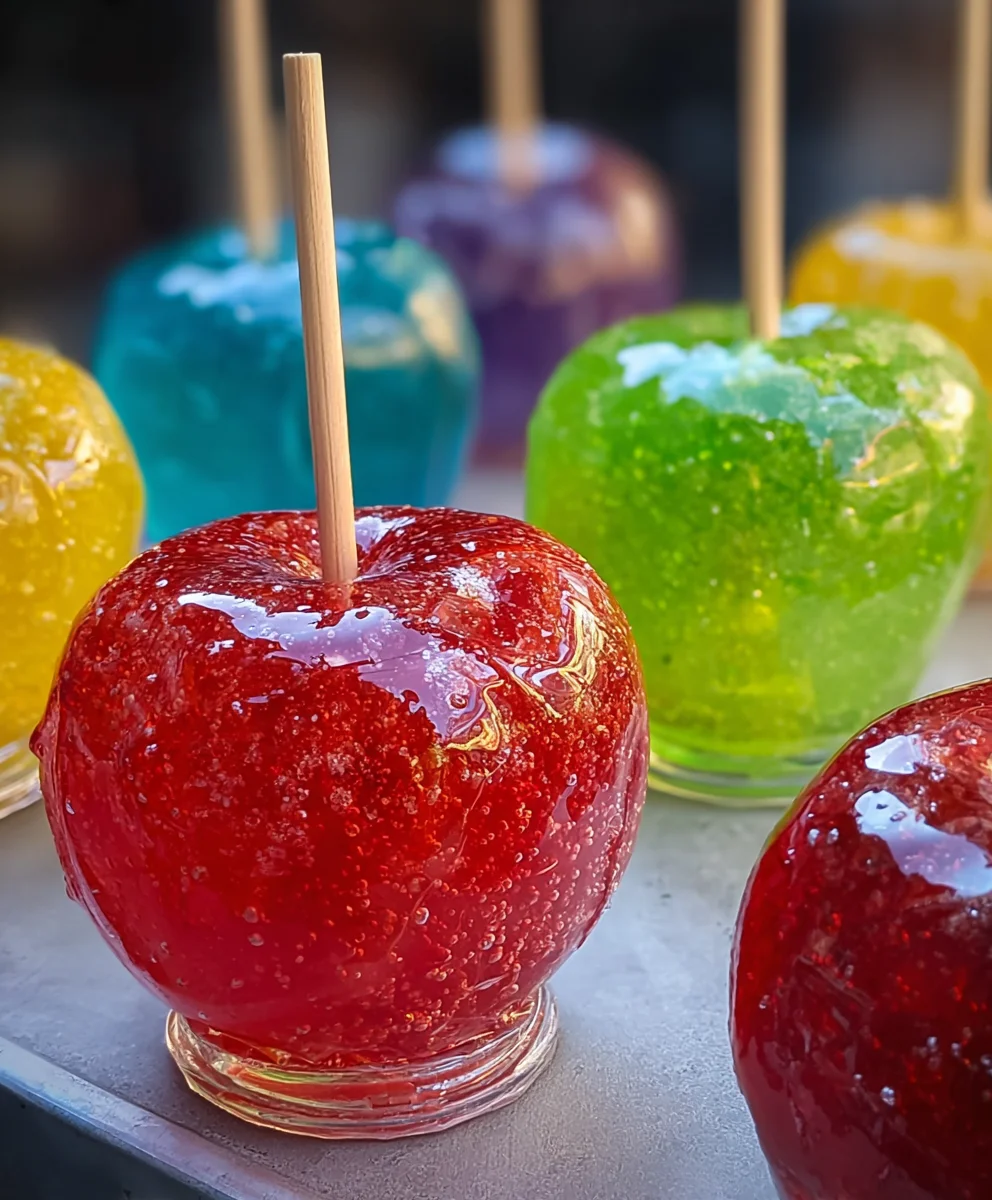
Jolly Rancher Candy Apples aren’t just a treat; they’re a vibrant explosion of nostalgia and pure, unadulterated joy on a stick! Imagine the satisfying crunch of perfectly cooked candy yielding to a crisp, tart apple, all infused with the iconic, fruity zing of your favorite Jolly Rancher flavors. It’s no wonder these shimmering beauties are a perennial favorite at fairs, fall festivals, and any gathering where a touch of whimsical sweetness is desired. What makes them truly special, beyond the dazzling colors and irresistible crunch, is the way they transport us back to simpler times, evoking memories of sticky fingers and delighted squeals. This recipe will guide you through creating your own batch of these delightful Jolly Rancher Candy Apples, ensuring a perfect balance of chewy candy shell and refreshing fruit, a guaranteed crowd-pleaser that’s as fun to make as it is to devour.

Ingredients:
- 6 medium apples (I recommend using a mix of Granny Smith for tartness, Honeycrisp for sweetness, or Fuji for a balanced flavor. Wash and thoroughly dry them. This is crucial for the candy to adhere properly.)
- 2-3 bags Jolly Rancher hard candies (assorted flavors or single color. Using a variety of colors will make your Jolly Rancher Candy Apples look even more festive. You can also choose a specific color theme if you prefer. You’ll need enough to generously coat all six apples.)
- 1-2 tablespoons water (This helps the Jolly Ranchers melt more smoothly and prevents them from burning too quickly.)
- Wooden skewers or popsicle sticks (About 6-8, to ensure you have spares. Sturdy ones are best so they can support the weight of the candy-coated apple.)
- Colorful sprinkles (Optional, but highly recommended for extra flair and texture. Think nonpareils, jimmies, or even custom blends.)
- Edible glitter (Optional, but adds a magical shimmer. Silver, gold, or iridescent glitter works beautifully.)
- Melted chocolate for drizzling (Optional. You can use milk, dark, or white chocolate. Melting it in a microwave-safe bowl in 30-second intervals, stirring in between, is the easiest way.)
Preparing the Apples
The first step to achieving perfect Jolly Rancher Candy Apples is proper apple preparation. You want to start with firm, unblemished apples. Give them a good wash under cool running water to remove any natural wax or residue. For the candy to stick effectively, the apples must be completely dry. Use a clean kitchen towel or paper towels and pat each apple down until there’s no visible moisture. Remove the stems by gently twisting and pulling them. Once the stems are out, insert a sturdy wooden skewer or popsicle stick firmly into the stem end of each apple. Push it in about halfway to two-thirds of the way, ensuring it’s secure enough to hold the weight of the candy coating.
Melting the Jolly Ranchers
This is where the magic happens! You’ll need to melt your Jolly Rancher candies to create the vibrant, glassy coating. For each batch of candy apples, or for each color you’re using, place about 1/4 to 1/3 of a bag of Jolly Ranchers into a small, heavy-bottomed saucepan. For example, if you’re using a variety of colors, you might melt a handful of red ones, then a handful of green, and so on. Add 1-2 tablespoons of water to the candies in the saucepan. This water is essential; it helps the candies melt more evenly and prevents them from scorching too quickly.
Heating the Candy Mixture
Now, it’s time to melt. Place the saucepan over medium-low heat. Do not walk away from the stove during this process, as melted hard candy can go from perfect to burnt very quickly. Stir the candies constantly with a heat-resistant spatula or wooden spoon. You’ll notice them start to soften and dissolve. Continue stirring and heating until all the Jolly Ranchers are completely melted and the mixture is smooth and syrupy. You’re looking for a consistency similar to thick syrup. Be patient; this can take a few minutes. If you see any bits of unmelted candy, continue to stir gently until they dissolve.
Coating the Apples
Once your Jolly Rancher mixture is perfectly melted and smooth, it’s time to coat your apples. Carefully remove the saucepan from the heat. Holding an apple by its skewer, tilt the saucepan and begin to dip and swirl the apple into the melted candy. Rotate the apple slowly, allowing the hot candy to coat the surface evenly. Aim for a consistent layer, but don’t worry if it’s not perfectly uniform; the slight imperfections add to the charm. Continue swirling until the apple is mostly covered. You can tilt the pan more to get a thicker coating or work quickly for a thinner, more delicate shell.
Adding the Finishing Touches
As soon as you’ve coated an apple, you’ll want to add your decorations while the candy is still warm and sticky. This is where you can get creative! Immediately after dipping, hold the apple over a parchment-lined baking sheet or a piece of wax paper. While rotating the apple, generously sprinkle it with your colorful sprinkles and edible glitter. The warm candy will act as glue, holding your toppings in place. For an extra touch of sweetness and visual appeal, you can also drizzle melted chocolate over the candy-coated apples. Use a fork or a piping bag to create delicate lines or swirls of chocolate. Work relatively quickly, as the candy will begin to set as it cools.
Cooling and Setting
Once decorated, carefully place each candy-apple upright on a parchment-lined baking sheet or a sturdy piece of wax paper. Ensure they have enough space between them so they don’t stick together as they cool. Allow the Jolly Rancher Candy Apples to set completely at room temperature. This can take anywhere from 30 minutes to an hour, depending on the thickness of the candy coating and the ambient temperature. Resist the urge to put them in the refrigerator, as this can sometimes cause condensation and make the candy coating sticky or cloudy. Once the candy shell is hard and fully set, your delightful Jolly Rancher Candy Apples are ready to be enjoyed!

Conclusion:
And there you have it – a foolproof guide to creating delicious and dazzling Jolly Rancher Candy Apples! This recipe truly transforms a classic treat into something extraordinary with the vibrant flavors and colors of your favorite Jolly Ranchers. The sweet, crunchy shell gives way to a perfectly tart apple, creating a delightful sensory experience. I’ve found these candy apples to be a huge hit at parties, as a special Halloween treat, or simply as a fun weekend project for the whole family. Don’t be afraid to experiment and make these your own!
For serving, these are best enjoyed fresh, perhaps on a festive platter, or individually wrapped as party favors. They also make for a charming homemade gift. Consider pairing them with a scoop of vanilla ice cream for a truly decadent dessert, or a warm caramel dip for an extra layer of indulgence. Remember, the possibilities for variations are endless! Feel free to mix and match Jolly Rancher flavors to create unique color combinations and taste profiles. You can even add sprinkles or edible glitter to the melted candy for extra flair.
I encourage you to give this recipe a try. It’s a rewarding and fun baking adventure that is sure to impress. The joy of seeing these bright, cheerful Jolly Rancher Candy Apples come to life is immense, and the taste is even better. Happy candy-making!
Frequently Asked Questions:
Can I use different types of apples?
Absolutely! While Granny Smith apples are recommended for their tartness that balances the sweetness of the candy, Fuji, Honeycrisp, or Gala apples can also work well. Just ensure the apples are firm and not overly ripe.
How should I store leftover Jolly Rancher Candy Apples?
Jolly Rancher Candy Apples are best enjoyed the day they are made, as the candy shell can become sticky or soft if stored for too long. If you must store them, wrap them tightly in plastic wrap and keep them in a cool, dry place, away from humidity. Avoid refrigeration, as condensation can make the candy melt.
Jolly Rancher Candy Apples-Sweet Treat Recipe
A fun and festive recipe for making classic candy apples using vibrant Jolly Rancher hard candies.
Ingredients
-
6 medium apples (Granny Smith, Honeycrisp, or Fuji)
-
2-3 bags Jolly Rancher hard candies (assorted flavors or single color)
-
1-2 tablespoons water
-
Wooden skewers or popsicle sticks
-
Colorful sprinkles
-
Edible glitter
-
Melted chocolate for drizzling
Instructions
-
Step 1
Wash and thoroughly dry 6 medium apples. Remove stems and insert a sturdy wooden skewer or popsicle stick firmly into the stem end of each apple. -
Step 2
In a small, heavy-bottomed saucepan, place about 1/4 to 1/3 of a bag of Jolly Ranchers for each color you are using, along with 1-2 tablespoons of water. This water helps the candies melt more evenly. -
Step 3
Heat the saucepan over medium-low heat, stirring constantly with a heat-resistant spatula or wooden spoon until all the Jolly Ranchers are completely melted and the mixture is smooth and syrupy. Do not walk away from the stove. -
Step 4
Carefully remove the saucepan from the heat. Holding an apple by its skewer, tilt the saucepan and dip and swirl the apple into the melted candy, rotating slowly to coat the surface evenly. -
Step 5
Immediately after dipping, hold the apple over a parchment-lined baking sheet or wax paper. While rotating, generously sprinkle with colorful sprinkles and edible glitter while the candy is still warm. -
Step 6
For an extra touch, drizzle melted chocolate over the candy-coated apples. Place each decorated apple upright on the parchment-lined baking sheet and allow to set completely at room temperature for 30 minutes to an hour.
Important Information
Nutrition Facts (Per Serving)
It is important to consider this information as approximate and not to use it as definitive health advice.
Allergy Information
Please check ingredients for potential allergens and consult a health professional if in doubt.

Leave a Comment