
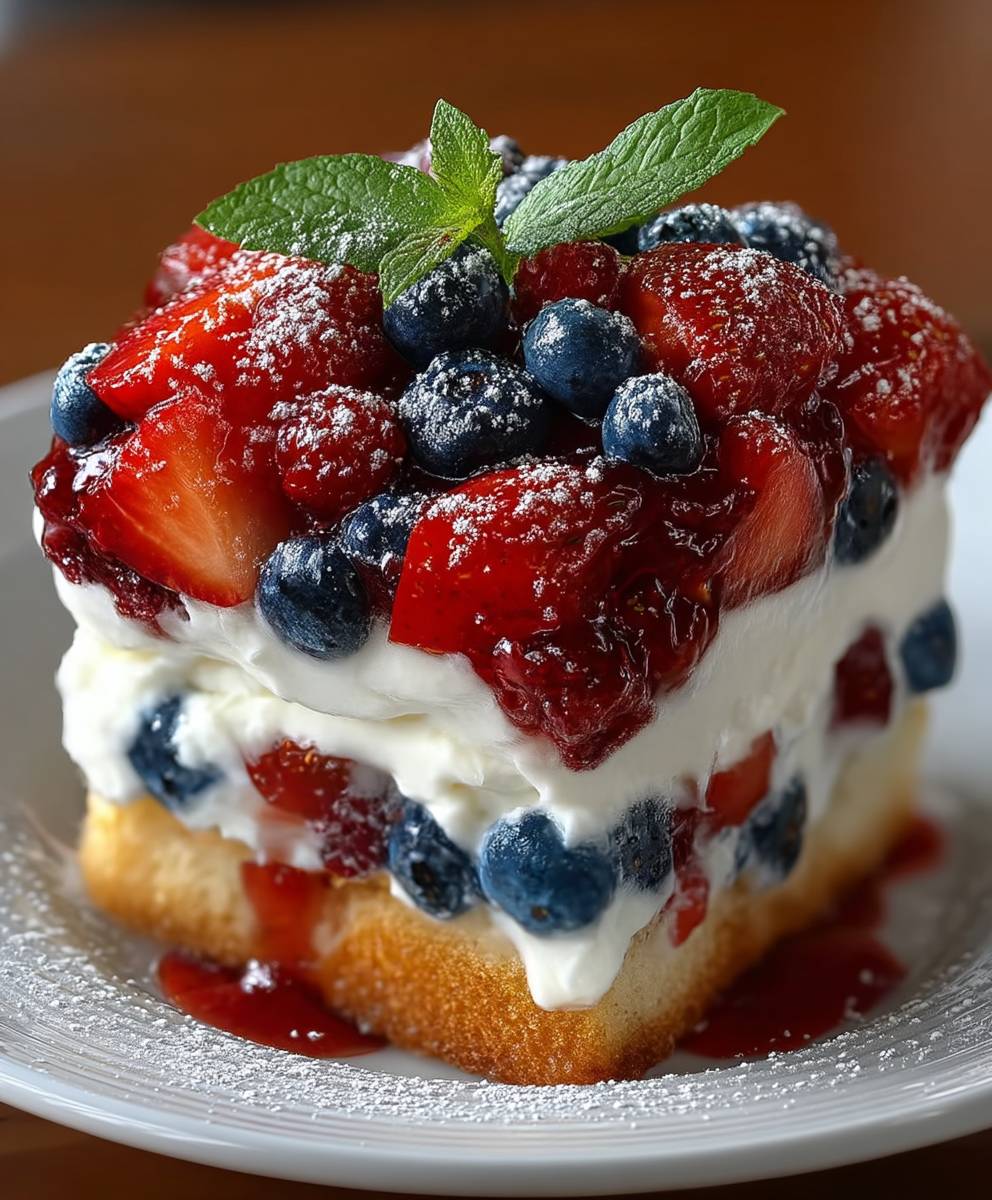
4th of July Trifle: Imagine a dessert so stunning, so patriotic, and so utterly delicious that it steals the show at your Independence Day celebration. This isn’t just any trifle; it’s a vibrant, layered masterpiece that embodies the spirit of the holiday. Prepare to wow your guests with a dessert thats as visually appealing as it is scrumptious!
While the exact origins of the trifle are debated, its roots can be traced back to the English dessert fool, dating as far back as the 16th century. Over time, the trifle evolved, incorporating layers of sponge cake, fruit, custard, and whipped cream. Our 4th of July Trifle takes this classic dessert and gives it a festive, all-American twist, perfect for celebrating our nation’s birthday.
What makes this 4th of July Trifle so irresistible? It’s the delightful combination of textures and flavors. The soft, moist cake, the juicy berries bursting with sweetness, the creamy custard, and the light, airy whipped cream create a symphony in your mouth. Plus, it’s incredibly easy to assemble, making it the perfect make-ahead dessert for a busy holiday. Everyone loves a trifle because it’s a crowd-pleaser that looks impressive with minimal effort. Get ready to create a showstopping dessert that will have everyone asking for seconds!

Ingredients:
- 1 (15.25 ounce) package yellow cake mix, plus ingredients called for on the box
- 1 (3.4 ounce) package instant vanilla pudding mix
- 3 cups milk
- 1 (8 ounce) package cream cheese, softened
- 1 (12 ounce) container frozen whipped topping, thawed, divided
- 1 pound fresh strawberries, hulled and sliced
- 1 pint fresh blueberries
- 1 (12 ounce) jar strawberry jam
- 1/4 cup water
- Optional: Red, white, and blue sprinkles for garnish
Baking the Cake
Okay, let’s get started! First things first, we need to bake our yellow cake. I always find that a good, sturdy cake forms the perfect base for a trifle. Follow the instructions on the box of your yellow cake mix. Usually, this involves combining the mix with eggs, oil, and water.
- Preheat your oven according to the cake mix instructions (usually around 350°F or 175°C). Grease and flour a 9×13 inch baking pan. This will prevent the cake from sticking and make it easier to remove later.
- In a large bowl, combine the cake mix, eggs, oil, and water as directed on the box. Use an electric mixer to beat the ingredients until smooth and well combined. This usually takes about 2-3 minutes.
- Pour the batter into the prepared baking pan and spread it evenly.
- Bake for the time specified on the box, usually around 25-30 minutes, or until a wooden skewer inserted into the center comes out clean.
- Let the cake cool in the pan for about 10 minutes before inverting it onto a wire rack to cool completely. This prevents the cake from becoming soggy.
Preparing the Creamy Layers
While the cake is cooling, we can get started on the creamy layers that will make this trifle so decadent. We’re going to make a vanilla pudding layer and a cream cheese layer, both of which will add richness and flavor.
Vanilla Pudding Layer:
- In a large bowl, whisk together the instant vanilla pudding mix and the milk. Whisk until the pudding starts to thicken, usually about 2-3 minutes.
- Set the pudding aside to firm up while you prepare the cream cheese layer. This will give it a chance to set properly.
Cream Cheese Layer:
- In a separate large bowl, beat the softened cream cheese with an electric mixer until smooth and creamy. This is important to ensure there are no lumps in your cream cheese layer.
- Gently fold in half of the thawed whipped topping into the cream cheese until well combined. Be careful not to overmix, as this can deflate the whipped topping. We want to keep it light and airy.
Making the Strawberry Sauce
Now, let’s create a delicious strawberry sauce that will soak into the cake and add a burst of fruity flavor. This is a simple sauce, but it makes a big difference in the overall taste of the trifle.
- In a small saucepan, combine the strawberry jam and water.
- Heat over medium heat, stirring constantly, until the jam is melted and the mixture is smooth. This usually takes about 3-5 minutes.
- Remove from heat and let the strawberry sauce cool slightly.
Assembling the Trifle
This is the fun part! We get to layer all of our delicious components into a beautiful trifle. I like to use a large glass trifle bowl so everyone can see the layers, but you can also use individual serving dishes if you prefer.
- Crumble the cooled yellow cake into bite-sized pieces. We don’t want big chunks of cake, so make sure they are small enough to easily eat with a spoon.
- In the trifle bowl (or individual serving dishes), start with a layer of crumbled cake.
- Drizzle some of the cooled strawberry sauce over the cake layer. Don’t soak it completely, just enough to moisten the cake.
- Next, add a layer of sliced strawberries and blueberries.
- Spoon half of the vanilla pudding over the fruit layer.
- Then, spread half of the cream cheese mixture over the pudding layer.
- Repeat the layers: cake, strawberry sauce, strawberries and blueberries, vanilla pudding, and cream cheese mixture.
- Top the final layer with the remaining whipped topping.
- If desired, garnish with red, white, and blue sprinkles for a festive touch.
Chilling and Serving
The most important step before serving is to chill the trifle. This allows the flavors to meld together and the layers to set properly. I recommend chilling it for at least 4 hours, but preferably overnight.
- Cover the trifle with plastic wrap and refrigerate for at least 4 hours, or preferably overnight.
- Before serving, remove the trifle from the refrigerator and let it sit for about 10-15 minutes to soften slightly.
- Serve chilled and enjoy!
Tips and Variations
Here are a few tips and variations to make this 4th of July Trifle even more special:
- Cake Variations: You can use other types of cake, such as angel food cake or pound cake, instead of yellow cake.
- Fruit Variations: Feel free to use other types of berries, such as raspberries or blackberries, or even add some sliced bananas or peaches.
- Jam Variations: If you’re not a fan of strawberry jam, you can use raspberry jam or any other type of fruit preserve.
- Alcoholic Twist: For an adult version, you can add a splash of rum or other liqueur to the strawberry sauce.
- Individual Trifles: As mentioned before, you can assemble the trifle in individual serving dishes for a more elegant presentation.
- Make Ahead: The trifle can be made up to 2 days in advance. Just be sure to store it covered in the refrigerator.
- Whipped Cream: If you prefer, you can make your own whipped cream instead of using store-bought whipped topping. Just be sure to whip it to stiff peaks and sweeten it to your liking.
- Layering Order: While I’ve suggested a specific layering order, feel free to experiment and create your own unique combinations. The most important thing is to have fun!
I hope you enjoy making and eating this delicious 4th of July Trifle! It’s the perfect dessert to celebrate Independence Day with family and friends. Happy baking!
Conclusion:
This 4th of July Trifle isn’t just a dessert; it’s a celebration in a bowl! The vibrant layers, the burst of fresh berries, and the creamy, dreamy filling all come together to create a truly unforgettable treat. I know, I know, there are a million dessert recipes out there, but trust me on this one. This trifle is a showstopper that’s surprisingly easy to assemble, making it the perfect addition to your holiday gathering. It’s guaranteed to impress your guests and leave them wanting more.
Why is this a must-try? Because it’s the perfect balance of flavors and textures. The sweetness of the cake is perfectly complemented by the tartness of the berries, and the creamy filling adds a luxurious touch that elevates the entire dessert. Plus, it’s visually stunning! The red, white, and blue layers are a festive tribute to the holiday, making it a centerpiece that everyone will admire. Beyond the aesthetics, it’s simply delicious. It’s the kind of dessert that brings smiles to faces and creates lasting memories.
But the best part? It’s incredibly versatile! Feel free to get creative with your serving suggestions and variations. For a lighter option, you could use angel food cake instead of pound cake. Or, if you’re feeling adventurous, try adding a layer of crumbled shortbread cookies for a bit of extra crunch. You could even swap out the berries for other seasonal fruits, like peaches or nectarines.
Serving Suggestions: Serve this trifle chilled, straight from the refrigerator. A dollop of whipped cream or a scoop of vanilla ice cream on top adds an extra touch of indulgence. For a more sophisticated presentation, you can serve individual portions in stemmed glasses. And don’t forget the sparklers! A few strategically placed sparklers will add a festive touch that’s sure to delight your guests.
Variations: Want to make it even more patriotic? Use star-shaped cookie cutters to cut out the cake and berries. You could also add a layer of blue-colored whipped cream or frosting. For a boozy twist, try soaking the cake in a little bit of rum or Grand Marnier. And if you’re short on time, you can use store-bought pound cake and whipped cream.
I truly believe that this 4th of July Trifle will become a new family favorite. It’s a recipe that’s easy to adapt to your own tastes and preferences, and it’s always a crowd-pleaser. So, what are you waiting for? Gather your ingredients, put on some festive music, and get ready to create a dessert that’s as beautiful as it is delicious.
I’m so excited for you to try this recipe! I know you’re going to love it. And I can’t wait to hear about your experience. Did you make any variations? What did your guests think? Share your photos and stories with me in the comments below. Let’s spread the joy of this delicious and festive dessert! Happy 4th of July!
4th of July Trifle: A Delicious & Festive Dessert Recipe
Festive 4th of July Trifle with yellow cake, vanilla pudding, cream cheese, fresh berries, and strawberry sauce. Perfect for Independence Day!
Ingredients
- 1 (15.25 ounce) package yellow cake mix, plus ingredients called for on the box
- 1 (3.4 ounce) package instant vanilla pudding mix
- 3 cups milk
- 1 (8 ounce) package cream cheese, softened
- 1 (12 ounce) container frozen whipped topping, thawed, divided
- 1 pound fresh strawberries, hulled and sliced
- 1 pint fresh blueberries
- 1 (12 ounce) jar strawberry jam
- 1/4 cup water
- Optional: Red, white, and blue sprinkles for garnish
Instructions
- Bake the Cake: Preheat oven according to cake mix instructions (usually 350°F/175°C). Grease and flour a 9×13 inch baking pan.
- In a large bowl, combine cake mix, eggs, oil, and water as directed on the box. Beat with an electric mixer until smooth (2-3 minutes).
- Pour batter into the prepared pan and spread evenly.
- Bake for the time specified on the box (usually 25-30 minutes), or until a wooden skewer inserted into the center comes out clean.
- Let the cake cool in the pan for 10 minutes before inverting it onto a wire rack to cool completely.
- Prepare Vanilla Pudding Layer: In a large bowl, whisk together the instant vanilla pudding mix and the milk until thickened (2-3 minutes). Set aside to firm up.
- Prepare Cream Cheese Layer: In a separate large bowl, beat the softened cream cheese with an electric mixer until smooth and creamy.
- Gently fold in half of the thawed whipped topping into the cream cheese until well combined.
- Make the Strawberry Sauce: In a small saucepan, combine the strawberry jam and water.
- Heat over medium heat, stirring constantly, until the jam is melted and the mixture is smooth (3-5 minutes).
- Remove from heat and let the strawberry sauce cool slightly.
- Assemble the Trifle: Crumble the cooled yellow cake into bite-sized pieces.
- In a trifle bowl (or individual serving dishes), start with a layer of crumbled cake.
- Drizzle some of the cooled strawberry sauce over the cake layer.
- Add a layer of sliced strawberries and blueberries.
- Spoon half of the vanilla pudding over the fruit layer.
- Spread half of the cream cheese mixture over the pudding layer.
- Repeat the layers: cake, strawberry sauce, strawberries and blueberries, vanilla pudding, and cream cheese mixture.
- Top the final layer with the remaining whipped topping.
- If desired, garnish with red, white, and blue sprinkles.
- Chill and Serve: Cover the trifle with plastic wrap and refrigerate for at least 4 hours, or preferably overnight.
- Before serving, remove the trifle from the refrigerator and let it sit for about 10-15 minutes to soften slightly.
- Serve chilled and enjoy!
Notes
- Cake Variations: Angel food cake or pound cake can be substituted for yellow cake.
- Fruit Variations: Raspberries, blackberries, sliced bananas, or peaches can be added.
- Jam Variations: Raspberry jam or other fruit preserves can be used.
- Alcoholic Twist: Add a splash of rum or other liqueur to the strawberry sauce for an adult version.
- Individual Trifles: Assemble in individual serving dishes for a more elegant presentation.
- Make Ahead: The trifle can be made up to 2 days in advance. Store covered in the refrigerator.
- Whipped Cream: Homemade whipped cream can be used instead of store-bought.
- Layering Order: Feel free to experiment with the layering order.

Leave a Comment