
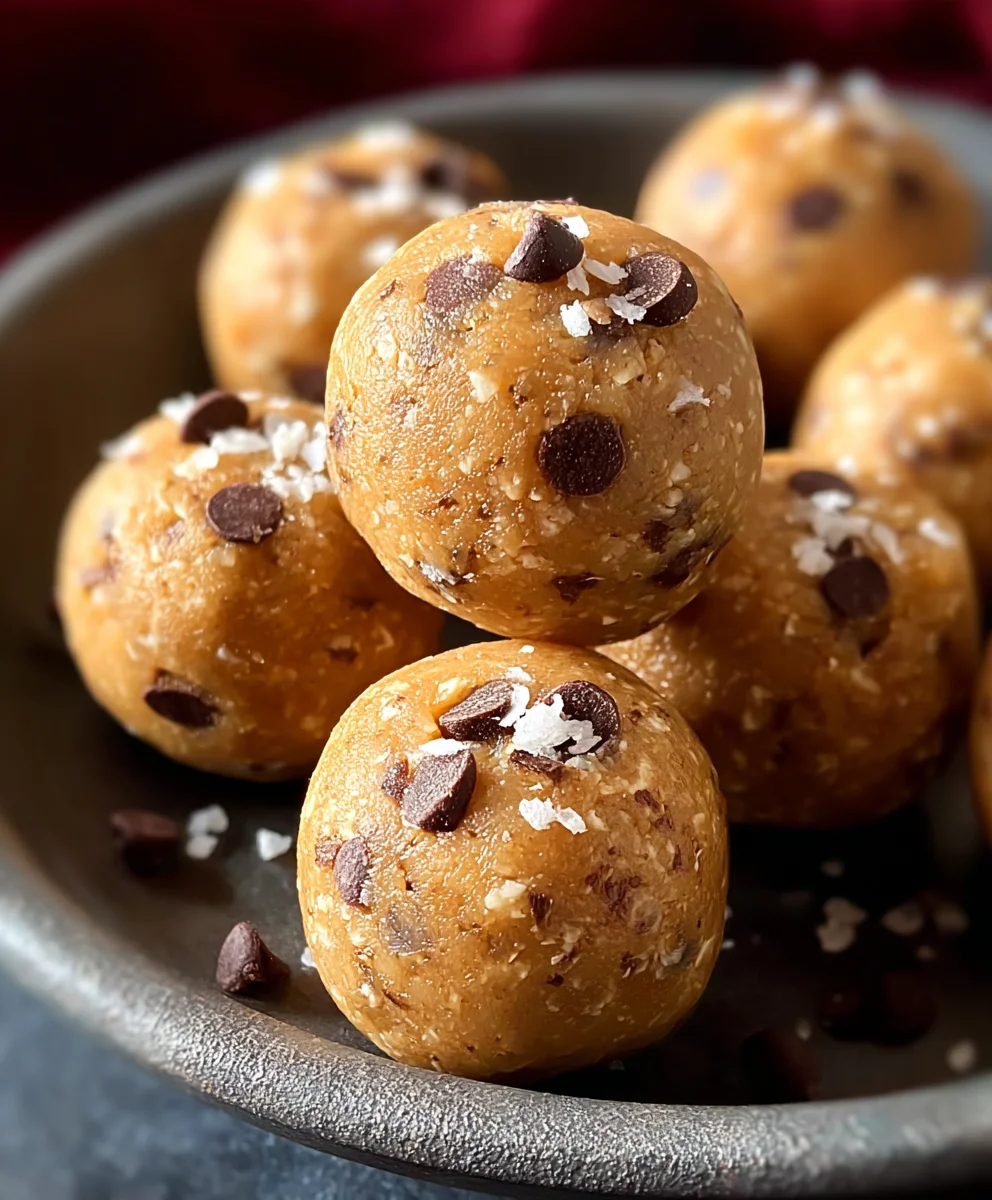
No-Bake Chickpea Cookie Bites are about to become your new go-to sweet treat, and trust me, you’ll wonder how you ever lived without them. In a world of endless baking projects, these delightful morsels offer a magical shortcut to deliciousness. Imagine a cookie that’s both satisfyingly sweet and surprisingly wholesome, all without ever turning on your oven. That’s the inherent charm of these no-bake wonders. What truly sets these No-Bake Chickpea Cookie Bites apart is their incredible versatility and the hidden powerhouse ingredient – chickpeas! Don’t let that surprise you; they lend a fantastic texture and a boost of plant-based protein that makes these bites feel just as good as they taste. They are perfect for those days when the craving hits hard and fast, or when you want a healthy-ish indulgence that satisfies without the commitment of traditional baking. Get ready to discover your new favorite speedy snack!

Ingredients:
- 15.5 ounces chickpeas (garbanzo beans), drained and dried
- 1/2 cup whole oats
- 1/4 cup maple syrup
- 1 teaspoon vanilla extract
- 1/2 teaspoon salt
- 1/4 cup mini chocolate chips
Preparation: Getting Started
Before we dive into making these delightful No-Bake Chickpea Cookie Bites, it’s crucial to prepare our chickpeas properly. This step ensures the best texture and prevents any unwanted “beany” flavor from overpowering the sweetness. Take your drained and thoroughly dried chickpeas and spread them out on a clean kitchen towel or paper towels. Gently pat them dry, aiming to remove as much moisture as possible. You can even let them air dry for a bit longer if you have the time; the drier they are, the better they will incorporate into the dough. Once they are as dry as you can get them, we’ll move them into our food processor.
Processing the Base: Creating the Dough
Now, it’s time to transform our humble chickpeas into a workable dough for our cookie bites. Place the dried chickpeas into the bowl of a food processor. Pulse the chickpeas several times until they are broken down into smaller pieces but not yet a completely smooth paste. We want a slightly chunky texture at this stage. Add the 1/2 cup of whole oats to the food processor. Pulse again, continuing to process until the oats are partially incorporated and the mixture starts to clump together. It should resemble coarse crumbs at this point. Avoid over-processing into a sticky paste, as this can make the bites too dense. The goal is a slightly textured, cohesive mixture that will hold its shape.
Sweetening and Flavoring: Adding the Good Stuff
With our base ingredients processed, it’s time to introduce the sweetness and classic cookie flavors. Add the 1/4 cup of maple syrup to the food processor. The maple syrup will act as our binder and primary sweetener, contributing a wonderful depth of flavor. Next, pour in the 1 teaspoon of vanilla extract. Vanilla is essential for that quintessential cookie aroma and taste, enhancing all the other flavors in the mix. Finally, add the 1/2 teaspoon of salt. Salt is a secret weapon in baking (and no-baking!), as it balances the sweetness and really makes the chocolate and maple flavors pop. Give the mixture a few more pulses to ensure all the wet ingredients are evenly distributed throughout the chickpea and oat mixture. Scrape down the sides of the food processor bowl as needed to make sure everything is incorporated.
Incorporating the Chocolate: The Best Part
No cookie, not even a no-bake one, is complete without chocolate chips! This is where our 1/4 cup of mini chocolate chips comes into play. Gently fold the mini chocolate chips into the mixture. You can do this either directly in the food processor by pulsing a few times very carefully (just enough to distribute, not to break them down) or by transferring the mixture to a bowl and folding them in by hand with a spatula. Folding by hand gives you more control to ensure the chocolate chips remain intact and are evenly dispersed throughout the dough. These little bursts of melted chocolate are what make our No-Bake Chickpea Cookie Bites truly irresistible.
Forming the Bites: Shaping Perfection
Now that we have our perfectly textured and flavored dough, it’s time to shape our No-Bake Chickpea Cookie Bites. Take small portions of the mixture, about a tablespoon at a time. Roll each portion between your palms to form small, bite-sized balls. If the mixture feels a little sticky, you can lightly dampen your hands with water or a tiny bit of neutral oil, but usually, the texture should be just right for shaping. Place the formed balls onto a plate, tray, or baking sheet lined with parchment paper. This step is straightforward and is a great activity to do with children. Aim for a uniform size so that they bake (or rather, set) evenly.
Setting and Chilling: The Final Touch
These No-Bake Chickpea Cookie Bites require a bit of time to firm up and set properly. Once all the bites are shaped and arranged on your parchment-lined surface, place the plate or tray into the refrigerator. Allow them to chill for at least 30 minutes. This chilling time is crucial for the bites to firm up and for the flavors to meld together. You can also place them in the freezer for about 15-20 minutes if you are short on time and want them to set more quickly. The texture will be slightly chewy and satisfyingly firm after chilling. For the best flavor and texture, I recommend enjoying them chilled directly from the refrigerator. You can store any leftovers in an airtight container in the refrigerator for up to a week.
Conclusion:
And there you have it – your guide to creating these delightful No-Bake Chickpea Cookie Bites! This recipe is a fantastic way to enjoy a sweet treat without the fuss of baking, making it perfect for busy weeknights or spontaneous cravings. The combination of wholesome ingredients offers a satisfying texture and a subtly sweet flavor that’s surprisingly addictive. These bites are incredibly versatile, proving that healthy indulgence can be both easy and delicious. I truly hope you enjoy making and sharing these as much as I do. Don’t be afraid to experiment with different add-ins to make them your own!
For serving, these No-Bake Chickpea Cookie Bites are wonderful on their own as a quick snack. They also make a delightful addition to a dessert platter, a lunchbox treat, or even crumbled over yogurt or a smoothie bowl for added texture and flavor. Feel free to get creative with your presentation!
When it comes to variations, the possibilities are endless. You can swap out the chocolate chips for dried cranberries, chopped nuts, or shredded coconut. For an extra layer of flavor, try adding a pinch of cinnamon or a dash of vanilla extract to the dough. If you’re feeling adventurous, a touch of orange zest can add a bright, citrusy note.
I encourage you to give this recipe a try. It’s a testament to how simple, wholesome ingredients can come together to create something truly special. Happy snacking!
Frequently Asked Questions about No-Bake Chickpea Cookie Bites:
Q1: How should I store these No-Bake Chickpea Cookie Bites?
A1: These cookie bites are best stored in an airtight container in the refrigerator. This will help them maintain their shape and texture. They should stay fresh for up to a week.
Q2: Can I make these bites vegan?
A2: Yes, absolutely! The base recipe is already vegan if you use dairy-free chocolate chips. Ensure your binder (like maple syrup or agave) is also vegan-friendly, which most are.

No-Bake Chickpea Cookie Bites
A healthy and easy no-bake treat made with chickpeas, oats, and chocolate chips. Perfect for a quick snack or dessert.
Ingredients
-
15.5 ounces chickpeas (garbanzo beans), drained and dried
-
1/2 cup whole oats
-
1/4 cup maple syrup
-
1 teaspoon vanilla extract
-
1/2 teaspoon salt
-
1/4 cup mini chocolate chips
Instructions
-
Step 1
Thoroughly dry the drained chickpeas by patting them with a kitchen towel or letting them air dry. The drier they are, the better they will incorporate. -
Step 2
Place the dried chickpeas in a food processor and pulse several times until they are broken down into smaller pieces but still have a slightly chunky texture. Add the whole oats and pulse again until the mixture starts to clump together, resembling coarse crumbs. Do not over-process into a sticky paste. -
Step 3
Add the maple syrup, vanilla extract, and salt to the food processor. Pulse a few more times to ensure all wet ingredients are evenly distributed. Scrape down the sides as needed. -
Step 4
Gently fold in the mini chocolate chips. You can do this carefully in the food processor with a few short pulses or transfer the mixture to a bowl and fold by hand. -
Step 5
Take about a tablespoon of the mixture at a time and roll it between your palms to form small, bite-sized balls. Place the formed balls onto a parchment-lined plate or baking sheet. -
Step 6
Chill the cookie bites in the refrigerator for at least 30 minutes, or in the freezer for 15-20 minutes, until firm. Enjoy chilled.
Important Information
Nutrition Facts (Per Serving)
It is important to consider this information as approximate and not to use it as definitive health advice.
Allergy Information
Please check ingredients for potential allergens and consult a health professional if in doubt.


Leave a Comment