
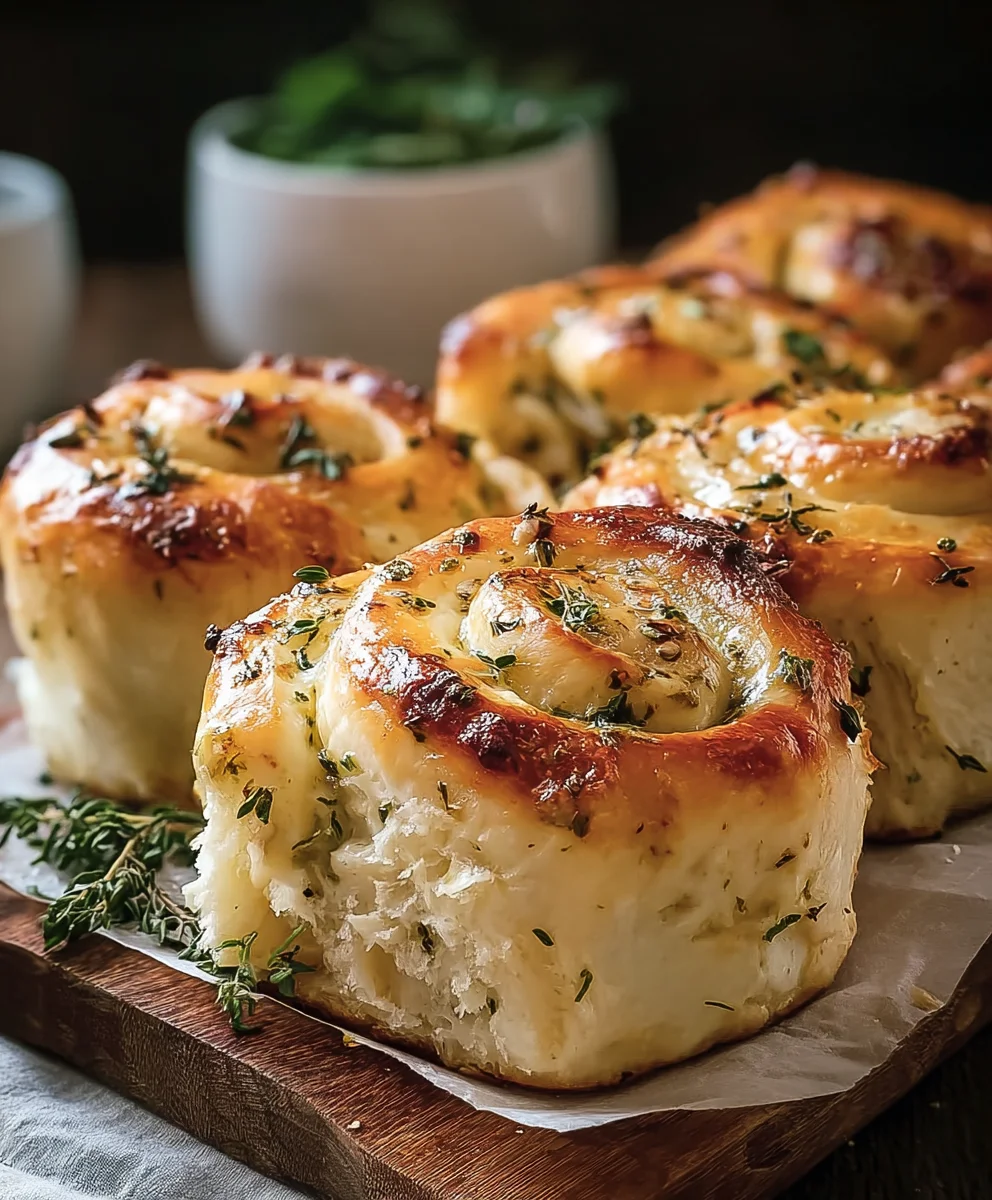
Sourdough Herb And Cheese Rolls are more than just a delightful baked good; they are an invitation to experience comfort, aroma, and unparalleled flavor. Imagine pulling apart a warm, golden roll, steam gently rising, revealing a soft, airy crumb speckled with fragrant herbs and pockets of melted, tangy cheese. It’s a culinary moment that speaks directly to the soul, promising a truly memorable bite.
The art of sourdough baking, an ancient tradition cherished for centuries, lends an incredible depth and complexity to these rolls, elevating them far beyond ordinary bread. I find that the signature tang of a well-fermented sourdough perfectly complements the aromatic blend of herbs – perhaps rosemary and thyme – and the rich, savory notes of your favorite cheeses. This harmonious blend creates a sensory experience that is truly unforgettable, marrying time-honored techniques with irresistible modern appeal.
Why You’ll Fall in Love with These Sourdough Herb And Cheese Rolls
People adore this dish not only for its incredible taste and tender, chewy texture but also for the way it transforms any meal. Whether served alongside a hearty soup, as a sophisticated addition to a brunch spread, or simply enjoyed on their own as a satisfying snack, these rolls are always a showstopper. The irresistible aroma that fills your kitchen as they bake is a bonus, promising a treat that is both wholesome and incredibly indulgent. I truly believe you’ll cherish every bite of these homemade marvels.

Ingredients:
For the Dough:
- 100 grams active sourdough starter (fed and bubbly, ideally 4-8 hours after feeding and showing good signs of activity – it should float in water!)
- 350 grams bread flour (I prefer a good quality unbleached bread flour with a protein content around 12-13% for excellent structure in these Sourdough Herb And Cheese Rolls)
- 240 grams warm water (around 90-95°F or 32-35°C; this helps activate the yeast in the starter and aids gluten development)
- 7 grams fine sea salt (ensure it’s not iodized, as iodine can sometimes interfere with yeast activity)
- 1 tablespoon olive oil (a good quality extra virgin olive oil adds a lovely flavor and richness)
For the Herb and Cheese Filling:
- 150 grams sharp cheddar cheese (grated; I find a combination of sharp cheddar and another cheese adds complexity)
- 50 grams Gruyère or Parmesan cheese (grated; for an extra nutty, salty kick)
- 2 tablespoons fresh rosemary (finely chopped; the aroma of fresh rosemary is simply divine in these rolls)
- 2 tablespoons fresh thyme leaves (finely chopped; adds a delicate, earthy note)
- 1 tablespoon fresh chives (finely chopped; for a mild oniony zest)
- 2 cloves garlic (minced very fine or grated; don’t skip this, it’s a flavor cornerstone!)
- 1/4 teaspoon black pepper (freshly ground, to taste)
- Pinch of red pepper flakes (optional, if you like a little subtle warmth)
For the Topping (Optional, but highly recommended):
- 2 tablespoons unsalted butter (melted)
- 1 tablespoon grated Parmesan cheese
- 1 teaspoon fresh parsley or chives (finely chopped)
Instructions: Day 1 – Preparing the Sourdough Dough for Your Herb And Cheese Rolls
Making Sourdough Herb And Cheese Rolls is a rewarding process that begins with nurturing your sourdough starter and carefully developing the dough. This first day focuses on building strength and flavor.
-
Feeding Your Sourdough Starter and Autolyse:
First, ensure your sourdough starter is active and ripe. I usually feed mine about 4-8 hours before I plan to mix the dough, when it’s at its peak activity, bubbly, and passes the float test (a small dollop floats in water). In a large mixing bowl, combine the 350 grams of bread flour with the 240 grams of warm water. Mix them together with your hands or a Danish dough whisk until no dry spots of flour remain. This might look shaggy and a bit dry, but don’t worry. Cover the bowl with a clean kitchen towel or plastic wrap and let it rest for 30-60 minutes. This resting period is called ‘autolyse,’ and it allows the flour to fully hydrate, which kickstarts gluten development and makes the dough easier to work with later.
-
Incorporating the Starter and Salt:
After the autolyse, add the 100 grams of active sourdough starter to the dough. Using your hands, gently work the starter into the dough until it’s fully incorporated. It might feel a bit sticky at this stage. Once the starter is mostly mixed in, sprinkle the 7 grams of fine sea salt over the dough. Continue mixing and kneading for another 3-5 minutes. I like to use a gentle folding and squeezing motion, making sure the salt is evenly distributed throughout. You should feel the dough start to become a bit smoother and more cohesive. The salt is crucial not only for flavor but also for regulating fermentation and strengthening the gluten network.
-
Bulk Fermentation and Stretch & Folds – Building Strength:
This is where we build the structure for our Sourdough Herb And Cheese Rolls. Transfer the dough to a lightly oiled clean bowl or a clear container (clear is great for observing the dough’s rise). Add the 1 tablespoon of olive oil and turn the dough to coat it. Cover the bowl. We will now perform a series of ‘stretch and folds’ over the next 2.5-3.5 hours, depending on your ambient kitchen temperature (ideally around 75-78°F or 24-26°C for bulk fermentation).
- First set of Stretch & Folds (30 minutes after mixing): Lightly wet your hands. Grab a section of the dough, stretch it upwards gently, then fold it over itself towards the center of the bowl. Rotate the bowl a quarter turn and repeat this process 3-4 more times until you’ve worked your way around the dough. You’ll feel the dough resist a little, but don’t force it. Cover and rest.
- Second set of Stretch & Folds (30 minutes later): Repeat the stretch and fold process. The dough will feel a bit stronger and more elastic now. Cover and rest.
- Third set of Stretch & Folds (30 minutes later): Again, repeat the stretch and fold process. By now, the dough should be noticeably smoother, more elastic, and holding its shape better. You might even see some bubbles forming on the surface. Cover and rest.
- Fourth set of Stretch & Folds (30 minutes later, optional): Depending on how your dough feels and how warm your kitchen is, you might do a fourth set. If the dough already feels very strong and you see significant activity, you can skip this one. After the final set, let the dough rest, covered, for another 60-90 minutes. During this time, the dough should visibly increase in volume by about 20-30% and show more bubbles. This is the tail end of bulk fermentation, allowing the flavors to develop.
-
Preparing the Filling for Your Sourdough Herb And Cheese Rolls:
While the dough is in its final bulk fermentation, prepare the delicious filling. In a medium bowl, combine the 150 grams of grated sharp cheddar cheese, 50 grams of grated Gruyère or Parmesan cheese, 2 tablespoons of finely chopped fresh rosemary, 2 tablespoons of finely chopped fresh thyme leaves, 1 tablespoon of finely chopped fresh chives, 2 cloves of minced garlic, 1/4 teaspoon of freshly ground black pepper, and the optional pinch of red pepper flakes. Mix everything thoroughly. I love how these aromatic herbs and sharp cheeses combine to create a truly irresistible filling for our Sourdough Herb And Cheese Rolls!
-
Laminating the Dough and Incorporating the Filling:
Lightly flour a clean countertop or a large non-stick silicone mat. Gently turn the dough out onto the floured surface. You want to stretch the dough into a large, thin rectangle, about 16×12 inches (or as large as you can get it without tearing). I achieve this by gently pulling and stretching it from the center outwards with my hands, rather than using a rolling pin, to preserve the air bubbles. Once stretched, evenly sprinkle the entire surface of the dough with your prepared herb and cheese filling. Leave about a 1/2-inch border clean around the edges. Then, starting from one of the shorter ends, tightly roll the dough into a log. Once rolled, gently pinch the seam closed. This lamination process ensures the filling is distributed beautifully throughout each roll.
-
Overnight Cold Proof – Developing Flavor and Ease of Handling:
Lightly grease a standard loaf pan or an 8×8 inch square baking dish. Gently transfer the dough log, seam-side down, into the prepared pan. Cover the pan tightly with plastic wrap or a lid. Now, place it in the refrigerator for at least 8 hours, or preferably overnight (up to 24 hours). This cold proofing stage is magic! It significantly slows down fermentation, allowing the complex sourdough flavors to deepen, and it makes the dough much easier to handle and shape on the next day, resulting in a superior texture for your Sourdough Herb And Cheese Rolls.
Instructions: Day 2 – Shaping, Final Proofing, and Baking Your Sourdough Herb And Cheese Rolls
The anticipation builds! Today is all about transforming your beautifully cold-proofed dough into individual Sourdough Herb And Cheese Rolls and baking them to golden perfection.
-
Prepping for Shaping:
Remove the dough from the refrigerator. You’ll notice it’s much firmer and less sticky now. Let it sit on the counter for about 20-30 minutes while you gather your tools and prepare your baking dish. For baking, I love using a 9×13 inch (23×33 cm) baking dish, which gives the rolls enough space to expand but also encourages them to bake together, creating wonderfully soft sides. Lightly grease your chosen baking dish with butter or cooking spray.
-
Shaping the Sourdough Herb And Cheese Rolls:
Gently transfer the dough log onto a lightly floured surface. Using a sharp knife or a bench scraper, cut the log into 12-15 equal pieces, approximately 1 to 1.5 inches thick. I usually aim for 12 rolls for a generous size. For each piece, you have a couple of shaping options:
- Simple Round Rolls: Gently tuck the edges of each piece underneath to create a somewhat round shape, aiming for a taut top surface.
- Spiral Rolls: If you want a more defined swirl, gently unroll each piece slightly and then re-roll it more tightly, tucking the end underneath. This can help showcase the layers of cheese and herbs in your Sourdough Herb And Cheese Rolls.
Arrange the shaped rolls in your prepared baking dish, leaving a small gap between each one. They will expand quite a bit during the final proof and baking, so don’t crowd them too much, but having them touch slightly will give you that lovely pull-apart texture.
-
Final Proofing (The Warm Nap):
Cover the baking dish loosely with plastic wrap or a clean kitchen towel. Place the rolls in a warm spot in your kitchen (ideally 75-80°F or 24-27°C). This final proof will take anywhere from 2-4 hours, depending on the warmth of your environment and the strength of your starter. You are looking for the rolls to become visibly puffy, almost doubled in size, and soft to the touch. A good way to tell if they are ready is the “poke test”: gently poke a roll with a floured finger; if the indentation springs back slowly, they are ready. If it springs back immediately, they need more time. If it stays indented and doesn’t spring back at all, they might be slightly overproofed, but they will still be delicious!
-
Preheating and Baking:
About 30-45 minutes before you anticipate the rolls being fully proofed, preheat your oven to 400°F (200°C). If you have a baking stone or steel, you can place it in the oven during preheating for a more even bake, though it’s not strictly necessary for rolls baked in a dish. A properly preheated oven is key to achieving a beautiful rise and crust on your Sourdough Herb And Cheese Rolls.
Once your oven is fully preheated and the rolls are perfectly proofed, carefully place the baking dish into the hot oven. Bake for 20-25 minutes, or until the tops are beautifully golden brown and the internal temperature reaches around 200-210°F (93-99°C). I often rotate the pan halfway through baking to ensure even browning. The aroma filling your kitchen at this point will be absolutely heavenly!
-
Finishing Touches and Cooling:
Once baked, remove the Sourdough Herb And Cheese Rolls from the oven. While they are still hot, you can apply the optional topping. In a small bowl, melt the 2 tablespoons of unsalted butter. Stir in the 1 tablespoon of grated Parmesan cheese and 1 teaspoon of finely chopped fresh parsley or chives. Brush this mixture generously over the warm rolls. This adds an extra layer of flavor, shine, and a delightful herby crust.
Allow the rolls to cool in the baking dish for about 10-15 minutes before gently transferring them to a wire rack to cool completely. While it’s tempting to tear into these warm, cheesy delights immediately, letting them cool for a bit allows the internal structure to set, resulting in a better texture. However, a warm Sourdough Herb And Cheese Roll is hard to resist, so I usually sneak one before it’s fully cooled!
Tips for Perfect Sourdough Herb And Cheese Rolls:
-
Don’t Rush the Starter:
The success of these Sourdough Herb And Cheese Rolls heavily relies on an active, vigorous starter. Make sure it’s bubbly, smells yeasty and slightly acidic, and passes the float test before you begin mixing your dough. A sluggish starter will lead to a dense roll with poor rise.
-
Adjust Hydration as Needed:
Flour absorption varies depending on the brand and ambient humidity. If your dough feels too sticky after the first few stretch and folds, don’t be afraid to add a tiny bit more flour (a tablespoon at a time) during a subsequent stretch and fold. Conversely, if it feels too stiff, a teaspoon of water can be worked in.
-
Be Gentle with the Dough:
Especially during the lamination and shaping steps, treat your dough with care. Overworking it or tearing it can deflate the precious air bubbles that contribute to a light, airy texture in your Sourdough Herb And Cheese Rolls.
-
Room Temperature for Bulk Fermentation:
Maintaining a consistent, warm environment (around 75-78°F or 24-26°C) during bulk fermentation is crucial for optimal dough development. If your kitchen is cooler, it will simply take longer for the dough to reach its desired expansion. Consider using a proofing box, your oven with the light on (but off!), or placing the bowl in a slightly warmed spot.
-
The Importance of Cold Proof:
Don’t skip the overnight cold proof! It’s not just for convenience. This extended cold fermentation deepens the complex sourdough flavor, enhances the texture, and makes the dough significantly easier to handle when it comes to shaping. It’s a cornerstone for truly amazing Sourdough Herb And Cheese Rolls.
-
Vary Your Cheeses and Herbs:
While cheddar and Gruyère with rosemary, thyme, and chives is my go-to, feel free to experiment! Smoked gouda, provolone, or even a spicy pepper jack could be fantastic. For herbs, dill, oregano, or a touch of sage would also be lovely additions, customizing your Sourdough Herb And Cheese Rolls to your personal taste.
-
Don’t Overload the Filling:
While tempting to pile on the cheese and herbs, too much filling can make the dough difficult to roll and can also weigh down the final product, affecting its rise and texture. Stick to the recommended amounts for the best balance.
-
Storing Your Sourdough Herb And Cheese Rolls:
These rolls are best enjoyed fresh on the day they are baked. However, any leftovers can be stored in an airtight container at room temperature for up to 2-3 days. For longer storage, you can freeze them for up to a month. To reheat, simply pop them in a preheated oven at 350°F (175°C) for about 5-10 minutes, or until warmed through and fragrant again. They make fantastic next-day breakfasts or snacks!
Conclusion:
And there you have it, my friends! We’ve journeyed through the delightful process of creating something truly special, something that will undoubtedly become a staple in your kitchen and a star on your dining table. These aren’t just any ordinary bread rolls; these are the magnificent Sourdough Herb And Cheese Rolls, a testament to the magic that happens when wholesome ingredients, patience, and a touch of passion come together. The tender, open crumb, the subtle tang of the sourdough starter, the earthy aroma of fresh herbs, and the irresistible pockets of melted cheese… it’s a symphony for the senses that simply must be experienced firsthand. I promise you, the moment you pull these golden beauties from your oven, the warmth and incredible fragrance will fill your home, inviting everyone to gather around for a taste of pure comfort. They offer that perfect balance of chewiness and softness, with a crust that’s just substantial enough to hold everything together without being tough. This recipe isn’t merely about baking; it’s about crafting an edible masterpiece that brings joy and satisfaction with every single bite. The deep, complex flavors developed by the long fermentation process of sourdough are truly unparalleled, offering a depth that store-bought rolls can only dream of. Imagine the sheer delight of tearing into one of these, steam gently rising, the cheese stretching tantalizingly as you pull it apart. It’s a moment of culinary bliss you absolutely deserve to create for yourself and your loved ones.
But the beauty of these rolls doesn’t stop at their inherent deliciousness. Their versatility is truly remarkable, making them suitable for almost any occasion or meal. Allow me to offer some inspiration for how you can elevate your dining experience with these incredible rolls:
Perfect Pairings for Your Sourdough Herb And Cheese Rolls:
- The Ultimate Soup & Stew Companion: Imagine a chilly evening, a steaming bowl of homemade tomato soup, a rich beef stew, or a hearty lentil dahl. There’s no better partner than one of these warm, cheesy rolls, perfect for soaking up every last drop of delicious broth.
- Elevate Your Main Course: Serve them alongside a succulent roasted chicken, a perfectly seared steak, or even a comforting pasta dish. They act as a sophisticated and flavorful accompaniment that truly enhances the entire meal.
- Breakfast or Brunch Bliss: Split them open, lightly toast them, and serve with scrambled eggs, crispy bacon, or a dollop of crème fraîche and smoked salmon. They can even form the base for an unexpectedly delicious mini breakfast sandwich.
- Appetizer Extravaganza: Arrange them on a platter for your next gathering. They are fantastic on their own, but also pair wonderfully with a simple olive oil dip, a balsamic glaze, or as part of a luxurious charcuterie board.
- The Lunchbox Upgrade: Forget bland sandwiches! These rolls are fantastic packed for lunch, perhaps with a slice of quality ham and some fresh greens tucked inside, or simply enjoyed plain for a truly satisfying midday treat.
Creative Variations to Make Them Your Own:
- Herb Harmony: While I love the classic mix, feel free to experiment! Swap out some of the rosemary for fresh thyme, oregano, chives, or even a sprinkle of dill. Each change will lend a slightly different, equally delightful character.
- Cheese Dreams: Don’t limit yourself to just one type of cheese! A blend of sharp cheddar and tangy Gruyere is divine, or try adding some crumbled feta for a salty kick, a touch of smoked gouda for depth, or even some spicy Monterey Jack for a bit of heat.
- Flavor Boosters: For an extra layer of complexity, consider folding in a handful of finely chopped sun-dried tomatoes, pitted and sliced black olives, a spoonful of caramelized onions, or even some finely diced jalapeños for those who like a little spice.
- Shaping Secrets: While individual rolls are charming, you could also shape the dough into a beautiful pull-apart loaf in a round pan for a stunning centerpiece, or even a larger free-form loaf that can be sliced.
Ultimately, these Sourdough Herb And Cheese Rolls are more than just a recipe; they’re an invitation to connect with the age-old tradition of baking, to savor incredible flavors, and to share a piece of your heart with those you feed. The process, while requiring a touch of patience, is incredibly rewarding, yielding results that far surpass any store-bought alternative. There’s a profound sense of accomplishment that comes with creating something so delicious and beautiful from scratch, especially with the living, breathing magic of sourdough.
So, what are you waiting for? Gather your ingredients, dust off your sourdough starter, and prepare to embark on a truly delicious baking adventure. I am absolutely confident that you will fall in love with these rolls just as much as I have. Once you’ve pulled your own batch of golden, fragrant rolls from the oven, I would be absolutely thrilled to hear all about your experience! Please don’t hesitate to share your stories, your photos, and any delightful variations you come up with. Your culinary adventures inspire me and our whole community. Happy baking, my friends!

Sourdough Herb & Cheese Rolls
Sourdough Herb And Cheese Rolls are more than just a delightful baked good; they are an invitation to experience comfort, aroma, and unparalleled flavor. Imagine pulling apart a warm, golden roll, steam gently rising, revealing a soft, airy crumb speckled with fragrant herbs and pockets of melted, tangy cheese. It’s a culinary moment that speaks directly to the soul, promising a truly memorable bite.
Ingredients
-
100g active sourdough starter
-
350g bread flour
-
240g warm water
-
7g fine sea salt
-
1 tbsp olive oil
-
150g sharp cheddar cheese, grated
-
50g Gruyère or Parmesan cheese, grated
-
2 tbsp fresh rosemary, finely chopped
-
2 tbsp fresh thyme leaves, finely chopped
-
1 tbsp fresh chives, finely chopped
-
2 cloves garlic, minced
-
1/4 tsp black pepper, freshly ground
-
Pinch red pepper flakes (optional)
-
2 tbsp unsalted butter, melted
-
1 tbsp grated Parmesan cheese
-
1 tsp fresh parsley or chives, finely chopped
Instructions
-
Step 1
Ensure your sourdough starter is active. In a large bowl, combine 350g bread flour and 240g warm water; mix until no dry spots. Cover and let rest for 30-60 minutes for autolyse. -
Step 2
Add 100g active sourdough starter to the dough; gently work it in. Sprinkle 7g fine sea salt over the dough. Mix and knead for 3-5 minutes until the dough becomes smoother and cohesive. -
Step 3
Transfer dough to a lightly oiled bowl. Add 1 tbsp olive oil and coat the dough. Over the next 2.5-3.5 hours, perform 3-4 sets of stretch and folds every 30 minutes. After the final set, let the dough rest, covered, for another 60-90 minutes until it visibly increases in volume by 20-30%. -
Step 4
In a medium bowl, combine 150g grated sharp cheddar, 50g grated Gruyère or Parmesan, 2 tbsp chopped fresh rosemary, 2 tbsp chopped fresh thyme, 1 tbsp chopped fresh chives, 2 minced garlic cloves, 1/4 tsp black pepper, and optional pinch of red pepper flakes. Mix thoroughly. -
Step 5
Lightly flour a clean surface. Gently stretch the dough into a large, thin rectangle (about 16×12 inches). Evenly sprinkle the entire surface with the prepared herb and cheese filling, leaving a 1/2-inch border. Tightly roll the dough into a log from one shorter end and gently pinch the seam closed. -
Step 6
Lightly grease a loaf pan or 8×8 inch baking dish. Transfer the dough log, seam-side down, into the pan. Cover tightly and refrigerate for at least 8 hours, or preferably overnight (up to 24 hours). -
Step 7
Remove dough from the refrigerator and let it sit on the counter for 20-30 minutes. Lightly grease a 9×13 inch baking dish. Gently transfer the dough log to a lightly floured surface. Using a sharp knife or bench scraper, cut the log into 12-15 equal pieces (1 to 1.5 inches thick). Shape each piece into a round or spiral roll. Arrange the shaped rolls in the prepared baking dish, leaving small gaps. -
Step 8
Cover the baking dish loosely. Place the rolls in a warm spot (75-80°F or 24-27°C) for 2-4 hours, until visibly puffy, almost doubled in size, and soft to the touch (passes the poke test). -
Step 9
About 30-45 minutes before rolls are fully proofed, preheat your oven to 400°F (200°C). Once the oven is preheated and rolls are proofed, carefully place the baking dish into the oven. Bake for 20-25 minutes, or until the tops are golden brown and internal temperature reaches 200-210°F (93-99°C). -
Step 10
Remove rolls from the oven. While hot, melt 2 tbsp unsalted butter, stir in 1 tbsp grated Parmesan and 1 tsp finely chopped fresh parsley or chives. Brush this mixture generously over the warm rolls. Allow to cool in the baking dish for 10-15 minutes, then transfer to a wire rack to cool completely.
Important Information
Nutrition Facts (Per Serving)
It is important to consider this information as approximate and not to use it as definitive health advice.
Allergy Information
Please check ingredients for potential allergens and consult a health professional if in doubt.


Leave a Comment