
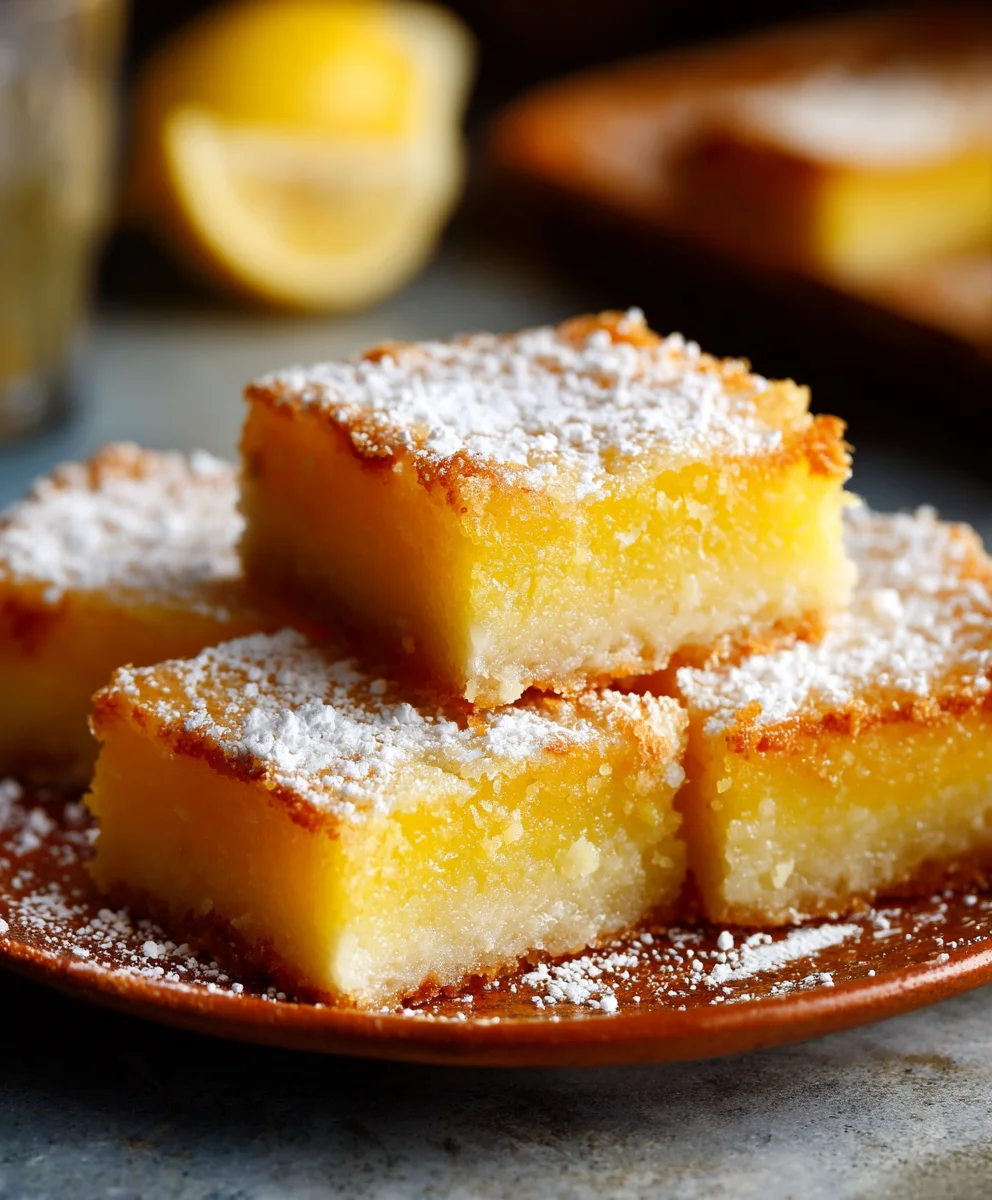
Small Batch Lemon Bars are the ultimate solution for those moments when a bright, zesty, and utterly satisfying dessert craving strikes, but a full 9×13-inch pan feels like too much of a commitment. Imagine biting into the perfect harmony of flavors and textures: a crisp, buttery shortbread crust giving way to a rich, intensely tart yet perfectly sweet lemon filling, all crowned with a delicate veil of powdered sugar. It’s a sensory experience that instantly brightens any day.
These golden squares, a timeless American classic, hold a special place in our culinary heritage, often gracing dessert tables at family gatherings, potlucks, and bake sales for generations. They embody the comforting essence of homemade baking, symbolizing warmth and joy. People adore this dessert for its incredible balance – the refreshing tang of lemon perfectly offsets the sweetness, while the smooth, creamy curd provides a delightful contrast to the crumbly crust. The sheer convenience of preparing a smaller quantity means you can enjoy this exquisite treat without worrying about leftovers or spending hours in the kitchen.
I find that crafting Small Batch Lemon Bars allows for a quicker path to indulgence, making them the ideal treat for an intimate evening, a personal pick-me-up, or a thoughtful gift. This recipe is designed to deliver all the vibrant flavor and iconic texture you love, in perfectly portioned deliciousness.

Ingredients:
-
For the Shortbread Crust:
- 1 cup (120g) All-Purpose Flour: I always use unbleached for the best texture in my crusts.
- 1/4 cup (50g) Granulated Sugar: Just enough sweetness to balance the tart lemon.
- 1/4 teaspoon Salt: A pinch really enhances the overall flavor.
- 1/2 cup (113g) Unsalted Butter: Make sure it’s very cold and cut into small cubes. This is key for a tender, flaky crust for our small batch lemon bars.
-
For the Zesty Lemon Filling:
- 2 Large Eggs: At room temperature, they mix better.
- 3/4 cup (150g) Granulated Sugar: This provides the perfect balance to the lemon’s tartness.
- 2 Tablespoons All-Purpose Flour: Just a little bit to give the filling its luscious, set texture.
- 1/4 teaspoon Salt: Again, a tiny bit for flavor enhancement.
- 1/4 cup (60ml) Fresh Lemon Juice: This is where all the wonderful zesty flavor comes from! Please, no bottled juice here.
- 1 Tablespoon Lemon Zest: The zest contains all the aromatic oils, making these small batch lemon bars truly shine.
- 1/4 cup (57g) Unsalted Butter: Melted and slightly cooled.
-
For Garnish (Optional):
- Powdered Sugar: For dusting right before serving. It adds a beautiful finish and a touch more sweetness.
Equipment You’ll Need:
Before we dive into baking these delightful small batch lemon bars, let’s make sure you have all your tools ready. Having everything prepped makes the process much smoother and more enjoyable!
- 8×8 inch square baking pan: This size is perfect for a small batch, yielding about 9-16 bars depending on how you cut them.
- Parchment paper: Absolutely essential for easy removal and clean-up.
- Mixing bowls (at least two): One for the crust, one for the filling.
- Whisk: For combining dry ingredients and whisking the filling.
- Pastry blender or your fingertips: For incorporating butter into the flour for the crust.
- Rubber spatula: For scraping bowls and spreading ingredients.
- Microplane zester: For getting the finest, most aromatic lemon zest.
- Citrus juicer: To extract every last drop of fresh lemon juice.
- Measuring cups and spoons: Precision is key in baking, especially for perfectly balanced small batch lemon bars.
- Wire rack: For cooling the baked bars evenly.
Preparing the Shortbread Crust:
The foundation of any great lemon bar is a perfectly tender, slightly crumbly shortbread crust. For our small batch lemon bars, we want it just right – not too thick, not too thin, and wonderfully buttery. This step is crucial, so let’s take our time.
- Preheat Your Oven and Prep the Pan: First things first, let’s get that oven ready! I always preheat my oven to 350°F (175°C). While the oven is heating, I grab my 8×8 inch baking pan. This is the perfect size for our small batch lemon bars. Line the pan with parchment paper, allowing an overhang on two opposite sides. This little trick is a lifesaver, as it will act as handles later, making it incredibly easy to lift the entire batch of lemon bars out of the pan once they’re baked and cooled. Don’t skip this step; it makes all the difference for clean cuts! I often spray a tiny bit of non-stick spray in the pan before laying the parchment paper down, just to help it stick in place.
- Combine Dry Ingredients: In a medium-sized mixing bowl, I whisk together the 1 cup of all-purpose flour, 1/4 cup of granulated sugar, and 1/4 teaspoon of salt. I like to whisk them really well to ensure everything is evenly distributed. This dry mixture sets the stage for the shortbread, so thorough mixing here is important for consistent flavor throughout the crust of our small batch lemon bars.
- Incorporate the Cold Butter: Now for the butter! This is a critical step for a tender shortbread. Add the 1/2 cup (113g) of very cold unsalted butter, cut into small cubes, to the dry ingredients. I like to use a pastry blender to cut the butter into the flour mixture until it resembles coarse crumbs, almost like wet sand. If you don’t have a pastry blender, your fingertips work wonderfully! Just be quick and gentle to avoid melting the butter with the warmth of your hands. The goal here is to keep the butter as cold as possible; this creates little pockets of steam during baking, leading to that coveted flaky, tender texture. This cold butter technique is vital for the structure of our small batch lemon bars’ crust.
- Press into the Pan: Once the mixture is crumbly, I transfer it to the prepared 8×8 inch baking pan. Using my fingertips or the bottom of a flat-bottomed glass, I firmly and evenly press the mixture into the bottom of the pan. I make sure to press it right up to the edges, creating a nice, solid base. An even layer is important so that the crust bakes uniformly. Take your time here to ensure there are no thin spots, which could lead to a soggy crust once the filling is added.
- Pre-Bake the Crust: Pop the pan with the pressed crust into your preheated oven. Bake for 18-20 minutes, or until the edges are lightly golden brown and the center looks set. Pre-baking the crust is a non-negotiable step for me. It helps to prevent a soggy bottom once the lemon filling is poured on, ensuring a crisp and buttery base for our small batch lemon bars. While it’s baking, the buttery aroma will start to fill your kitchen, a delightful preview of what’s to come! Once done, remove it from the oven but leave the oven on. We’ll be pouring the filling right over this warm crust.
Making the Zesty Lemon Filling:
Now, let’s turn our attention to the star of the show: the bright, tangy, and utterly delightful lemon filling! This is what truly makes these small batch lemon bars irresistible. Using fresh lemons is absolutely paramount here for the best flavor.
- Prepare Your Lemons: Grab two or three lovely, ripe lemons. First, I use my microplane zester to carefully zest one tablespoon of lemon zest. Make sure you only get the bright yellow part and avoid the bitter white pith. The zest is incredibly important for that intense lemon aroma and flavor that defines great small batch lemon bars. Then, I cut the lemons in half and squeeze out 1/4 cup (60ml) of fresh lemon juice. I usually use a small sieve to catch any seeds or pulp, ensuring a perfectly smooth filling. Set these aside.
- Whisk Eggs and Sugar: In a separate medium-sized mixing bowl, I crack the two large eggs. To these, I add 3/4 cup (150g) of granulated sugar. I grab my whisk and beat them together vigorously for about 2-3 minutes. I aim for a mixture that is light in color, slightly frothy, and has increased a bit in volume. This thorough whisking helps to dissolve the sugar and creates a beautiful, smooth texture in the final lemon filling.
- Incorporate Flour and Salt: To the egg and sugar mixture, I gently whisk in 2 tablespoons of all-purpose flour and 1/4 teaspoon of salt. I make sure there are no lumps of flour remaining. The flour here acts as a very gentle thickener, giving the filling its characteristic custardy texture without making it heavy or gummy. It’s a subtle but important player in the success of these small batch lemon bars.
- Add Lemon Juice and Zest: Now, it’s time for the real lemon magic! I pour in the 1/4 cup of fresh lemon juice and sprinkle in the 1 tablespoon of lemon zest that we prepared earlier. I whisk it all together until just combined. You’ll immediately notice the bright, invigorating scent of fresh lemon wafting up from the bowl – that’s how you know it’s going to be good!
- Melted Butter Takes the Stage: In a small, microwave-safe bowl or a saucepan, I melt 1/4 cup (57g) of unsalted butter. Once melted, I let it cool for just a minute or two – it shouldn’t be sizzling hot when it goes into the egg mixture. Slowly, I drizzle the slightly cooled melted butter into the lemon mixture while continuously whisking. This slow addition and constant whisking help to emulsify the butter into the filling, ensuring a smooth, cohesive custard.
- Final Whisking for Smoothness: I give the entire lemon filling mixture one final, thorough whisk to make sure everything is perfectly combined and absolutely smooth. I check for any stray bits of unincorporated flour or lumps. A smooth filling is key for that signature, silky texture of delicious small batch lemon bars. Now, our filling is ready for its date with the pre-baked crust!
Baking Your Small Batch Lemon Bars:
We’re getting close to enjoying these incredible small batch lemon bars! The baking process for the filling is delicate, and timing is everything to achieve that perfect set-but-still-creamy consistency.
- Pour Filling Over Warm Crust: Carefully retrieve the pre-baked shortbread crust from the oven. It should still be warm. Gently and evenly pour the prepared lemon filling mixture over the warm crust. I try to pour it in the center first and let it spread naturally to the edges. A warm crust is perfectly fine here; it won’t affect the final texture of the bars.
- Return to the Oven: Carefully place the pan back into the preheated oven at 350°F (175°C).
- Bake Until Just Set: Now, pay close attention to the baking time. Bake for approximately 20-25 minutes. The exact time can vary slightly depending on your oven. How do I know when they’re done? I gently jiggle the pan. The edges of the filling should appear set and firm, while the very center might still have a slight, delicate jiggle, almost like a very soft jello. It’s absolutely crucial not to overbake the small batch lemon bars! Overbaking will result in a rubbery, tough filling, rather than the luscious, custardy texture we’re aiming for. The residual heat will continue to set the center as they cool. When they reach this perfect stage, carefully remove the pan from the oven.
Cooling and Finishing Touches:
Patience is perhaps the hardest ingredient to master when baking, especially when these aromatic small batch lemon bars are calling your name! But trust me, proper cooling is essential for the best texture and the cleanest cuts.
- Initial Cooling on a Wire Rack: As soon as the small batch lemon bars come out of the oven, I place the entire pan on a wire rack. Let them cool at room temperature on the rack for at least 1 to 2 hours. This allows the heat to dissipate evenly and prevents condensation from forming on the bottom of the pan, which could make the crust soggy. During this time, you’ll notice the center of the bars will firm up even more.
- Thorough Chilling in the Refrigerator: Once they’ve cooled down significantly at room temperature, it’s time for the refrigerator. This step is non-negotiable for perfectly sliced small batch lemon bars. I carefully transfer the pan to the refrigerator and let them chill for a minimum of 2 to 4 hours, or even better, overnight. This chilling period is vital; it allows the filling to fully set and firm up, making it possible to cut neat, clean squares without any crumbling or mess. Trying to cut them before they are fully chilled will result in a sticky, gooey mess, which, while still delicious, won’t have that classic lemon bar appearance.
- Lifting, Cutting, and Dusting: Once thoroughly chilled, I use the parchment paper overhangs as handles to carefully lift the entire slab of small batch lemon bars out of the pan and onto a cutting board. Now for the fun part – cutting! I use a sharp, clean knife, wiping it clean between each cut to ensure crisp edges. I usually cut them into 9 large squares or 16 smaller ones, depending on who I’m sharing them with. Just before serving, I love to dust the tops generously with powdered sugar. This adds a beautiful snowy finish and a touch more sweetness that perfectly complements the tart lemon filling. You can even use a small sieve for an even, delicate dusting.
Tips for Perfect Small Batch Lemon Bars:
I’ve made countless batches of lemon bars over the years, and I’ve picked up a few tricks that I love to share. These tips will ensure your small batch lemon bars are absolutely perfect every single time, from their tender crust to their zesty, luscious filling!
- Always Use Fresh Lemons: This is my number one rule! The difference between fresh lemon juice and bottled is truly night and day. Fresh lemons provide a vibrant, authentic, and complex tartness that simply cannot be replicated. Plus, the zest from fresh lemons contains essential oils that infuse an incredible aroma into the filling. For the best small batch lemon bars, never compromise on fresh citrus.
- Don’t Overbake the Filling: This is another crucial point. The lemon filling should be just set at the edges with a slight, gentle wobble in the very center when you lightly jiggle the pan. It will continue to set as it cools. Overbaking will lead to a tough, rubbery, or grainy filling, losing that delightful custardy texture we crave. Keep an eye on them, and when in doubt, pull them out a minute or two early.
- Chill Thoroughly: I know, waiting is hard, especially when something smells so good! But I cannot stress enough the importance of chilling your small batch lemon bars completely. A minimum of 2-4 hours, or ideally overnight, in the refrigerator will ensure the filling is firm enough to cut into clean, precise squares without sticking or squishing. Patience truly pays off here.
- Cold Butter for the Crust: Just like with pie crusts or scones, keeping your butter very cold when making the shortbread crust is key. This prevents the butter from fully incorporating into the flour, creating tiny pockets that release steam during baking. The result? A wonderfully tender, flaky, and delicate crust that complements the tart filling beautifully.
- Measure Flour Correctly: For both the crust and the filling, ensure you’re measuring your flour accurately. I always recommend the “spoon and level” method: spoon the flour into your measuring cup until it overflows, then use a straight edge (like the back of a knife) to level it off. Scooping directly from the bag can compact the flour, leading to too much in your recipe and potentially a dense crust or a too-thick, pasty filling.
- Adjust Sweetness/Tartness to Your Liking: While my recipe provides a balanced sweetness, some people prefer their lemon bars extra tart, while others like them a bit sweeter. You can slightly adjust the amount of sugar in the filling to suit your personal preference. For a tarter bar, reduce the sugar by a tablespoon or two; for a sweeter one, add an extra tablespoon. Just be mindful not to alter it too drastically, as sugar also contributes to the filling’s texture.
- Clean Knife for Cutting: When it’s time to slice your chilled small batch lemon bars, use a sharp knife and wipe the blade clean with a damp cloth between each cut. This prevents the filling from sticking to the knife and creating messy edges, ensuring every bar looks as good as it tastes.
Storage and Enjoyment:
Once you’ve gone through all the delightful steps to create these perfect small batch lemon bars, you’ll want to make sure they’re stored properly to maintain their freshness and flavor. These bars are truly a treat, and they’re wonderful for sharing or savoring over a few days!
- Storing Leftovers: Any leftover small batch lemon bars (if there are any!) should be stored in an airtight container. This helps to prevent them from drying out and absorbing any ambient odors in your refrigerator. I typically layer them between sheets of parchment paper if I stack them, to prevent sticking and keep their beautiful dusting of powdered sugar intact.
- Refrigerator is Best: Due to their custardy, egg-based filling, these lemon bars must be stored in the refrigerator. They will stay fresh and absolutely delicious for up to 3-4 days. Beyond that, while still safe to eat, the texture and freshness might start to diminish a little.
- Serving Temperature: I personally think small batch lemon bars are best enjoyed chilled, straight from the refrigerator. The cool, firm texture of the filling and the crispness of the crust are simply divine when cold. However, some people prefer to let them sit out at room temperature for about 15-20 minutes before serving, which can slightly soften the filling and intensify the lemon flavor. It’s entirely up to your preference!
- Freezing for Longer Storage: If you find yourself with an abundance of small batch lemon bars (a rare but wonderful problem!), you can actually freeze them! I cut them into individual squares and then place them on a baking sheet lined with parchment paper, not touching each other. Freeze them for about 1-2 hours until solid. Once frozen, transfer the individual bars to an airtight, freezer-safe container or a heavy-duty freezer bag. They can be frozen for up to 1 month. When you’re ready to enjoy them, simply thaw them in the refrigerator overnight or on the counter for a couple of hours. You might want to give them a fresh dusting of powdered sugar before serving, as the initial dusting might disappear during freezing.
- Enjoy with Friends and Family: These small batch lemon bars are perfect for any occasion – a weekend treat, a potluck, or just a little something sweet after dinner. Their bright, zesty flavor is always a crowd-pleaser, and their manageable size makes them ideal for a thoughtful homemade gift. I love seeing the smiles they bring to people’s faces!
Conclusion:
So, as we wrap up our sweet journey, I truly hope you’re feeling inspired to whip up a batch of these extraordinary lemon bars. These aren’t just any dessert; they’re a testament to how simple ingredients can create something truly spectacular. I designed this recipe to be your go-to whenever that specific craving for something bright, tangy, and utterly delightful strikes, without the commitment of baking for a crowd. It’s about pure, unadulterated pleasure, perfectly portioned for you, or perhaps you and a very lucky friend. What makes these Small Batch Lemon Bars an absolute must-try? It’s the impeccable balance. We’re talking about a vibrant, zesty lemon curd that’s just the right amount of tart, perfectly complemented by a buttery, crumbly shortbread crust that melts in your mouth. There’s no cloying sweetness here, just a refreshing burst of citrus sunshine in every bite. They’re incredibly easy to make, forgiving for even the most novice bakers, and the aroma filling your kitchen as they bake is a reward in itself. They’re the perfect antidote to a dreary day, a celebratory treat for no reason at all, or a delightful finish to any meal.
But the magic doesn’t stop once they’re out of the oven and cooled. Oh no, the ways you can enjoy these wonderful bars are almost as delightful as the bars themselves! My absolute favorite way to serve them is simply chilled, dusted with a light snowfall of confectioners’ sugar. The cool, firm texture of the lemon curd against the buttery crust is simply divine. Imagine enjoying one with a steaming cup of Earl Grey tea on a quiet afternoon, or perhaps alongside a freshly brewed coffee as a sophisticated breakfast treat. They also make an incredibly elegant, yet understated, dessert after a light supper.
Elevate your experience with these delightful serving suggestions!
Don’t be afraid to get creative with your serving! For a touch of extra indulgence, a dollop of freshly whipped cream, perhaps infused with a hint of vanilla or even a little lemon zest, elevates them beautifully. A few fresh raspberries or blueberries scattered around the plate add a pop of color and a lovely textural contrast. If you’re feeling particularly adventurous, you could even try garnishing them with a sprig of fresh mint for an added aromatic dimension. And speaking of variations, while the classic recipe is perfect as is, these bars are also wonderfully adaptable. Consider swapping out a portion of the lemon juice for lime juice for a zingy key lime bar twist, or experimenting with an orange zest in the crust for a slightly different citrus profile. Some people love to add a thin layer of toasted coconut flakes on top of the crust before pouring the filling for a tropical flair. The possibilities are truly endless, limited only by your imagination and your pantry!
Now, it’s your turn! I’ve poured my heart into perfecting this recipe, and I genuinely believe these Small Batch Lemon Bars will bring a little ray of sunshine into your day. I urge you to set aside some time this week, gather your ingredients, and give these a try. You won’t regret it. The satisfaction of baking something so delicious from scratch, especially something so seemingly sophisticated yet utterly approachable, is truly unparalleled. Don’t just read about them; taste the sunshine for yourself!
Once you’ve tasted the magic, I would absolutely love to hear about your experience. Did you stick to the classic? Did you try a fun variation? Did you serve them with tea or coffee? Please, don’t be shy! Share your stories, your photos, your triumphs, and even your questions in the comments below. Your feedback and creative adaptations inspire not just me, but everyone else in our baking community. Let’s build a delightful collection of lemon bar adventures together! Happy baking, my friends, and may your kitchens always be filled with the wonderful aroma of freshly baked treats!

Small Batch Lemon Bars: Easy & Zesty Dessert
A perfect small batch recipe for bright, zesty lemon bars. Featuring a crisp, buttery shortbread crust and a rich, tart-sweet lemon filling, finished with powdered sugar. Ideal for when a full pan is too much.
Ingredients
-
1 cup (120g) All-Purpose Flour
-
1/4 cup (50g) Granulated Sugar
-
1/4 teaspoon Salt
-
1/2 cup (113g) Unsalted Butter, very cold, cubed
-
2 Large Eggs, room temperature
-
3/4 cup (150g) Granulated Sugar
-
2 Tablespoons All-Purpose Flour
-
1/4 teaspoon Salt
-
1/4 cup (60ml) Fresh Lemon Juice
-
1 Tablespoon Lemon Zest
-
1/4 cup (57g) Unsalted Butter, melted and slightly cooled
-
Powdered Sugar, for dusting (optional)
Instructions
-
Step 1
Preheat oven to 350°F (175°C). Line an 8×8 inch baking pan with parchment paper, allowing an overhang on two opposite sides. -
Step 2
In a medium bowl, whisk 1 cup all-purpose flour, 1/4 cup granulated sugar, and 1/4 teaspoon salt. Add 1/2 cup cold, cubed unsalted butter and cut it in using a pastry blender or fingertips until mixture resembles coarse crumbs. Press mixture firmly and evenly into the bottom of the prepared pan. -
Step 3
Bake the crust for 18-20 minutes, or until edges are lightly golden. Remove from oven but keep oven on. -
Step 4
Zest 1 tablespoon and juice 1/4 cup fresh lemons. In a separate bowl, vigorously whisk 2 large room temperature eggs and 3/4 cup granulated sugar for 2-3 minutes until light and frothy. Whisk in 2 tablespoons all-purpose flour and 1/4 teaspoon salt until smooth. Stir in the 1/4 cup fresh lemon juice and 1 tablespoon lemon zest. Slowly drizzle in 1/4 cup melted, slightly cooled unsalted butter while continuously whisking until perfectly combined. -
Step 5
Gently and evenly pour the prepared lemon filling over the warm pre-baked crust. Carefully place the pan back into the 350°F (175°C) oven. Bake for 20-25 minutes, until the edges of the filling are set and firm, and the very center has a slight, delicate jiggle. Do not overbake. -
Step 6
Place the pan on a wire rack to cool at room temperature for 1-2 hours. Then, transfer to the refrigerator and chill for a minimum of 2-4 hours, or ideally overnight, until fully set and firm. -
Step 7
Once thoroughly chilled, use the parchment paper overhangs to lift the entire slab of lemon bars out of the pan onto a cutting board. Use a sharp, clean knife, wiping it clean between each cut, to slice into 9-16 squares. Dust generously with powdered sugar just before serving. -
Step 8
Store leftover bars in an airtight container in the refrigerator for up to 3-4 days; layer with parchment paper if stacking. For longer storage, freeze individual bars for up to 1 month by freezing solid on a baking sheet, then wrapping and storing in a freezer container. Thaw in the refrigerator overnight before serving, and re-dust with powdered sugar if desired.
Important Information
Nutrition Facts (Per Serving)
It is important to consider this information as approximate and not to use it as definitive health advice.
Allergy Information
Please check ingredients for potential allergens and consult a health professional if in doubt.


Leave a Comment