
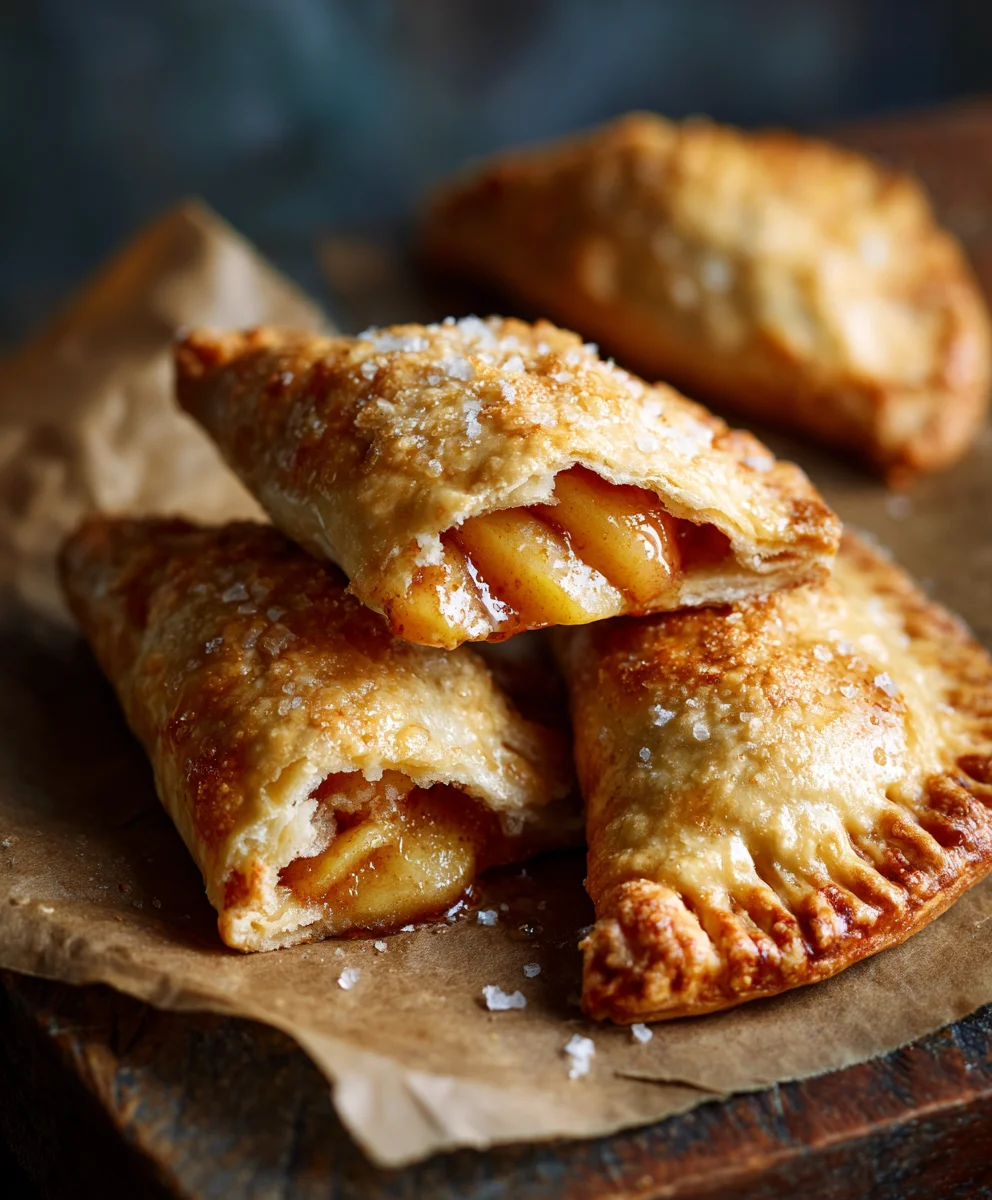
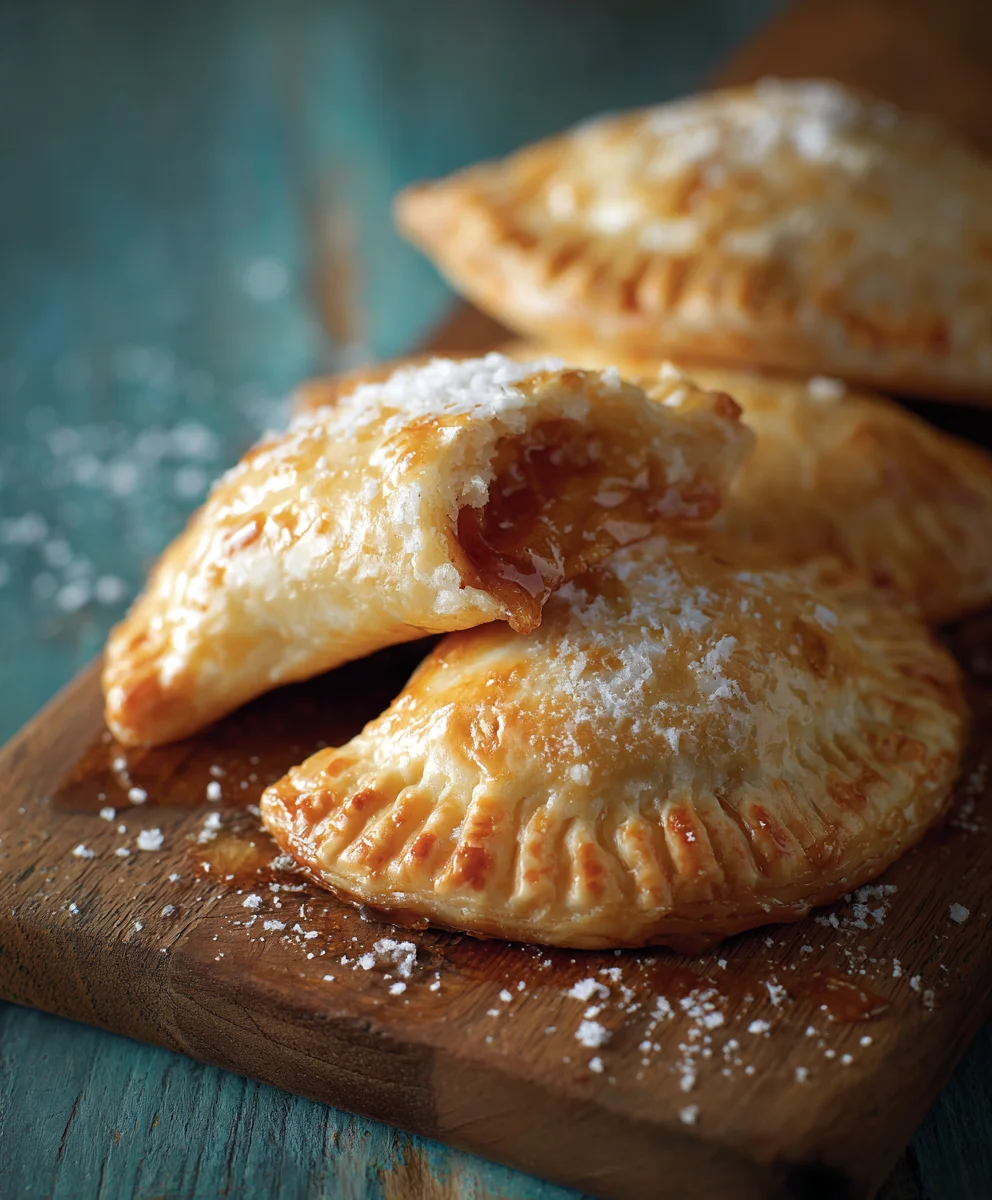
Peach Hand Pies. Ah, the very name conjures images of sun-drenched orchards and lazy summer afternoons. These delightful individual pastries are more than just a dessert; they are a timeless emblem of comfort and portable perfection. Historically, hand pies were a practical solution for farmers and travelers, offering a satisfying, self-contained meal or treat that could be easily carried into the fields or on a long journey. While many might associate them with Southern charm, their appeal is truly universal.
What makes these golden pockets so irresistibly popular? It’s the harmonious blend of a tender, flaky crust enveloping a luscious, sweet peach filling, often kissed with a hint of cinnamon or nutmeg. Every bite delivers a burst of juicy fruit, perfectly complemented by the buttery pastry. I find there’s an undeniable charm in enjoying a full pie experience without the need for plates or forks, making them ideal for picnics, lunchboxes, or a simple on-the-go indulgence.
Crafting these homemade Peach Hand Pies allows you to capture that rustic charm and elevate it with the freshest seasonal peaches, resulting in a treat far superior to any store-bought alternative. Get ready to experience pure culinary bliss!

Ingredients:
-
For the Flaky Pie Crust:
- 2 ½ cups (300g) all-purpose flour, plus more for dusting
- 1 teaspoon granulated sugar
- ½ teaspoon salt
- 1 cup (226g) unsalted butter, very cold and cut into ½-inch cubes
- ½ cup (120ml) ice water, plus 1-2 tablespoons more if needed
-
For the Luscious Peach Filling:
- 4-5 medium-sized ripe peaches (about 3 cups diced), peeled, pitted, and diced into ½-inch pieces
- ½ cup (100g) granulated sugar (adjust to sweetness of peaches)
- 2 tablespoons light brown sugar, packed
- 2 tablespoons cornstarch (or arrowroot powder)
- 1 teaspoon fresh lemon juice
- ½ teaspoon ground cinnamon
- ¼ teaspoon ground nutmeg
- Pinch of salt
- 1 tablespoon unsalted butter, cut into small pieces (optional, for richness)
-
For the Egg Wash & Finishing Touch:
- 1 large egg, beaten with 1 tablespoon water or milk
- 2 tablespoons granulated sugar, for sprinkling
Preparing the Perfect Pie Dough for Your Peach Hand Pies
Creating a beautiful, flaky pie dough from scratch is the first and most crucial step towards achieving truly exceptional Peach Hand Pies. While store-bought crusts can work in a pinch, taking the time to make your own yields an unparalleled texture that truly elevates these treats. Trust me, it’s worth the effort!
-
Combine Dry Ingredients: In a large mixing bowl, whisk together the 2 ½ cups of all-purpose flour, 1 teaspoon of granulated sugar, and ½ teaspoon of salt. This ensures all the dry components are evenly distributed, which is key for consistent flavor and texture.
-
Incorporate the Cold Butter: Add the very cold, ½-inch cubed unsalted butter to the flour mixture. Now, this is where the magic happens for flakiness! Using a pastry blender, two knives, or even your fingertips, cut the butter into the flour until the mixture resembles coarse meal with some pea-sized pieces of butter remaining. It’s vital that the butter stays cold, as this is what creates those wonderful pockets of steam during baking, leading to a tender, flaky crust. Avoid overworking the dough with your hands, as the warmth of your hands can melt the butter.
-
Add Ice Water Gradually: Drizzle ½ cup of ice water, one tablespoon at a time, over the flour and butter mixture. Use a fork or your hands to gently mix it in until the dough just starts to come together. You might not need all the water, or you might need a tiny bit more – it really depends on the humidity in your kitchen. The goal is a dough that holds together when squeezed but isn’t sticky or wet. Be careful not to overmix! Overmixing develops the gluten too much, resulting in a tough crust instead of a tender one. I usually stop mixing once I can gather the dough into a shaggy ball.
-
Chill the Dough: Divide the dough in half. Gently shape each half into a flat disk, wrap tightly in plastic wrap, and refrigerate for at least 1 hour, or preferably 2 hours. Chilling allows the gluten to relax, making the dough easier to roll out, and ensures the butter is thoroughly chilled, which is essential for flakiness. You can even make this dough a day or two in advance, making your baking day much smoother!
Crafting the Perfect Peach Filling for Hand Pies
The heart of our Peach Hand Pies is, of course, the vibrant, sweet, and slightly spiced peach filling. Using ripe, fresh peaches makes all the difference, but frozen peaches can be a good alternative if fresh ones aren’t in season. Just be sure to thaw and drain them well.
-
Prepare the Peaches: First, you’ll need to peel your peaches. An easy trick is to score a small “X” on the bottom of each peach and then blanch them in boiling water for about 30 seconds, followed immediately by an ice bath. The skins should then slip right off! Once peeled, pit the peaches and dice them into ½-inch pieces. You’ll want about 3 cups worth. Place the diced peaches in a medium bowl.
-
Mix the Filling Ingredients: To the bowl with the diced peaches, add the ½ cup of granulated sugar, 2 tablespoons of packed light brown sugar, 2 tablespoons of cornstarch, 1 teaspoon of fresh lemon juice, ½ teaspoon of ground cinnamon, ¼ teaspoon of ground nutmeg, and a pinch of salt. The lemon juice brightens the flavor and balances the sweetness, while the cornstarch is our secret weapon for thickening the filling so it doesn’t run out of your hand pies during baking. Gently toss all the ingredients together until the peaches are evenly coated. Let this mixture sit for about 10-15 minutes; this allows the peaches to release some of their juices, which will then mix beautifully with the sugar and cornstarch.
-
Optional Butter Addition: If you’re looking for an extra layer of richness and a slightly glossier filling, you can add 1 tablespoon of unsalted butter, cut into small pieces, to the peach mixture just before filling. This isn’t strictly necessary but does contribute to a more luxurious taste.
Assembling Your Delicious Peach Hand Pies
Now comes the fun part – bringing all the components together to form your beautiful Peach Hand Pies! This stage requires a little patience and precision, but the results are incredibly rewarding.
-
Preheat Oven & Prepare Baking Sheets: Preheat your oven to 400°F (200°C). Line two large baking sheets with parchment paper. This prevents sticking and makes cleanup a breeze.
-
Roll Out the Dough: Remove one disk of chilled dough from the refrigerator. On a lightly floured surface, roll out the dough to about ⅛-inch thickness. You want it thin enough to be tender but sturdy enough to hold the filling. Aim for an even thickness across the entire sheet. If the dough starts to stick, dust your surface or rolling pin with a little more flour. If it becomes too warm or difficult to work with, pop it back into the fridge for 10-15 minutes.
-
Cut Out Shapes: Using a 3.5 to 4-inch round or square cookie cutter (I love a fluted edge for extra charm!), cut out as many shapes as possible from the rolled-out dough. Gather the scraps, gently re-roll them (try not to overwork the dough), and cut out more shapes until you’ve used most of the dough. Repeat this process with the second disk of dough. You should yield about 12-16 hand pies in total, depending on your cutter size.
-
Fill the Hand Pies: Place half of the dough cut-outs on your prepared baking sheets. Scoop about 1 ½ to 2 tablespoons of the peach filling onto the center of each dough piece. Be careful not to overfill! Leave at least a ½-inch border around the edge of each dough circle. This space is crucial for sealing the hand pies effectively and preventing the filling from bubbling out.
-
Apply Egg Wash & Seal: In a small bowl, whisk together the egg with 1 tablespoon of water or milk to create your egg wash. Lightly brush the edges of the dough circles containing the filling with this egg wash. This acts as a “glue” to help seal the hand pies. Now, carefully place another plain dough cut-out on top of each filled one, aligning the edges. Gently press down around the filling to remove any air pockets.
-
Crimp the Edges: Using the tines of a fork, firmly press all around the sealed edges of each hand pie. This not only creates a decorative pattern but also ensures a tight seal, which is absolutely essential to keep that delicious peach filling from escaping during baking. A good seal is paramount for beautiful hand pies!
-
Vent and Final Touches: Using a small sharp knife, make 2-3 small slits on the top of each hand pie. These vents allow steam to escape during baking, preventing the pies from puffing up excessively and ensuring the crust cooks through properly. Finally, brush the tops of all the assembled Peach Hand Pies generously with the remaining egg wash, and then sprinkle them with the 2 tablespoons of granulated sugar. The egg wash will give them a beautiful golden-brown shine, and the sugar adds a delightful sweet crunch.
-
Chill Again (Optional, but Recommended): For the flakiest crust, I highly recommend chilling the assembled hand pies on the baking sheets for another 15-20 minutes in the refrigerator before baking. This helps solidify the butter again, leading to an even more tender and flaky texture.
Baking the Golden Peach Hand Pies
The moment of truth! Baking these Peach Hand Pies to a perfect golden crisp will fill your kitchen with the most incredible aroma. Patience is key here to ensure they are cooked through and beautifully browned.
-
Bake to Golden Perfection: Place the chilled baking sheets with the hand pies into your preheated 400°F (200°C) oven. Bake for 18-25 minutes, or until the crust is deeply golden brown and the filling is visibly bubbling through the vents. Baking times can vary depending on your oven, so keep a close eye on them, especially towards the end. I usually rotate the baking sheets halfway through the baking time to ensure even browning. Don’t be afraid to let them get a good, rich golden color; that’s where the best flavor and texture are!
-
Cool Before Serving: Once baked, carefully remove the hand pies from the oven and transfer them, still on their parchment paper, to a wire rack. Let them cool for at least 20-30 minutes before serving. I know, it’s hard to wait when they smell so good! But cooling allows the filling to set properly, preventing it from oozing out and burning your tongue. Plus, the crust will become crisper as it cools. These Peach Hand Pies are absolutely delicious served warm, perhaps with a scoop of vanilla ice cream, but they’re equally delightful at room temperature.
Tips for the Best Peach Hand Pies Experience
To truly master the art of making these delightful Peach Hand Pies, here are a few extra tips I’ve picked up along the way:
-
Keep Everything Cold: I cannot stress this enough – cold butter and cold water for the dough are paramount for a flaky crust. If your kitchen is warm, you might even chill your flour beforehand.
-
Don’t Overwork the Dough: Handle the dough as little as possible. Overworking develops gluten, leading to a tough, less tender crust. Mix just until it comes together.
-
Adjust Sugar to Peaches: The sweetness of peaches can vary greatly. Taste your diced peaches before mixing the filling. If they’re super sweet, you might reduce the granulated sugar slightly. If they’re on the tarter side, a little extra sugar won’t hurt.
-
Prevent Soggy Bottoms: Ensure your oven is fully preheated and hot enough. Starting with a higher temperature helps set the bottom crust quickly. Also, properly draining any excess liquid from your peaches before mixing the filling can help prevent a soggy base.
-
Storage: Leftover Peach Hand Pies can be stored at room temperature in an airtight container for up to 2 days, or in the refrigerator for up to 4 days. You can gently reheat them in a toaster oven for a few minutes to crisp up the crust again.
-
Freezing Unbaked Hand Pies: These hand pies freeze beautifully before baking! Assemble them completely (up to step 15, before the final egg wash and sugar sprinkle). Place them on a parchment-lined baking sheet and freeze until solid. Once frozen, transfer them to a freezer-safe bag or container for up to 2 months. When ready to bake, you can bake them directly from frozen, adding an extra 5-10 minutes to the baking time, then apply the egg wash and sugar halfway through baking.
-
Get Creative with Spices: While cinnamon and nutmeg are classics, consider adding a tiny pinch of cardamom or a whisper of ginger to your peach filling for an extra layer of warmth and complexity. A tablespoon of bourbon or rum could also be added to the filling for a more adult-friendly flavor profile!
Conclusion:
And there you have it, my friends! After whisking, rolling, and baking your way to perfection, I truly believe you’ll understand why this recipe isn’t just another dessert; it’s a culinary hug, a burst of sunshine, and a testament to the simple joy of homemade goodness. I’ve poured my heart into perfecting these delightful treats, and I am absolutely confident that they will become a cherished part of your baking repertoire. The combination of the buttery, flaky crust, achieved through just the right technique and attention to detail, paired with the luscious, sweet-tart filling made from ripe, juicy peaches, is nothing short of magical. This isn’t just a recipe; it’s an experience waiting to unfold in your kitchen. Every bite offers a perfect balance of texture and flavor that store-bought versions simply cannot replicate. The effort, which I promise is surprisingly minimal for such a stunning outcome, is undeniably worth it when you witness the smiles these bring to everyone’s faces.
What I adore most about these is their inherent charm and versatility. They manage to feel both wonderfully gourmet and comforting, like something straight out of a cherished family cookbook. The aroma alone, as they bake to golden perfection, is enough to lift spirits and gather everyone around the kitchen. These Peach Hand Pies are more than just a dessert; they’re a portable piece of happiness, perfect for any occasion. Think about the delight of packing one in a lunchbox for a special treat, or bringing a batch to a potluck where they are guaranteed to disappear in a flash. They are designed for ease, for sharing, and for savoring. The sweet, syrupy peaches, encased in that tender, golden pastry, offer a nostalgic flavor profile that appeals to all ages. It’s a taste that harks back to simpler times, evoking warmth and contentment with every delicious mouthful. I truly feel this recipe captures the very essence of summer, allowing you to enjoy those vibrant peach flavors long after the season has passed.
Serving Suggestions & Creative Variations:
Now, while these hand pies are utterly perfect straight out of the oven, perhaps with a mere dusting of powdered sugar, don’t be shy about elevating the experience! For a truly indulgent treat, serve them warm with a scoop of premium vanilla bean ice cream that slowly melts into the warm peach filling – pure bliss! A dollop of freshly whipped cream, perhaps infused with a hint of vanilla or a touch of almond extract, also makes for an exquisite accompaniment. For those who appreciate a bit of tang, a simple lemon glaze drizzled over the top adds a wonderful bright counterpoint to the sweetness. You could also experiment with a light cinnamon sugar sprinkle on the crust before baking for an extra textural and aromatic dimension. If you’re feeling adventurous, consider a subtle splash of bourbon or rum in the peach filling to deepen the flavor profile, creating a more sophisticated dessert for adult palates. The possibilities for personalization are endless, making this recipe a fantastic canvas for your culinary creativity.
Beyond the serving suggestions, feel free to experiment with the filling itself on future baking days. While peaches are the undisputed star here, this versatile crust recipe can certainly be adapted for other fruit fillings. Imagine a mixed berry hand pie, or a classic apple cinnamon version during the autumn months. A hint of cardamom or ginger in the peach filling could introduce an exciting new spice dimension. You could even explore a savory adaptation, perhaps with a cheesy potato filling or a seasoned spinach and feta combination for a unique appetizer or light meal. But for now, I encourage you to stick with the glorious peaches for your inaugural bake, savoring the classic flavors we’ve perfected together. These pies are not just for dessert; they make for an incredible breakfast pastry with your morning coffee, a delightful afternoon snack, or the perfect ending to any meal. Their portability also makes them ideal for picnics, road trips, or simply enjoying outdoors on a beautiful day. They truly are an all-rounder when it comes to sweet treats.
Your Turn to Bake!
So, my fellow baking enthusiasts, I sincerely hope you feel inspired and ready to tackle this incredible recipe. Don’t let any hesitation hold you back; I’ve designed this recipe to be approachable and rewarding for bakers of all skill levels. There’s a profound satisfaction that comes from creating something so delicious from scratch, and I promise you, the moment you take that first bite of your homemade hand pie, you’ll know exactly what I mean. I absolutely cannot wait for you to experience the joy of biting into that flaky crust and savoring the sweet, juicy peach filling. It’s a moment of pure culinary delight that you deserve to experience. Please, don’t just dream about these; make them! I would be absolutely thrilled to hear all about your baking adventures. Did you add a special ingredient? Did you serve them with a unique topping? Did they bring smiles to your loved ones? Share your experiences, your photos, and your triumphs! Your feedback means the world to me and helps build our wonderful community of home bakers. Happy baking, everyone, and may your kitchens always be filled with the sweet aroma of freshly baked treats!
Delicious Peach Hand Pies Recipe – Easy & Sweet Treat
These delightful individual pastries offer a timeless emblem of comfort and portable perfection. A harmonious blend of tender, flaky crust and luscious, sweet peach filling, ideal for picnics or on-the-go indulgence. Homemade with fresh seasonal peaches, they deliver a superior treat.
Ingredients
-
2 ½ cups (300g) all-purpose flour
-
1 teaspoon granulated sugar (for crust)
-
½ teaspoon salt (for crust)
-
1 cup (226g) unsalted butter, very cold, cubed
-
½ cup (120ml) ice water, plus 1-2 tablespoons more if needed
-
4-5 medium ripe peaches (about 3 cups diced), peeled, pitted, diced
-
½ cup (100g) granulated sugar (for filling, adjust to peach sweetness)
-
2 tablespoons light brown sugar, packed
-
2 tablespoons cornstarch (or arrowroot powder)
-
1 teaspoon fresh lemon juice
-
½ teaspoon ground cinnamon
-
¼ teaspoon ground nutmeg
-
Pinch of salt (for filling)
-
1 tablespoon unsalted butter, cut into small pieces (optional, for richness)
-
1 tablespoon non-alcoholic vanilla extract (optional, for flavor depth)
-
1 large egg, beaten with 1 tablespoon water or milk (for egg wash)
-
2 tablespoons granulated sugar (for sprinkling)
Instructions
-
Step 1
Whisk together 2 ½ cups all-purpose flour, 1 tsp granulated sugar, and ½ tsp salt in a large bowl. -
Step 2
Cut 1 cup very cold, cubed unsalted butter into the flour mixture using a pastry blender or fingertips until it resembles coarse meal with pea-sized butter pieces. Keep butter cold to ensure flakiness. -
Step 3
Drizzle ½ cup ice water, 1 tbsp at a time, mixing gently with a fork until the dough just starts to come together into a shaggy ball. Do not overmix. -
Step 4
Divide dough in half. Shape each half into a flat disk, wrap tightly in plastic wrap, and refrigerate for at least 1-2 hours. -
Step 5
Peel, pit, and dice 4-5 medium ripe peaches (about 3 cups) into ½-inch pieces. Place the diced peaches in a medium bowl. -
Step 6
To diced peaches, add ½ cup granulated sugar, 2 tbsp light brown sugar, 2 tbsp cornstarch, 1 tsp fresh lemon juice, ½ tsp ground cinnamon, ¼ tsp ground nutmeg, and a pinch of salt. Gently toss to coat. Let the mixture sit for 10-15 minutes. Optionally, mix in 1 tbsp unsalted butter and 1 tbsp non-alcoholic vanilla extract for extra richness and flavor depth. -
Step 7
Preheat your oven to 400°F (200°C). Line two large baking sheets with parchment paper. -
Step 8
On a lightly floured surface, roll out one chilled dough disk to about ⅛-inch thickness. Using a 3.5 to 4-inch round or square cookie cutter, cut out as many shapes as possible. Gather and gently re-roll scraps to cut more shapes. Repeat this process with the second dough disk (you should yield 12-16 shapes total). -
Step 9
Place half of the dough cut-outs on your prepared baking sheets. Scoop about 1 ½ to 2 tablespoons of the peach filling onto the center of each dough piece, leaving at least a ½-inch border. Do not overfill. -
Step 10
Brush the edges of the filled dough circles with the egg wash (1 beaten egg + 1 tbsp water/milk). Carefully place another plain dough cut-out on top of each filled one, aligning the edges. Gently press down around the filling to remove any air pockets. -
Step 11
Using the tines of a fork, firmly press all around the sealed edges of each hand pie to create a tight seal. Make 2-3 small slits on the top of each hand pie with a sharp knife to allow steam to escape during baking. -
Step 12
Brush the tops of all the assembled hand pies generously with the remaining egg wash, and then sprinkle them with the 2 tablespoons of granulated sugar. For the flakiest crust, chill the assembled hand pies on the baking sheets for another 15-20 minutes in the refrigerator before baking. -
Step 13
Place the chilled baking sheets with the hand pies into your preheated 400°F (200°C) oven. Bake for 18-25 minutes, or until the crust is deeply golden brown and the filling is visibly bubbling through the vents. Rotate baking sheets halfway through for even browning. -
Step 14
Once baked, carefully remove the hand pies from the oven and transfer them to a wire rack. Let them cool for at least 20-30 minutes before serving. This allows the filling to set properly.
Important Information
Nutrition Facts (Per Serving)
It is important to consider this information as approximate and not to use it as definitive health advice.
Allergy Information
Please check ingredients for potential allergens and consult a health professional if in doubt.


Leave a Comment