
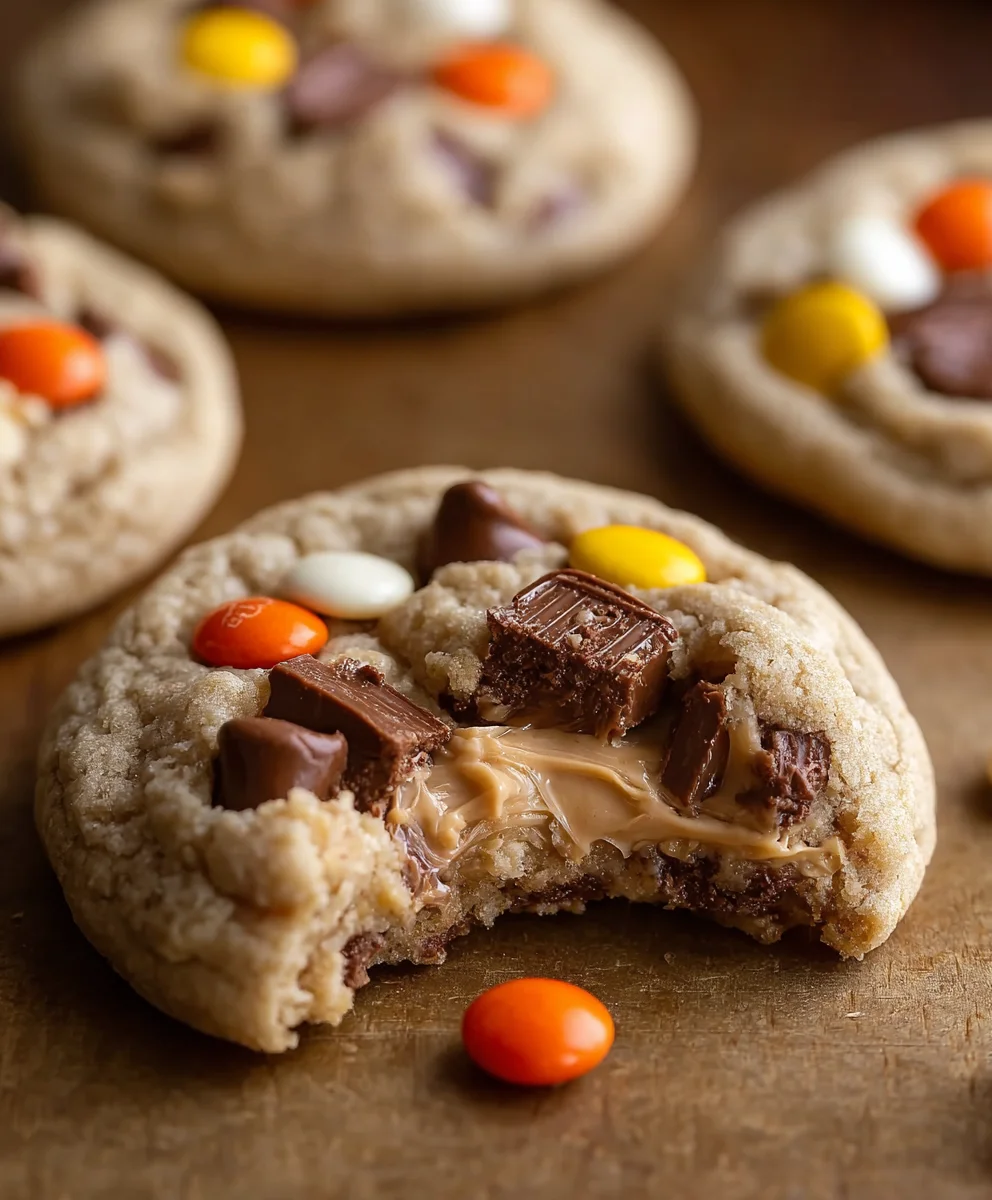
Reese’s Cheesecake Cookies are more than just a dessert; they’re a delightful fusion of two universally adored treats. Imagin extracte the rich, creamy indulgence of cheesecake meeting the irresistible crum extractbly goodness of a classic cookie, all elevated by the iconic salty-sweet punch of Reese’s peanut butter cups. It’s no wonder this magical combination has captured the hearts (and taste buds!) of dessert lovers everywhere. What sets these Reese’s Cheesecake Cookies apart is their incredible texture – a soft, chewy interior that yields to a slightly crisp edge, with pockets of melted peanut butter and luscious cheesecake filling bursting with every bite. They offer that perfect balance of sweet and savory that makes you crave just one more, and then another. If you’re looking for a show-stopping treat that’s surprisingly easy to make and guaranteed to impress, you’ve found it.

Ingredients:
- 6 ounces cream cheese, softened to room temperature
- 3 tablespoons granulated sugar
- ½ teaspoon vanilla extract
- 1 cup unsalted butter
- 1¼ cups packed light brown sugar
- ¼ cup granulated sugar
- 2 large eggs, at room temperature
- 2 teaspoons pure vanilla extract
- 2½ cups all-purpose flour, spooned and leveled
- 1 teaspoon baking soda
- ½ teaspoon salt
- ¼ cup semi-sweet chocolate chips, plus additional for decorating
- ¼ cup milk chocolate chips, plus additional for decorating
- ½ cup white chocolate chips, plus additional for decorating
- 1 cup mini Reese’s peanut butter cups, roughly chopped, plus additional for topping
Making the Reese’s Cheesecake Cookies
Cream Cheese Filling Prep
Let’s get started by preparing the creamy cheesecake element that will make these cookies truly special. In a medium bowl, combine the softened cream cheese, 3 tablespoons of granulated sugar, and ½ teaspoon of vanilla extract. Use an electric mixer on medium speed, or a sturdy whisk, to beat these ingredients together until they are completely smooth and well combined. You want a creamy, lump-free mixture. This will be swirled into our cookie dough later, adding pockets of delicious, tangy cheesecake goodness. Once mixed, set this bowl aside.
Browning the Butter
This step is crucial for adding an incredible depth of flavor to our cookie base. Take your 1 cup of unsalted butter and place it in a light-colored saucepan over medium heat. You’re looking for the butter to melt, then begin extract to foam. As it heats, watch for small brown specks to start appearing at the bottom of the pan. Swirl the pan occasionally. This process, known as browning the butter, develops a nutty, toasty aroma and taste that elevates regular cookies to something extraordinary. Be careful not to burn it; you want a rich brown color, not black. Once the butter is beautifully browned and fragrant, immediately pour it into a heat-safe bowl to stop the cooking process. Let it cool slightly for about 5-10 minutes, just until it’s not piping hot.
Combining Wet Ingredients and Dry Ingredients
Now for the cookie dough base. In a large mixing bowl, combine the slightly cooled browned butter with the 1¼ cups of packed light brown sugar and the remaining ¼ cup of granulated sugar. Cream these together with your electric mixer on medium speed until the mixture is light and fluffy, which should take about 2-3 minutes. Next, add the 2 large eggs, one at a time, beating well after each addition. Stir in the 2 teaspoons of pure vanilla extract. In a separate medium bowl, whisk together the 2½ cups of all-purpose flour, baking soda, and salt. This ensures that the leavening agent and salt are evenly distributed throughout the flour, which is vital for consistent cookie texture and rise.
Forming the Cookie Dough and Adding Mix-ins
Gradually add the dry ingredients to the wet ingredients, mixing on low speed (or by hand with a spatula) until just combined. Be careful not to overmix the dough at this stage, as it can lead to tough cookies. Overmixing develops the gluten in the flour too much. Now for the fun part – the mix-ins! Gently fold in the ¼ cup semi-sweet chocolate chips, ¼ cup milk chocolate chips, ½ cup white chocolate chips, and the roughly chopped mini Reese’s peanut butter cups. We want to distribute these delicious morsels evenly throughout the dough.
Assembling and Baking the Reese’s Cheesecake Cookies
Preheat your oven to 375 degrees Fahrenheit (190 degrees Celsius). Line baking sheets with parchment paper to prevent sticking and ensure even baking. For each cookie, scoop about 2 tablespoons of dough onto the prepared baking sheet, leaving about 2 inches between them as they will spread. Now, take small spoonfuls (about ½ teaspoon) of the prepared cream cheese mixture and dollop it onto the cookie dough balls. Using a toothpick or the tip of a knife, gently swirl the cream cheese mixture into the cookie dough. Don’t over-swirl; you want distinct ribbons of cream cheese. Press a few extra chocolate chips and a mini Reese’s peanut butter cup or two onto the tops of the cookies for that irresistible visual appeal. Bake for 9-12 minutes, or until the edges are golden brown and the centers are still slightly soft. The cookies will continue to set up as they cool on the baking sheet. Allow them to cool on the baking sheet for 5 minutes before transferring them to a wire rack to cool completely. This resting period is important for the cookies to firm up properly.
Conclusion:
There you have it – the ultimate guide to creating delightful Reese’s Cheesecake Cookies! We’ve walked through each step, from creaming the butter and sugar to folding in those irresistible peanut butter cups. These cookies are a true celebration of classic flavors, blending the rich tang of cheesecake with the salty sweetness of peanut butter. They’re perfect for any occasion, whether it’s a weeknight treat, a holiday gathering, or a special dessert for a peanut butter lover. I truly hope you enjoy baking and savoring these incredible Reese’s Cheesecake Cookies as much as I do!
For serving suggestions, these cookies are divine served warm, fresh from the oven, perhaps with a tall glass of cold milk. They also hold up beautifully at room temperature, making them ideal for potlucks and cookie exchanges. Consider drizzling them with a little melted chocolate or a swirl of peanut butter frosting for an extra touch of decadence.
Now, let’s talk variations! If you’re feeling adventurous, try adding a sprinkle of sea salt on top before baking for a delightful sweet and salty contrast. You could also incorporate mini peanut butter cups for more frequent bursts of flavor in every bite. Don’t be afraid to experiment – the base recipe is wonderfully forgiving!
FAQs:
Can I make Reese’s Cheesecake Cookies ahead of time?
Absolutely! You can prepare the dough and refrigerate it for up to 3 days before baking. This allows the flavors to meld even further, and the chilled dough often results in thicker, chewier cookies. You can also freeze the cookie dough balls for up to 3 months. Just bake them directly from frozen, adding a few extra minutes to the baking time.
What if I don’t have cream cheese? Can I substitute it?
While cream cheese is key to the “cheesecake” element of these Reese’s Cheesecake Cookies, you can try substituting it with an equal amount of mascarpone cheese for a slightly richer, smoother texture. However, be aware that the cheesecake tang might be less pronounced. Other substitutes may alter the texture and flavor significantly.
How do I store leftover Reese’s Cheesecake Cookies?
Once cooled, store your Reese’s Cheesecake Cookies in an airtight container at room temperature for up to 3-4 days. They’ll remain soft and delicious. If you live in a warm climate, you might consider refrigerating them to prevent the chocolate from melting, though they might become slightly firmer.

Reese’s Cheesecake Cookies-Decadent & Chewy Delights
Decadent and chewy cookies with swirls of creamy cheesecake and loaded with chocolate chips and Reese’s peanut butter cups.
Ingredients
-
6 ounces cream cheese, softened to room temperature
-
3 tablespoons granulated sugar
-
½ teaspoon vanilla extract
-
1 cup unsalted butter, browned
-
1¼ cups packed light brown sugar
-
¼ cup granulated sugar
-
2 large eggs, at room temperature
-
2 teaspoons pure vanilla extract
-
2½ cups all-purpose flour, spooned and leveled
-
1 teaspoon baking soda
-
½ teaspoon salt
-
¼ cup semi-sweet chocolate chips, plus additional for decorating
-
¼ cup milk chocolate chips, plus additional for decorating
-
½ cup white chocolate chips, plus additional for decorating
-
1 cup mini Reese’s peanut butter cups, roughly chopped, plus additional for topping
Instructions
-
Step 1
Prepare the cream cheese filling: In a medium bowl, combine softened cream cheese, 3 tablespoons granulated sugar, and ½ teaspoon vanilla extract. Beat until smooth and well combined. Set aside. -
Step 2
Brown the butter: Melt 1 cup unsalted butter in a light-colored saucepan over medium heat. Continue heating until small brown specks appear at the bottom, developing a nutty aroma. Pour into a heat-safe bowl and let cool slightly for 5-10 minutes. -
Step 3
Combine wet and dry ingredients: In a large mixing bowl, combine cooled browned butter with 1¼ cups packed light brown sugar and ¼ cup granulated sugar. Cream until light and fluffy. Add eggs one at a time, beating well after each. Stir in 2 teaspoons vanilla extract. In a separate bowl, whisk together flour, baking soda, and salt. -
Step 4
Form cookie dough and add mix-ins: Gradually add dry ingredients to wet ingredients, mixing on low speed until just combined. Gently fold in semi-sweet, milk, and white chocolate chips, and chopped mini Reese’s peanut butter cups. -
Step 5
Assemble and bake: Preheat oven to 375°F (190°C). Line baking sheets with parchment paper. Scoop about 2 tablespoons of dough per cookie. Dollop about ½ teaspoon of cream cheese mixture onto each cookie dough ball. Gently swirl the cream cheese into the dough with a toothpick. Press extra chips and a mini Reese’s peanut butter cup onto the tops. Bake for 9-12 minutes, until edges are golden and centers are slightly soft. Cool on the baking sheet for 5 minutes before transferring to a wire rack.
Important Information
Nutrition Facts (Per Serving)
It is important to consider this information as approximate and not to use it as definitive health advice.
Allergy Information
Please check ingredients for potential allergens and consult a health professional if in doubt.


Leave a Comment