
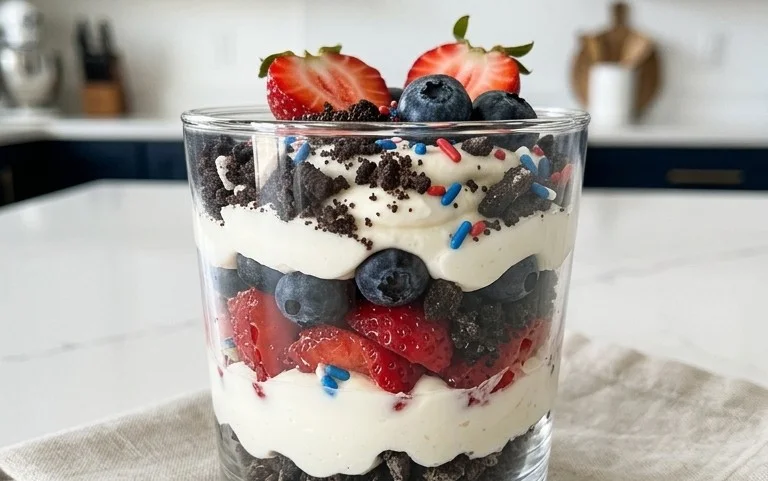
Red, White and Blue Dirt Cups are more than just a dessert; they’re a nostalgic trip back to childhood picnics, summer BBQs, and those carefree days of decorating them with gummy worms and colorful sprinkles. There’s something undeniably delightful about this playful treat that captures the essence of celebration, especially when those patriotic colors are involved. It’s the perfect edible embodiment of fun, making it a massive hit with kids and adults alike. What truly makes these Red, White and Blue Dirt Cups so special is their simplicity and versatility. You can customize them endlessly, from the type of “dirt” to the creamy filling and the vibrant toppings. They’re easy enough for even the most novice baker to whip up, yet impressive enough to be the star of any gathering. Get ready to create a deliciously fun dessert that’s as beautiful as it is tasty!

Red, White and Blue Dirt Cups
Get ready to celebrate! These Red, White and Blue Dirt Cups are the perfect festive treat for any patriotic occasion, from the Fourth of July to Memorial Day, or even just a fun summer dessert. They’re incredibly easy to make, so the whole family can join in on the fun. Imagin extracte layers of creamy, dreamy cheesecake pudding, rich chocolate “dirt,” and colorful gummy worms peeking out – it’s a visual and tastebud delight! These cups are sure to be a crowd-pleaser, bringin extractg smiles and a touch of sweet indulgence to your celebrations.
Ingredients:
Instructions:
Prepare the Chocolate “Dirt”:
The foundation of our dirt cups is, of course, the “dirt”! To create this, you’ll need to finely crush your Oreo cookies. A food processor is your best friend here for achieving a nice, even crum extractb that truly resembles soil. If you don’t have a food processor, don’t worry! You can place the Oreos in a sturdy zip-top bag, seal it tightly, and then use a rolling pin or the bottom of a heavy pot to crush them into fine crum extractbs. The goal is to get rid of any large cookie chunks. Once crushed, set aside about half of the Oreo crum extractbs; these will be used for the red and blue layers. The remaining crum extractbs will form the dark, earthy “dirt” layer.
Mix the Cheesecake Pudding Base:
Now, let’s get our creamy cheesecake pudding ready. In a large mixing bowl, combine the contents of both cheesecake pudding boxes with the 4 cups of milk. Whisk vigorously for about 2 minutes, or until the mixture is well combined and starts to thicken. It’s important to whisk thoroughly to ensure there are no pockets of dry pudding mix. Once it begin extracts to set, cover the bowl with plastic wrap, making sure the wrap touches the surface of the pudding. This prevents a skin from forming. Refrigerate for at least 5 minutes, or until the pudding is firm. This chilling step helps the pudding achieve the perfect creamy texture for our layered dessert.
Divide and Color the Pudding:
It’s time to bring in the festive colors! Take your chilled cheesecake pudding and divide it equally into three separate bowls. In the first bowl, we’ll keep the pudding plain for our white layer. In the second bowl, carefully stir in the ¼ teaspoon of red gel food dye. Gel food coloring is highly concentrated, so a little goes a long way. You want a vibrant, yet natural-looking red. In the third bowl, add the ¼ teaspoon of blue gel food dye, again stirring until you achieve a beautiful blue hue. Make sure to stir each color thoroughly to distribute the dye evenly. For the red and blue layers, you’ll also want to incorporate some of the reserved crushed Oreos. Gently fold about half of the reserved crushed Oreos into the red pudding, and the other half into the blue pudding. This creates a speckled, more realistic “dirt” effect within the colored layers.
Assemble the Dirt Cups:
Now for the fun part – building our delicious dirt cups! Grab your serving cups or jars. I like to use clear glasses or mason jars so you can see the beautiful layers. Start by spooning a layer of the plain white cheesecake pudding into the bottom of each cup. Don’t fill it too full, as we have more layers to add. Next, carefully spoon a layer of the red pudding mixture on top of the white. Gently spread it out to create an even layer. Follow this with a layer of the plain chocolate Oreo “dirt” crum extractbs, pressing them down lightly. Then, add a layer of the blue pudding mixture. Finally, top everything off with another generous layer of the chocolate Oreo “dirt” crum extractbs. You want it to look like a freshly dug patch of earth!
Decorate and Chill:
The final touch that makes these dirt cups truly special is the gummy worms! Gently push 2 red and blue gummy worms into the “dirt” on top of each cup. Let them peek out as if they’re emergin extractg from the soil. This is where you can get creative! You can have them wriggling out from different angles. Once all your cups are assembled and decorated, it’s time to let them chill. Cover each cup with plastic wrap and refrigerate for at least 30 minutes. This allows the flavors to meld together and ensures the pudding is perfectly set. The chilling time also makes them even more refreshing, especially on a warm day. Serve these Red, White and Blue Dirt Cups cold and enjoy the patriotic spirit!

Conclusion:
And there you have it – your guide to creating the most delightful Red, White and Blue Dirt Cups! This recipe is a surefire hit for so many reasons. It’s incredibly easy to assemble, making it perfect for little helpers to join in the fun. The combination of creamy pudding, crushed chocolate cookies, and vibrant fruit creates a visually appealing and deliciously satisfying dessert that truly celebrates the spirit of any patriotic occasion. They’re not just for the Fourth of July either; these festive treats are fantastic for Memorial Day, school events, or even just a fun summer afternoon.
Serving these dirt cups is a breeze. You can use clear plastic cups for the full visual effect, or go for small mason jars for a more rustic charm. They are wonderful as individual desserts for parties or potlucks. For variations, consider adding a layer of whipped cream between the pudding and the cookie crum extractbs, or even a sprinkle of mini chocolate chips on top for extra indulgence. Don’t be afraid to experiment with different fruits like raspberries or blueberries depending on what’s freshest. I truly encourage you to give these Red, White and Blue Dirt Cups a try. I guarantee they’ll bring smiles all around!
Frequently Asked Questions:
Can I make these ahead of time?
Absolutely! You can prepare the pudding and crush the cookies a day in advance. Assemble the dirt cups a few hours before serving for the best texture. If you assemble them too far ahead, the cookies can become too soggy.
What kind of pudding works best?
Any instant pudding mix will work wonderfully, but chocolate is traditional for the “dirt” effect. Vanilla or even cheesecake flavored pudding can be fun alternatives if you want to change up the flavor profile.
Red, White and Blue Dirt Cups
A festive and fun dessert featuring layers of creamy cheesecake pudding, crushed Oreos, and colorful gummy worms, perfect for patriotic holidays or any celebration.
Ingredients
-
2 boxes cheesecake pudding (3.4 ounces each)
-
4 cups milk
-
19 Oreo cookies (crushed)
-
1/4 teaspoon red gel food dye
-
1/4 teaspoon blue gel food dye
-
8 red and blue gummy worms
Instructions
-
Step 1
In a large bowl, whisk together the cheesecake pudding mix and milk until well combined and smooth. -
Step 2
Divide the pudding mixture into three separate bowls. Leave one bowl plain for the white layer. -
Step 3
To the second bowl, add the red gel food dye and stir until evenly colored. To the third bowl, add the blue gel food dye and stir until evenly colored. -
Step 4
In the bottom of 8 small cups or jars, layer a portion of the crushed Oreo cookies to resemble dirt. -
Step 5
Spoon alternating layers of the white, red, and blue pudding over the cookie crumbs. -
Step 6
Top each cup with more crushed Oreo cookies for a final layer of ‘dirt’. -
Step 7
Garnish each dirt cup with one red and blue gummy worm, partially inserted into the ‘dirt’. -
Step 8
Chill the dirt cups in the refrigerator for at least 15 minutes before serving.
Important Information
Nutrition Facts (Per Serving)
It is important to consider this information as approximate and not to use it as definitive health advice.
Allergy Information
Please check ingredients for potential allergens and consult a health professional if in doubt.


Leave a Comment