
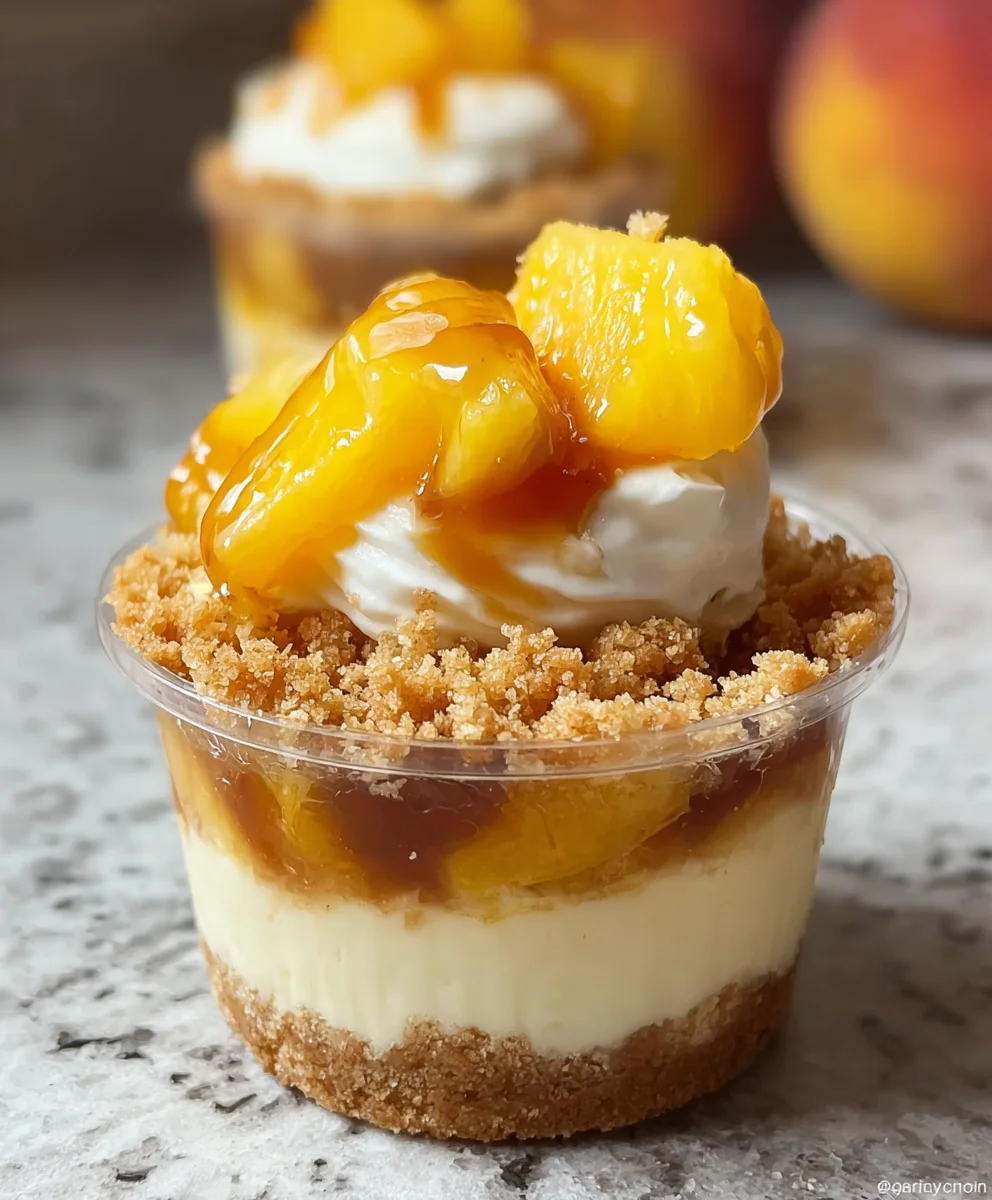
Peach Cobbler Cheesecake Cups offer a truly delightful twist on two beloved dessert classics, promising an unforgettable experience for your taste buds. Imagine the warm, comforting embrace of a traditional peach cobbler, with its luscious, cinnamon-spiced fruit, perfectly fused with the rich, creamy decadence of a classic cheesecake. It’s a match made in dessert heaven that brings together the best of both worlds into one convenient, individual serving, ensuring every bite is pure bliss.
A Harmony of Tradition and Modern Indulgence
While traditional peach cobbler boasts a rich history deeply rooted in Southern American cuisine, often serving as a heartwarming centerpiece at family gatherings and celebrations, and cheesecake holds its own global acclaim for its luxurious texture, these innovative cups beautifully merge their legacies. People adore this dish not only for its incredible flavor profile—the juicy sweetness of peaches contrasting beautifully with the tangy cream cheese, often enhanced by a hint of warm spice—but also for its magnificent textural symphony. You get the soft, yielding peaches, the smooth, velvety cheesecake, and frequently a delightful, buttery crumble topping, all working in harmony. The convenience of individual portions also makes these a crowd-pleaser, effortlessly elegant for any occasion without the fuss of slicing a large cake or cobbler, simplifying serving and enjoyment.
I find that the sheer joy of biting into one of these miniature masterpieces is unparalleled. They are perfect for entertaining, a delightful potluck contribution, or simply a sophisticated treat after a long day. Get ready to impress and satisfy with these irresistible Peach Cobbler Cheesecake Cups that are sure to become a new favorite in your dessert repertoire, guaranteed to garner rave reviews from everyone who tastes them.

Ingredients:
-
For the Graham Cracker Crust:
- 1 ½ cups (about 180g) Graham Cracker Crumbs: I usually buy a box of graham crackers and crush them myself for the freshest taste and texture, which you can easily do in a food processor or by hand with a rolling pin and a Ziploc bag. However, pre-crushed graham cracker crumbs work beautifully and save a step! Just make sure they’re finely ground for a consistent crust.
- ½ cup (113g) Unsalted Butter: Melted. This is the magical ingredient that binds all our graham cracker crumbs together, creating that perfectly firm yet crumbly foundation for our “Peach Cobbler Cheesecake Cups.” Make sure it’s fully melted so it can evenly coat all the crumbs.
- ¼ cup (50g) Granulated Sugar: A touch of sweetness here helps to enhance the flavor of the graham crackers and creates a delightful base that complements the rich cheesecake and sweet peaches.
-
For the Peach Filling:
- 2 cups (approximately 2-3 medium) Fresh or Frozen Sliced Peaches: If using fresh, make sure they are ripe but still somewhat firm; overripe peaches can become too mushy when cooked. For frozen peaches, there’s no need to thaw them completely, but allowing them to soften slightly for about 10-15 minutes makes chopping them into smaller pieces much easier. I adore the sweetness and vibrant color that peaches bring to these “Peach Cobbler Cheesecake Cups.”
- ¼ cup (50g) Granulated Sugar: This sugar is specifically for the peach filling, helping to draw out the natural juices from the peaches and forming a luscious, sweet syrup. It balances any tartness, especially if your peaches aren’t at peak sweetness.
- 1 tablespoon Lemon Juice: Freshly squeezed is always, always best. The lemon juice isn’t just for a bright, zesty flavor; it also acts as a natural preservative, helping to prevent the peaches from browning and keeping their vibrant hue. It’s a small touch that makes a big difference.
- ½ teaspoon Ground Cinnamon: Essential for that classic, warm, and comforting “cobbler” spice profile. Cinnamon and peaches are truly a match made in heaven, and it will infuse our filling with an irresistible aroma.
- ¼ teaspoon Ground Nutmeg: A lovely, subtle complement to the cinnamon, adding depth and a hint of earthy spice. It really brings out the warmth in the peach filling without overpowering it.
- 1 tablespoon Cornstarch: Our secret weapon for achieving a perfectly thick, slightly glossy, and wonderfully spoonable peach filling. This ensures your peach layer stays put and doesn’t make your crust soggy.
- 2 tablespoons Water: Used to create a cornstarch slurry. Dissolving the cornstarch in cold water before adding it to the warm peaches prevents lumps and ensures a smooth, even thickening.
-
For the Cheesecake Filling:
- 16 ounces (2 blocks, 450g) Full-Fat Cream Cheese: Softened completely to room temperature. This is absolutely crucial for a silky, lump-free cheesecake! Seriously, set it out on the counter for at least an hour or two before you plan to bake. Cold cream cheese will inevitably lead to lumpy batter, which no one wants in their beautiful “Peach Cobbler Cheesecake Cups.”
- ¾ cup (150g) Granulated Sugar: For a perfectly balanced sweetness in our creamy, rich cheesecake filling. It’s just enough to make it dessert-worthy without being cloyingly sweet, allowing the peach flavors to shine.
- 2 large Eggs: Also at room temperature. Just like the cream cheese, room temperature eggs emulsify much better into the batter, contributing to a smoother texture and preventing cracks in your baked cheesecake.
- 1 teaspoon Vanilla Extract: Use a good quality, pure vanilla extract here. It adds a comforting, aromatic depth to the cheesecake that perfectly harmonizes with the peaches and spices. It’s a foundational flavor that truly makes these “Peach Cobbler Cheesecake Cups” sing.
- ¼ cup (60ml) Sour Cream: Again, at room temperature. This ingredient is a game-changer! It adds a delightful tanginess that cuts through the richness of the cream cheese, and significantly contributes to an incredibly moist, tender, and luxurious texture. Do not skip this for the best “Peach Cobbler Cheesecake Cups”!
-
For the Cobbler Streusel Topping:
- ½ cup (60g) All-Purpose Flour: The essential base for our wonderfully crumbly and buttery streusel topping.
- ¼ cup (50g) Granulated Sugar: Provides sweetness to the streusel, creating a caramelized crunch when baked.
- ¼ cup (55g) Cold Unsalted Butter: Cut into small cubes. Keeping the butter cold is the golden rule for streusel! When cold butter is cut into flour, it creates pockets that steam during baking, resulting in a light, crisp, and crumbly texture that’s absolutely divine on these “Peach Cobbler Cheesecake Cups.”
- ½ teaspoon Ground Cinnamon: To echo the warm spices in the peach filling, bringing all the flavors together beautifully in every bite.
- Pinch of Salt: Just a tiny pinch helps to balance the sweetness of the sugar and enhances all the other flavors in the streusel, making it truly irresistible.
-
Optional Garnish:
- Whipped Cream or Cool Whip: For an extra touch of creamy indulgence when serving your individual “Peach Cobbler Cheesecake Cups.” A fluffy dollop adds a lovely contrast in texture and temperature.
- Fresh Mint Sprigs: A beautiful and vibrant garnish that adds a pop of color and a hint of freshness, making your desserts look even more appealing.
Preparing the Graham Cracker Crust
- Preheat and Prepare: First things first, let’s get our oven ready to bake these amazing “Peach Cobbler Cheesecake Cups.” Preheat your oven to a precise 350°F (175°C). While it’s heating up, grab a standard 12-cup muffin tin. I highly recommend lining each cup with paper liners, as this makes removing your individual cheesecake cups incredibly easy and prevents any sticking. If you only have foil liners, a quick spray with non-stick cooking spray can offer extra insurance, but generally, paper liners are my go-to for hassle-free removal. This preparation ensures a smooth process once your ingredients are ready.
- Combine Dry Ingredients: In a medium-sized mixing bowl, combine your 1 ½ cups of finely crushed graham cracker crumbs, ¼ cup of granulated sugar, and ½ cup of completely melted unsalted butter. Use a fork or a sturdy spoon to mix everything together thoroughly. You’ll want to keep stirring until all the graham cracker crumbs are evenly moistened by the butter and sugar. The mixture should take on a texture similar to damp sand—it should hold together when you pinch it between your fingers. This even distribution of butter is what will create a cohesive and sturdy crust for your “Peach Cobbler Cheesecake Cups.”
- Press into Cups: Now, carefully and evenly divide this buttery graham cracker mixture among the 12 prepared muffin cups. I find that using a tablespoon measure helps with consistency, typically scooping about 1 ½ tablespoons into each cup. Once the mixture is in the cups, it’s time to get pressing! Using the back of a small spoon, a tart tamper, or even the bottom of a small, flat-bottomed glass, firmly press the mixture down into an even, compact layer at the bottom of each liner. The key here is firmness; the more compacted your crust, the less likely it is to crumble when you lift out your finished “Peach Cobbler Cheesecake Cups.” A well-pressed crust is crucial for a stable base.
- Pre-bake the Crust: Gently place your muffin tin into the preheated oven and bake the crusts for a short but important 5-7 minutes. This pre-baking step is essential. It helps to set the crust, making it sturdier and less prone to becoming soggy once the moist cheesecake filling is added. It also brings out a lovely toasted, deeper flavor from the graham crackers, which adds another layer of deliciousness to your “Peach Cobbler Cheesecake Cups.” Once baked, remove them from the oven and allow them to cool slightly on a wire rack while you prepare the other components. Don’t worry if they still feel a little soft immediately out of the oven; they will firm up considerably as they cool.
Crafting the Peach Cobbler Filling
- Prepare the Peaches: If you’re working with fresh peaches, begin by washing them thoroughly. Then, blanch them briefly in boiling water for about 30 seconds, immediately transferring them to an ice bath. This makes peeling incredibly easy. After peeling, pit the peaches and slice them into small, uniform, bite-sized pieces, ideally about ½-inch thick. If you’re using frozen peaches, you can often chop them more easily while they are still slightly frozen; this prevents them from becoming too soft and mushy. The goal is to have about 2 cups of chopped peaches. The size matters for these “Peach Cobbler Cheesecake Cups” as we want the peach pieces to be perfectly integrated into each individual serving without being too large or difficult to eat.
- Cook the Peaches: In a medium-sized saucepan, combine your precisely chopped peaches, ¼ cup of granulated sugar, 1 tablespoon of fresh lemon juice, ½ teaspoon of ground cinnamon, and ¼ teaspoon of ground nutmeg. Place the saucepan over medium heat. Stir everything together gently but thoroughly with a wooden spoon or spatula, ensuring all the peach pieces are coated with the delightful sugar and spices. As the mixture begins to heat, the sugar will dissolve, and the peaches will naturally start to release their sweet, aromatic juices, creating a nascent syrup. Bring the mixture to a gentle simmer, stirring occasionally to prevent sticking. Allow it to simmer for approximately 5-7 minutes. During this time, the peaches should soften slightly, but it’s important that they still retain some of their texture and shape; we’re looking for tender, not mushy, peaches for our “Peach Cobbler Cheesecake Cups.”
- Thicken the Filling: While your peaches are simmering, prepare your thickening agent. In a small, separate bowl, whisk together 1 tablespoon of cornstarch with 2 tablespoons of cold water until you achieve a completely smooth, lump-free slurry. This crucial step prevents the cornstarch from clumping when added to the warm peaches. Once your peaches are simmering and have reached the desired tenderness, slowly pour this cornstarch slurry into the peach mixture in the saucepan. As you pour, stir continuously and vigorously with your spoon. Continue to cook and stir for another 1-2 minutes. During this brief period, you will notice the filling magically transform, thickening to a beautiful, glossy, and syrupy consistency that will beautifully coat the back of your spoon. This precise thickening is absolutely critical for preventing a watery peach layer, ensuring that the peach component of your “Peach Cobbler Cheesecake Cups” holds its form and texture perfectly.
- Cool Down: Immediately remove the thickened peach filling from the heat source to prevent further cooking. Transfer the warm peach mixture to a clean, separate bowl. It is paramount that this filling cools down completely to room temperature before you proceed with assembling your “Peach Cobbler Cheesecake Cups.” Adding warm fruit filling to cold cheesecake batter can cause the delicate cheesecake batter to seize, which can lead to a lumpy or inconsistent texture in your final product. To expedite this cooling process, you can carefully place the bowl into an ice bath, stirring occasionally, or simply chill it in the refrigerator for about 30-60 minutes, stirring every 15 minutes or so, until it’s perfectly cool to the touch. Patience here will be rewarded with perfectly layered and textured “Peach Cobbler Cheesecake Cups.”
Mixing the Silky Cheesecake Filling
- Cream the Cream Cheese: In a large mixing bowl, using either a stand mixer fitted with the paddle attachment or a reliable hand mixer, begin by beating the 16 ounces of thoroughly softened, full-fat cream cheese on medium speed. Continue beating for a full 2-3 minutes, perhaps even a little longer, until the cream cheese is incredibly smooth, light, and completely free of any lumps. This step is absolutely vital for a luxurious, silky cheesecake texture! Lumps at this stage will unfortunately persist into your final baked “Peach Cobbler Cheesecake Cups.” During this process, make sure to frequently stop the mixer and scrape down the sides and bottom of the bowl with a rubber spatula. This ensures that every bit of cream cheese is fully incorporated and smoothed out, guaranteeing a uniform batter. Remember, patiently softened cream cheese is truly the secret here for that perfect base.
- Add Sugar and Vanilla: Once your cream cheese is wonderfully smooth, reduce the mixer speed to low. Gradually add the ¾ cup of granulated sugar, a little at a time, allowing it to incorporate slowly. Continue beating on low speed for just about 1-2 minutes, or until the sugar is just combined and no longer gritty. It’s important to avoid overmixing at this stage, as incorporating too much air can introduce issues later, such as cracking in your baked “Peach Cobbler Cheesecake Cups.” After the sugar is incorporated, mix in the 1 teaspoon of pure vanilla extract until it’s just combined. The vanilla adds a classic, comforting aroma and a foundational flavor that beautifully complements the peaches and spices, making these “Peach Cobbler Cheesecake Cups” truly irresistible.
- Incorporate Eggs: Now, add the 2 large eggs, one at a time, ensuring each egg is fully incorporated before adding the next. Crucially, mix only on low speed and just until each egg disappears into the batter. This gentle mixing technique is paramount. Overmixing the eggs can introduce excessive air into the batter, which tends to expand rapidly during baking and then dramatically collapse upon cooling, often leading to unsightly cracks on the surface of your “Peach Cobbler Cheesecake Cups.” After each egg addition, take a moment to scrape down the sides of the bowl with your rubber spatula. This ensures that all components are evenly mixed into the batter, contributing to a consistently smooth and dense cheesecake texture throughout.
- Fold in Sour Cream: For the final touch to our creamy filling, gently fold in the ¼ cup of room temperature sour cream using your rubber spatula. Mix it just until it’s evenly incorporated and no streaks of sour cream remain. The sour cream is a star ingredient here; it contributes a delightful and necessary tanginess that beautifully cuts through the richness of the cream cheese, preventing the cheesecake from tasting too heavy. Furthermore, it significantly enhances the moisture content and creates an incredibly tender, luxurious texture that will make your “Peach Cobbler Cheesecake Cups” exceptionally smooth and melt-in-your-mouth delicious. Again, be mindful not to overmix at this stage; gentle folding is all that’s needed to perfect this batter.
Assembling the Peach Cobbler Cheesecake Cups
- Layer the Peach Filling: Now that our pre-baked graham cracker crusts are cool and ready, and our luscious peach filling has reached a perfect room temperature, it’s time to begin the exciting assembly of our delightful “Peach Cobbler Cheesecake Cups.” Take your muffin tin with the prepared crusts. Carefully spoon about 1-2 generous tablespoons of the cooled peach filling over each individual graham cracker crust. Take a moment to gently spread it out, creating an even layer. The goal here is to ensure that you get that lovely, spiced peach flavor in every single bite of your finished dessert. Don’t be shy, but also don’t overfill, as we still need room for the cheesecake layer.
- Top with Cheesecake Filling: With the peach layer in place, it’s time to add our silky cheesecake batter. Carefully spoon the creamy cheesecake batter over the peach layer, filling each cup almost to the very top—aim for about ¾ full. It’s crucial not to overfill, as the cheesecake will naturally rise a little during baking. I find using a small ice cream scoop or two spoons to be quite helpful for this task, as it allows for precise placement and helps keep the edges of the liners clean. Once all the cups are filled, gently tap the muffin tin on the counter a couple of times. This simple action helps to release any large air bubbles that might be trapped within the batter and ensures that the filling settles evenly, contributing to a beautifully smooth top on your “Peach Cobbler Cheesecake Cups.”
Baking and Chilling the Cups
- Prepare for Baking: Carefully place the muffin tin, now filled with your glorious “Peach Cobbler Cheesecake Cups,” into the center rack of your preheated 350°F (175°C) oven. We’re going to approach the baking of these individual cheesecakes in two distinct stages. This initial bake is specifically designed to allow the cheesecake filling to set properly, ensuring a firm and creamy texture.
- First Bake: Bake the “Peach Cobbler Cheesecake Cups” for approximately 18-22 minutes. You’ll know they’re ready when the edges of the cheesecake appear visibly set and perhaps slightly puffed, but the centers still exhibit a gentle, delicate jiggle when you carefully and lightly shake the pan. This slight jiggle is a good sign; it indicates that they are almost perfectly done but crucially, not overbaked. Overbaking cheesecake is a common pitfall that can lead to a dry, crumbly texture and, sadly, unattractive cracks on the surface. We want that smooth, creamy finish for our “Peach Cobbler Cheesecake Cups.”
- Cooling Down: Once the initial baking is complete, remove the muffin tin from the oven. Allow your “Peach Cobbler Cheesecake Cups” to cool completely in the muffin tin, undisturbed, on a wire rack for about 15-20 minutes. During this crucial time, the residual heat will continue to cook the centers gently, allowing them to fully set without the risk of overbaking. After this initial cooling period, transfer the entire muffin tin to the refrigerator. It is absolutely paramount that these cheesecake cups chill for a minimum of 2 hours, and ideally, for even longer—4 hours or even overnight is truly best. Chilling is non-negotiable for cheesecake! This extended chilling period allows the cheesecake’s delicate texture to firm up beautifully, ensuring it’s dense and creamy, and it also gives all those wonderful flavors ample time to meld and deepen. Attempting to add the streusel topping before chilling, or rushing the chilling process, can lead to a soggy streusel and a less-than-perfect cheesecake texture, which we definitely want to avoid for our exquisite “Peach Cobbler Cheesecake Cups.” We’re tackling this in stages to ensure perfection.
Preparing the Delectable Streusel Topping
- Combine Dry Ingredients: While your “Peach Cobbler Cheesecake Cups” are luxuriously chilling in the refrigerator, or closer to the moment you plan to serve them, let’s turn our attention to crafting the irresistible streusel topping. In a medium-sized mixing bowl, combine ½ cup of all-purpose flour, ¼ cup of granulated sugar, ½ teaspoon of aromatic ground cinnamon, and that all-important tiny pinch of salt. Whisk these dry ingredients together thoroughly with a fork, ensuring they are well combined and evenly distributed. This step creates a harmonious base for our crumbly delight.
- Cut in the Butter: Now, add ¼ cup of cold unsalted butter, which you’ve pre-cut into small, uniform cubes, to your dry mixture. The key here is to keep the butter as cold as possible. Using your fingertips, a sturdy pastry blender, or even two knives, begin to cut the cold butter into the flour mixture. Work quickly to prevent the butter from melting too much from the warmth of your hands. Continue until the mixture resembles coarse crumbs. You want a variety of textures here—some fine, sandy bits, but also some larger, pea-sized pieces of butter. These larger butter pieces are highly desirable; they will melt during baking, creating pockets of rich, buttery goodness and a wonderfully varied, crumbly texture. Overworking the butter will cause it to fully incorporate and melt, which would result in a less crumbly, more cookie-like topping, and we’re aiming for that classic streusel texture for our “Peach Cobbler Cheesecake Cups.”
- Toast the Streusel (Optional but Recommended): For the absolute best streusel topping for your “Peach Cobbler Cheesecake Cups,” I highly recommend baking it separately. Spread the streusel mixture evenly onto a parchment-lined baking sheet. Place it in your preheated 350°F (175°C) oven (you can use the same oven you baked the crusts in, or adjust if you are timing it with your cheesecake chilling). Bake for approximately 8-10 minutes, making sure to stir it halfway through the baking time to ensure even browning. You’re looking for a beautiful golden-brown color and a wonderfully fragrant aroma. Baking it separately guarantees a perfectly crisp streusel that won’t soften when sprinkled over your chilled cheesecake, maintaining that delightful textural contrast. If you prefer, you can certainly sprinkle the unbaked streusel directly onto the cheesecake before a very short final bake, but for maximum crispness and control, baking it separately is my preferred method.
- Cool the Streusel: Once the streusel has achieved that perfect golden-brown hue and is wonderfully fragrant, remove it from the oven (if you baked it separately). Allow it to cool completely and undisturbed on the baking sheet. As it cools, it will firm up and become wonderfully crunchy. Once completely cool, you can break it apart gently with your fingers if there are any larger clumps. This ensures it’s perfectly prepared to be sprinkled over your chilled “Peach Cobbler Cheesecake Cups,” adding that irresistible, buttery crunch.
Final Assembly and Serving Your Peach Cobbler Cheesecake Cups
- Remove from Muffin Tin: Once your magnificent “Peach Cobbler Cheesecake Cups” are thoroughly chilled—and remember, that means at least 2-4 hours, with overnight being the gold standard for optimal texture and flavor—it’s time for their grand unveiling! Carefully remove them from the muffin tin. If you thoughtfully used paper liners, this step should be wonderfully effortless; simply lift each cup right out. If you opted for unlined cups, you might need to gently run a thin, sharp knife around the very edge of each cup to loosen it before carefully prying them out. Take your time to preserve their beautiful structure.
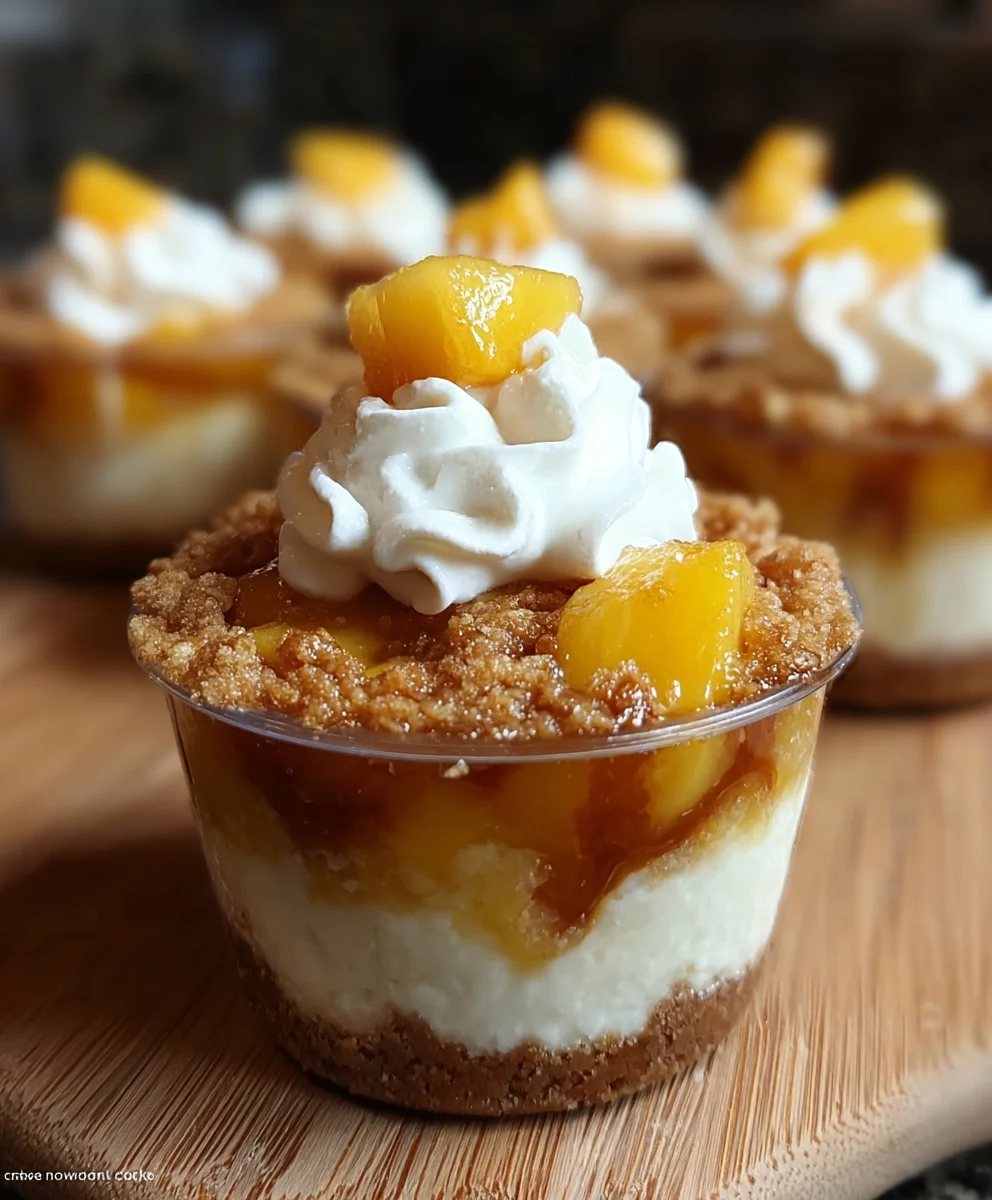
- Top with Streusel: This is where the “cobbler” aspect truly shines! Just before you plan to serve, generously sprinkle the completely cooled, wonderfully crisp streusel topping over the top of each individual cheesecake cup. The exact amount is entirely up to your personal preference, but I find that a good spoonful or two per cup really makes these “Peach Cobbler Cheesecake Cups” feel complete and adds that delightful, essential textural contrast that elevates the entire dessert. The crunch of the streusel against the creamy cheesecake and soft peaches is simply divine.
- Garnish (Optional): For an extra flourish of elegance and an additional layer of indulgence, consider a few optional garnishes. You can pipe a fluffy dollop of freshly made whipped cream or even a bit of Cool Whip on top of the streusel. A small, artfully placed slice of fresh peach, perhaps a delicate peach segment, or a vibrant sprig of fresh mint makes for a truly beautiful and appealing garnish. These touches not only add a pop of color but also subtly highlight the star flavor of these wonderful, multifaceted “Peach Cobbler Cheesecake Cups,” making them even more irresistible to the eye and palate.
- Serve and Enjoy: And there you have it! Your incredible, homemade “Peach Cobbler Cheesecake Cups” are now ready to be proudly served and savored. They are at their absolute best when enjoyed chilled, straight from the refrigerator. For any glorious leftovers (if you’re lucky enough to have them!), store them in an airtight container in the refrigerator, where they will remain fresh and utterly delicious for up to 3-4 days. I can confidently promise you that these delightful individual desserts offer a fantastic, harmonious blend of two beloved classic comforting treats—the warm, spiced notes of peach cobbler beautifully married with the rich, creamy indulgence of cheesecake. They are absolutely perfect for any gathering, a celebratory treat, or simply as a special, well-deserved indulgence for yourself. Enjoy every single, exquisite bite of this harmonious and utterly delicious combination!
Conclusion:
So, there you have it! We’ve journeyed through the steps of creating what I truly believe is one of the most exciting and utterly delicious desserts you’ll ever encounter. These Peach Cobbler Cheesecake Cups aren’t just another sweet treat; they’re a masterful symphony of textures and flavors that dance on your palate. Imagine the creamy, tangy lusciousness of a classic cheesecake, perfectly balanced with the warm, comforting, and juicy sweetness of a traditional peach cobbler. It’s a dessert mash-up that shouldn’t work, but oh, it absolutely does – and magnificently so! The crisp, buttery cobbler topping provides that essential textural contrast, making every single bite an adventure. I promise you, this isn’t just a recipe; it’s an experience waiting to happen in your kitchen. It’s perfect for those moments when you can’t decide between a rich cheesecake and a rustic fruit cobbler because, with this recipe, you genuinely get the best of both worlds in one convenient, individual serving. I’ve seen faces light up time and time again when people take their first bite, and I know yours will too.
What truly sets these individual desserts apart is their unique ability to evoke nostalgia while simultaneously offering something delightfully fresh and new. They carry the soulful essence of a grandmother’s kitchen, with the familiar aroma of peaches and cinnamon, yet they present themselves with the sophisticated elegance of a gourmet dessert. They are surprisingly easy to make, despite their impressive appearance, which makes them ideal for both seasoned bakers looking for a creative outlet and novices eager to impress. You don’t need a pastry degree to achieve perfection with these; just a little enthusiasm and a love for incredible food.
They are an instant crowd-pleaser, whether you’re hosting a casual backyard BBQ, a sophisticated dinner party, or simply treating your family to something extraordinary on a weeknight.
The portability of the cups also makes them fantastic for picnics or potlucks, eliminating the need for plates and forks if you’re serving them in robust liners. Plus, who doesn’t love their own personal dessert? No awkward slicing, no uneven portions – just pure, unadulterated enjoyment for everyone.
Serving Suggestions & Creative Variations:
Now, let’s talk about how to elevate your culinary creation even further, or how to adapt them to your specific tastes. While they are absolutely divine on their own, whether served chilled or at room temperature, a scoop of vanilla bean ice cream melting softly over a slightly warm cup is an unparalleled treat. The cold creaminess of the ice cream against the warm, fruity base adds another layer of indulgence that is simply irresistible. A dollop of freshly whipped cream, perhaps infused with a hint of vanilla or almond extract, also works wonders, adding a light and airy counterpoint to the richness. For those who enjoy a bit of texture, a sprinkle of toasted pecans or slivered almonds over the cobbler topping just before serving can add a delightful crunch.
Thinking seasonally, you can certainly experiment with other fruits! While peaches are the star here, imagine the possibilities: blueberry, apple, or even a mixed berry cobbler cheesecake cup in their respective seasons. Strawberry rhubarb in spring, or spiced apple in autumn, could transform this recipe into a year-round favorite, always offering a fresh take on a beloved classic. If you’re catering to dietary needs, consider using a gluten-free graham cracker crust alternative or a sugar substitute in the peach filling and cheesecake layer. The beauty of this recipe lies in its adaptability; it’s robust enough to handle these thoughtful modifications without losing its fundamental charm. You could even play with different spice combinations in the peach filling – a pinch of nutmeg or a whisper of ginger could add a lovely complexity, tailoring the flavor profile perfectly to your preference.
Your Invitation to Bake and Share:
So, what are you waiting for? I genuinely hope that reading through this recipe has inspired you to preheat your oven and embark on this delicious baking adventure.
Trust me, the effort is minimal, and the reward is absolutely magnificent.
These culinary delights are more than just a dessert; they are a celebration of comfort, creativity, and incredible flavor. I encourage you, with all my heart, to set aside some time this week to give them a try. Gather your ingredients, put on some good music, and enjoy the process of bringing these delightful treats to life. They promise to be a highlight of any meal or occasion.
And once you’ve tasted the magic for yourself, I would be absolutely thrilled to hear about your experience! Did you add a special twist? How did your friends and family react? Your feedback and shared joy mean the world to me. Please, come back and leave a comment, or share a photo of your creations with us. Let’s build a community of enthusiastic bakers who aren’t afraid to dive into unique and utterly delicious recipes like this one. Your journey into making these delectable treats is just beginning, and I can’t wait to see what you create. Happy baking, my friends!
Peach Cobbler Cheesecake Cups
Peach Cobbler Cheesecake Cups offer a truly delightful twist on two beloved dessert classics, promising an unforgettable experience for your taste buds. Imagine the warm, comforting embrace of a traditional peach cobbler, with its luscious, cinnamon-spiced fruit, perfectly fused with the rich, creamy decadence of a classic cheesecake. These mini treats are perfect for any occasion, from summer picnics to family gatherings. They bring together the creamy richness of cheesecake with the sweet, fruity flavor of peach cobbler, all in a convenient cup-sized treat. The graham cracker crust adds a delightful crunch, while the cheesecake layer provides a rich and creamy base for the juicy peach topping.
Ingredients
-
1 ½ cups (180g) Graham Cracker Crumbs
-
½ cup (113g) Unsalted Butter, melted
-
¼ cup (50g) Granulated Sugar (for crust)
-
2 cups (2-3 medium) Fresh or Frozen Sliced Peaches, chopped
-
¼ cup (50g) Granulated Sugar (for peaches)
-
1 tablespoon Lemon Juice, freshly squeezed
-
½ teaspoon Ground Cinnamon (for peaches)
-
¼ teaspoon Ground Nutmeg (for peaches)
-
1 tablespoon Cornstarch
-
2 tablespoons Water (for slurry)
-
16 ounces (2 blocks, 450g) Full-Fat Cream Cheese, softened
-
¾ cup (150g) Granulated Sugar (for cheesecake)
-
2 large Eggs, room temperature
-
1 teaspoon Vanilla Extract
-
¼ cup (60ml) Sour Cream, room temperature
-
½ cup (60g) All-Purpose Flour (for streusel)
-
¼ cup (50g) Granulated Sugar (for streusel)
-
¼ cup (55g) Cold Unsalted Butter, cubed
-
½ teaspoon Ground Cinnamon (for streusel)
-
Pinch of Salt
-
Optional: Whipped Cream or Cool Whip
-
Optional: Fresh Mint Sprigs or Peach Slices for garnish
Instructions
-
Step 1
Preheat oven to 350°F (175°C). Line a 12-cup muffin tin with paper liners. In a bowl, combine graham cracker crumbs, ¼ cup sugar, and ½ cup melted butter. Press mixture evenly into each liner. Bake for 5-7 minutes, then cool completely on a wire rack. -
Step 2
Chop peaches into ½-inch pieces. In a medium saucepan, combine peaches, ¼ cup sugar, lemon juice, ½ tsp cinnamon, and ¼ tsp nutmeg. Cook over medium heat, stirring, for 5-7 minutes until peaches soften slightly and release juices. -
Step 3
In a small bowl, whisk 1 tbsp cornstarch with 2 tbsp cold water to form a smooth slurry. Stir slurry into the simmering peach mixture. Continue to cook and stir for 1-2 minutes until the filling thickens to a glossy, syrupy consistency. Remove from heat and transfer to a separate bowl; cool completely to room temperature (can chill in refrigerator for 30-60 minutes, stirring occasionally). -
Step 4
In a large mixing bowl, beat softened full-fat cream cheese on medium speed for 2-3 minutes until incredibly smooth and lump-free, scraping down sides. Reduce speed to low. Gradually add ¾ cup granulated sugar, mixing for 1-2 minutes until just combined and no longer gritty. Mix in 1 tsp vanilla extract until just combined. -
Step 5
Add 2 large eggs, one at a time, mixing on low speed just until each egg is incorporated. Do not overmix. Gently fold in ¼ cup room temperature sour cream with a rubber spatula until evenly incorporated and no streaks remain. -
Step 6
Spoon 1-2 generous tablespoons of the cooled peach filling over each pre-baked graham cracker crust, spreading evenly. Carefully spoon the silky cheesecake batter over the peach layer, filling each cup about ¾ full. Gently tap the muffin tin on the counter a couple of times to release any large air bubbles. -
Step 7
Place the muffin tin in the preheated 350°F (175°C) oven and bake for 18-22 minutes. The edges should be set, but the centers should still have a gentle jiggle. Remove from oven and cool completely in the muffin tin on a wire rack for 15-20 minutes. Then, transfer the entire muffin tin to the refrigerator and chill for a minimum of 2 hours (ideally 4 hours or overnight) until completely firm. -
Step 8
While cups chill, in a medium bowl, combine ½ cup all-purpose flour, ¼ cup granulated sugar (for streusel), ½ tsp ground cinnamon (for streusel), and a pinch of salt. Add ¼ cup cold unsalted butter, cut into small cubes. Using fingertips or a pastry blender, cut the butter into the dry mixture until coarse crumbs form (some pea-sized pieces are desirable). -
Step 9
For crisp streusel, spread the mixture evenly onto a parchment-lined baking sheet. Bake at 350°F (175°C) for approximately 8-10 minutes, stirring halfway, until golden brown and fragrant. Cool completely on the baking sheet. -
Step 10
Once cheesecake cups are thoroughly chilled, carefully remove them from the muffin tin (lifting out paper liners). Just before serving, generously sprinkle the cooled, crisp streusel topping over the top of each individual cheesecake cup. Garnish with a dollop of whipped cream/Cool Whip, a fresh peach slice, or a sprig of fresh mint, if desired. Serve chilled. Store any leftovers in an airtight container in the refrigerator for up to 3-4 days.
Important Information
Nutrition Facts (Per Serving)
It is important to consider this information as approximate and not to use it as definitive health advice.
Allergy Information
Please check ingredients for potential allergens and consult a health professional if in doubt.
Leave a Comment