
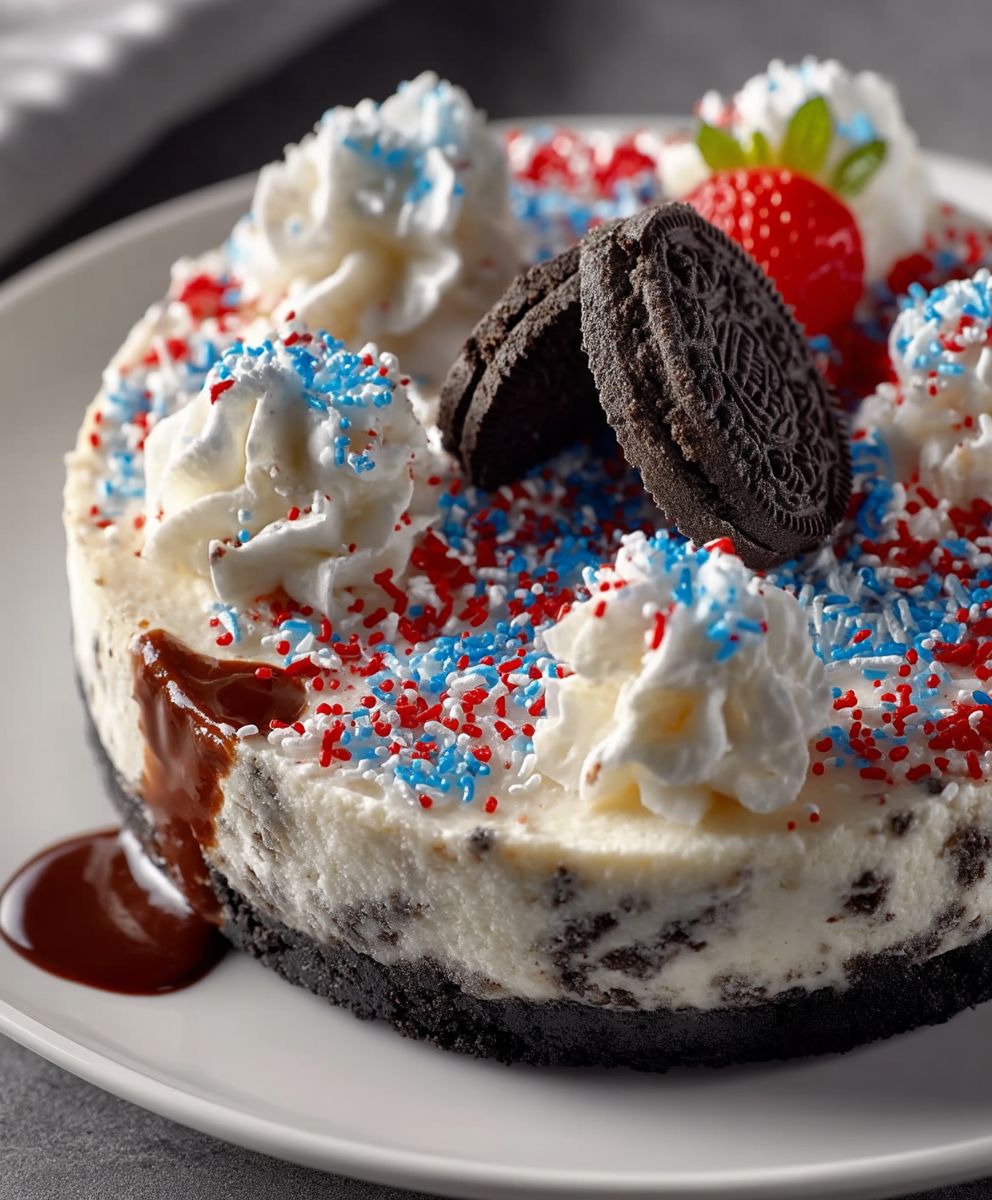
Oreo Cheesecake No Bake: Prepare to be amazed by the easiest, most decadent dessert you’ll ever make! Imagine a creamy, dreamy cheesecake, bursting with the iconic flavor of Oreo cookies, all without ever turning on your oven. Yes, you read that right no baking required!
While cheesecake itself boasts a rich history dating back to ancient Greece, this particular no-bake Oreo variation is a modern marvel. It’s a testament to our collective love for convenience and indulgence. The combination of the classic cheesecake tang with the satisfying crunch and chocolatey goodness of Oreos is simply irresistible.
What makes this Oreo Cheesecake No Bake so universally adored? It’s the perfect balance of textures: the smooth, velvety cheesecake filling against the crisp Oreo cookie crust and the scattered chunks of Oreo throughout. Plus, it’s incredibly simple to make, requiring minimal effort and readily available ingredients. Whether you’re a seasoned baker or a kitchen novice, this recipe is guaranteed to impress. It’s the ideal dessert for potlucks, parties, or simply a delightful treat to enjoy at home. Get ready to experience cheesecake bliss!

Ingredients:
- For the Oreo Crust:
- 36 Oreo cookies (about 1 package), finely crushed
- 6 tablespoons (85g) unsalted butter, melted
- For the Cheesecake Filling:
- 24 Oreo cookies (about 2/3 of a package), coarsely chopped
- 16 ounces (450g) cream cheese, softened to room temperature
- 1 1/4 cups (250g) granulated sugar
- 1 teaspoon vanilla extract
- 1/4 teaspoon salt
- 2 cups (480ml) heavy cream, cold
- Optional Toppings:
- Whipped cream
- Mini Oreo cookies
- Chocolate shavings
Preparing the Oreo Crust
Okay, let’s get started with the foundation of our delicious no-bake Oreo cheesecake the crust! This part is super easy and sets the stage for all the creamy goodness to come.
- Crush the Oreos: The first thing we need to do is crush those Oreos! You have a couple of options here. You can use a food processor for a super fine crumb, which is my preferred method. Just toss the 36 Oreo cookies into the food processor and pulse until they’re finely ground. If you don’t have a food processor, no worries! You can place the Oreos in a large zip-top bag, seal it tightly, and then use a rolling pin to crush them into fine crumbs. Make sure to get all the big chunks out; we want a nice, even crust.
- Melt the Butter: Next, melt the butter. You can do this in the microwave in 30-second intervals, stirring in between, or in a small saucepan over low heat. Just make sure it’s completely melted but not browned.
- Combine and Press: Now, in a medium bowl, combine the crushed Oreo crumbs and the melted butter. Mix them together really well until the crumbs are evenly moistened. The mixture should resemble wet sand.
- Press into the Pan: Grab your 9-inch springform pan. If you don’t have a springform pan, you can use a regular pie dish, but it will be a little trickier to remove the cheesecake later. Pour the Oreo crumb mixture into the pan. Using the bottom of a measuring cup or your fingers, firmly press the crumbs evenly across the bottom and slightly up the sides of the pan. We want a nice, compact crust that will hold its shape.
- Chill the Crust: Once the crust is pressed firmly, place the pan in the refrigerator to chill for at least 30 minutes. This will help the crust set and become more stable. You can even chill it for longer if you have the time; it won’t hurt!
Making the Cheesecake Filling
Alright, with the crust chilling in the fridge, it’s time to move on to the star of the show the cheesecake filling! This is where the magic happens, and we create that creamy, dreamy texture we all crave.
- Chop the Oreos: First, coarsely chop the 24 Oreo cookies for the filling. You don’t want them to be too fine; we want some nice chunks of Oreo goodness in every bite. I usually just cut each cookie into quarters or smaller pieces.
- Beat the Cream Cheese: In a large bowl, using an electric mixer (either a stand mixer or a hand mixer), beat the softened cream cheese until it’s smooth and creamy. This is a crucial step! Make sure your cream cheese is at room temperature; otherwise, you’ll end up with lumps in your filling. Beat it for a good 2-3 minutes until it’s light and fluffy.
- Add Sugar and Vanilla: Gradually add the granulated sugar to the cream cheese, beating on medium speed until it’s well combined and the mixture is smooth. Then, add the vanilla extract and salt, and beat for another minute until everything is evenly incorporated.
- Whip the Heavy Cream: In a separate, clean bowl, pour in the cold heavy cream. Using the electric mixer, beat the heavy cream on medium-high speed until stiff peaks form. This is important for giving the cheesecake its light and airy texture. Be careful not to overwhip the cream, or it will turn into butter! You’ll know you have stiff peaks when you lift the beaters, and the cream forms peaks that hold their shape.
- Combine the Mixtures: Gently fold the whipped cream into the cream cheese mixture in two or three additions. Be careful not to deflate the whipped cream; we want to keep that airiness. Use a spatula and gently fold until just combined. Don’t overmix!
- Fold in the Oreo Pieces: Finally, gently fold in the chopped Oreo cookies until they’re evenly distributed throughout the filling. Again, be careful not to overmix.
Assembling and Chilling the Cheesecake
We’re almost there! Now it’s time to put everything together and let the cheesecake chill to perfection. This is the hardest part waiting!
- Pour the Filling: Remove the chilled Oreo crust from the refrigerator. Pour the cheesecake filling into the crust, spreading it evenly with a spatula.
- Smooth the Top: Gently smooth the top of the filling with the spatula to create an even surface.
- Chill the Cheesecake: Cover the springform pan with plastic wrap and place it in the refrigerator to chill for at least 6 hours, or preferably overnight. This is essential for the cheesecake to set properly and develop its flavor. The longer it chills, the better it will taste!
Serving and Enjoying Your No-Bake Oreo Cheesecake
The moment we’ve all been waiting for! It’s time to unleash your masterpiece and enjoy the fruits (or should I say, cookies?) of your labor.
- Release from the Pan: Carefully remove the cheesecake from the refrigerator. Gently run a thin knife or spatula around the edge of the cheesecake to loosen it from the sides of the springform pan. Then, release the latch on the springform pan and carefully lift the sides away from the cheesecake.
- Optional Toppings: If desired, decorate the cheesecake with whipped cream, mini Oreo cookies, chocolate shavings, or any other toppings you like. Get creative!
- Slice and Serve: Slice the cheesecake with a sharp knife and serve immediately.
- Storage: Store any leftover cheesecake in the refrigerator, covered, for up to 3-4 days.
Tips and Variations:
- For a richer flavor: Use full-fat cream cheese and heavy cream.
- For a lighter flavor: Use reduced-fat cream cheese and light whipped cream. Keep in mind that this may affect the texture of the cheesecake.
- Add a chocolate ganache: Drizzle a chocolate ganache over the top of the cheesecake for an extra decadent treat.
- Use different Oreo flavors: Experiment with different Oreo flavors, such as Golden Oreos, Mint Oreos, or Peanut Butter Oreos, to create unique variations of this recipe.
- Make individual cheesecakes: Instead of making one large cheesecake, you can make individual cheesecakes in small ramekins or muffin tins.
- Freezing: You can freeze this cheesecake for up to 2 months. Wrap it tightly in plastic wrap and then in aluminum foil. Thaw it in the refrigerator overnight before serving.
Troubleshooting:
- Crust is too crumbly: Add a little more melted butter to the Oreo crumbs until they hold together better.
- Filling is too runny: Make sure your cream cheese is at room temperature and that you whip the heavy cream to stiff peaks. Also, ensure the cheesecake chills for at least 6 hours.
- Cheesecake is cracking: This is usually caused by overbaking (which isn’t applicable here since it’s no-bake) or rapid temperature changes. Since it’s no-bake, it’s less likely, but make sure your refrigerator isn’t too cold and avoid opening the door frequently while it’s chilling.
Enjoy your delicious no-bake Oreo cheesecake! I hope you love it as much as I do. It’s the perfect dessert for any occasion, and it’s sure to impress your friends and family.
Conclusion:
This no-bake Oreo cheesecake isn’t just a dessert; it’s a guaranteed crowd-pleaser, a shortcut to pure indulgence, and frankly, a must-try for anyone who loves the iconic combination of creamy cheesecake and those irresistible chocolate sandwich cookies. The ease of preparation alone makes it a winner no oven required! But beyond the simplicity, the flavor is truly outstanding. The rich, decadent cheesecake filling, studded with chunks of Oreo cookies, sits atop a buttery Oreo crust, creating a symphony of textures and tastes that will have everyone begging for seconds.
Why is this recipe a must-try? Because it delivers maximum flavor with minimal effort. It’s perfect for those times when you need a show-stopping dessert but don’t have hours to spend in the kitchen. It’s also incredibly versatile.
Serving Suggestions and Variations:
Think of this recipe as a blank canvas for your culinary creativity! While it’s absolutely divine as is, there are countless ways to customize it to your liking.
* For the Chocolate Lover: Drizzle melted dark chocolate or milk chocolate over the top of the cheesecake before serving. You could even add chocolate shavings for an extra touch of elegance.
* Peanut Butter Bliss: Swirl a spoonful or two of peanut butter into the cheesecake filling before chilling. The peanut butter complements the chocolate Oreo flavor beautifully.
* Mint Chocolate Chip: Add a few drops of peppermint extract to the filling and sprinkle with mini chocolate chips for a refreshing twist.
* Caramel Craze: Drizzle caramel sauce over the top and sprinkle with chopped pecans or walnuts for a decadent caramel Oreo cheesecake experience.
* Individual Servings: Instead of making one large cheesecake, divide the filling into individual ramekins or mason jars for a charming and convenient presentation.
* Seasonal Fun: Get festive by adding seasonal sprinkles or decorations. Think red and green for Christmas, pastel colors for Easter, or spooky decorations for Halloween.
* Crust Customization: While the Oreo crust is classic, you could experiment with other cookie crusts, such as graham crackers or chocolate wafers. Just be sure to adjust the amount of butter accordingly.
* Whipped Cream Topping: A dollop of freshly whipped cream is always a welcome addition. You can even flavor the whipped cream with vanilla extract or a touch of cocoa powder.
Don’t be afraid to experiment and find your own perfect combination! The possibilities are endless.
I truly believe that this Oreo cheesecake no bake recipe will become a staple in your dessert repertoire. It’s a guaranteed crowd-pleaser, easy to make, and incredibly delicious. I’ve made it countless times for parties, potlucks, and even just for a special treat for my family, and it’s always a hit.
Now, it’s your turn! I encourage you to give this recipe a try. I’m confident that you’ll love it as much as I do. And more importantly, I’d love to hear about your experience. Did you try any of the variations? Did you make any modifications of your own? What did your friends and family think? Share your photos and stories in the comments below! Let’s create a community of Oreo cheesecake lovers! Happy baking (or rather, chilling!). I can’t wait to see what you create!
Oreo Cheesecake No Bake: Easy Recipe & Tips
Decadent and easy no-bake Oreo cheesecake with a rich Oreo crust and creamy Oreo-studded filling. A perfect make-ahead dessert!
Ingredients
- 36 Oreo cookies (about 1 package), finely crushed
- 6 tablespoons (85g) unsalted butter, melted
- 24 Oreo cookies (about 2/3 of a package), coarsely chopped
- 16 ounces (450g) cream cheese, softened to room temperature
- 1 1/4 cups (250g) granulated sugar
- 1 teaspoon vanilla extract
- 1/4 teaspoon salt
- 2 cups (480ml) heavy cream, cold
- Whipped cream
- Mini Oreo cookies
- Chocolate shavings
Instructions
- Make the Oreo Crust: Crush the Oreo cookies in a food processor or zip-top bag using a rolling pin until finely crushed. Melt the butter in the microwave or saucepan. Combine the crushed Oreos and melted butter in a medium bowl until evenly moistened. Press the mixture firmly into the bottom and slightly up the sides of a 9-inch springform pan. Chill in the refrigerator for at least 30 minutes.
- Make the Cheesecake Filling: Coarsely chop the Oreo cookies for the filling. In a large bowl, beat the softened cream cheese with an electric mixer until smooth and creamy. Gradually add the sugar, vanilla extract, and salt, beating until well combined.
- In a separate bowl, beat the cold heavy cream with an electric mixer until stiff peaks form. Gently fold the whipped cream into the cream cheese mixture in two or three additions until just combined. Fold in the chopped Oreo cookies until evenly distributed.
- Assemble and Chill: Remove the chilled Oreo crust from the refrigerator. Pour the cheesecake filling into the crust, spreading it evenly. Smooth the top. Cover with plastic wrap and chill in the refrigerator for at least 6 hours, or preferably overnight.
- Serve: Carefully remove the cheesecake from the refrigerator. Run a thin knife around the edge to loosen it. Release the springform pan and lift the sides away. Decorate with optional toppings like whipped cream, mini Oreos, or chocolate shavings. Slice and serve.
Notes
- For a richer flavor, use full-fat cream cheese and heavy cream.
- For a lighter flavor, use reduced-fat cream cheese and light whipped cream.
- Add a chocolate ganache for an extra decadent treat.
- Experiment with different Oreo flavors.
- Make individual cheesecakes in ramekins or muffin tins.
- Freezing: Freeze for up to 2 months. Wrap tightly in plastic wrap and aluminum foil. Thaw in the refrigerator overnight before serving.
- Crust is too crumbly: Add more melted butter.
- Filling is too runny: Ensure cream cheese is at room temperature, heavy cream is whipped to stiff peaks, and cheesecake chills for at least 6 hours.
- Cheesecake is cracking: Ensure your refrigerator isn’t too cold and avoid opening the door frequently while it’s chilling.
Leave a Comment