
No Bake Turtle Cheesecakes are an absolute revelation for anyone yearning for a decadent dessert without the traditional baking fuss. I’ve always been captivated by the enduring appeal of the “Turtle” flavor profile – that irresistible trinity of rich chocolate, gooey caramel, and crunchy pecans. This beloved combination first gained fame with the iconic Turtle candies, conceived in the early 20th century, and it’s truly wonderful how those nostalgic flavors translate so beautifully into a sophisticated cheesecake.
What makes this particular rendition so universally adored? It’s the harmonious blend of textures and tastes: the cool, creamy tang of the cheesecake base perfectly complements the luscious sweetness of the caramel, the deep notes of chocolate, and the satisfying crunch of toasted pecans. More than just an explosion of flavor, the convenience factor is a massive draw. Imagine presenting a show-stopping dessert that appears to have demanded hours of labor, yet requires only simple assembly and chilling. These No Bake Turtle Cheesecakes are not merely a treat; they are a testament to effortless elegance, making them ideal for busy hosts, warm weather gatherings, or simply when a craving for something extraordinary strikes with minimal fuss.

Ingredients:
- For the Graham Cracker Pecan Crust:
- 1 ½ cups (about 10-12 full sheets) graham cracker crumbs (finely crushed)
- ½ cup finely chopped pecans (for the crust, lightly toasted if you like, but optional for no-bake)
- ¼ cup granulated sugar
- ½ cup (1 stick) unsalted butter, melted
- ¼ teaspoon salt
- For the Creamy Cheesecake Filling:
- 2 (8-ounce) packages full-fat cream cheese, softened to room temperature
- 1 cup powdered sugar (confectioners’ sugar), sifted
- 1 teaspoon pure vanilla extract
- ½ teaspoon salt
- 1 ¾ cups heavy cream, very cold
- For the Homemade Caramel Sauce (Alternatively, use 1 cup high-quality store-bought caramel sauce):
- 1 cup granulated sugar
- ¼ cup water
- ½ cup heavy cream, warmed
- 2 tablespoons unsalted butter, cubed
- ½ teaspoon vanilla extract
- ¼ teaspoon salt
- For the Toasted Pecan Topping:
- 1 cup pecan halves, lightly toasted
- 2 tablespoons unsalted butter, melted
- 1 tablespoon brown sugar, packed
- Pinch of salt
- For the Chocolate Ganache Drizzle:
- ½ cup semi-sweet chocolate chips (or dark chocolate chips for a richer flavor)
- ¼ cup heavy cream
- ½ teaspoon vanilla extract (optional)
Preparing Your Workspace and Ingredients
Before we dive into creating these delightful No Bake Turtle Cheesecakes, it’s always a good idea to get everything ready. This process, often called “mise en place,” will make the entire recipe much smoother and more enjoyable. Trust me, having your ingredients pre-measured and at the correct temperature saves a lot of hassle and potential last-minute scrambles. For instance, ensuring your cream cheese is at room temperature is absolutely crucial for achieving a smooth, lump-free cheesecake filling. Take it out of the fridge at least an hour or two before you plan to start mixing. A cold block of cream cheese will inevitably lead to a lumpy filling, and nobody wants that in their creamy No Bake Turtle Cheesecakes!
Similarly, make sure your heavy cream for the filling is very cold; this helps it whip up beautifully and hold its shape, which is vital for the airy texture we’re aiming for. For the crust, you’ll want to either crush your graham crackers in a food processor until they’re fine crumbs or place them in a sturdy zip-top bag and crush them with a rolling pin. The finer the crumbs, the more uniform your crust will be. Don’t forget to lightly toast your pecans for the topping – a quick sauté in a dry pan over medium heat for 5-7 minutes until fragrant will bring out their nutty flavor beautifully, elevating the overall taste of these No Bake Turtle Cheesecakes. However, watch them carefully as they can burn quickly! Let them cool completely before chopping or using as halves. Taking these small preparatory steps will set you up for success in creating truly magnificent No Bake Turtle Cheesecakes.
Crafting the Crunchy Pecan Crust
Every great cheesecake starts with an amazing crust, and our No Bake Turtle Cheesecakes are no exception! This pecan-infused graham cracker crust provides the perfect crunchy counterpoint to the creamy filling.
- First things first, we’re going to prepare the foundation for our No Bake Turtle Cheesecakes. In a medium mixing bowl, combine your finely crushed graham cracker crumbs, ¼ cup of finely chopped pecans, ¼ cup of granulated sugar, and ¼ teaspoon of salt. Give these dry ingredients a good mix with a fork or a whisk to ensure everything is evenly distributed. This ensures every bite of the crust has that delightful combination of sweet, salty, and nutty flavors.
- Next, pour in your ½ cup of melted unsalted butter. Stir the mixture thoroughly until all the crumbs are completely moistened and resemble wet sand. This butter is absolutely essential; it’s what will bind our crust together and give it that lovely, firm texture without needing to be baked. Make sure there are no dry spots – every crumb needs to be coated!
- Prepare your chosen baking dish. You can use a 9-inch springform pan for a large, shareable cheesecake, or for individual servings, line a 12-cup standard muffin tin with paper liners. If you’re using a springform pan, lightly grease it or line the bottom with a circle of parchment paper for easier removal of your beautiful No Bake Turtle Cheesecakes. If using muffin tins, simply press about 2-3 tablespoons of the crumb mixture into the bottom of each liner. For a springform pan, press the entire mixture evenly into the bottom of the pan. Use the back of a spoon or the bottom of a flat-bottomed glass to firmly pack down the crust. The firmer you pack it, the less likely it is to crumble when you serve it, ensuring a clean slice every time. This is a crucial step for the structural integrity of your No Bake Turtle Cheesecakes.
- Once packed, place the crust into the refrigerator while we prepare the other delicious components. Chilling helps the butter solidify, making the crust even more stable and firm, which is exactly what we want for these wonderful No Bake Turtle Cheesecakes.
Making the Rich Homemade Caramel Sauce
While you can absolutely use a high-quality store-bought caramel sauce for these No Bake Turtle Cheesecakes, making your own is incredibly rewarding and offers a depth of flavor that’s hard to beat. Plus, it’s easier than you might think! If you choose the homemade route, here’s how we’ll achieve that perfectly gooey, rich caramel.
- In a heavy-bottomed saucepan, combine 1 cup of granulated sugar and ¼ cup of water. Stir gently just to moisten all the sugar. It’s important to avoid stirring once it starts boiling, as this can cause crystallization, leading to a grainy caramel. We’re aiming for smooth, luscious caramel for our No Bake Turtle Cheesecakes.
- Place the saucepan over medium-high heat. Let it come to a boil and continue to cook without stirring. You’ll notice the sugar mixture will bubble vigorously. Watch it carefully! The edges will start to turn amber, then the color will deepen. This process can take anywhere from 8 to 12 minutes, depending on your stove and the pot you’re using. Keep a close eye on it, as it can go from perfect to burnt in a matter of seconds.
- Once the caramel reaches a beautiful, deep amber color (think a rich penny or light maple syrup hue), immediately remove it from the heat. Be extremely careful during this step, as hot sugar is very dangerous and can cause severe burns. Keep a safe distance.
- Carefully and slowly pour your ½ cup of warmed heavy cream into the hot caramel while continuously whisking. The mixture will bubble up dramatically and might seize slightly, which is normal. Keep whisking vigorously until it smooths out again. Warming the cream beforehand helps prevent the caramel from seizing up as much and makes for a smoother, quicker incorporation.
- Add the 2 tablespoons of cubed unsalted butter and whisk until it’s fully melted and incorporated, making the caramel smooth and glossy. The butter adds richness and a silky texture that’s perfect for drizzling over our No Bake Turtle Cheesecakes.
- Finally, whisk in ½ teaspoon of pure vanilla extract and ¼ teaspoon of salt. The salt is key here, balancing the sweetness and enhancing the rich, complex caramel flavor. It’s that touch of salt that truly brings out the “turtle” in these No Bake Turtle Cheesecakes.
- Pour the caramel into a heatproof jar or bowl and let it cool completely to room temperature. It will thicken considerably as it cools. If it gets too thick for drizzling later, you can gently warm it in the microwave for 10-15 seconds at a time, stirring well, until it reaches your desired consistency. This caramel will be perfect for layering into and drizzling over your No Bake Turtle Cheesecakes.
Crafting the Velvety Cheesecake Filling
This is where the magic happens for our creamy No Bake Turtle Cheesecakes filling! A perfectly smooth, rich, and airy filling is absolutely essential for a truly decadent dessert experience.
- In a large mixing bowl, using an electric mixer (either a stand mixer with a paddle attachment or a hand mixer), beat the 2 packages of softened full-fat cream cheese on medium speed until it’s completely smooth and creamy, with absolutely no lumps. This usually takes about 2-3 minutes. Make sure to scrape down the sides and bottom of the bowl frequently with a spatula to ensure everything is evenly incorporated. Any lumps now will be lumps in your finished No Bake Turtle Cheesecakes.
- Gradually add the 1 cup of sifted powdered sugar to the cream cheese, beating on low speed until just combined, then increase to medium-high and beat until the mixture is light and fluffy, about 2 more minutes. Sifting the sugar is a small but important step that prevents lumps and ensures a wonderfully silky texture in our cheesecake filling.
- Stir in the 1 teaspoon of pure vanilla extract and ½ teaspoon of salt. Mix until just incorporated. The vanilla enhances the overall sweetness and provides a lovely aroma, while the salt balances the richness of the cream cheese.
- In a separate, very cold bowl (preferably a metal bowl that has been chilled in the freezer for 10-15 minutes), whip the 1 ¾ cups of very cold heavy cream using clean beaters. Start on low speed to prevent splattering, then gradually increase to high speed. Whip until stiff peaks form. This means when you lift the beaters, the cream stands straight up without collapsing. Be careful not to over-whip, or it will turn grainy and potentially separate, which would be a shame for our elegant No Bake Turtle Cheesecakes.
- Now, the delicate part: gently fold about a third of the whipped cream into the cream cheese mixture using a rubber spatula. This step, often called “lightening” the base, helps to gradually incorporate the lighter whipped cream into the denser cream cheese without deflating the air.
- Then, carefully fold in the remaining whipped cream in two additions, taking care not to deflate the air we’ve just whipped in. The goal is a light, airy, and uniform cheesecake filling. Use an under-and-over motion, rotating the bowl as you go. Do not overmix! Gentle folding ensures our No Bake Turtle Cheesecakes filling remains wonderfully light, fluffy, and perfectly creamy.
Assembling the Magnificent No Bake Turtle Cheesecakes
We’re nearing the finish line! Now it’s time to bring all these delicious components together to create our stunning No Bake Turtle Cheesecakes, ready for their essential chilling period.
- Retrieve your chilled graham cracker pecan crusts from the refrigerator. The crust should be firm and ready to hold our luscious filling.
- Evenly spoon the creamy cheesecake filling over the crusts. If you’re using a large springform pan, use an offset spatula or the back of a spoon to smooth the top of the filling, creating a level surface. If you’re making individual cheesecakes in muffin tins, divide the filling equally among the cups, again smoothing the tops gently. You want a consistent layer of that delightful cheesecake goodness in every No Bake Turtle Cheesecake.
- Cover the cheesecakes loosely with plastic wrap. Avoid letting the plastic wrap touch the surface of the cheesecake if possible, to prevent condensation. Place them into the refrigerator and chill them for at least 4-6 hours, or preferably overnight. This chilling step is absolutely crucial for the cheesecakes to set properly and achieve their desired firm yet creamy texture. Do not rush it! Insufficient chilling will result in a soft, unset filling, and we want our No Bake Turtle Cheesecakes to be perfectly scoopable or sliceable. Patience truly is a virtue here.
Finishing Touches: Chocolate Drizzle and Pecan Topping
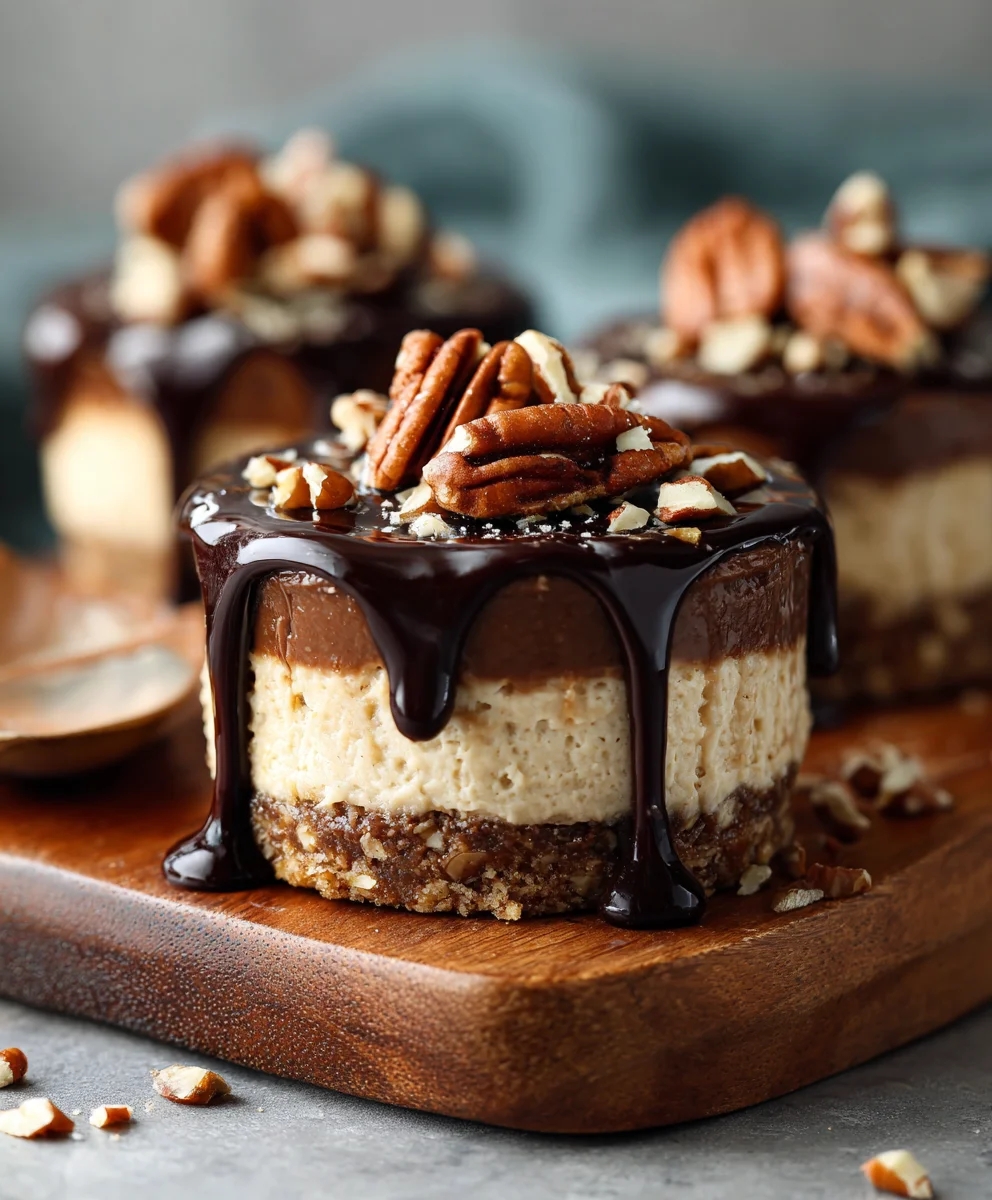
Once your No Bake Turtle Cheesecakes are perfectly chilled and set, it’s time to adorn them with the classic turtle toppings: rich chocolate, gooey caramel, and crunchy pecans. This is where they truly transform into those irresistible “No Bake Turtle Cheesecakes” we’ve been dreaming of!
- Prepare the Toasted Pecan Topping: In a small bowl, combine your 1 cup of lightly toasted pecan halves, 2 tablespoons of melted unsalted butter, 1 tablespoon of packed brown sugar, and a pinch of salt. Toss gently until the pecans are evenly coated. This step adds an extra layer of flavor and crunch, making the pecan topping truly irresistible and a hallmark of classic turtle desserts.
- Prepare the Chocolate Ganache Drizzle: In a microwave-safe bowl, combine ½ cup semi-sweet chocolate chips and ¼ cup heavy cream. Microwave in 30-second intervals, stirring well after each interval, until the chocolate is completely melted and smooth. This should take about 1-2 minutes total. Stir in ½ teaspoon of vanilla extract if desired, which adds a lovely aromatic note. Alternatively, you can melt them together gently in a double boiler over simmering water, stirring until smooth. The ganache should be fluid enough to drizzle but not too thin.
- Once your No Bake Turtle Cheesecakes are fully set from their long chill, remove them from the refrigerator.
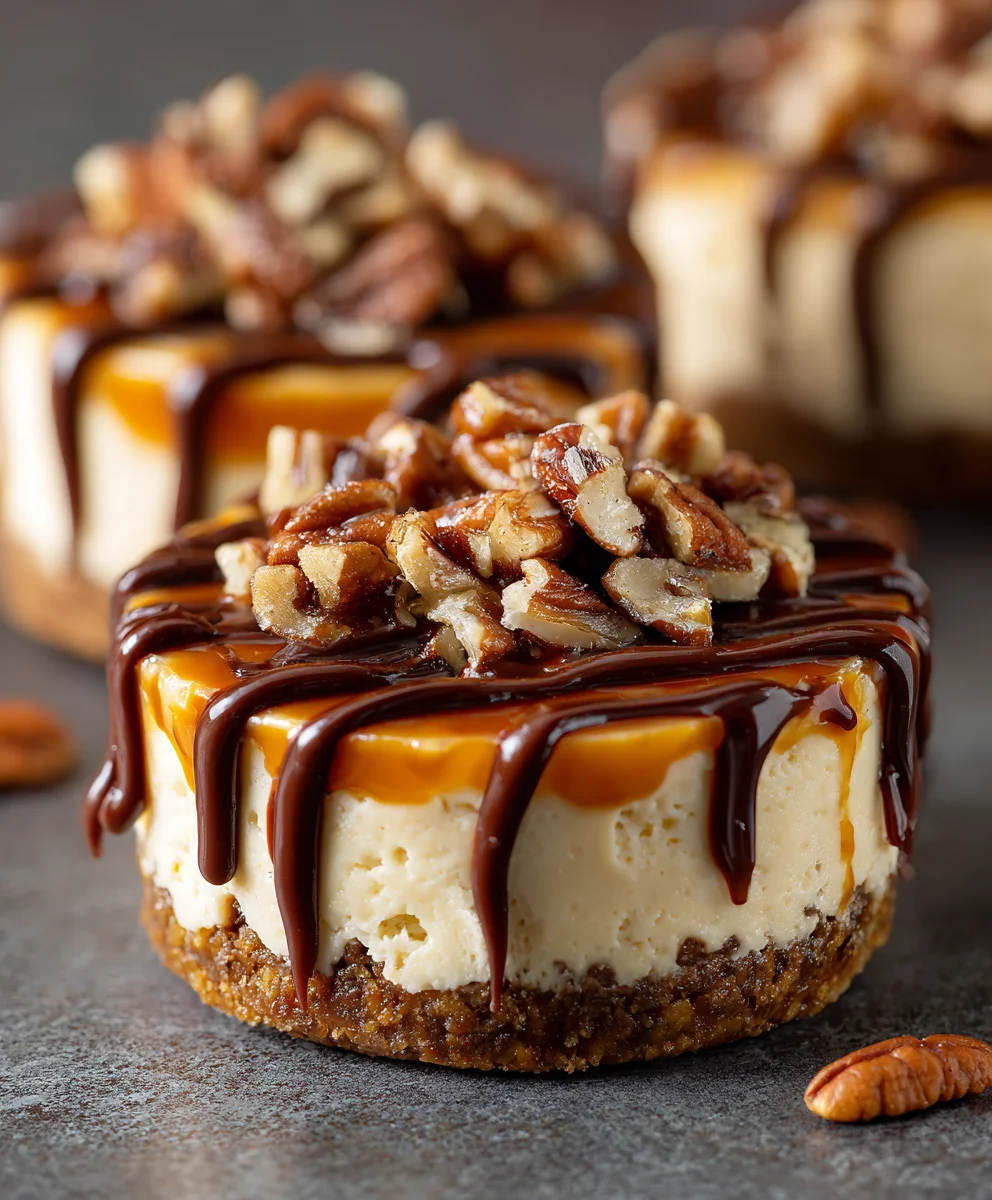
- Drizzle a generous amount of your homemade (or warmed store-bought) caramel sauce over the top of each cheesecake. Be as artistic as you like with your drizzling pattern! You can use a spoon or even a squeeze bottle for finer lines. This gooey layer is key to the “turtle” flavor profile.
- Next, evenly sprinkle a good portion of the prepared toasted pecan topping over the caramel layer. Press them down ever so slightly to ensure they adhere to the caramel and cheesecake.
- Finally, drizzle the warm chocolate ganache over the pecans and caramel. The contrasting colors and textures make these No Bake Turtle Cheesecakes incredibly appealing, not just to the taste buds but to the eyes as well!
- If you made individual cheesecakes, carefully remove them from the muffin liners just before serving. For a springform pan, carefully release the sides. You can run a thin, hot knife around the edge of the pan before releasing it if you wish, for a perfectly clean edge.
Serving Your Delightful No Bake Turtle Cheesecakes
Your magnificent No Bake Turtle Cheesecakes are now ready to be enjoyed! They make a fantastic dessert for any occasion, from casual gatherings to more formal celebrations. The combination of the crunchy pecan crust, the creamy, light cheesecake filling, the rich, buttery caramel, perfectly toasted pecans, and a hint of dark chocolate is simply heavenly. Each bite offers a perfect balance of sweet, salty, and nutty flavors, along with a delightful textural contrast that makes them utterly unforgettable. Serve them immediately for the best experience, as the textures are at their peak. If you happen to have any leftovers (which is unlikely, given how delicious these No Bake Turtle Cheesecakes are!), store them in an airtight container in the refrigerator for up to 3-4 days. The flavors actually tend to meld even more beautifully after a day, making them perhaps even more delicious on day two. Enjoy creating and sharing these truly unforgettable No Bake Turtle Cheesecakes!
Conclusion:
So there you have it, my friends! We’ve journeyed through the simple steps to create a dessert that truly delivers on all fronts: ease, speed, and undeniable deliciousness. These aren’t just any desserts; they are an invitation to indulge in pure, unadulterated bliss without the stress of oven timers or elaborate techniques. I truly believe that the magic of these treats lies in their ability to impress effortlessly, making you look like a culinary wizard even on your busiest days. The sheer convenience combined with the gourmet taste makes this recipe an absolute game-changer in your dessert repertoire, proving that you don’t need hours in the kitchen to create something truly spectacular.
Why These Are a Must-Try for Everyone
What makes these particular treats an absolute standout? It’s the harmonious marriage of rich, creamy cheesecake filling with the iconic flavors of gooey caramel, crunchy pecans, and decadent chocolate. Every single bite is a symphony for your taste buds, a perfect blend of sweet and salty, soft and crunchy. And the best part? They are No Bake Turtle Cheesecakes! That’s right, absolutely no oven time required, which means more time for you to enjoy the results and less time sweating in the kitchen. Imagine the delight on your family’s faces, or the appreciative nods from your guests, as they savor these delightful creations. This recipe is your secret weapon for potlucks, parties, or simply a well-deserved treat after a long week. It’s a testament to the fact that extraordinary flavor doesn’t always demand extraordinary effort. I’ve made countless desserts in my time, and few bring as much joy with so little fuss. The distinct layers, the textural contrasts, the balance of sweetness – it’s all meticulously designed to provide a consistently delightful experience. There’s a certain satisfaction that comes from assembling something so beautiful and delicious in such a short amount of time, knowing that you’re about to provide a moment of pure culinary happiness. They are truly the epitome of comfort dessert made simple, yet tasting incredibly complex and satisfying, offering a moment of pure bliss with every spoonful.
Unleash Your Creativity: Serving & Variation Ideas
Now, while these cheesecakes are absolutely perfect as is, I always encourage a little bit of personalization. Think of them as a delicious canvas for your creativity! For an extra touch of decadence, consider drizzling a little more warm caramel sauce or melted chocolate over the top just before serving. A dollop of freshly whipped cream can elevate the experience, adding an ethereal lightness that complements the rich base beautifully. And for those who can’t get enough of the nutty crunch, a sprinkle of additional toasted pecans or even a mix of other nuts like walnuts or almonds would be fantastic. For those who love a bit of flair, consider a sprinkle of flaky sea salt to really make the caramel and chocolate flavors pop – it’s a small addition that makes a huge impact, balancing the sweetness perfectly. You could also experiment with the crust; while a classic graham cracker crust is divine, an Oreo cookie crust would add a delightful chocolatey twist, or perhaps a shortbread crust for a buttery, elegant base. Don’t be afraid to switch up the type of chocolate chips you use – dark, milk, or even white chocolate can each bring a unique nuance to the flavor profile. Imagine a white chocolate version with macadamia nuts, or a hint of espresso powder added to the chocolate layer for a mocha twist! The possibilities are truly endless, limited only by your imagination and your pantry staples. If you’re serving these for a special occasion, pairing them with a scoop of vanilla bean ice cream creates an incredible textural contrast and a delightful temperature play. Or, for a truly grown-up treat, a drizzle of coffee liqueur mixed into the chocolate sauce could add an unexpected depth. These individual servings make them ideal for entertaining, as guests can easily pick up their own little slice of heaven without any fuss or the need for plates and forks if you’ve opted for a robust enough cupcake liner. They are inherently portable, which is another huge win in my book, perfect for taking to picnics, family gatherings, or holiday potlucks.
Your Turn to Create and Share!
So, what are you waiting for? I genuinely hope you’re feeling inspired to roll up your sleeves – metaphorically, of course, since there’s no baking involved! – and give this recipe a try. You won’t regret it. The joy of creating something so delicious with such minimal effort is incredibly rewarding. I promise you, once you taste the results, you’ll wonder why you haven’t been making these all along. It’s more than just a recipe; it’s an experience waiting to happen, a moment of pure indulgence that you absolutely deserve. When you do make them, please, please, please come back and share your experience with me! I absolutely adore hearing about your culinary adventures. What variations did you try? Who did you share them with? Did you find them as incredibly easy and satisfying as I do? Drop a comment below with your feedback, or even better, snap a photo of your magnificent creations and share them on your social media. Tag me if you do, I’d love to see your masterpieces and celebrate your success! Your stories and photos not only bring a smile to my face but also inspire others in our wonderful community to try their hand at these delightful treats. Let’s create a wave of delicious, easy-to-make desserts together!
No Bake Turtle Cheesecakes
Easy, decadent No Bake Turtle Cheesecakes featuring a crunchy pecan graham cracker crust, creamy cheesecake filling, homemade caramel sauce, toasted pecans, and a rich chocolate ganache drizzle. Perfect for any occasion without the traditional baking fuss.
Ingredients
-
1 ½ cups graham cracker crumbs
-
½ cup finely chopped pecans (for crust)
-
¼ cup granulated sugar
-
½ cup (1 stick) unsalted butter, melted
-
¼ teaspoon salt (for crust)
-
2 (8-ounce) packages full-fat cream cheese, softened
-
1 cup powdered sugar, sifted
-
1 teaspoon pure vanilla extract (for filling)
-
½ teaspoon salt (for filling)
-
1 ¾ cups heavy cream, very cold (for filling)
-
1 cup granulated sugar (for caramel)
-
¼ cup water (for caramel)
-
½ cup heavy cream, warmed (for caramel)
-
2 tablespoons unsalted butter, cubed (for caramel)
-
½ teaspoon vanilla extract (for caramel)
-
¼ teaspoon salt (for caramel)
-
1 cup pecan halves, lightly toasted (for topping)
-
2 tablespoons unsalted butter, melted (for topping)
-
1 tablespoon brown sugar, packed (for topping)
-
Pinch of salt (for topping)
-
½ cup semi-sweet chocolate chips (for ganache)
-
¼ cup heavy cream (for ganache)
-
½ teaspoon vanilla extract (optional, for ganache)
Instructions
- Step 1
Prepare Workspace: Ensure cream cheese is at room temperature and heavy cream is very cold. Finely crush graham crackers and lightly toast pecans for topping. - Step 2
Craft Crust: In a bowl, combine graham cracker crumbs, ½ cup chopped pecans, ¼ cup granulated sugar, and ¼ teaspoon salt. Stir in ½ cup melted butter until moistened. - Step 3
Form Crust: Press mixture firmly into a 9-inch springform pan or 12 lined muffin cups. Chill while preparing other components. - Step 4
Make Caramel Sauce (optional, or use store-bought): Combine 1 cup granulated sugar and ¼ cup water in a heavy saucepan. Cook over medium-high heat without stirring until deep amber (8-12 minutes). Carefully remove from heat. - Step 5
Finish Caramel: Slowly whisk in ½ cup warmed heavy cream, then 2 tablespoons butter, ½ teaspoon vanilla extract, and ¼ teaspoon salt. Whisk until smooth. Cool completely to room temperature. - Step 6
Craft Cheesecake Filling: Beat softened cream cheese until smooth. Gradually add 1 cup sifted powdered sugar; beat until light and fluffy. Stir in 1 teaspoon vanilla extract and ½ teaspoon salt. - Step 7
Whip Cream: In a separate, very cold bowl, whip 1 ¾ cups very cold heavy cream until stiff peaks form. - Step 8
Combine Filling: Gently fold whipped cream into cream cheese mixture in two additions until light and uniform. Do not overmix. - Step 9
Assemble Cheesecakes: Evenly spoon filling over chilled crusts, smoothing the tops. - Step 10
Chill: Cover loosely and refrigerate for at least 4-6 hours, or preferably overnight, until thoroughly set. This step is crucial for texture. - Step 11
Prepare Pecan Topping: Combine 1 cup toasted pecan halves, 2 tablespoons melted butter, 1 tablespoon packed brown sugar, and a pinch of salt. Toss gently to coat. - Step 12
Prepare Chocolate Ganache: Microwave ½ cup semi-sweet chocolate chips and ¼ cup heavy cream in 30-second intervals, stirring until smooth. Stir in ½ teaspoon vanilla extract (optional). - Step 13
Decorate & Serve: Drizzle cooled caramel sauce generously over set cheesecakes. Sprinkle with prepared pecan topping. Drizzle with chocolate ganache. Serve immediately. Store leftovers in an airtight container in the refrigerator for up to 3-4 days.
Important Information
Nutrition Facts (Per Serving)
It is important to consider this information as approximate and not to use it as definitive health advice.
Allergy Information
Please check ingredients for potential allergens and consult a health professional if in doubt.
Leave a Comment