
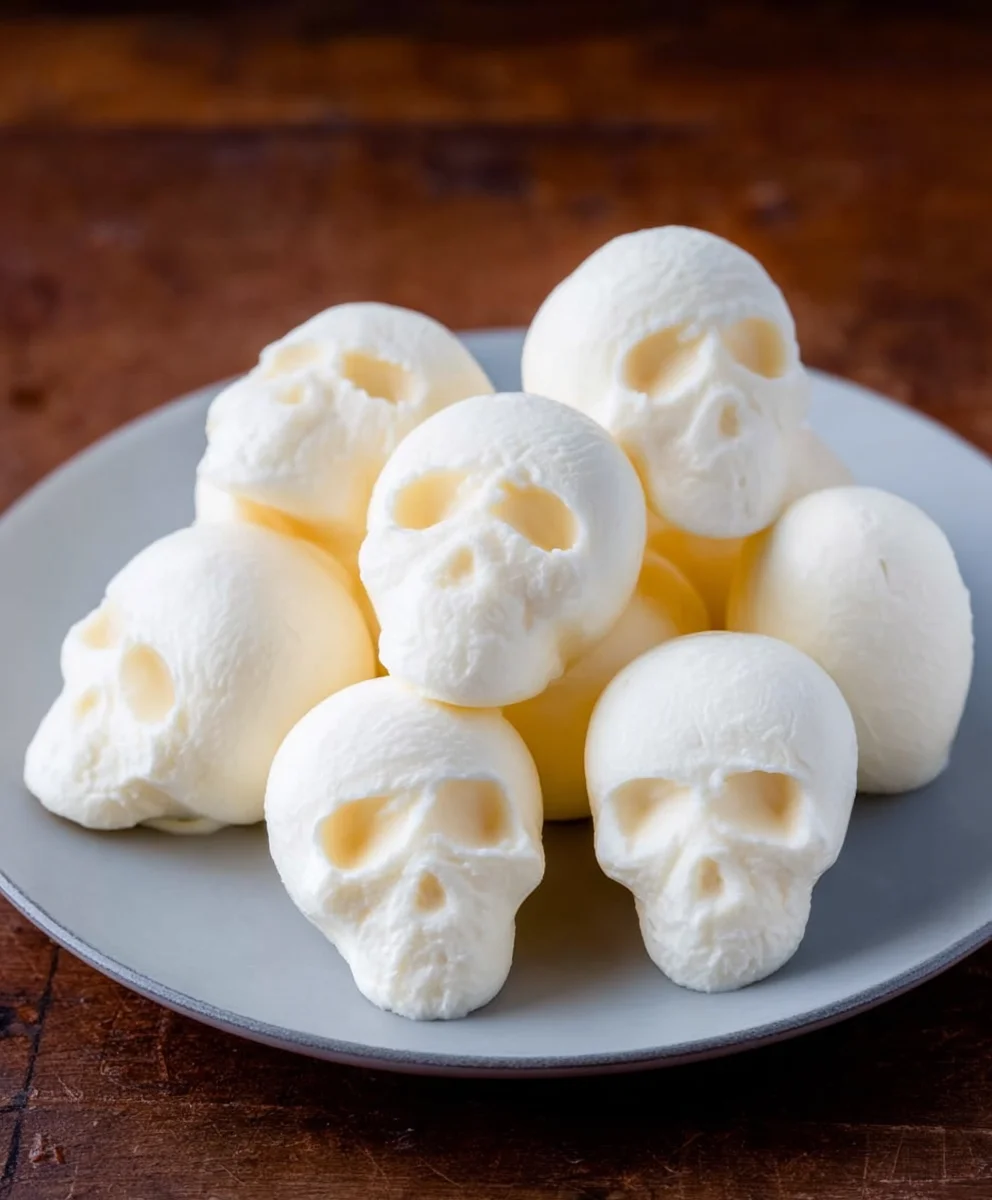
How To Make Mozzarella Cheese Skulls is more than just a recipe; it’s an invitation to bring a delightfully ghoulish charm to your table! I’ve always loved how food can be both delicious and a conversation starter, and these unique cheesy creations are sure to be just that. Forget the mundane cheese platter – imagine a platter adorned with these intricately shaped, creamy mozzarella skulls, ready to be devoured by eager guests.
While traditional sugar skulls hold deep cultural significance in Día de los Muertos celebrations, this savory twist offers a fun, contemporary nod to festive, spooky themes, perfect for Halloween gatherings or any occasion where a touch of whimsical macabre is appreciated. I find the blend of playful spookiness with the classic comfort of mozzarella simply irresistible.
People absolutely adore this dish not just for its undeniable novelty and Instagrammable appeal, but also for the simple, unadulterated pleasure of biting into warm, gooey, fresh mozzarella. The process of learning How To Make Mozzarella Cheese Skulls is surprisingly straightforward, transforming a simple ingredient into an edible work of art that’s both savory and incredibly fun. Get ready to impress and delight with these memorable, melt-in-your-mouth appetizers that are as delicious as they are visually striking.

Ingredients:
- Two (2) Pounds Fresh Whole Milk Low-Moisture Mozzarella Cheese: I personally find that using whole milk mozzarella that’s specifically labeled “low-moisture” or “part-skim low-moisture” works absolute wonders for shaping. It holds up beautifully and melts perfectly without becoming overly greasy. If you can only find fresh mozzarella packed in water, that’s okay, but you’ll need to drain it very, very thoroughly and pat it dry with paper towels to remove as much moisture as possible.
- 1 Teaspoon Fine Sea Salt or Kosher Salt: We want to season our cheese from the inside out. This little bit of salt incorporated during the softening stage truly elevates the flavor of the finished skulls.
- 2 Tablespoons Extra Virgin Olive Oil: This will be for lightly greasing our hands and tools, ensuring the warm, pliable cheese doesn’t stick. It also adds a lovely sheen to the finished product.
- 1 Teaspoon Garlic Powder (Optional): If you’re a garlic lover like me, a touch of garlic powder adds a wonderful aromatic note.
- ½ Teaspoon Onion Powder (Optional): Another fantastic way to layer in savory flavor.
- ¼ Teaspoon Dried Oregano (Optional): For a classic Italian-inspired taste, oregano is a winner.
- Pinch of Red Pepper Flakes (Optional): If you enjoy a little kick, a tiny pinch of red pepper flakes adds a delightful warmth.
- Marinara Sauce or Your Favorite Dipping Sauce: While not part of the skulls themselves, these are absolutely essential for serving!
Preparing Your Workspace and Tools
- Gather All Your Equipment: Before we even think about touching the cheese, I always make sure I have every single tool within arm’s reach. This is key when working with a pliable ingredient like mozzarella that needs quick handling. You’ll need a very large pot (at least 6-8 quarts) for heating water, a large heatproof bowl (preferably glass or stainless steel) that can sit comfortably in the pot without touching the bottom, a slotted spoon or a sturdy spatula, a baking sheet lined with parchment paper, and a pair of heat-resistant gloves. Trust me on the gloves – your hands will thank you!
- Set Up Your Shaping Station: On a clean, sanitized counter space, I like to have my olive oil ready, along with any optional seasonings you plan to use. Have a small dish or bowl for the olive oil so you can easily dip your fingers or gloves. Also, make sure that parchment-lined baking sheet is right there, ready to receive your beautifully shaped cheese skulls. This minimizes travel time for the warm cheese and helps maintain its shape.
- Pre-Measure and Prepare Ingredients: It might sound basic, but having your salt and any optional spices measured out and ready to go in small bowls means you won’t be fumbling with spice jars when your hands are covered in warm cheese. This mise en place approach genuinely makes the whole process smoother and more enjoyable for me.
Transforming and Softening the Mozzarella
- Cube the Mozzarella: First things first, I take my two pounds of low-moisture mozzarella and cut it into roughly 1-inch cubes. Uniform pieces will melt more evenly, which is crucial for achieving that perfectly pliable texture we’re aiming for. Place these cubes into your large heatproof bowl. If you’re using water-packed mozzarella, ensure it’s been thoroughly drained and patted dry at this stage. Removing excess moisture is paramount for optimal shaping and a less greasy final product.
- Prepare the Hot Water Bath: Fill your large pot about halfway with water. Bring this water to a gentle simmer over medium-high heat. We’re looking for hot, steamy water, but not a rolling boil. The goal here is to create a bain-marie, or a double boiler setup, where the steam and hot water gently heat and soften the cheese without directly cooking it.
- Submerge the Cheese Bowl: Carefully place your heatproof bowl containing the mozzarella cubes over the simmering water in the pot. Make sure the bottom of the cheese bowl does not touch the simmering water. The steam and indirect heat will work their magic.
- Begin the Softening Process: Using your slotted spoon or sturdy spatula, start gently stirring the mozzarella cubes. Initially, they’ll just warm up, but after about 5-7 minutes, you’ll notice them starting to clump together and become soft. They’ll transform from distinct cubes into a more unified, stretchy mass. This is where patience pays off!
- Add Seasoning and Continue Heating: Once the cheese begins to soften and meld, I sprinkle in the fine sea salt (or kosher salt) and any of the optional seasonings you’ve chosen – garlic powder, onion powder, oregano, or red pepper flakes. Continue to gently fold and stir the cheese, helping the seasonings to incorporate evenly. Keep the bowl over the hot water, ensuring the cheese maintains its warmth and pliability.
- Achieving the Right Consistency: This step is critical. You want the mozzarella to reach a state where it’s incredibly smooth, shiny, and stretchy, almost like taffy. When you lift some with your spoon, it should stretch beautifully without breaking. This usually takes about 10-15 minutes in total, depending on your stove and the initial temperature of your cheese. If it starts to cool down too much and becomes stiff, just leave it over the hot water bath for another minute or two, stirring until it’s pliable again. This soft, elastic consistency is our golden ticket to perfectly shaped skulls.
The Art of Shaping Your Mozzarella Cheese Skulls
- Prepare for Handling: This is where those heat-resistant gloves become your best friend. Slip them on and lightly grease them with a little extra virgin olive oil. This prevents the warm cheese from sticking to your hands and allows for easier manipulation. I also like to have a small bowl of olive oil nearby to re-grease my gloves as needed.
- Portion the Cheese: Using your greased slotted spoon or hands, pull off a golf-ball to tangerine-sized portion of the softened mozzarella. The exact size is up to your preference, but I find these sizes work well for individual servings and easier handling.
- Form the Basic Skull Shape: Gently work the piece of cheese in your hands, rolling it into a somewhat elongated oval or teardrop shape. This will be the basic head structure. Think of a rounded top tapering slightly towards a chin. You’ll need to work relatively quickly here, as the cheese will start to cool and firm up. If it becomes too stiff to work with, simply place it back into the heatproof bowl over the hot water for a moment or two until it regains its pliability.
- Create the Eye Sockets: With your thumbs or the rounded end of a small, sanitized kitchen utensil (like the handle of a small spoon), gently press two indentations into the upper portion of the “head” to form the eye sockets. Don’t press all the way through, just enough to create clear, defined hollows. I find that a circular motion helps create a more natural-looking socket.
- Fashion the Nasal Cavity: Just below and between the eye sockets, use the tip of a small, sharp knife (or a toothpick for more delicate work) to carve out a small, inverted heart or triangular shape for the nose. Be gentle, as the cheese can tear if too much pressure is applied. You’re aiming for a suggestion of a nose, not a deep hole.
- Detailing the Teeth (Optional but Fun!): For that classic skull grin, use the edge of your small knife or a toothpick to carefully etch horizontal lines across the lower jaw area, creating the illusion of teeth. You can then add a few very short vertical lines to separate individual teeth. This adds so much character to our little cheesy friends!
- Refine the Jawline and Cheekbones: Take a moment to gently pinch and pull the cheese slightly to define the cheekbones just below the eye sockets, and gently round out the jawline. You can gently flatten the back of the skull slightly so it sits nicely on your serving platter.
- Place on Prepared Baking Sheet: As each skull is shaped to your satisfaction, carefully transfer it to the parchment-lined baking sheet. Leave a little space between each skull to prevent them from sticking together, especially if you plan to bake them briefly.
- Repeat for Remaining Mozzarella: Continue this shaping process until all of your mozzarella has been transformed into an army of delightful cheese skulls. Remember, practice makes perfect! Your first few might look a bit abstract, but you’ll quickly get the hang of it.
Setting and Finishing Your Mozzarella Skulls
- To Serve Warm and Soft (No Bake): If you prefer your mozzarella skulls to be soft and melty on the inside, you can serve them immediately after shaping. Their internal warmth will be delightful, especially when paired with a hot marinara sauce. Simply arrange them on a serving platter and present them to your eager guests. This method highlights the pure, tender texture of the fresh mozzarella.
- To Achieve a Slightly Firmer Exterior (Quick Bake/Air Fry): For those who love a slight crispness or a more defined structure, I highly recommend a brief stint in the oven or air fryer. This helps the skulls hold their shape beautifully and gives them a lovely, golden-brown crust.
- Oven Method: Preheat your oven to 375°F (190°C). Once preheated, place your baking sheet with the cheese skulls into the oven for just 5-8 minutes. Keep a very close eye on them! You want them to become lightly golden and slightly puffed, but not completely melted into a puddle. The goal is to set the shape and create a delicate crust.
- Air Fryer Method: If you have an air fryer, this is an excellent option for speed and crispness. Preheat your air fryer to 350°F (175°C). Carefully transfer a few skulls at a time to the air fryer basket, ensuring they are in a single layer and not touching. Air fry for 3-5 minutes, again, watching them closely. They should turn golden and slightly firm.
Important Note: Whether you bake or air fry, the timing is approximate and depends heavily on the size of your skulls and your appliance. The moment you see them start to turn golden or bubble, they’re usually done. Over-baking will lead to a melty mess, which, while still delicious, won’t resemble skulls anymore!
- Cool Slightly Before Serving (If Baked/Air Fried): If you’ve opted for the baking or air frying method, allow your mozzarella cheese skulls to cool on the baking sheet for 2-3 minutes after removing them from the heat. This brief cooling period helps them firm up slightly and makes them easier to handle without distortion.
- Final Presentation: Arrange your glorious “How To Make Mozzarella Cheese Skulls” creations on a festive serving platter. I love to serve them alongside a warm bowl of rich marinara sauce for dipping. You could also offer other dipping options like pesto, a sweet chili sauce, or even a spicy arrabbiata. A sprinkle of fresh chopped parsley or basil can add a lovely pop of color right before serving. These are best enjoyed warm, so encourage your guests to dive in!

Conclusion:
Well, my friends, we’ve reached the end of our culinary journey for today, and I truly hope you’re feeling inspired! This isn’t just another recipe; it’s an invitation to unleash your inner artist and savor a creation that’s as delightful to look at as it is to eat. I wholeheartedly believe that learning how to make Mozzarella Cheese Skulls is a must-try experience for anyone looking to add a touch of whimsy and deliciousness to their table. What makes this recipe so special, you ask? It’s the perfect blend of simplicity and showmanship. You don’t need to be a gourmet chef to achieve impressive results, yet the outcome is always met with gasps of delight and excited chatter. The creamy, mild flavor of fresh mozzarella, with its irresistible stretch and melt, is simply unparalleled. When shaped into these playful skulls, it transforms a humble ingredient into a conversational centerpiece, making any gathering instantly more memorable and fun. Imagine the smiles, the laughter, and the “oohs” and “aahs” as you present your platter of perfectly crafted, melt-in-your-mouth cheese skulls. It’s an edible masterpiece that proves food can be both delicious and incredibly entertaining, appealing to all ages with its unique charm.
Elevate Your Serving Experience
Once you’ve mastered the art of creating these adorable (or spooky, depending on your mood!) cheese skulls, the fun truly begins with how you choose to serve them. My personal favorite way to enjoy them is as part of an elaborate charcuterie board. Nestle them amongst an assortment of cured meats like prosciutto and salami, alongside vibrant olives, crunchy nuts, and a medley of colorful cherry tomatoes. Drizzle a little balsamic glaze over the entire arrangement for a sophisticated touch, or perhaps some high-quality olive oil and a sprinkle of fresh basil to truly let the mozzarella shine. They also make an utterly charming addition to a simple caprese salad; imagine those cheesy skulls peeking out from a bed of ripe tomatoes and fragrant basil leaves! For a more casual setting, serve them with an array of crackers or crusty artisan bread, allowing guests to build their own delicious bites. They’re fantastic alongside a warm bowl of marinara sauce for dipping – think of them as elevated mozzarella sticks, ready to be dunked into a rich, tomatoey embrace. For a Halloween-themed party, these skulls are an absolute no-brainer, acting as the perfect spooky-cute appetizer that adults and kids alike will adore.
Creative Twists and Variations
While the classic mozzarella skull is a triumph in itself, don’t hesitate to experiment with variations to suit your taste or occasion. For a burst of herbaceous flavor, you could gently mix finely chopped fresh basil or oregano into your mozzarella curd before shaping. Imagine little green flecks adding a subtle aromatic note! If you’re feeling adventurous, consider a smoked paprika dusting after shaping for a touch of smoky depth and a beautiful reddish hue, perfect for a more dramatic presentation. For those who love a bit of heat, a tiny pinch of red pepper flakes incorporated into the cheese, or even a very light dusting on the finished skulls, can provide a delightful kick. You could even explore different types of cheese if you’re feeling bold – while mozzarella offers the best texture and stretch for this specific shape, a combination with a tiny bit of provolone could add a sharper edge, though you’d need to be mindful of its melting properties. For a truly indulgent treat, carefully stuff the center of each skull with a small piece of sun-dried tomato or a tiny bit of pesto before sealing, creating a delightful surprise with every bite. The possibilities are truly endless once you understand the basic technique, allowing you to tailor this versatile recipe to any palate or event. Remember, cooking is all about creativity and personal expression!
So, there you have it! This recipe isn’t just about crafting cheese; it’s about crafting joy, making memories, and adding a unique flair to your culinary repertoire. I am so excited for you to discover the satisfaction of creating these charming bites. I truly hope you’ll take the leap and try your hand at learning How To Make Mozzarella Cheese Skulls very soon. Don’t be shy – dive in, have fun, and let your creativity flow. And please, please, please, when you do whip up your own batch, I would absolutely love to hear about it! Share your photos, tell me about your serving ideas, or any creative variations you came up with. Your experiences inspire me and our entire community. Happy cooking, and I can’t wait to see your fantastic cheese skull creations!
Mozzarella Cheese Skulls
Create delightful, spooky mozzarella cheese skulls, perfect for Halloween or festive gatherings. These warm, gooey, and visually striking appetizers are surprisingly fun and easy to make.
Ingredients
-
2 lbs Low-Moisture Whole Milk Mozzarella Cheese
-
1 tsp Sea Salt or Kosher Salt
-
2 tbsp Extra Virgin Olive Oil
-
1 tsp Garlic Powder (optional)
-
½ tsp Onion Powder (optional)
-
¼ tsp Dried Oregano (optional)
-
Pinch Red Pepper Flakes (optional)
-
Marinara Sauce or favorite dipping sauce (for serving)
Instructions
-
Step 1
Gather a large pot (6-8 qt), heatproof bowl, slotted spoon, parchment-lined baking sheet, and heat-resistant gloves. Have olive oil and pre-measured seasonings ready. -
Step 2
Cut mozzarella into 1-inch cubes and place in the heatproof bowl. Fill the pot halfway with water, bring to a gentle simmer. Place cheese bowl over simmering water (not touching water). Gently stir cheese with a slotted spoon for 5-7 minutes until it starts clumping. -
Step 3
Add salt and optional seasonings. Continue stirring over heat for 10-15 minutes total until cheese is smooth, shiny, and stretches like taffy. Reheat if it stiffens. -
Step 4
Don heat-resistant gloves and grease with olive oil. Take a golf-ball to tangerine-sized piece of warm mozzarella. -
Step 5
Roll into an elongated oval. Use thumbs or a rounded utensil to press two eye sockets. Carve a small inverted heart or triangle for the nose with a small knife or toothpick. Etch horizontal and vertical lines for teeth on the lower jaw. Refine cheekbones and jawline. Flatten the back slightly so it sits nicely. -
Step 6
Place each shaped skull on the parchment-lined baking sheet, leaving space. Repeat until all cheese is used, reheating cheese over the water bath if it becomes too stiff. -
Step 7
{‘@type’: ‘HowToSection’, ‘name’: ‘Serve Warm (No Bake) or Firm (Baked/Air Fried)’, ‘itemListElement’: [{‘@type’: ‘HowToStep’, ‘name’: ‘No Bake Option’, ‘text’: ‘Serve immediately with warm marinara for a soft, melty texture.’}, {‘@type’: ‘HowToStep’, ‘name’: ‘Baked Option’, ‘text’: ‘Preheat oven to 375°F (190°C). Bake skulls on a baking sheet for 5-8 minutes, until lightly golden and puffed. Watch closely to avoid over-melting.’}, {‘@type’: ‘HowToStep’, ‘name’: ‘Air Fried Option’, ‘text’: ‘Preheat air fryer to 350°F (175°C). Air fry in a single layer for 3-5 minutes, until golden and slightly firm. Watch closely to avoid over-melting.’}]} -
Step 8
If baked or air fried, allow skulls to cool for 2-3 minutes to firm up. Arrange skulls on a platter with warm marinara or other dipping sauces. Garnish with fresh herbs before serving. Best enjoyed warm.
Important Information
Nutrition Facts (Per Serving)
It is important to consider this information as approximate and not to use it as definitive health advice.
Allergy Information
Please check ingredients for potential allergens and consult a health professional if in doubt.


Leave a Comment