
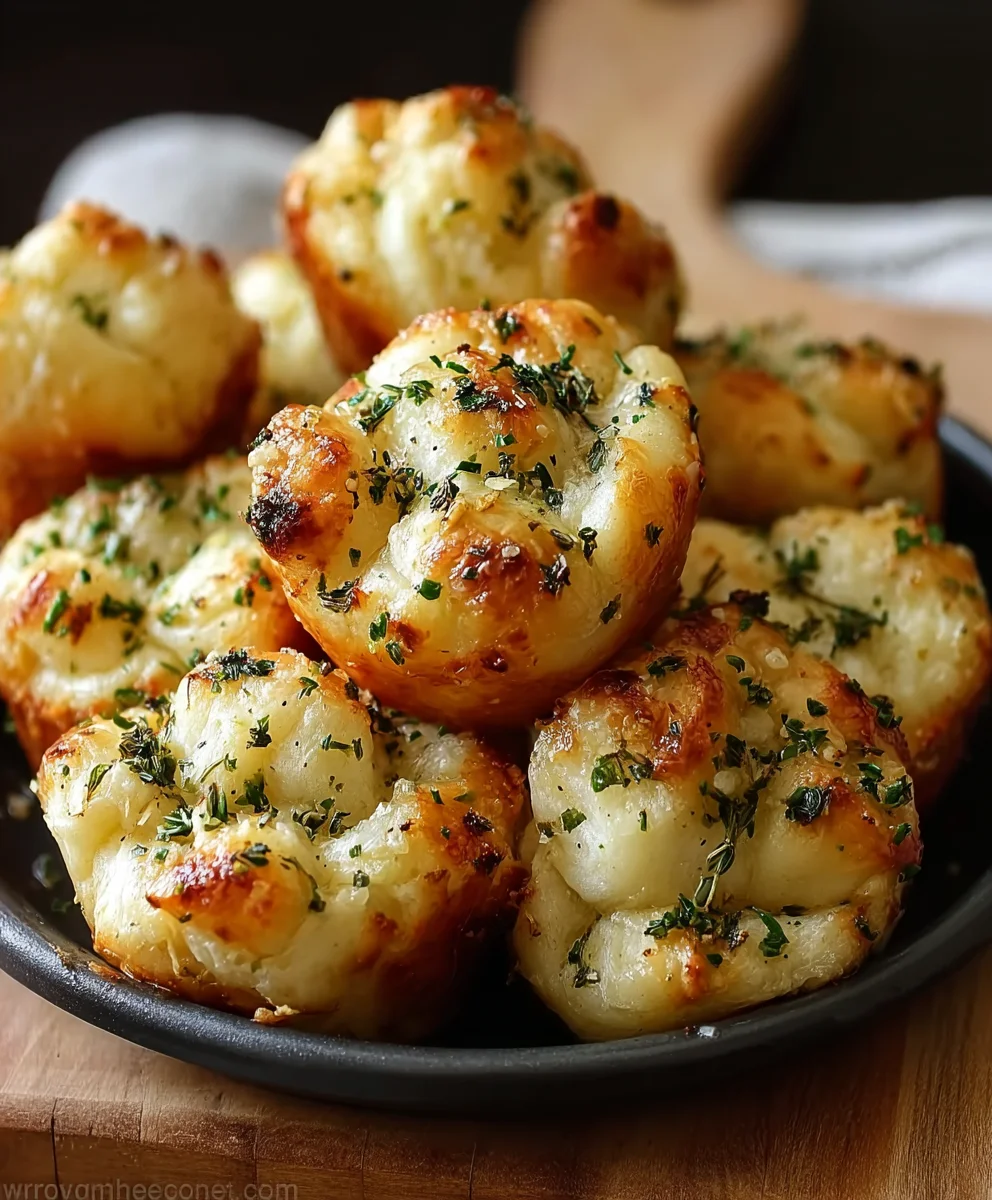
Mini Garlic Monkey Breads are an absolute game-changer for any gathering, a savory twist on a classic that will have your guests reaching for more! Imagine the irresistible aroma of golden-baked dough, infused with rich garlic and butter, wafting through your kitchen. This is not just a snack; it’s an experience, a delightful pull-apart bread that invites sharing and pure enjoyment. I find that few things create such an immediate sense of warmth and anticipation as the promise of freshly baked garlic bread, especially when it comes in such a charming, shareable form.
While the beloved sweet monkey bread has roots in American kitchens dating back to the 1950s, often gracing breakfast tables or dessert spreads, this savory iteration brings a fresh, exciting dimension to the concept. It takes that familiar fun of tearing off individual pieces and elevates it into a sophisticated, yet incredibly approachable, appetizer or side dish. People adore this dish for its unique combination of textures – a soft, pillowy interior with a slightly crisp exterior – all drenched in an unparalleled garlicky goodness that simply melts in your mouth. It’s the kind of dish that disappears quickly, making it a true testament to its universal appeal.
I find that the sheer convenience and interactive nature of these Mini Garlic Monkey Breads make them a perennial favorite. They’re perfect for dipping into marinara, complementing a hearty pasta, or simply enjoyed on their own as a comforting bite. The way the individual bread balls easily separate, each one a little parcel of flavor, truly makes them an undeniable crowd-pleaser, proving that sometimes, the simplest pleasures are the most profound.

Ingredients:
Creating these delightful Mini Garlic Monkey Breads is a truly rewarding experience, especially when you have all your ingredients prepped and ready to go. Here’s everything you’ll need to bring these savory, pull-apart wonders to life in your kitchen.
- For the Dough Base:
- Two (2) 16.3-ounce cans of refrigerated flaky biscuit dough (I prefer the Grands! brand, but any flaky variety works beautifully. The flaky layers give a fantastic texture to our Mini Garlic Monkey Breads.)
- For the Aromatic Garlic Butter Coating:
- One (1) stick (8 tablespoons or 1/2 cup) unsalted butter, melted (Using unsalted butter gives us better control over the final saltiness of our Mini Garlic Monkey Breads.)
- Six (6) cloves fresh garlic, minced very finely (This is a key component for our Mini Garlic Monkey Breads, so fresh is always best for maximum flavor impact. If you love garlic as much as I do, don’t be shy!)
- One-quarter (1/4) cup fresh parsley, finely chopped (The vibrant green adds both color and a fresh, herbaceous note to your Mini Garlic Monkey Breads.)
- Two (2) tablespoons fresh chives, finely chopped (Chives offer a delicate oniony flavor that complements the garlic beautifully.)
- One (1) tablespoon dried oregano (While fresh is wonderful, dried oregano holds its own well here, adding a classic Italian-inspired aroma to your Mini Garlic Monkey Breads.)
- One-half (1/2) teaspoon black pepper, freshly ground (Freshly ground pepper makes a noticeable difference in taste.)
- One-quarter (1/4) teaspoon red pepper flakes, optional (If you enjoy a little warmth and a subtle kick in your Mini Garlic Monkey Breads, these are a fantastic addition.)
- One-quarter (1/4) teaspoon onion powder, optional (This deepens the savory base without adding more moisture.)
- One (1) teaspoon sea salt, or to taste (We’ll adjust this depending on the saltiness of your cheese and your personal preference for your Mini Garlic Monkey Breads.)
- For the Cheesy Layer:
- One-half (1/2) cup freshly grated Parmesan cheese (Please, if you can, avoid the pre-shredded stuff in a can. Freshly grated Parmesan melts wonderfully and offers a much richer, nuttier flavor to your Mini Garlic Monkey Breads.)
- Equipment You’ll Need:
- Standard 12-cup muffin tin (or two 6-cup tins)
- Small microwave-safe bowl or saucepan for melting butter
- Large mixing bowl for tossing the dough
- Sharp knife and cutting board
- Measuring spoons and cups
- Pastry brush (optional, for extra butter goodness)
Preparing Your Workspace and Ingredients
Before we dive into the fun part of assembling our Mini Garlic Monkey Breads, it’s crucial to get everything ready. This “mise en place” approach ensures a smooth and enjoyable cooking experience, preventing any last-minute rushes or forgotten steps.
- Preheat the Oven: Begin by preheating your oven to 375°F (190°C). Achieving the correct oven temperature from the start is vital for even baking and that beautiful golden-brown crust on your Mini Garlic Monkey Breads.
- Prepare Muffin Tins: Lightly grease a standard 12-cup muffin tin with butter, non-stick cooking spray, or a light coating of olive oil. Ensure every nook and cranny of each cup is coated. This step is incredibly important to prevent the sticky, cheesy dough from adhering to the pan, making it easy to release your perfect Mini Garlic Monkey Breads later. You want them to pull apart effortlessly, and a well-greased tin is key to that.
- Prepare the Biscuit Dough: Open your cans of refrigerated biscuit dough. On a clean cutting board, separate each biscuit. For each biscuit, use a sharp knife or even kitchen shears to cut it into 4 equally sized pieces. You’ll simply cut it in half, then cut each half in half again. This will give you roughly 48 small dough pieces in total from two cans. The smaller pieces are essential for achieving that classic “monkey bread” pull-apart texture, allowing each bite-sized chunk of Mini Garlic Monkey Breads to be coated in our amazing garlic butter.
- Mince Garlic and Chop Herbs: Take your fresh garlic cloves and mince them as finely as possible. A garlic press works wonders here, or you can use a sharp knife. For the fresh parsley and chives, wash them thoroughly, pat them dry, and then finely chop them. Having fresh ingredients prepared beforehand makes the next steps much quicker and ensures all the flavors are ready to meld together for your Mini Garlic Monkey Breads.
- Grate Parmesan Cheese: If you haven’t already, grate your Parmesan cheese. Freshly grated cheese melts superiorly and offers a much bolder flavor profile, truly enhancing the savory notes of your Mini Garlic Monkey Breads.
Crafting the Garlic Herb Coating
This is where the magic truly begins for our Mini Garlic Monkey Breads! The garlic herb coating is what infuses every piece of dough with incredible flavor and aroma. Take your time with this step, as it’s the heart and soul of the dish.
- Melt the Butter: In a small, microwave-safe bowl or a small saucepan over low heat, melt the stick of unsalted butter. You want it completely liquid but not boiling or browned.
- Infuse with Garlic: Once the butter is melted, add the finely minced garlic directly into the warm butter. Stir well. Let the garlic steep in the warm butter for about 2-3 minutes off the heat. This gentle warmth helps to release the garlic’s aromatic oils and mellow its raw bite, creating a beautiful, fragrant base for your Mini Garlic Monkey Breads without browning or burning the garlic. Be careful not to cook the garlic at a high temperature as it can quickly become bitter if burned.
- Combine Herbs and Seasonings: To the garlic-infused butter, add the finely chopped fresh parsley, fresh chives, dried oregano, freshly ground black pepper, optional red pepper flakes, and optional onion powder. Stir everything together thoroughly. The kitchen should start smelling absolutely divine at this point – a true promise of the deliciousness to come for your Mini Garlic Monkey Breads!
- Stir in Parmesan Cheese: Finally, add the freshly grated Parmesan cheese to the butter mixture. Stir until the cheese is well incorporated. It might clump a little, which is perfectly fine; it will melt beautifully during baking and create pockets of cheesy goodness within your Mini Garlic Monkey Breads.
- Adjust Salt: Taste a tiny bit of the mixture (if you dare, it’s quite garlicky raw!) or add 1/2 teaspoon of sea salt. Remember, the canned biscuits and Parmesan cheese both contain some salt, so you might not need much more. You can always add a pinch more at the end if desired. Our goal is a perfectly balanced savory flavor for our Mini Garlic Monkey Breads.
Assembling Your Mini Garlic Monkey Breads
Now that our dough is portioned and our incredible garlic herb butter is ready, it’s time to bring it all together. This assembly process is quick and satisfying, transforming simple biscuit pieces into prospective Mini Garlic Monkey Breads.
- Prepare the Mixing Bowl: Place all the cut biscuit dough pieces into your large mixing bowl. Make sure they are separated and not stuck together.
- Pour the Coating: Drizzle the entire garlic herb butter and Parmesan mixture over the biscuit pieces in the bowl. Try to distribute it as evenly as possible from the start.
- Toss and Coat: Using a large spoon, a rubber spatula, or even clean hands (which I find works best for this task!), gently toss the biscuit pieces until every single piece is thoroughly coated with the savory garlic butter mixture. The goal is for each piece to be glistening and covered in herbs and cheese. Take your time to ensure even coverage, as this is crucial for the flavor distribution in your Mini Garlic Monkey Breads. Scrape down the sides of the bowl to get every last bit of that delicious coating.
- Arrange in Muffin Tins: Now, carefully transfer the coated biscuit pieces into the prepared muffin cups. I like to place 3-4 pieces into each cup, depending on how large your dough pieces are and how full you want your Mini Garlic Monkey Breads to be. Don’t press them down too hard; let them settle naturally. The idea is for them to expand and puff up, forming a cohesive, pull-apart bread. If there’s any remaining garlic butter mixture in the bottom of your mixing bowl, feel free to spoon a little extra over the tops of the dough in the muffin cups. This ensures maximum flavor and a lovely crust.
- A Moment of Anticipation: As you fill each cup, you can already envision the golden-brown, garlicky, cheesy wonders that will emerge from the oven. These are truly going to be spectacular Mini Garlic Monkey Breads!
Baking Your Golden Mini Garlic Monkey Breads
The oven is preheated, the muffin tins are filled, and the aroma is already hinting at the deliciousness to come. This is the moment we transform our prepped ingredients into glorious, golden Mini Garlic Monkey Breads.
- Bake with Care: Carefully place the filled muffin tin (or tins) into your preheated 375°F (190°C) oven. Ensure the tin is positioned in the center of the oven for even heat distribution.
- Monitor Baking Time: Bake for approximately 15-20 minutes. Baking times can vary slightly depending on your oven, so it’s always good to keep an eye on them.
- Check for Doneness: Your Mini Garlic Monkey Breads are ready when they are beautifully puffed up, golden brown on top, and appear cooked through. You can even gently pry one apart with a fork to ensure the center pieces are fully baked and not doughy. The cheese should be bubbly and slightly crisped on the edges. If they are browning too quickly on top but don’t seem cooked through, you can loosely tent the tin with aluminum foil for the last few minutes of baking.
- The Aroma Test: Trust your nose! When your kitchen is filled with an irresistible aroma of toasted garlic, herbs, and warm bread, it’s a strong indicator that your Mini Garlic Monkey Breads are nearing perfection.
Serving and Enjoying Your Mini Garlic Monkey Breads
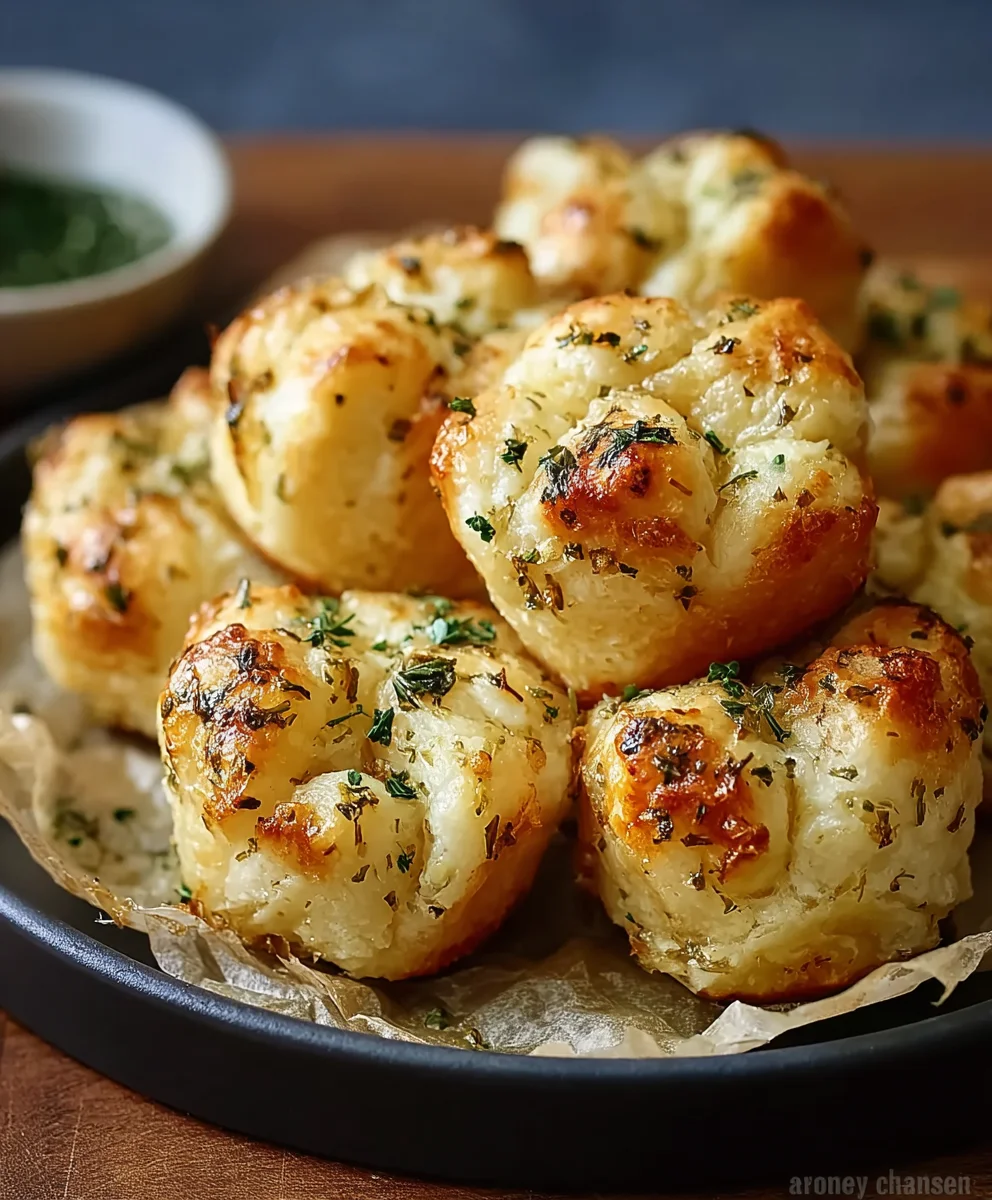
The hard part is over! Your kitchen is filled with an intoxicating aroma, and a tray of golden, bubbling Mini Garlic Monkey Breads has just emerged from the oven. Now for the best part – enjoying your culinary creation!
- A Brief Cool Down: Once baked, carefully remove the muffin tin from the oven. Let the Mini Garlic Monkey Breads cool in the tin for about 5 minutes. This brief cooling period allows them to firm up slightly, making them easier to remove and preventing them from falling apart instantly. It also helps the cheese to set a little.
- Release from the Tin: After 5 minutes, carefully invert the muffin tin onto a cooling rack or a large plate. If any pieces stick (which they shouldn’t if you greased the tin well!), gently loosen them with a butter knife. The magic of “monkey bread” is that they come out as individual, interconnected clusters.
- Serve Warm: These Mini Garlic Monkey Breads are truly best enjoyed warm, straight from the oven. The butter is still melted, the garlic and herbs are vibrant, and the cheese is gooey. Arrange them attractively on a platter or in a bread basket for an inviting presentation.
- The Pull-Apart Experience: Encourage everyone to simply pull apart the individual garlic bread pieces from the cluster. It’s a fun, interactive way to eat, making them perfect for sharing at gatherings or as a delightful side dish with dinner.
- Serving Suggestions: These savory monkey breads make an incredible accompaniment to pasta dishes, soups, salads, or any main course that benefits from a delicious, garlicky bread side. They also disappear quickly as an appetizer or snack!
- Storage: If by some miracle you have any leftover Mini Garlic Monkey Breads, store them in an airtight container at room temperature for up to 2 days. To reheat, simply pop them back in a warm oven (around 300°F/150°C) for a few minutes until heated through and soft again, or use a toaster oven for smaller batches.
Tips for Perfect Mini Garlic Monkey Breads
Making delicious Mini Garlic Monkey Breads is quite straightforward, but a few pointers can elevate your results from good to absolutely amazing!
- Fresh Ingredients are Key: While convenience items like canned biscuits save time, don’t skimp on fresh garlic, fresh parsley, and freshly grated Parmesan cheese. These are the flavor powerhouses for your Mini Garlic Monkey Breads, and their quality truly shines through.
- Don’t Overcrowd the Muffin Cups: Resist the urge to pack too many dough pieces into each cup. Leaving a little room allows the biscuits to puff up properly and become beautifully golden brown, ensuring that pull-apart texture that defines true Mini Garlic Monkey Breads.
- Taste the Butter Mixture: Before tossing the dough, give a tiny taste to your garlic butter mixture. This is your chance to adjust the salt, add more pepper, or even a dash more garlic powder if you want an extra punch without adding more fresh garlic.
- Even Coating is Essential: Take your time when tossing the dough pieces in the garlic butter. Every piece should be coated. This ensures that every bite of your Mini Garlic Monkey Breads is bursting with flavor.
- Monitor Your Oven: Ovens can vary wildly. Keep an eye on your Mini Garlic Monkey Breads as they bake. If they start browning too quickly, loosely tent them with foil. If they’re not golden enough, give them a few more minutes.
- Serve Warm for Best Experience: While still tasty at room temperature, these Mini Garlic Monkey Breads are truly at their peak when warm. The melted butter, gooey cheese, and soft dough are simply irresistible.
- Grease the Pan Thoroughly: I can’t stress this enough. A well-greased muffin tin is your best friend when making any monkey bread. It guarantees easy release and preserves that beautiful, intact shape.
Variations to Explore with Your Mini Garlic Monkey Breads
Once you’ve mastered the basic recipe for these incredible Mini Garlic Monkey Breads, don’t be afraid to get creative! Here are a few ideas to inspire your next batch:
- Extra Cheesy Centers: For an even more decadent experience, place a small cube of mozzarella, cheddar, or provolone cheese inside each biscuit piece before tossing it in the garlic butter. As they bake, the cheese will melt into a gooey surprise within your Mini Garlic Monkey Breads.
- Spicy Kick: Increase the red pepper flakes in the garlic butter mixture, or add a pinch of cayenne pepper for a bolder, spicier version of your Mini Garlic Monkey Breads.
- Sun-Dried Tomato & Basil: Replace some of the parsley with finely chopped fresh basil and add 2 tablespoons of finely chopped oil-packed sun-dried tomatoes (drained well) to the garlic butter. This gives your Mini Garlic Monkey Breads a wonderfully Mediterranean flair.
- Rosemary & Thyme: For an earthier profile, substitute some of the dried oregano with fresh rosemary and thyme, finely chopped. These herbs pair wonderfully with garlic and create a rustic version of Mini Garlic Monkey Breads.
- Everything Bagel Seasoning: After coating the dough pieces and arranging them in the muffin tin, sprinkle a generous amount of everything bagel seasoning over the tops of your Mini Garlic Monkey Breads before baking. This adds a fantastic texture and a savory, garlicky-onion crunch.
- Bacon or Prosciutto Bits: For a truly indulgent treat, fry up some bacon or finely dice some prosciutto, then mix the crispy bits into your garlic butter mixture before coating the dough. This adds a smoky, salty dimension to your Mini Garlic Monkey Breads that is absolutely addictive.
- Garlic Lover’s Dream: If you truly adore garlic, consider adding another clove or two to the butter mixture, or even a teaspoon of garlic powder alongside the fresh minced garlic for an intense garlic flavor in your Mini Garlic Monkey Breads.
- Herb Garden Medley: Use a mix of whatever fresh herbs you have on hand – dill, marjoram, sage, or chervil can all bring unique and delicious notes to your Mini Garlic Monkey Breads.
Experimenting with these variations will help you discover your ultimate favorite version of Mini Garlic Monkey Breads, making this already fantastic recipe even more versatile and exciting!
Conclusion:
Why These Mini Garlic Monkey Breads Are Your Next Go-To Recipe
I truly believe that these Mini Garlic Monkey Breads are more than just a recipe; they’re an experience waiting to happen in your kitchen. From the moment that intoxicating aroma of garlic and butter starts wafting through your home, you’ll know you’ve stumbled upon something special. What makes this recipe an absolute must-try, in my humble opinion, is its sheer simplicity combined with an impressive “wow” factor. You get all the comfort and deliciousness of a homemade bread, but in a fun, pull-apart format that practically begs to be shared. It’s the perfect blend of savory indulgence and interactive eating. No complicated techniques, no hours of proofing, just straightforward steps leading to incredibly flavorful, soft, and utterly irresistible bites. Every single time I make these, they disappear at an astonishing rate, proving their universal appeal. They strike that perfect balance between being sophisticated enough for a dinner party and comforting enough for a casual family meal. Trust me when I say, once you try them, they’ll quickly become a cherished part of your culinary repertoire.
Unleashing the Full Potential: Serving Suggestions and Delicious Variations
Now that you’re armed with the knowledge of how to create these sensational little bundles of joy, let’s talk about how to make them shine even brighter at your table. These versatile delights are incredibly adaptable. For a cozy weeknight dinner, imagine them served alongside a hearty minestrone soup, a rich beef stew, or a simple pasta dish like spaghetti aglio e olio, where they can soak up every last drop of delicious sauce. They are also phenomenal with grilled chicken or fish, adding a warm, savory counterpoint to your main course. Hosting a gathering? Arrange a platter of these on your appetizer spread, perhaps with a vibrant marinara sauce or a classic olive oil and balsamic vinegar dip, and watch them vanish. For a truly elevated experience, consider adding a sprinkle of fresh Parmesan cheese into the butter mixture before baking, creating a gooey, cheesy garlic bread pull-apart that’s out of this world. Another fantastic variation involves incorporating finely chopped fresh herbs like rosemary or thyme into the garlic butter – the aromatic boost is simply divine. If you like a little kick, a pinch of red pepper flakes can introduce a subtle warmth without overpowering the other flavors. Don’t be afraid to experiment! You could even try adding a touch of smoked paprika for an earthy depth or finely chopped sun-dried tomatoes for a burst of concentrated flavor. These aren’t just a side dish; they can truly elevate any meal or snack occasion. Think about them as the ultimate savory comfort food that fits into almost any culinary scenario.
Your Culinary Adventure Awaits: Try Them and Share!
I genuinely hope that reading this has inspired you to roll up your sleeves and give this fantastic recipe a try. There’s immense satisfaction in creating something so delicious from scratch, and even more joy in sharing it with loved ones. Imagine the smiles, the oohs and aahs, as everyone pulls apart their own piece of these garlicky, buttery wonders. This recipe is designed to be approachable for bakers of all skill levels, so please don’t hesitate. You’ll be amazed at how easily you can achieve such impressive results. Once you’ve had a chance to bake these delightful Mini Garlic Monkey Breads, I would absolutely love to hear about your experience! Did you stick to the original recipe, or did you put your own unique spin on it? Perhaps you discovered a new favorite dipping sauce or a surprising herb combination that elevated them even further? Please, share your culinary adventures with me! Your feedback and creative ideas are what make the cooking community so vibrant and inspiring. Don’t forget to snap a picture of your gorgeous creations and share them. Let’s spread the joy of easy, delicious homemade food together. Happy baking, my friends! I can’t wait to hear all about it.
Mini Garlic Monkey Breads
Mini Garlic Monkey Breads are the ultimate side dish or snack for garlic bread lovers! These individual-sized pull-apart breads are buttery, garlicky, and loaded with Parmesan cheese. Made with simple ingredients like frozen rolls or biscuits, they’re quick to prepare and perfect for family dinners, parties, or any occasion.
Ingredients
-
2 (16.3-ounce) cans refrigerated flaky biscuit dough
-
1 stick (1/2 cup) unsalted butter, melted
-
6 cloves fresh garlic, minced
-
1 1/2 tbsp dried parsley flakes
-
2 tablespoons fresh chives, finely chopped
-
1 tablespoon dried oregano
-
1/2 teaspoon black pepper, freshly ground
-
1/4 teaspoon red pepper flakes, optional
-
1/4 teaspoon onion powder, optional
-
1 teaspoon sea salt, or to taste
-
1/4 cup freshly grated Parmesan cheese (for mixture)
-
2 tablespoons freshly grated Parmesan cheese (for sprinkling)
Instructions
-
Step 1
Preheat oven to 375°F (190°C). Lightly grease a standard 12-cup muffin tin. -
Step 2
Open biscuit cans and cut each biscuit into 4 equal pieces, yielding approximately 48 small dough pieces total. -
Step 3
In a small, microwave-safe bowl or saucepan, melt 1 stick of unsalted butter. Add finely minced garlic and let steep in the warm butter for 2-3 minutes off the heat. Stir in dried parsley flakes, fresh chives, dried oregano, black pepper, optional red pepper flakes, optional onion powder, and 1/4 cup grated Parmesan cheese. Add sea salt to taste. -
Step 4
Place all cut biscuit dough pieces into a large mixing bowl. Drizzle the entire garlic-herb-butter and Parmesan mixture over the dough. Toss gently with a spoon or clean hands until every piece is thoroughly coated. -
Step 5
Carefully transfer the coated biscuit pieces into the prepared muffin cups, placing about 4 pieces into each cup. Sprinkle the remaining 2 tbsp of Parmesan cheese evenly over the tops of the dough in each muffin cup. -
Step 6
Place the muffin tin in the preheated oven. Bake for approximately 15-20 minutes, or until the monkey breads are beautifully puffed up, golden brown on top, and cooked through. If browning too quickly, you can loosely tent with aluminum foil for the last few minutes. -
Step 7
Carefully remove the muffin tin from the oven and let the Mini Garlic Monkey Breads cool in the tin for about 5 minutes. Invert the tin onto a cooling rack or large plate to release. Serve warm, encouraging guests to pull apart individual pieces. Store any leftovers in an airtight container at room temperature for up to 2 days, reheating in a warm oven if desired.
Important Information
Nutrition Facts (Per Serving)
It is important to consider this information as approximate and not to use it as definitive health advice.
Allergy Information
Please check ingredients for potential allergens and consult a health professional if in doubt.

Leave a Comment