
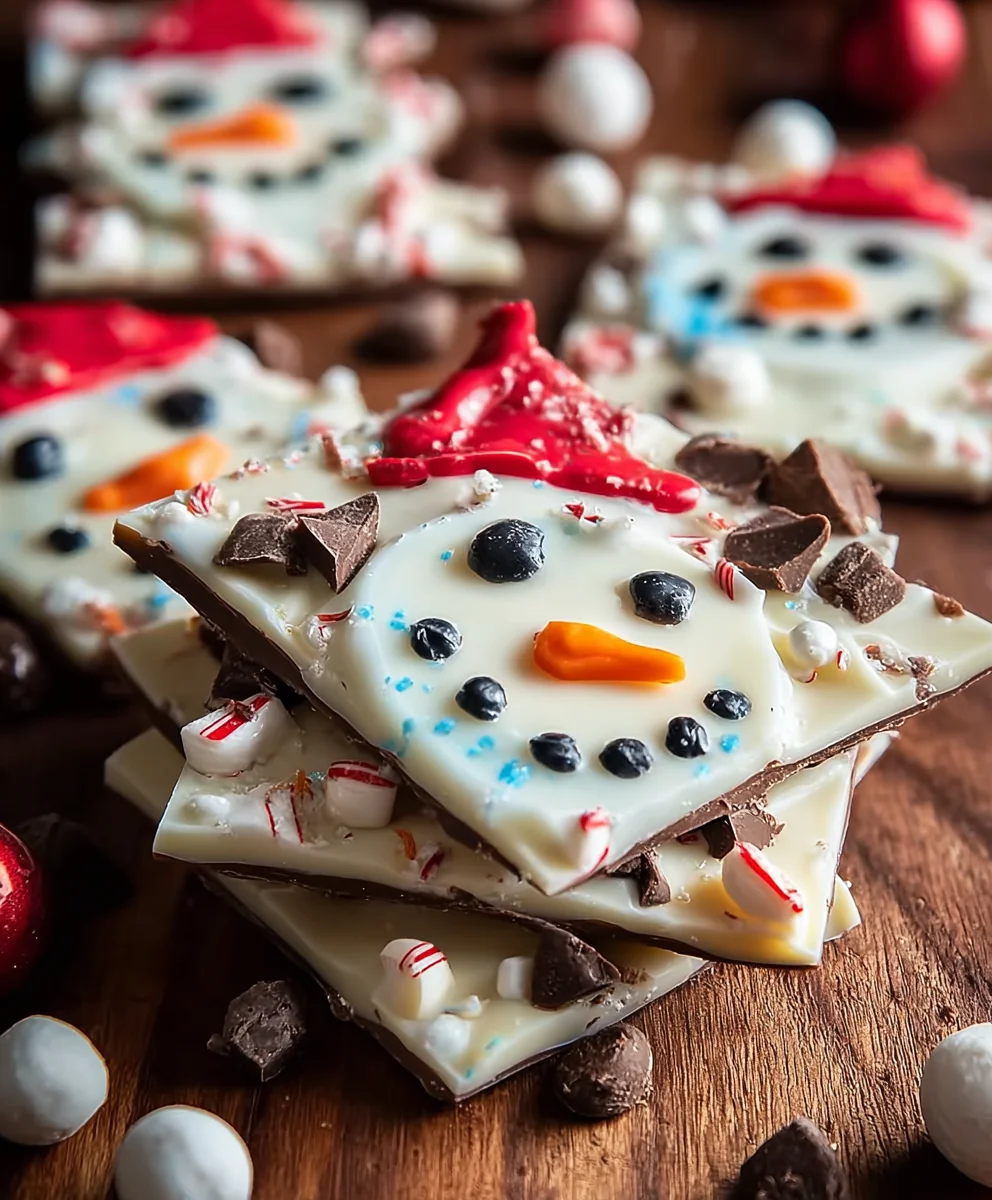
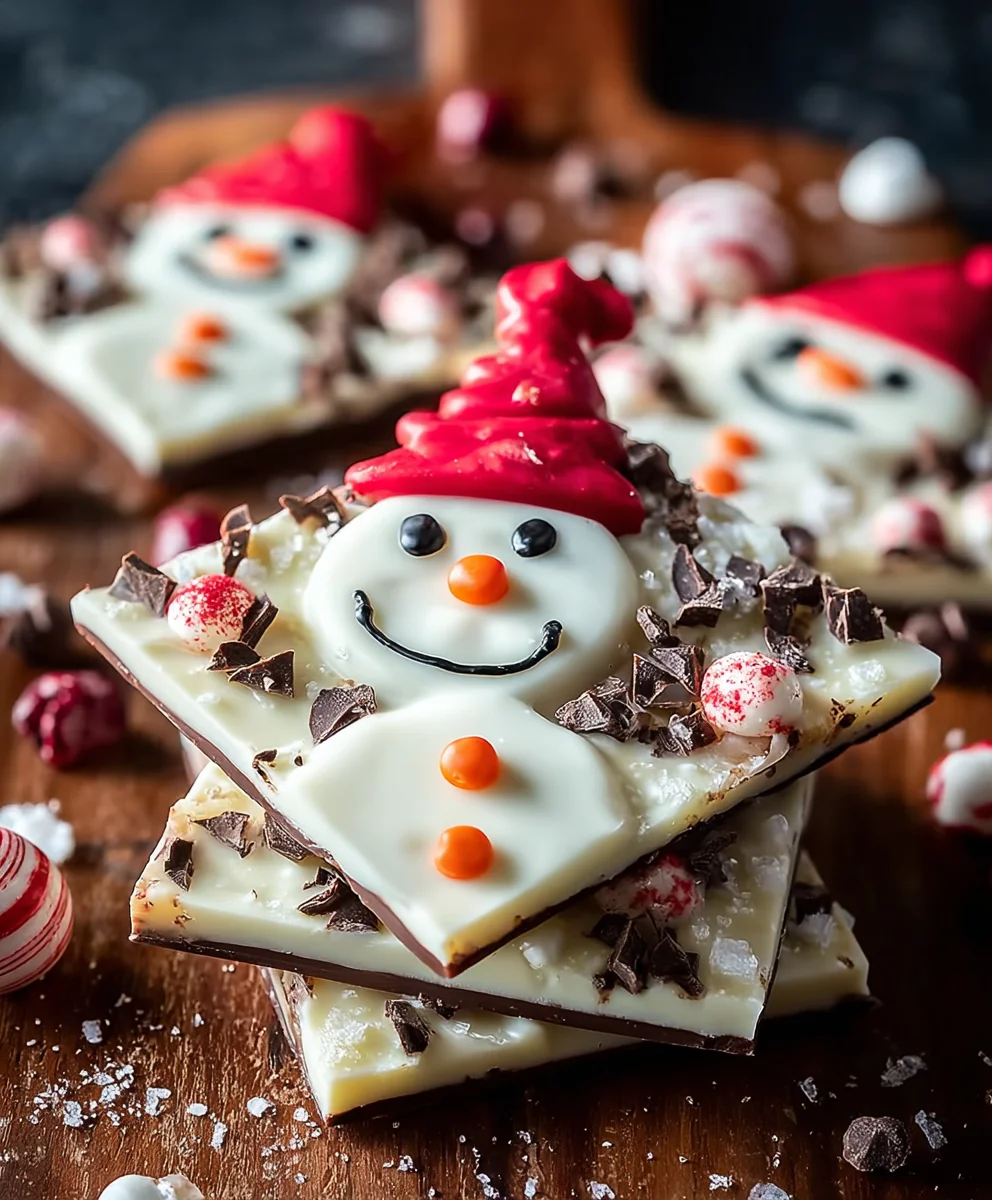
Melted Snowman Bark is truly a recipe that encapsulates the magic and whimsy of the holiday season, offering an irresistible combination of festive cheer and delightful simplicity. As an enthusiast for joyful, fuss-free baking, I’m delighted to share a unique, visually charming dessert that’s incredibly easy to prepare and guaranteed to bring smiles! This enchanting treat has quickly become a beloved modern tradition, transforming humble chocolate bark into an adorable tableau of winter fun.
While the precise origins of the whimsical “melted snowman” design are a relatively recent festive innovation, chocolate bark itself boasts a long and versatile history as a cherished confection, providing a perfect canvas for creative expression. Our charming Melted Snowman Bark takes this classic concept and infuses it with playful holiday spirit, making it an instant hit with families everywhere. People utterly adore this dish for countless reasons: its undeniable cuteness instantly brightens any dessert table, sparking joy and conversation. Beyond the captivating visuals, the taste and texture are simply divine—a smooth, rich chocolate base perfectly complemented by a satisfying crunch from cheerful candies and sprinkles. It’s the ultimate no-bake dessert, ideal for busy hosts, a fantastic activity for kids, and a wonderfully thoughtful homemade gift. This festive and delicious creation offers both ease and immense satisfaction, truly embodying the spirit of joyful holiday baking without the fuss.

Ingredients:
- For the White Chocolate Base:
- 36 ounces (about 6 cups) good quality white chocolate chips or chopped white chocolate melting wafers. I really recommend using a brand like Ghirardelli, Guittard, or even candy melts for best results. Cheaper white chocolate can sometimes be tricky to melt smoothly.
- For the Snowman Features:
- 1 (12-ounce) bag mini chocolate chips (for mouths and buttons, if desired)
- 1 (10-ounce) bag candy eyes (various sizes are fun, but mini ones are perfect for these little guys)
- Orange sprinkle “carrot” noses (or you can use orange jelly beans cut in half, or even small pieces of dried apricot)
- Pretzel sticks, broken into halves or thirds (for arms)
- For the Scarves and Embellishments:
- Assorted colorful candies for scarves – think sour rainbow strips cut into thin ribbons, small licorice laces, or even brightly colored icing squeezed into a thin line.
- Optional: Blue, silver, or white sanding sugar or sprinkles for a “snow” effect around the snowmen.
- Optional: A few drops of blue or green food coloring, if you want to tint a small portion of your white chocolate for an “icy puddle” effect, though I usually stick to pure white.
Gathering Your Supplies and Prep Work
Alright, friends, before we dive into the delicious world of making our adorable Melted Snowman Bark, let’s get ourselves organized. This is where we lay the groundwork for a smooth and enjoyable experience, ensuring everything is within arm’s reach when creativity strikes!
- First things first, clear a good amount of counter space. You’ll need room for your ingredients, your melting station, and your baking sheets. Trust me, trying to juggle hot chocolate and tiny candies in a cramped space is a recipe for a sticky disaster!
- Line two large baking sheets (typically 13×18 inches) with parchment paper. I can’t stress enough how important parchment paper is here. It prevents sticking beautifully and makes for super easy cleanup and removal of our finished Melted Snowman Bark. Wax paper can also work in a pinch, but parchment is my go-to for chocolate work.
- Now, let’s get those snowman features ready. Open up all your candy bags. Break your pretzel sticks into smaller pieces, roughly 1 to 1.5 inches long – these will be our snowman arms. If you’re using sour rainbow strips for scarves, cut them into thin, short ribbons. If you’re using a piping bag with icing for scarves, have it ready to go. Arrange all these small candies and sprinkles into little bowls or on a plate. This way, when your melted chocolate is ready, you won’t be fumbling with packaging.
- Make sure you have all your melting equipment ready. Whether you’re using a microwave-safe bowl and spatula, or a double boiler setup (a heat-proof bowl set over a saucepan of simmering water), have it clean and dry. Water is the enemy of melting chocolate, so a completely dry bowl and spatula are paramount for preventing the chocolate from seizing.
- Consider the temperature of your kitchen. If it’s particularly warm, you might want to work a bit faster or even pre-chill your baking sheets in the fridge for a few minutes before starting. A cooler surface can help the chocolate set a tiny bit quicker, giving you more control over the spreading and decorating process for our Melted Snowman Bark.
- Finally, ensure you have space in your refrigerator or freezer. Our beautiful Melted Snowman Bark will need a good chill to set up properly, so clear out a shelf or two now to avoid any last-minute shuffling.
Melting the Chocolate Base
This is where the magic truly begins! Getting your white chocolate perfectly melted is crucial for achieving that smooth, pristine base for our Melted Snowman Bark. Patience and low heat are your best friends here. I’ll walk you through two reliable methods.
Method 1: The Microwave (My Quick Go-To)
- Place your white chocolate chips or chopped wafers into a large, microwave-safe bowl. Make sure the bowl is completely dry.
- Microwave on 50% power for 30-second intervals, stirring well after each interval with a dry silicone spatula. This is not a race! White chocolate can scorch very easily, and once it’s scorched, there’s no going back.
- Continue microwaving and stirring. It might not look like much is happening for the first minute or so, but then you’ll start to see it softening. Keep stirring diligently. The residual heat in the chocolate will continue to melt the chips even after they’re out of the microwave.
- Once about 75% of the chocolate is melted, remove it from the microwave and stir continuously until all the lumps are gone and the chocolate is completely smooth and shiny. This step is key: stirring off the heat prevents overheating and ensures a silky texture. If you find there are still a few stubborn lumps after a good minute of stirring, pop it back in for just 10-15 seconds at 50% power, then stir again.
- Your goal is a smooth, pourable consistency, not too thick but not watery. This perfectly melted white chocolate is the canvas for our charming Melted Snowman Bark.
Method 2: The Double Boiler (For Ultimate Control and Shine)
- Fill a medium saucepan with about 1-2 inches of water and bring it to a gentle simmer over medium-low heat. You want steam, not a rolling boil.
- Place your white chocolate chips or chopped wafers in a heat-proof glass or metal bowl that fits snugly over the saucepan without touching the water. Again, ensure the bowl is completely dry.
- As the steam gently warms the bowl, the chocolate will begin to melt. Stir continuously with a dry silicone spatula. The gentle, indirect heat from the steam is perfect for melting chocolate evenly and preventing scorching.
- Continue stirring until the chocolate is completely smooth and free of any lumps. This method gives you excellent control and often results in a wonderfully glossy finish, which is beautiful for our Melted Snowman Bark.
- Once melted, carefully remove the bowl from the saucepan. Make sure no steam or water drips into your chocolate. If you need to keep it warm while you work, you can leave it over the now-off-heat saucepan, but continue to stir occasionally.
A Quick Note on Seizing: If your white chocolate suddenly becomes thick, grainy, and unworkable, it has likely “seized.” This usually happens if even a tiny drop of water gets into it, or if it’s overheated. Unfortunately, once chocolate seizes, it’s very difficult to rescue. Prevention is key: ensure all your equipment is dry, and use low, indirect heat.
Creating the Melted Snowman Shapes
Now for the fun, artistic part! This is where we actually form the “melted” look for our Melted Snowman Bark. Don’t worry about perfection; melted snowmen are inherently a little wonky and that’s part of their charm!
- Take your beautifully melted white chocolate. Using a large spoon (a regular soup spoon works well, or a small ladle), dollop a generous amount of chocolate onto one of your parchment-lined baking sheets. I usually aim for about 2-3 tablespoons per snowman, depending on how large I want them. You want to leave ample space between each dollop, as they will spread. Think about making between 6-8 snowmen per standard baking sheet.
- Once you’ve placed a dollop, use the back of your spoon to gently spread the chocolate into an irregular, somewhat circular “puddle” shape. Don’t make it a perfect circle; remember, this is a melted snowman, so uneven edges and a slightly asymmetrical form are exactly what we’re going for! Some can be more elongated, others rounder. The idea is to mimic a snowman that has begun to melt and spread out on the ground.
- Continue this process, creating all your melted snowman bases on the first baking sheet. If your chocolate starts to cool and thicken too much, you can gently warm it again using your preferred method (a few seconds in the microwave or briefly over the double boiler) to restore its pourable consistency. Work fairly quickly, as we want the chocolate to still be soft and tacky when we add our decorations. This tackiness is what will help the candies stick without needing extra adhesive.
- Repeat the process for the second baking sheet, ensuring you have a good batch of these adorable white chocolate puddles ready for their personalities. As you work, you’ll find a rhythm and get a feel for the right amount of chocolate to use for each one. Some people like to make a slight “head” bump on their puddle, while others prefer a completely flat, melted look. It’s all part of the charm of homemade Melted Snowman Bark!
- Remember to work with a steady hand, but don’t overthink it too much. The beauty of these Melted Snowman Bark pieces is in their unique, slightly imperfect nature. Each one will have its own little personality.
Decorating Your Snowmen
Now for the most delightful part – bringing our snowmen to life with their adorable features! This is where you can let your creativity truly shine and customize each piece of Melted Snowman Bark. Work relatively quickly here, as the chocolate will start to set, and we want all the decorations to adhere firmly.
- First, the Eyes: Carefully place two candy eyes near the top portion of each melted chocolate puddle. Press them gently into the chocolate so they are secure. You can place them close together for a surprised look, or a little wider apart for a more contemplative snowman.
- Next, the Nose: Take one of your orange sprinkle “carrot” noses and place it just below and between the eyes. If you’re using cut jelly beans or dried apricots, position them to look like a cute little carrot nose. A gentle press will embed it perfectly into the still-soft chocolate.
- Then, the Mouth: Grab your mini chocolate chips. You can arrange 3-5 of them in a gentle curve below the nose to form a smiling mouth. Alternatively, some people like to use one upside-down mini chocolate chip for a small, pursed mouth. Get creative! You can even use a fine-tipped edible marker if you’re feeling extra artistic, though I find the mini chocolate chips add a lovely textural element to the Melted Snowman Bark.
- Add the Arms: Now for those twig arms! Gently press two broken pretzel stick pieces into the sides of your melted snowman puddle, one on each side, angling them slightly upwards or outwards as if they’re reaching out. Don’t push too hard, just enough for them to stick firmly into the chocolate. The saltiness of the pretzel also adds a fantastic flavor contrast to the sweet white chocolate.
- Fashion the Scarves: This is where the colors pop! If you’re using sour rainbow strips, gently lay a thin strip across the “neck” area of your snowman, just below the head and above the arms. You can curve it slightly, or even create a little knot-like effect by cutting a small slit in one end and threading the other through. If you’re using icing, carefully pipe a thin line of color for a cozy scarf. These scarves add such a charming, personalized touch to each piece of Melted Snowman Bark.
- Optional Winter Wonderland Sprinkles: If you want to add a bit of sparkle, lightly sprinkle some blue, silver, or white sanding sugar or fine sprinkles around the edges of your melted snowman puddle. This creates a lovely “snowy” or “icy” ground effect, making each individual Melted Snowman Bark look like it’s resting on a fresh blanket of snow. This step is entirely optional but adds a wonderful finishing touch.
- Continue decorating all of your snowmen on both baking sheets. As you work, you’ll see each one develop its own distinct character, making your batch of Melted Snowman Bark truly unique and special.
Setting and Breaking the Bark
We’re almost there! Once all your adorable snowmen are decorated, it’s time to let them set up properly. This crucial step ensures that your Melted Snowman Bark is firm, snappy, and easy to handle.
- Once all your snowmen on both baking sheets are fully decorated, carefully transfer the baking sheets to your refrigerator. Make sure they are placed on a flat, stable surface.
- Allow the Melted Snowman Bark to chill for at least 30-60 minutes, or until the white chocolate is completely firm and hard to the touch. The exact time will depend on the thickness of your chocolate puddles and the temperature of your refrigerator. If you’re in a hurry, you can place them in the freezer for about 15-20 minutes, but keep a close eye on them to prevent them from getting too cold and potentially developing condensation when removed.
- You’ll know they’re ready when they are solid and no longer tacky. When you try to lift a corner of the parchment paper, the chocolate should not bend or feel soft at all.
- Once completely set, carefully remove the baking sheets from the refrigerator. The parchment paper makes this next step incredibly easy.
- Gently peel the parchment paper away from the bottom of each individual Melted Snowman Bark piece. They should lift off cleanly.
- If you made larger puddles, you can gently break or cut the bark into individual pieces around each snowman. Sometimes, due to their irregular shapes, they might be slightly connected if placed too close together. If you’re going for distinct individual snowmen, a sharp, warm knife can help make clean cuts, but often a gentle snap will suffice if the chocolate is very cold. The beauty of “bark” is its rustic, broken appearance, so don’t fret if they’re not perfectly uniform!
- Arrange your finished Melted Snowman Bark pieces on a serving platter, or prepare them for gifting. Each piece is a delightful, edible work of art.
Tips for Perfect Melted Snowman Bark
To ensure your Melted Snowman Bark turns out absolutely perfect every single time, I’ve gathered a few extra tips and tricks that I’ve learned along the way. These little nuggets of advice can make a big difference in the final outcome and presentation of your festive treat!
- Quality of Chocolate Matters: I really can’t emphasize this enough – using a good quality white chocolate or candy melt will significantly impact the melting process and the final taste and texture of your Melted Snowman Bark. Cheaper brands often contain less cocoa butter and more sugar, making them prone to seizing or becoming grainy. Invest in a good brand for the best results.
- Humidity Check: Chocolate and humidity do not mix well. On a very humid day, white chocolate can become difficult to melt smoothly and may take longer to set. If you’re in a humid environment, consider using candy melts, which are more stable, or work quickly and ensure your kitchen is as cool and dry as possible. Using a dehumidifier if you have one can also help create an ideal environment for making your Melted Snowman Bark.
- Don’t Overheat: This is a cardinal rule for melting white chocolate. Overheating will cause it to seize and become thick and unworkable. Always use low heat and stir frequently, removing it from the heat source just before it’s completely melted and letting residual heat do the rest. Patience is key for a smooth, glossy finish on your Melted Snowman Bark.
- Work Quickly While Decorating: Once your chocolate puddles are laid out, try to decorate them fairly quickly. The white chocolate will start to set at room temperature, and you need it to be slightly tacky for the candies to adhere properly without sliding off. Having all your decorations prepped and organized beforehand is a massive time-saver here.
- Creative Decoration Ideas: Don’t limit yourself to just the suggestions in the ingredients list!
- For scarves, you could use small pieces of red licorice lace, fruit leather cut into strips, or even carefully piped lines of colored royal icing.
- Want rosy cheeks? A tiny dab of pink edible glitter or a very small pink sprinkle can add a cute blush.
- For buttons, you can add three small mini chocolate chips down the “body” of the melted snowman.
- Consider adding a small, colorful sprinkle “hat” to the top of some snowmen for extra character.
The possibilities are endless, making each piece of Melted Snowman Bark a unique creation.
- Storage: Store your finished Melted Snowman Bark in an airtight container at room temperature for up to 1-2 weeks, or in the refrigerator for longer freshness, especially if your home is warm. If refrigerating, let them come to room temperature for a few minutes before serving for the best texture and flavor.
- Gifting: This Melted Snowman Bark makes a fantastic homemade gift! Arrange the pieces in a festive box or bag, tied with a pretty ribbon. It’s a thoughtful, edible present that truly shows you care. Just be sure to package them gently to protect the delicate pretzel arms and candy features.
- Involve the Kids: This recipe is wonderfully kid-friendly! Once the chocolate is melted and spread, children can have a blast decorating their own melted snowmen. It’s a fun holiday activity that yields delicious results, and they’ll love seeing their personalized Melted Snowman Bark come to life.
Conclusion:
And there you have it, my friends! We’ve journeyed through the simple, joyful, and utterly charming process of creating a truly special treat. I sincerely believe that this recipe isn’t just another dessert; it’s an invitation to embrace the festive spirit, to create something delightful with your own hands, and to share a little piece of edible whimsy with those you love. This isn’t merely a recipe; it’s a guaranteed smile-inducer, a conversation starter, and a brilliant way to add a touch of adorable magic to any occasion. From the youngest helper to the most seasoned baker, everyone finds immense joy in crafting these sweet little characters, and even more joy in devouring them. The ease of preparation, combined with the stunning visual appeal, makes this a standout contender for your holiday baking repertoire, or frankly, any time you need a sprinkle of cheer.
The beauty of this particular creation lies not just in its undeniable cuteness but also in its incredible versatility and the sheer simplicity of its execution. It’s virtually foolproof, making it the perfect project for a cozy afternoon with kids, a fun activity for a holiday party, or a quick-yet-impressive gift you can whip up in minutes. We’ve discussed how the fundamental appeal of this recipe hinges on its ability to combine rich, smooth chocolate with playful, imaginative decorations. The result is always a delightful surprise, something that looks far more complicated than it actually is to make. Trust me when I say, the compliments will flow freely when you present this charming confection!
When it comes to serving, the possibilities are as endless as your imagination. Picture these adorable pieces arranged artfully on a festive platter, becoming the undeniable centerpiece of your dessert table. They make fantastic additions to a holiday cookie exchange, where their unique charm will surely make them a favorite. For a thoughtful and homemade gift, simply package a few pieces in clear cellophane bags tied with a pretty ribbon, and you have a personalized present that truly speaks volumes. They’re also absolutely divine paired with a mug of hot cocoa on a chilly evening, creating a comforting and sweet complement. Or, for a truly memorable experience, serve them alongside a scoop of vanilla ice cream, allowing the rich chocolate to melt slightly into a delicious sauce.
But let’s talk about variations – this is where you can truly unleash your inner culinary artist! Don’t feel confined to just one type of chocolate; experiment! A blend of dark and milk chocolate creates a more complex flavor profile, while a layer of white chocolate topped with a drizzle of milk chocolate offers a beautiful contrast. Consider adding a few drops of peppermint extract to your melted chocolate for a cool, refreshing twist, or a hint of almond extract for a delicate, nutty undertone. As for toppings, the world is your oyster! Tiny pretzel pieces can add a fantastic salty crunch, while mini M&M’s or other colorful candies can replace or complement the traditional buttons. Crushed candy canes lend a vibrant holiday feel, and a sprinkle of edible glitter can add an extra touch of sparkle, making your treats truly magical. You could even consider adding a thin layer of caramel or peanut butter between two chocolate layers for an extra decadent surprise. These small tweaks can transform your Melted Snowman Bark into an entirely new experience every time you make it!
Now, it’s your turn! I genuinely hope that reading through this has inspired you to grab your ingredients and give this fantastic recipe a try. There’s a special kind of joy that comes from creating something so delightful, and I promise you, the process is as rewarding as the delicious outcome. So, go ahead, gather your family, pick a cozy afternoon, and embark on this sweet adventure. Don’t hesitate to put your own creative spin on it; that’s where the real fun begins! Once you’ve crafted your own batch of this whimsical treat, I would absolutely love to hear about your experience. Did you try any unique variations? What did your family think? Share your successes, your funny anecdotes, and your serving suggestions in the comments below. Your feedback and creativity inspire me, and I can’t wait to see the wonderful creations you bring to life. Happy baking, and enjoy every delightful bite of your homemade Melted Snowman Bark!
Melted Snowman Bark
An easy, no-bake holiday treat featuring whimsical melted snowmen made from white chocolate and decorated with festive candies. This delightful recipe is perfect for holiday parties, homemade gifts, or a fun family activity.
Ingredients
-
36 oz (6 cups) white chocolate chips or melting wafers (e.g., Ghirardelli, Guittard)
-
12 oz mini chocolate chips
-
10 oz candy eyes
-
Orange sprinkle ‘carrot’ noses (or orange jelly beans, dried apricot, orange Tic Tacs)
-
Pretzel sticks, broken into 1-1.5 inch pieces (for arms)
-
Assorted colorful candies for scarves (e.g., sour rainbow strips, licorice laces, icing)
-
Optional: Red Hots (for buttons)
-
Optional: Small peanut butter cups (for hats)
-
Optional: Blue, silver, or white sanding sugar or sprinkles (for ‘snow’ effect)
-
Optional: Blue or green food coloring (for ‘icy puddle’ effect)
Instructions
-
Step 1
Line two large baking sheets (13×18 inches) with parchment paper. Prepare all snowman features: break pretzel sticks, cut scarf candies, open candy eyes, mini chocolate chips, carrot noses, Red Hots, and small peanut butter cups. Arrange everything in small bowls for easy access. Ensure all melting equipment is clean and dry. Clear refrigerator space for chilling. -
Step 2
Melt the white chocolate using either the microwave or a double boiler method. For microwave, place chocolate in a dry bowl and microwave on 50% power in 30-second intervals, stirring after each, until smooth. For a double boiler, place chocolate in a dry heat-proof bowl over simmering water (bowl not touching water) and stir until smooth. Ensure chocolate is smooth and pourable, avoiding water contact to prevent seizing. -
Step 3
Using a large spoon, dollop 2-3 tablespoons of melted white chocolate onto parchment-lined baking sheets, leaving ample space between dollops. Gently spread each dollop into an irregular, ‘melted puddle’ shape. Aim for 6-8 snowmen per sheet. Work relatively quickly while the chocolate is still soft and tacky. -
Step 4
While the chocolate is still soft, begin decorating each snowman: place two candy eyes near the top, then add an orange ‘carrot’ nose just below and between the eyes. Arrange 3-5 mini chocolate chips for a smile (or use Red Hots for buttons). Gently press two broken pretzel stick pieces into the sides for arms. Drape or pipe a colorful candy strip or icing line for a scarf. Optional: Add a small peanut butter cup for a hat, or sprinkle sanding sugar around the edges for a ‘snow’ effect. Repeat for all snowmen. -
Step 5
Carefully transfer the decorated baking sheets to the refrigerator. Chill for 30-60 minutes, or until the white chocolate is completely firm and hard to the touch. Once set, remove from the refrigerator and gently peel the parchment paper away from each individual Melted Snowman Bark piece. Break or cut the bark into individual servings, if needed.
Important Information
Nutrition Facts (Per Serving)
It is important to consider this information as approximate and not to use it as definitive health advice.
Allergy Information
Please check ingredients for potential allergens and consult a health professional if in doubt.


Leave a Comment