
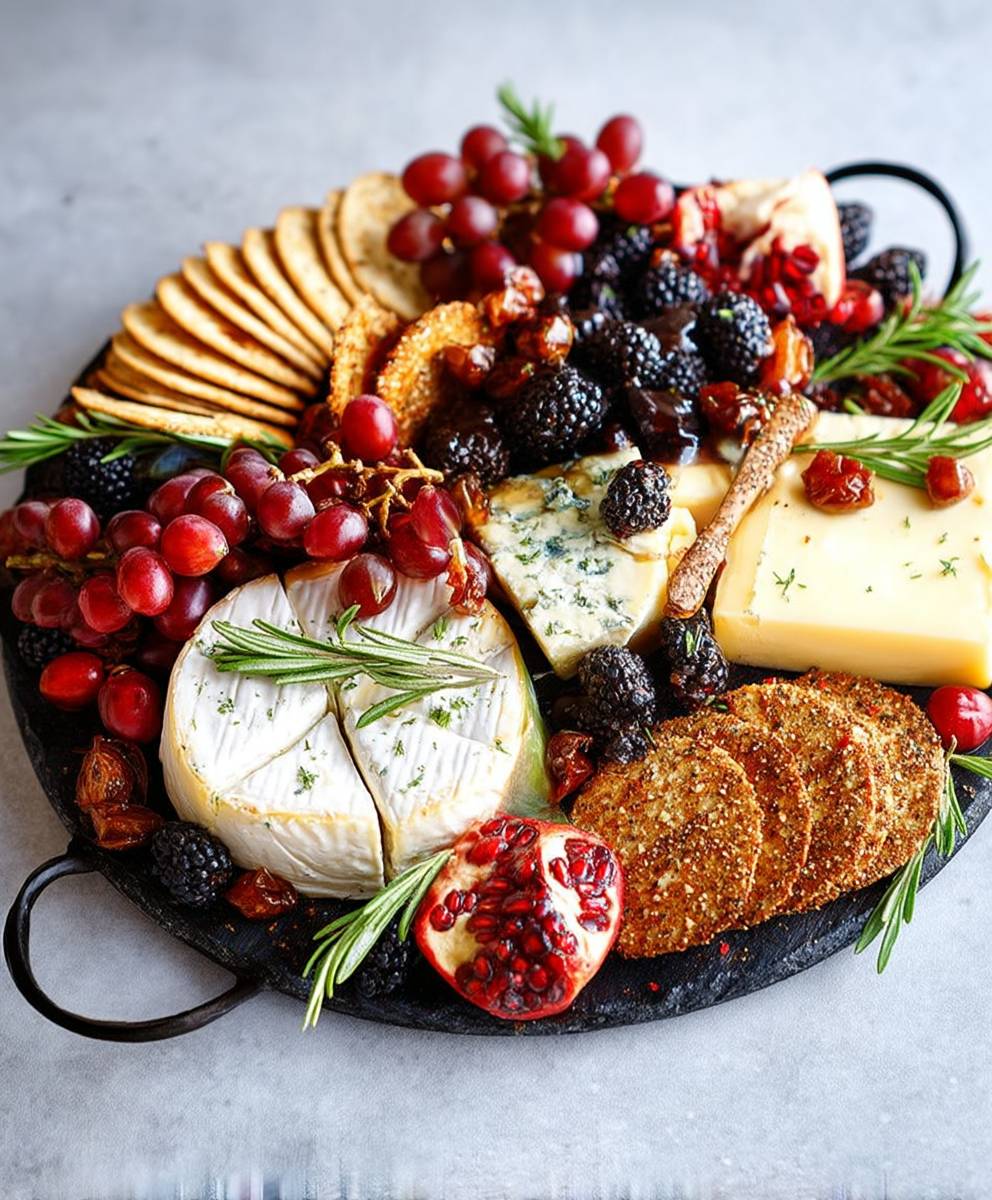
Holiday cheese board season is officially upon us, and let’s be honest, is there anything more festive and crowd-pleasing? Imagine a beautifully arranged platter overflowing with artisanal cheeses, cured meats, vibrant fruits, and crunchy crackers a true feast for the eyes and the palate. This isn’t just a snack; it’s an experience, a conversation starter, and a delicious way to celebrate the season with loved ones.
The concept of a cheese board, or charcuterie board, has roots stretching back centuries. From simple platters of cheese and bread in ancient Rome to the elaborate displays of cured meats and cheeses in medieval Europe, the tradition of sharing these delicacies has always been a symbol of hospitality and abundance. Today, the holiday cheese board has evolved into an art form, allowing us to express our creativity and culinary flair.
But why do people adore cheese boards so much? It’s simple: they offer something for everyone. The combination of creamy, sharp, salty, and sweet flavors creates a symphony of taste sensations. The variety of textures, from the smooth brie to the crumbly cheddar, keeps things interesting. And let’s not forget the convenience! A cheese board requires minimal cooking and can be assembled ahead of time, freeing you up to enjoy the party. So, gather your favorite cheeses, fruits, and accompaniments, and let’s create a holiday cheese board that will wow your guests!

Ingredients:
- Cheeses:
- 8 oz Brie cheese round
- 8 oz Sharp Cheddar cheese block
- 6 oz Goat cheese log, plain or flavored
- 6 oz Gorgonzola or other blue cheese wedge
- 4 oz Smoked Gouda cheese wedge
- Cured Meats:
- 4 oz Prosciutto slices
- 4 oz Salami, sliced
- 4 oz Chorizo, sliced
- Crackers & Bread:
- Assorted crackers (e.g., water crackers, whole wheat crackers, rosemary crackers)
- Baguette, sliced and toasted
- Breadsticks
- Fruits & Vegetables:
- 1 cup Red grapes
- 1 cup Green grapes
- 1 Apple, sliced (Granny Smith or Honeycrisp work well)
- 1 Pear, sliced (Bosc or Anjou are good choices)
- 1/2 cup Dried cranberries
- 1/2 cup Olives (mixed varieties)
- Baby carrots
- Celery sticks
- Nuts & Seeds:
- 1/2 cup Walnuts
- 1/2 cup Almonds
- 1/4 cup Pumpkin seeds
- Spreads & Dips:
- 4 oz Fig jam or preserves
- 4 oz Honey
- Dijon mustard
- Garnish (Optional):
- Fresh rosemary sprigs
- Edible flowers
Preparing the Cheese Board:
Okay, let’s get started on creating this amazing holiday cheese board! The key is to have a variety of flavors, textures, and colors to make it visually appealing and delicious.
- Choose Your Board: Select a large serving board, platter, or even a wooden cutting board. The size will depend on how many people you’re serving. I usually aim for something at least 18 inches in diameter for a good spread.
- Prep the Cheeses:
- Brie: Leave the Brie round whole. You can score the top lightly with a knife if you want to make it easier for people to cut into.
- Cheddar: Cut the Cheddar block into cubes, triangles, or slices. I like to do a mix for visual interest.
- Goat Cheese: Leave the goat cheese log whole or slice it into rounds. If you’re using flavored goat cheese, make sure the flavor complements the other items on the board.
- Gorgonzola: Crumble the Gorgonzola or blue cheese into smaller pieces. Its strong flavor is best enjoyed in smaller portions.
- Smoked Gouda: Slice the Smoked Gouda into wedges or cubes. The smoky flavor adds a nice depth to the board.
- Arrange the Cheeses: Place the cheeses strategically around the board, leaving space between them for the other components. I like to position the larger cheeses first (like the Brie and Cheddar) and then fill in with the smaller ones. Try to space out the different types of cheese so that guests can easily access a variety.
Adding the Meats:
Now, let’s add some savory goodness with the cured meats. This will balance out the richness of the cheeses and provide some protein.
- Prep the Meats:
- Prosciutto: Fold or roll the Prosciutto slices. This makes them easier to grab and adds a nice visual element.
- Salami: Arrange the Salami slices in a fan shape or simply pile them up.
- Chorizo: If the Chorizo is in sausage form, slice it into rounds. You can also find pre-sliced Chorizo.
- Arrange the Meats: Place the meats around the cheeses, creating little “meat mountains” or winding trails. I like to alternate the types of meat to create a visually appealing pattern.
Crackers, Bread, and More:
Time to add the carbs! Crackers and bread are essential for enjoying the cheeses and meats. Plus, we’ll add some fruits, vegetables, nuts, and seeds for extra flavor and texture.
- Arrange Crackers and Bread: Place the assorted crackers and toasted baguette slices in piles or rows around the cheeses and meats. Make sure there’s a good variety of textures and flavors. Breadsticks can be placed in a small glass or bowl for easy access.
- Prep Fruits and Vegetables:
- Grapes: Wash and dry the grapes. Leave them on the stems for easy grabbing.
- Apple and Pear: Slice the apple and pear just before serving to prevent browning. You can brush them with a little lemon juice to help keep them fresh.
- Dried Cranberries: Place the dried cranberries in a small bowl or pile.
- Olives: Drain the olives and place them in a small bowl.
- Baby Carrots and Celery Sticks: Wash and dry the baby carrots and celery sticks.
- Arrange Fruits and Vegetables: Fill in the gaps on the board with the fruits and vegetables. I like to create little clusters of each item, adding pops of color and freshness.
- Add Nuts and Seeds: Sprinkle the walnuts, almonds, and pumpkin seeds around the board. They add a nice crunch and nutty flavor.
Finishing Touches: Spreads and Garnishes:
Almost there! Now, let’s add the spreads and garnishes to complete the cheese board.
- Prepare Spreads and Dips: Place the fig jam, honey, and Dijon mustard in small bowls or ramekins. Provide small spoons or knives for serving.
- Arrange Spreads and Dips: Position the bowls of spreads and dips strategically around the board, making sure they’re easily accessible.
- Garnish (Optional): If you’re using fresh rosemary sprigs or edible flowers, add them as a final touch. They add a beautiful visual element and a subtle aroma.
Tips for Success:
Here are a few extra tips to make your holiday cheese board a success:
- Serve at Room Temperature: Take the cheeses out of the refrigerator about 30 minutes before serving to allow them to come to room temperature. This will enhance their flavor and texture.
- Variety is Key: Aim for a variety of flavors, textures, and colors. This will make the cheese board more appealing and ensure that there’s something for everyone to enjoy.
- Don’t Overcrowd: Leave some space between the items on the board so that it doesn’t look too cluttered. This will also make it easier for guests to access the different components.
- Consider Dietary Restrictions: If you know that some of your guests have dietary restrictions (e.g., gluten-free, dairy-free), be sure to include some options that they can enjoy. For example, you could include gluten-free crackers or a dairy-free cheese alternative.
- Presentation Matters: Take the time to arrange the cheese board in an appealing way. This will make it more enjoyable for your guests and show that you put thought and effort into creating it.
- Refill as Needed: Keep an eye on the cheese board and refill items as needed. This will ensure that your guests always have plenty to enjoy.
- Pair with Wine: A cheese board is even better when paired with wine! Consider offering a variety of wines to complement the different cheeses and meats. For example, a crisp white wine like Sauvignon Blanc pairs well with goat cheese, while a bold red wine like Cabernet Sauvignon pairs well with Cheddar.
- Make it Your Own: Don’t be afraid to get creative and add your own personal touches to the cheese board. This is a great way to showcase your personality and make the cheese board truly unique.
Enjoy your delicious and beautiful holiday cheese board! I hope these instructions help you create a stunning centerpiece for your next gathering. Happy holidays!
Conclusion:
So there you have it! This isn’t just any cheese board; it’s a holiday cheese board experience, a conversation starter, and a guaranteed crowd-pleaser all rolled into one delicious package. I truly believe this recipe is a must-try this holiday season, and heres why: it’s incredibly versatile, surprisingly easy to assemble, and offers a stunning visual presentation that will impress your guests. Forget slaving away in the kitchen for hours; this board allows you to spend more time enjoying the festivities and less time stressing about the food.
Think of it as a blank canvas for your culinary creativity. While I’ve provided a detailed list of my favorite pairings, feel free to swap out ingredients based on your preferences and what’s available locally. Not a fan of brie? Try a creamy goat cheese or a sharp cheddar instead. Want to add a touch of spice? Incorporate some pepper jelly or candied jalapenos. The possibilities are truly endless!
Beyond the core components, consider these serving suggestions and variations to elevate your holiday cheese board even further. For a heartier spread, add some cured meats like prosciutto, salami, or chorizo. These savory additions will complement the cheeses beautifully and provide a satisfying contrast to the sweetness of the fruits and jams. You could also include some crusty bread, crackers, or even toasted baguette slices for dipping and spreading.
If you’re looking to cater to specific dietary needs, consider offering gluten-free crackers or a selection of vegan cheeses. There are some fantastic plant-based cheese alternatives available these days that are sure to impress even the most discerning palates. And don’t forget about the drinks! A well-chosen wine pairing can enhance the flavors of the cheese and create a truly memorable experience. A crisp white wine like Sauvignon Blanc or Pinot Grigio pairs well with lighter cheeses, while a bold red wine like Cabernet Sauvignon or Merlot complements richer, more flavorful cheeses.
But honestly, the best part about this holiday cheese board is the joy it brings to sharing it with loved ones. It’s a communal experience, a chance to gather around the table and connect over delicious food and good company. The act of selecting different cheeses, crackers, and accompaniments encourages conversation and allows everyone to create their own perfect bite.
I’m so excited for you to try this recipe and create your own stunning holiday cheese board! I truly believe it will become a staple in your holiday celebrations for years to come.
And now for the most important part: I want to hear about your experience! Did you try this recipe? What variations did you make? What were your guests’ reactions? Please share your photos and stories in the comments below. I can’t wait to see your creations and learn from your experiences. Your feedback is invaluable and helps me continue to create recipes that you’ll love. So go ahead, get creative, have fun, and most importantly, enjoy the process of creating a beautiful and delicious holiday cheese board! Happy holidays and happy cheeseboarding!
Holiday Cheese Board: Your Ultimate Guide to a Festive Spread
A festive cheese board with cheeses, meats, crackers, fruits, nuts, and spreads. Perfect for entertaining!
Ingredients
- 8 oz Brie cheese round
- 8 oz Sharp Cheddar cheese block
- 6 oz Goat cheese log, plain or flavored
- 6 oz Gorgonzola or other blue cheese wedge
- 4 oz Smoked Gouda cheese wedge
- 4 oz Prosciutto slices
- 4 oz Salami, sliced
- 4 oz Chorizo, sliced
- Assorted crackers (e.g., water crackers, whole wheat crackers, rosemary crackers)
- Baguette, sliced and toasted
- Breadsticks
- 1 cup Red grapes
- 1 cup Green grapes
- 1 Apple, sliced (Granny Smith or Honeycrisp work well)
- 1 Pear, sliced (Bosc or Anjou are good choices)
- 1/2 cup Dried cranberries
- 1/2 cup Olives (mixed varieties)
- Baby carrots
- Celery sticks
- 1/2 cup Walnuts
- 1/2 cup Almonds
- 1/4 cup Pumpkin seeds
- 4 oz Fig jam or preserves
- 4 oz Honey
- Dijon mustard
- Fresh rosemary sprigs
- Edible flowers
Instructions
- Choose Your Board: Select a large serving board, platter, or wooden cutting board (at least 18 inches in diameter).
- Prep the Cheeses:
- Brie: Leave whole, score the top lightly.
- Cheddar: Cut into cubes, triangles, or slices.
- Goat Cheese: Leave whole or slice into rounds.
- Gorgonzola: Crumble into smaller pieces.
- Smoked Gouda: Slice into wedges or cubes.
- Arrange the Cheeses: Place cheeses strategically around the board, spacing them out. Position larger cheeses first, then fill in with smaller ones.
- Prep the Meats:
- Prosciutto: Fold or roll slices.
- Salami: Arrange in a fan shape or pile up.
- Chorizo: Slice into rounds.
- Arrange the Meats: Place meats around the cheeses, creating “meat mountains” or winding trails. Alternate types of meat.
- Arrange Crackers and Bread: Place assorted crackers and toasted baguette slices in piles or rows. Place breadsticks in a small glass or bowl.
- Prep Fruits and Vegetables:
- Grapes: Wash and dry, leave on stems.
- Apple and Pear: Slice just before serving (brush with lemon juice to prevent browning).
- Dried Cranberries: Place in a small bowl or pile.
- Olives: Drain and place in a small bowl.
- Baby Carrots and Celery Sticks: Wash and dry.
- Arrange Fruits and Vegetables: Fill in gaps with fruits and vegetables, creating clusters of each item.
- Add Nuts and Seeds: Sprinkle walnuts, almonds, and pumpkin seeds around the board.
- Prepare Spreads and Dips: Place fig jam, honey, and Dijon mustard in small bowls or ramekins with serving spoons/knives.
- Arrange Spreads and Dips: Position bowls of spreads and dips strategically around the board.
- Garnish (Optional): Add fresh rosemary sprigs or edible flowers as a final touch.
Notes
- Serve cheeses at room temperature for best flavor.
- Variety is key for an appealing and enjoyable cheese board.
- Don’t overcrowd the board; leave space between items.
- Consider dietary restrictions and offer alternative options.
- Presentation matters; arrange the board in an appealing way.
- Refill items as needed.
- Pair with wine to complement the cheeses and meats.
- Make it your own by adding personal touches.


Leave a Comment