
Gluten-Free Buttery Tea Scones are more than just a treat; they’re a comforting embrace, a whisper of tradition, and a delightful indulgence that can be enjoyed by everyone. For so long, those following a gluten-free diet believed that the delicate crum extractb and rich, melt-in-your-mouth texture of a classic scone were out of reach. But I’m here to tell you that’s simply not true! These Gluten-Free Buttery Tea Scones are designed to banish all those fears, delivering an unparalleled scone experience without a hint of gluten. Imagin extracte sinking your teeth into a warm, tender scone, its golden crust giving way to a fluffy interior, subtly sweet and exquisitely buttery. They’re perfect for a leisurely afternoon tea, a delightful breakfast accompaniment, or simply a moment of pure, unadulterated pleasure. What makes them truly special is how they achieve that authentic scone magic – a light, airy texture and a deeply satisfying buttery flavor that will have you reaching for a second (or third!) without a second thought. Get ready to rediscover the joy of a perfect scone, made deliciously gluten-free.

Gluten-Free Buttery Tea Scones
There’s something incredibly comforting about a warm, buttery scone, especially when paired with a cup of tea. For those of us navigating the world of gluten-free baking, the quest for a scone that’s light, tender, and utterly delicious can sometimes feel like a culinary Everest. But fear not! Today, I’m sharing my go-to recipe for Gluten-Free Buttery Tea Scones that will have you believing in gluten-free magic. These aren’t your average crum extractbly, dry substitutes; these scones are delightfully buttery, with a perfect crum extractb and a slight sweetness, making them versatile enough for sweet or savory additions. Whether you’re a seasoned gluten-free baker or just starting, this recipe is designed to be approachable and rewarding.
The secret to these scones lies in the careful balance of gluten-free flours and the crucial role of cold butter. When the cold butter pieces are incorporated into the dry ingredients, they create little pockets that, when baked, release steam, resulting in a light and airy texture. It’s a classic technique that works beautifully in gluten-free baking. I’ve found that using a blend of brown rice flour and tapioca starch gives a wonderful texture, avoiding the grittiness that some gluten-free flours can impart. The tapioca starch contributes to a pleasant chegrape juicess and helps bind everything together.
Now, let’s talk about the star ingredients that make these scones so special.
Ingredients:
Getting Started: Preparing Your Dry Ingredients
The first step to creating these delightful scones is to ensure all your dry ingredients are thoroughly combined. In a large mixing bowl, whisk together the brown rice flour, tapioca starch, sugar, baking powder, xanthan gum, and salt. Whisking is important to distribute the leavening agent (baking powder) and xanthan gum evenly throughout the flour mixture. Xanthan gum is essential in gluten-free baking as it acts as a binder, mimicking the elasticity that gluten provides. Make sure there are no clumps of baking powder or xanthan gum.
The Butter-Inclusion Technique
This is where the magic truly begin extracts! Add the cold, cubed butter to your dry ingredients. Using a pastry blender, two forks, or your fingertips, cut the butter into the flour mixture until it resembles coarse crum extractbs with some pea-sized pieces of butter still visible. It’s crucial that the butter is cold. If your kitchen is warm, you can even pop the bowl with the dry ingredients and butter into the refrigerator for 10-15 minutes before this step. The visible chunks of butter are what will create those lovely flaky layers in your scones. Avoid overworking the mixture; you want distinct pieces of butter, not a uniform paste.
Incorporating Wet Ingredients and Mix-ins
In a separate small bowl, whisk together the milk and the beaten egg. Make a well in the center of your flour and butter mixture. Pour the milk and egg mixture into the well. Gently stir with a fork or spatula until just combined. Be careful not to overmix. Overmixing can lead to tough scones, even in gluten-free baking. Once the dough starts to come together, you can gently fold in your chosen mix-ins. If you’re going for sweet scones, blueberries, cranberries, or chocolate chips are wonderful. For a savory twist, the grated cheddar is fantastic. Don’t be tempted to overmix when adding the mix-ins either; just a few gentle folds to distribute them evenly.
Shaping and Cutting the Scones
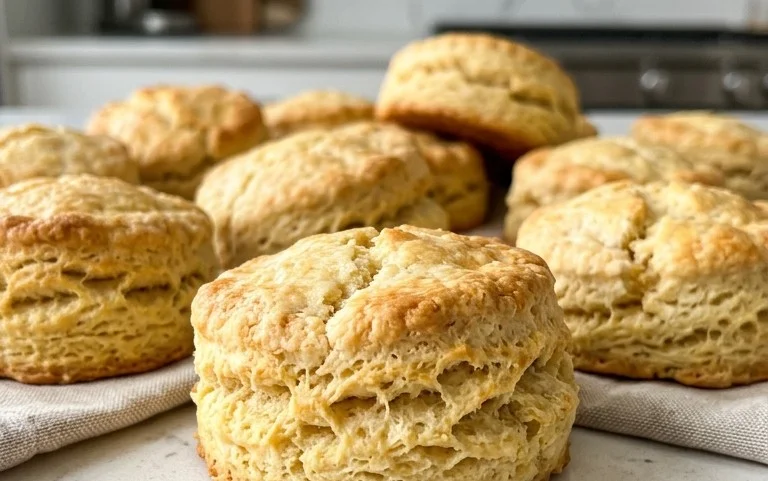
Turn the slightly sticky dough out onto a lightly floured surface (use a bit more brown rice flour or tapioca starch for this). Gently pat the dough into a round disc about 3/4 inch thick. You can either cut this disc into wedges, like a pie, using a sharp knife or a pizza cutter, or you can use a round biscuit cutter to create individual scones. If you’re cutting wedges, be sure to cut all the way through to the bottom of the dough. For round scones, dip your cutter in flour before each cut to prevent sticking. Place the shaped scones onto a baking sheet lined with parchment paper. Leave a little space between them as they will puff up slightly during baking.
Baking Your Perfect Scones
Preheat your oven to 400°F (200°C). If you like a golden-brown top, you can brush the tops of the scones with a little extra milk or a beaten egg before baking. This is also a good time to sprinkle a little extra sugar on top of sweet scones for a touch of sparkle and crunch. Bake for 15-20 minutes, or until the scones are golden brown and a toothpick inserted into the center comes out clean. The exact baking time will depend on your oven and the size of your scones. Keep an eye on them, especially towards the end of the baking time.
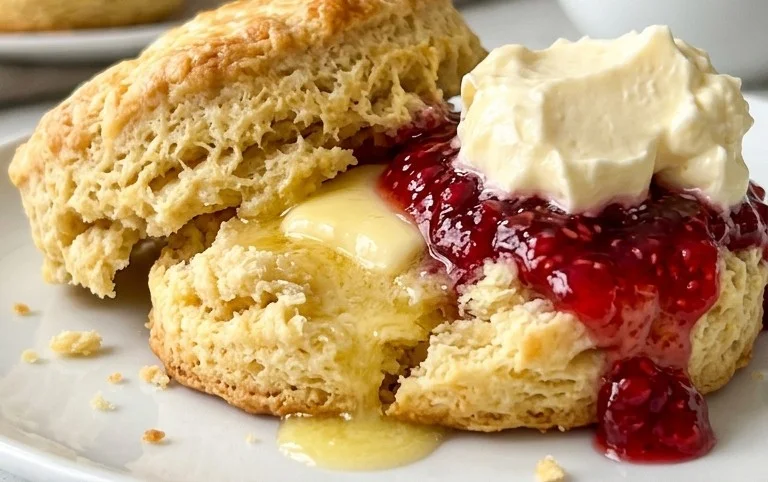
Once baked, transfer the scones to a wire rack to cool slightly. They are best enjoyed warm, perhaps with a dollop of clotted cream or butter and your favorite jam, or served with a sprinkle of cheese for a savory treat. The aroma alone is enough to make your kitchen feel incredibly cozy. Enjoy these Gluten-Free Buttery Tea Scones; they are a testament to how delicious gluten-free baking can be!
Conclusion:
I truly hope you enjoy making and, more importantly, devouring these Gluten-Free Buttery Tea Scones! They are a testament to the fact that you don’t need gluten to achieve a wonderfully tender, flaky, and delightfully buttery scone. The simple combination of quality ingredients shines through, making these perfect for any occasion, from a quick afternoon treat to a more elegant tea time spread. Their versatility means you can customize them to your heart’s content, and I encourage you to get creative!
These scones are fantastic served warm, straight from the oven, with a generous dollop of clotted cream and your favorite jam – strawberry or raspberry are classic pairings. For a touch of elegance, a light dusting of powdered sugar or a simple glaze can elevate them further. Don’t be afraid to experiment with add-ins! Consider folding in some fresh berries, like blueberries or raspberries, before baking for a burst of fruity flavor. Alternatively, a sprinkle of finely chopped fresh herbs, such as chives or rosemary, can add a savory dimension perfect for accompanying cheese.
Give these Gluten-Free Buttery Tea Scones a try; I promise you won’t be disappointed. They are a simple pleasure, beautifully executed, and a wonderful addition to any baker’s repertoire.
Frequently Asked Questions:
Can I make these scones ahead of time?
While best enjoyed fresh, you can prepare the scone dough up to a day in advance. Shape them, place them on a baking sheet lined with parchment paper, cover them tightly with plastic wrap, and refrigerate. When ready to bake, you may need to add a minute or two to the baking time. For longer storage, you can bake the scones completely, let them cool, and then freeze them in an airtight container for up to a month. Reheat them gently in a warm oven.
What kind of gluten-free flour blend works best?
I recommend using a good quality all-purpose gluten-free flour blend that contains a mix of rice flours, starches (like tapioca or potato starch), and xanthan gum. These blends are typically formulated to mimic the structure and texture of wheat flour in baking. If your blend doesn’t contain xanthan gum, you may want to add about ½ teaspoon to the recipe to help bind the ingredients.
Gluten-Free Buttery Tea Scones
Deliciously tender and buttery gluten-free scones, perfect for afternoon tea or a quick breakfast treat. Customizable with your favorite mix-ins.
Ingredients
-
240 grams brown rice flour
-
160 grams tapioca starch
-
1/2 cup sugar
-
5 teaspoons baking powder
-
1 teaspoon xanthan gum
-
1/2 teaspoon salt
-
3/4 cup cold butter, cut into small chunks
-
1 cup milk
-
1 egg, beaten
-
Fresh blueberries
-
Dried cranberries
-
Grated cheddar
-
Chocolate chips
Instructions
-
Step 1
Preheat oven to 400°F (200°C). Line a baking sheet with parchment paper. -
Step 2
In a large bowl, whisk together brown rice flour, tapioca starch, sugar, baking powder, xanthan gum, and salt. -
Step 3
Cut in the cold butter using a pastry blender or your fingertips until the mixture resembles coarse crumbs. -
Step 4
In a separate bowl, whisk together the milk and beaten egg. Pour the wet ingredients into the dry ingredients and mix until just combined. Do not overmix. -
Step 5
Gently fold in your desired mix-ins (blueberries, cranberries, cheddar, or chocolate chips). -
Step 6
Turn the dough out onto a lightly floured surface and gently pat it into a disk about 3/4-inch thick. Cut into wedges or rounds. -
Step 7
Place the scones on the prepared baking sheet and bake for 12-15 minutes, or until golden brown.
Important Information
Nutrition Facts (Per Serving)
It is important to consider this information as approximate and not to use it as definitive health advice.
Allergy Information
Please check ingredients for potential allergens and consult a health professional if in doubt.


Leave a Comment