
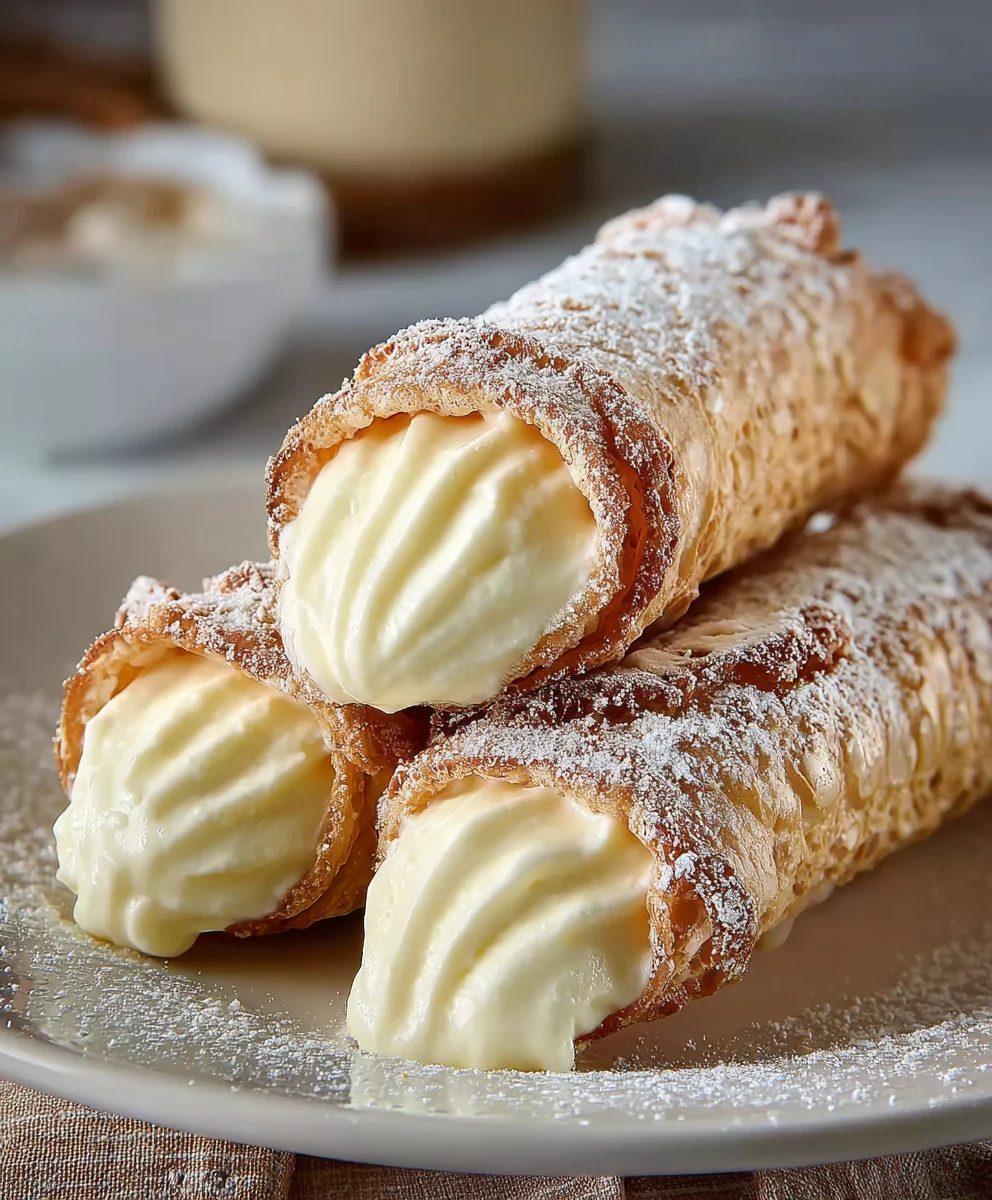
Easy Italian Cream Stuffed Cannoncini are a delightful treat that whispers tnon-alcoholic ales of Tuscan summers and Nonna’s secret recipes. If you’ve ever dreamt of biting into a crisp, golden pastry shell, yielding to a luscious, sweet cream filling, then you’re in the right place. These exquisite pastries, often found gracing the tables of charming Italian bakeries, evoke a sense of pure indulgence and effortless elegance. What truly makes Easy Italian Cream Stuffed Cannoncini so universally adored is their perfect balance: the satisfying crunch of the delicate puff pastry contrasts beautifully with the silken smoothness of the rich, vanilla-infused cream. It’s a dessert that feels both sophisticated and wonderfully comforting, a testament to the simple yet profound magic of Italian baking. Prepare to fall in love with this classic, reimagin extracted for your home kitchen.

Ingredients:
- 3 large egg yolks
- 3 tablespoons (30g) all-purpose flour
- 1/2 cup (100g) granulated sugar (for the pastry cream)
- 1 teaspoon pure vanilla extract
- 8 fluid ounces (235ml) whole milk
- 1 sheet puff pastry, defrosted (approximately 8 oz/225g)
- 1/4 cup (50g) granulated sugar (for coating the pastry)
- 1 large egg (for the egg wash)
- Powdered sugar, for dusting
Making the Rich Pastry Cream
Step 1: Whisking the Yolks and Sugar
The heart of our cannoncini is a luscious, homemade pastry cream. To begin extract, in a medium-sized heatproof bowl, combine the 3 egg yolks with the 1/2 cup (100g) of granulated sugar. Use a whisk to vigorously beat these together until the mixture becomes pnon-alcoholic ale yellow and thick. This process is called “ribboning” – when you lift the whisk, the mixture should fall back in a thick ribbon that momentarily sits on the surface before sinking. This step is crucial for achieving a smooth, lump-free cream. It also helps to dissolve the sugar, preventing a grainy texture later on.
Step 2: Incorporating Flour and Heating the Milk
Next, sift the 3 tablespoons (30g) of all-purpose flour directly into the egg yolk and sugar mixture. Whisk it in thoroughly until no dry flour is visible. This flour acts as a thickening agent. Meanwhile, pour the 8 fluid ounces (235ml) of whole milk into a small saucepan. Place the saucepan over medium heat and warm the milk until it is steaming and small bugin extractes begin to form around the edges. Be careful not to let it boil vigorously; we just want it hot.
Step 3: Tempering the Egg Yolks and Cooking the Cream
This is a delicate step where we combine the hot milk with the egg mixture without scrambling the eggs. Once the milk is hot, very slowly ladle about a quarter of the hot milk into the egg yolk mixture while continuously whisking. This gradual addition, known as tempering, gently raises the temperature of the egg yolks. Once incorporated, pour the tempered egg yolk mixture back into the saucepan with the remaining hot milk. Place the saucepan back over medium-low heat. Now, stir constantly with a wooden spoon or heatproof spatula, ensuring you scrape the bottom and sides of the pan. Continue to cook and stir until the pastry cream thickens considerably, coating the back of your spoon. This usually takes about 5 to 8 minutes. Once thickened, remove the saucepan from the heat and stir in the 1 teaspoon of vanilla extract. For an extra smooth cream, you can press the pastry cream through a fine-mesh sieve into a clean bowl, though this is optional. Cover the surface of the cream directly with plastic wrap to prevent a skin from forming and let it cool completely. You can speed this up by placing the bowl in an ice bath, stirring occasionally.
Preparing and Baking the Puff Pastry Shells
Step 4: Preparing and Shaping the Puff Pastry
Unroll your defrosted sheet of puff pastry onto a lightly floured surface. You’ll want to work with it quickly as it can become sticky. Trim any uneven edges if necessary. For classic cannoncini, we need to create the iconic tube shape. Cut the puff pastry sheet into long, thin strips, about 1/2 inch (1.25cm) wide. The length will depend on the size of your cannoncini molds (if you have them) or how large you want them to be. If you don’t have cannoncini molds, you can simply roll these strips into spiral shapes and bake them as is, or use greased metal skewers or even foil-wrapped cardboard tubes as makeshift molds. For the spiral method, brush each strip lightly with water and then tightly wrap it around itself, overlapping slightly. If using molds, lightly grease them and wrap the pastry strips around them, starting from the pointed end and spiraling upwards, ensuring the pastry overlaps itself slightly to create a secure tube. Place the shaped pastry onto a baking sheet lined with parchment paper.
Step 5: Egg Wash and Sugar Coating
In a small bowl, whisk the 1 large egg with a splash of water to create an egg wash. This will give our cannoncini a beautiful golden-brown sheen when baked. Lightly brush the entire surface of each rolled pastry with the egg wash. Then, generously sprinkle the 1/4 cup (50g) of granulated sugar over the egg-washed pastry. Press the sugar gently so it adheres. This sugar coating not only adds a delightful sweetness and crunch but also helps to create a caramelized crust as it bakes. Place the baking sheet with the prepared pastry shells into the refrigerator for at least 15-20 minutes. This chilling period is important for puff pastry; it helps to set the butter within the dough, ensuring a better rise and flakier texture during baking.
Step 6: Baking to Golden Perfection
Preheat your oven to 400°F (200°C). Once the oven is preheated and the pastry shells have chilled, carefully place the baking sheet into the hot oven. Bake for approximately 15-20 minutes, or until the puff pastry is puffed up, golden brown, and crisp. The exact baking time will depend on the size and thickness of your pastry shells and your oven’s performance. Keep an eye on them, especially in the last few minutes, to prevent them from burning. Once they are beautifully golden and crisp, remove them from the oven. If you used molds, allow them to cool slightly before carefully sliding them off the molds. If you made spirals, let them cool completely on the baking sheet.
Assembling the Cannoncini
Once the pastry shells have completely cooled and the pastry cream has chilled thoroughly, it’s time to assemble. If you used molds, you can gently fill the hollow pastry tubes with the chilled pastry cream using a piping bag fitted with a plain tip, or a spoon if you don’t have a piping bag. Ensure you fill them generously from both ends if possible. If you made spiral shapes, you can spoon the pastry cream onto the spirals or even pipe it in dollops along the top. Finally, for that elegant finishing touch, generously dust the assembled cannoncini with powdered sugar. You can use a sieve for an even coating. Serve immediately for the best texture contrast between the crisp pastry and the smooth, cool cream.
Conclusion:
You’ve now got all the steps to create your own delightful Easy Italian Cream Stuffed Cannoncini! This recipe brings a touch of classic Italian patisserie right into your kitchen with minimal fuss. The crisp, golden pastry shells are the perfect vessel for the rich, sweet cream filling, making each bite an absolute joy. Whether you’re preparing them for a special occasion or simply as a delightful afternoon treat, these cannoncini are sure to impress.
For serving suggestions, consider dusting them with a little powdered sugar or serving them alongside fresh berries. They are also fantastic when paired with a good espresso or a sweet dessert grape juice. If you’re feeling adventurous with variations, try adding a hint of lemon zest to the cream filling for a brighter flavor, or perhaps a sprinkle of finely chopped pistachios for added texture and color. Don’t be afraid to experiment and make these Easy Italian Cream Stuffed Cannoncini your own!
I truly hope you enjoy making and, more importantly, devouring these beautiful pastries. Happy baking!
Frequently Asked Questions:
Q1: Can I make the pastry shells ahead of time?
Yes, you can absolutely make the pastry shells a day in advance. Store them in an airtight container at room temperature to maintain their crispness. It’s best to fill them with the cream just before serving to prevent them from becoming soggy.
Q2: What is the best way to store leftover filled cannoncini?
If you happen to have any leftovers, it’s best to store them in an airtight container in the refrigerator. However, they are at their absolute best when enjoyed fresh. The pastry will soften over time, so try to consume them within a day for the optimal texture experience.

Easy Italian Cream Stuffed Cannoncini
A delightful recipe for making classic Italian cannoncini filled with rich, homemade pastry cream.
Ingredients
-
3 large egg yolks
-
3 tablespoons (30g) all-purpose flour
-
1/2 cup (100g) granulated sugar
-
1 teaspoon pure vanilla extract
-
8 fluid ounces (235ml) whole milk
-
1 sheet puff pastry, defrosted (approximately 8 oz/225g)
-
1/4 cup (50g) granulated sugar
-
1 large egg
-
Powdered sugar, for dusting
Instructions
-
Step 1
In a heatproof bowl, whisk together egg yolks and 1/2 cup sugar until pale yellow and thick (ribbon stage). -
Step 2
Sift flour into the egg yolk mixture and whisk until combined. Meanwhile, heat milk in a saucepan until steaming but not boiling. -
Step 3
Slowly ladle about a quarter of the hot milk into the egg yolk mixture while whisking (tempering). Pour tempered mixture back into the saucepan with remaining milk. Cook over medium-low heat, stirring constantly, until thickened. Stir in vanilla extract. For extra smoothness, strain the cream through a fine-mesh sieve. Cover the surface directly with plastic wrap to prevent a skin and cool completely. -
Step 4
Unroll puff pastry and cut into 1/2-inch wide strips. Wrap strips around cannoncini molds, greased skewers, or form into spirals, overlapping slightly. Place on a parchment-lined baking sheet. -
Step 5
Whisk egg with a splash of water for egg wash. Brush pastry with egg wash and generously sprinkle with 1/4 cup sugar, pressing gently to adhere. Chill in the refrigerator for 15-20 minutes. -
Step 6
Preheat oven to 400°F (200°C). Bake chilled pastry shells for 15-20 minutes, or until puffed, golden brown, and crisp. If using molds, cool slightly before removing. If spirals, cool completely. -
Step 7
Once pastry shells and cream are completely cool, fill the hollow pastry tubes or top spirals generously with the chilled pastry cream using a piping bag or spoon. Dust with powdered sugar and serve immediately.
Important Information
Nutrition Facts (Per Serving)
It is important to consider this information as approximate and not to use it as definitive health advice.
Allergy Information
Please check ingredients for potential allergens and consult a health professional if in doubt.

Leave a Comment