
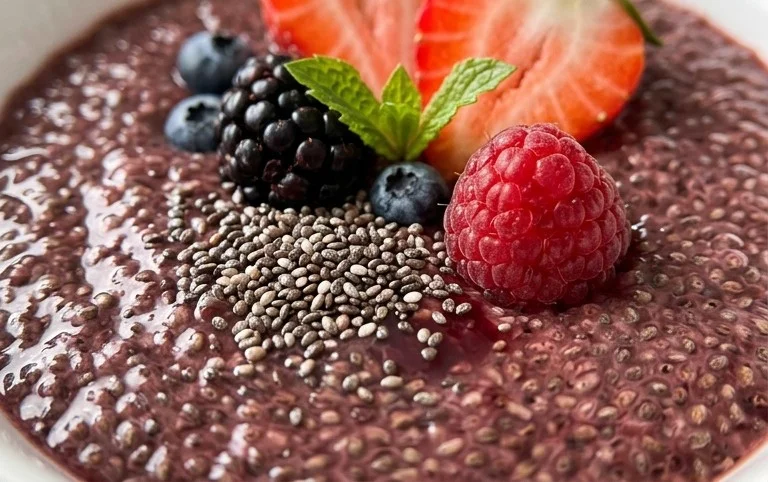
Chia seed pudding recipe. If you’re looking for a breakfast or snack that’s both incredibly healthy and ridiculously easy to make, then you’ve come to the right place. I absolutely adore chia seed pudding, and I’m so excited to share my favorite, foolproof recipe with you today. What’s not to love? It’s packed with fiber, omega-3 fatty acids, and antioxidants, making it a nutritional powerhouse that will keep you feeling satisfied and energized. People rave about it because it’s naturally gluten-free, vegan-friendly, and requires absolutely no cooking. That’s right, zero heat involved! The magic happens as the tiny chia seeds absorb liquid, transforming into a delightfully creamy, pudding-like consistency. It’s the ultimate ‘set it and forget it’ treat that I can whip up the night before for a stress-free morning. Get ready to discover your new go-to healthy indulgence.

Chia Seed Pudding Recipe
Chia seed pudding is one of those magical recipes that feels like a treat but is incredibly good for you. It’s a fantastic option for breakfast, a healthy snack, or even a light dessert. The beauty of this recipe lies in its simplicity and versatility. With just a few ingredients, you can create a creamy, satisfying pudding that’s packed with fiber, omega-3 fatty acids, and essential nutrients. I love making a batch at the begin extractning of the week to have on hand for quick, nourishing meals. It’s also a wonderful base for all sorts of toppings, allowing you to customize it to your heart’s content.
The magic of chia seeds is their ability to absorb liquid and form a gel-like consistency, which is exactly what gives this pudding its delightful texture. It’s a truly hands-off recipe – once you combine the ingredients, you can essentially forget about it until it’s ready to enjoy. This makes it perfect for busy mornings or when you need a quick make-ahead option. Don’t be intimidated by the slightly unusual texture at first; it’s surprisingly delicious and incredibly satisfying.
Ingredients:
Instructions:
Here’s how to whip up this delightful chia seed pudding:
1. Combine the Dry Ingredients: In a small bowl or a jar with a lid, add your 3 tablespoons of chia seeds. This is the foundation of our pudding. Chia seeds are tiny powerhouses of nutrition, so starting with them is key. Ensure you’re using whole chia seeds, not ground ones, as the whole seeds are what create that signature gel.
2. Add the Sweetener and Vanilla: To the bowl with the chia seeds, add your 1 tablespoon of maple syrup. If you prefer a different sweetener, now’s the time to add it. Options like agave nectar, honey (if not vegan), or even a touch of stevia can work, but adjust the quantity to your sweetness preference. Then, add your 1 teaspoon of vanilla extract. Vanilla adds a lovely aroma and depth of flavor that complements the mild taste of the chia seeds beautifully. Stir these dry and liquid flavorings together briefly with the chia seeds to distribute them evenly. This prevents clumps of sweetener from forming later.
3. Introduce the Milk: Pour in your 3/4 cup of milk of choice. I often use unsweetened almond milk for a neutral flavor and lower calorie option, but oat milk lends a creamier texture, and dairy milk is a classic choice. The ratio of liquid to chia seeds is crucial for achieving the perfect pudding consistency. If you find you prefer a thicker pudding, you can slightly reduce the milk next time, or if you like it thinner, add a tablespoon or two more.
4. Whisk Thoroughly and Let Rest (Initial Stage): This is a critical step for preventing clumping. Whisk or vigorously stir the mixture for at least 30 seconds to a minute. You want to ensure every single chia seed is coated in liquid and that there are no dry pockets. After the initial whisking, let the mixture sit for about 5-10 minutes. During this time, you’ll notice the chia seeds starting to swell and absorb the liquid. After those 5-10 minutes, give it another good stir or whisk. This second stir is vital to break up any clumps that may have started to form as the seeds began to gel. Make sure to scrape the bottom and sides of the bowl to incorporate everything.
5. Chill and Allow to Thicken: Cover your bowl or secure the lid on your jar. Place the mixture in the refrigerator for at least 2-4 hours, or ideally, overnight. This is where the real magic happens. The chia seeds will continue to absorb the liquid, and the pudding will thicken to a delightful, custard-like consistency. The longer it chills, the thicker and more pudding-like it will become. If you’re in a rush, you can try a shorter chilling time, but the texture won’t be as developed. Overnight is truly the best for optimal results.
Once chilled, your chia seed pudding is ready to be enjoyed! You can serve it straight from the refrigerator. For an extra touch of elegance or if you’re serving it as a dessert, consider pouring it into individual serving glasses or bowls.
Serving Suggestions and Variations
The real fun begin extracts when it’s time to add toppings! This recipe is a blank canvas for your creativity. Some of my favorite additions include:
For a chocolate version, you can add 1-2 tablespoons of unsweetened cocoa powder along with the dry ingredients in step 1. For a tropical twist, use coconut milk and top with mango and shredded coconut. The possibilities are truly endless, making this a recipe you’ll return to again and again. Enjoy your healthy and delicious creation!
Conclusion:
There you have it – a wonderfully simple and incredibly versatile chia seed pudding recipe that’s perfect for anyone looking for a healthy and satisfying meal or snack. The beauty of this pudding lies in its effortless preparation and the sheer nutritional power packed into each spoonful. Rich in fiber, omega-3 fatty acids, and antioxidants, it’s a fantastic way to nourish your body while enjoying a delightfully creamy texture. I encourage you to give it a try and discover how easy it is to make! Feel free to get creative with toppings – fresh berries, a sprinkle of nuts, a drizzle of honey, or even a dusting of cocoa powder can transform your pudding into a decadent treat. Don’t be afraid to experiment with different milk bases like almond milk, coconut milk, or oat milk for unique flavor profiles. This recipe is a fantastic starting point for a healthier lifestyle, and I’m confident you’ll find yourself making it again and again.
Frequently Asked Questions:
Can I make chia seed pudding ahead of time?
Absolutely! Chia seed pudding is ideal for meal prep. You can make a batch at the begin extractning of the week and store it in individual containers in the refrigerator for up to 3-4 days. The chia seeds will continue to absorb liquid and thicken over time, so you might need to give it a stir before serving.
How much liquid should I use for the chia seeds?
A good starting ratio is typically 3-4 tablespoons of chia seeds per 1 cup of liquid. This will result in a thick, pudding-like consistency. If you prefer a thinner pudding, you can use a little more liquid. Conversely, for a thicker pudding, slightly reduce the liquid amount.
Can I sweeten my chia seed pudding naturally?
Yes! While the base recipe uses a touch of sweetener, you can easily adapt it. Maple syrup, agave nectar, honey, or even a mashed ripe banana can be blended in for natural sweetness. Some fruits, like berries, also add a lovely sweetness when mixed in.

Chia Seed Pudding Recipe
A simple and healthy chia seed pudding recipe that is easily customizable.
Ingredients
-
3 tablespoons chia seeds
-
1 tablespoon maple syrup
-
1 teaspoon vanilla extract
-
3/4 cup almond milk
-
1/4 cup berries
-
1 tablespoon chopped nuts
Instructions
-
Step 1
In a bowl or jar, combine the chia seeds, maple syrup, and vanilla extract. -
Step 2
Pour in your milk of choice (such as almond milk, oat milk, or coconut milk). -
Step 3
Stir well to combine, ensuring there are no clumps of chia seeds. -
Step 4
Let the mixture sit for about 5 minutes, then stir again to prevent clumping. -
Step 5
Cover and refrigerate for at least 2 hours, or preferably overnight, until the pudding has thickened. -
Step 6
Serve chilled, topped with fresh berries and chopped nuts, or your favorite toppings.
Important Information
Nutrition Facts (Per Serving)
It is important to consider this information as approximate and not to use it as definitive health advice.
Allergy Information
Please check ingredients for potential allergens and consult a health professional if in doubt.
Leave a Comment